DIY leather bracelets - simple and beautiful! How to make leather bracelets with your own hands How to sew a leather bracelet
Making bracelets this is a very interesting and creative activity. You don’t always need a master class for this; sometimes a photograph is enough for an idea to pop into your head. Today I offer a selection of various models from the Internet with a short accompanying description. The models are very simple, but each idea has a useful thought. Moreover, many people really liked the last review, let’s continue the topic.
Often these bracelets use charms and connectors. The proposed version uses a flat natural leather cord and a ring connector. A button fastener with the help of connecting rings measuring approximately 4-5 mm is attached to the end for ribbons and cords:
Depending on what accessories are used for the bracelets, the style and mood of the jewelry completely changes. A few more options for example, made according to the same scheme. Waxed cord is used here, but with leather laces this bracelet will be more durable. 
If the hole is too small, you can use end caps. It is better not to use connecting rings in such a place; when tensioned, they can unbend. Or take the strongest ones, small in diameter and 1-1.2 mm thick.

In our store there are a lot of connectors suitable for such bracelets: birds, fish, twigs, lizards of different colors, flowers, eyes, lips, etc.

For a large item or button, you can simply thread the cord through the holes:

In this version, the top connector is also not fixed:

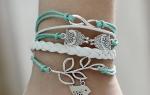
For the summer, you can make a bracelet with an anchor pendant. In order not to search for a long time, I selected several pendants for example: number one, number two, number three, but in general we have a lot of them)))


A few more options for leather bracelets and laces:
Fun solution:

This is how easy it is to make a lot of bright bracelets for the summer! Have a good preparation for the hot season!
Once again we continue the theme of hande-made bracelets. For this one we make leather ones.
It's time again to stretch our hands a little, exercise our imagination, tap into the creative spark within us and make something with our own hands. And not even something, but trendy leather bracelets. What's great about these bracelets is that you can wear them with anything, especially ethnic clothing. In addition, there are a huge variety of different shapes, colors and options, so you can always choose a leather bracelet to match your outfit. Well, it’s not even worth describing how good they look on the hand.
Photo: www.ispydiy.com, www.trinketsinbloom.com,
So, let's get down to the actual process of creating bracelets.
DIY wide leather bracelets


You will need:
Leather straps (strips of leather with a clasp at the end)
. Ribbons
. Metal spikes
. Threads
. Super glue
DIY leather bracelets


You can simply glue a narrower piece of tape onto the bracelet and add some spikes.
Or you can attach spikes and entangle them with a bright thread (yellow, for example).
You will get 2 wonderful bracelets.
How to make leather bracelets photo
A couple more options for the creative process. You will need:

- leather laces - you can use thin leather ribbons
- floss threads
- glue
- scissors
- scotch
- needle

Step 1
Measure your wrist by wrapping the leather cord loosely around your wrist twice, then add an extra 10cm to tie it. Glue one end of the leather cord to the surface so that it does not move and, stepping back about 5 cm from the edge, drop a drop of glue onto the leather cord and attach your first color of floss to it.
Step 2
Continue winding the floss around the leather cord until you have a strip of the width you want, then cut off the rest of the thread, securing the end to the bracelet.
Step 3
Take a different color of thread and do the same procedure with it again. Continue doing steps 2 and 3 until you have done about 5cm of different colors.
Step 4
When you're done wrapping, take the needle and pass it under yours. If you want, you can add a small drop of glue to make sure your floss doesn't come off.

Step 5
Tie the end of the lace that is closest to the wrap around the other end of the lace. Make a simple knot. The knot should be strong, but the leather lace should pass freely back and forth and slide through it.
Tip: Before tying a leather lace, wet it a little and remember it to make it softer and easier to tie. This will also help make a strong knot.
Step 6
Leaving at least 10 cm on the other side, repeat steps 1, 2, 3, and 4 again.
Step 7
When you have finished wrapping the other side of your bracelet, re-tie the loose end on the other side.

You will get wonderful multi-colored bracelets.
DIY leather bracelets
Well, now for more complex options.
You will need everything you have on hand: leather laces and strips, beads, chains, glue, threads.
1. Bracelet with beads. Take 2 laces, place beads between them and attach the beads to the laces by passing threads through them and entangling the laces with these threads.

2. Multi-strand bracelet with beads. Just grab some suede threads, a couple of end clasps, and seed beads with holes for your threads to fit through. String your beads and beads onto strings, tying the thread after each with a knot. Secure the fasteners at the ends.

3. Braided bracelet with beads. This is also an easy way. Just start braiding your hair with suede threads, adding beads here and there, secure the clasps at the ends, and you're done. This woven bracelet can also be made with a chain. Just add a thin chain instead of one of the threads and start braiding.

Don't stop your imagination. You can make your own options and variations. The main thing is that you don’t have to buy such wonderful bracelets in the store.

Hand jewelry has been relevant at all times. Today, a variety of hand-made jewelry from scrap materials is in fashion. You don’t need to have any special techniques or skills; there are plenty of ways to make original jewelry in a few simple steps. How to make leather bracelets with your own hands using different techniques?
What materials will be needed for the bracelet?
The main material - leather, natural or artificial - depends on the chosen technique. Any old leather clothing, bags, or even soft tops from boots and other shoes will do. Leather cord can be used to make elegant thin bracelets or use it for weaving. Accessories are also needed - fasteners, rivets and some decorative elements. You can use scrap of outdated jewelry - beads, fragments of chains, rhinestones and crystals. In order to make leather bracelets with your own hands, you will also need tools. A sharp knife or scissors is necessary to give the leather the desired shape. An awl, needles, wire cutters and other tools may also come in handy, depending on what materials will be used.
Weaving leather bracelets: simple and beautiful braids

To create a bracelet bracelet you will need three laces or strips of material. We fasten them together and weave a classic braid. We fasten the ends, sew or otherwise secure fasteners. Another way is to take a fairly wide strip of leather, cut it into three parts in the middle, but leave it whole at the ends. Intertwine these three separate parts, as if turning the strip elements inside out. It is much easier to attach fasteners to decorations made using this technique, and the weaving will be more even. You can additionally decorate the bracelet with metal pendants or other decorative elements. Making the decoration will take just a few minutes. Using this technique, you can make women's or men's leather bracelets.
Rigid weave

If you have thick vegetable tanned leather, you can make a miniature copy of a trouser belt for your hand. Cut a suitable strip of leather, choose a fastener - it is better if it is a buckle or buttons. Leather bracelets made with your own hands using this technique can be decorated using special paints suitable for use on the base material, rivets or other elements. An interesting effect can be achieved by placing several decorative thin leather laces or strips on the main fabric of the bracelet. You can also make shaped holes, a pattern of eyelets, or something else.
We make leather bracelets: with our own hands, but on a ready-made basis
If you only have thin leather or a substitute on hand, a wooden blank for a wide bracelet will help out. We glue a strip of leather on the outside of the base or cover the entire bracelet. If desired, you can combine several separate pieces of leather by gluing them overlapping or connecting them with decorative seams.
If you often think about what to give to the man you love, what gift to give? with your own hands, then this master class is for you. We will show you how to make your chosen one.
To make a bracelet we will need the following tools and materials:
- leather belt;
- sewing threads;
- silk threads "garus";
- soap or pencil;
- ruler;
- rivets;
- lock - cabins;
- carabiner loop;
- hole puncher;
- pliers or hammer;
- scissors;
- stationery knife;
- lighter.
Let's get down to business and make something wonderful. leather bracelet, in our case from a leather unnecessary belt. It's very easy and fun.
We prepare the belt for work, cut off the buckle, we won’t need it. The width of the belt used is 5.5 cm. Stepping back from the edge, measure 1.5 cm and mark it with a straight line.

Then mark the length of the bracelet. To do this, you need to measure the circumference of a man's wrist. The average girth of a man's wrist is from 20 to 24 centimeters.
Let's take a length of 22 cm + 1 (2) cm to go from one end of the bracelet to the other.

Cut the part to length.

We need to cut the leather piece into two parts. For this we need two even bars.

We clamp the leather between the pieces of wood, aligning the edge of the top bar with the intended line, and cut it off with a stationery knife.

On the wide part along the edges we mark round ends. This can be done simply by hand, but it is better to use some kind of stencil.

Armed with scissors, carefully cut out the semicircular edges.

The result is a piece with rounded edges.

We decorate the main part with machine stitching. Stepping back from the edge of the cut by 0.1–0.2 cm, we lay a line along the front side. We thread the machine with Garus threads from the top and regular threads from the bottom. At the end of the stitching, pull the threads to the wrong side. We tie knots and light them with a lighter.

On the smaller part we outline the required width for the fastener, at both ends.

We make notches of the required size.

On the narrow part, similarly to the main one, we apply a finishing machine stitch.

Then you need to do a fitting. First we apply the main part to the hand, then the second. Thread the carabiner and loop for basting. We decide on the location of the rivets.

Use a hole punch to make holes in the places where the rivets will be located.

Let's do a second fitting. We outline the places for attaching the thin part to the main one. We make marks with a needle or pencil. Punch holes on the main part with a hole punch.

We insert the leg of the rivet from the wrong side of the main part.

Let's bring it out into the open.

We place the head of the rivet on the front side.

Hammer or clamp tightly with pliers.

Often we want to sit down and create. So many different products that can be made from skin scraps. Each handmade thing, made with your own hands, carries a small piece of good, positive emotions.

Stylish men's bracelet made of leather belt.
Leather bracelet on a man's hand, made with your own hands, will remind you of you, giving him joy and a stylish image.
Especially for the site
An outdated jacket, an old bag or a piece of leather lying around in the bins is an ideal material for creating a stylish piece of jewelry.
In this master class you will learn how to make a leather bracelet with your own hands from a tin can and a small piece of soft leather. For decoration, you can take any stone that you have, buy a natural mineral, or use an imitation made of plastic or glass. Here amber plays the role of a decorative element.
Preparation of materials and tools
To transform a tin can, a damaged piece of amber and several small pieces of leather into a massive and stylish women's bracelet, you will need the following tools and materials:
- pieces of soft and thin genuine leather;
- amber;
- transparent universal glue “Dragon”;
- canned food tin;
- metal scissors;
- scissors;
- ball pen.

If there is no stone, you can make it from polymer clay, for example, according to.
Step-by-step master class with photos
First, make a metal frame for your leather bracelet. Tin from a can of canned olives or olives is best suited; it is thinner and at the same time holds its shape well.
Using tin snips, cut out a rectangle and trim the corners, rounding them.

Give the frame an oval shape. Try it on your hand and, if necessary, reduce the length.

Make a backing from the wrong side. To do this, use a ballpoint pen to trace the outline of the frame on a piece of leather. For this stage, you can take material with defects, for example, with uneven coloring or rougher material.

Use scissors to cut out the backing, allowing an allowance of one centimeter around the entire perimeter. Spread the entire back side with transparent universal glue “Dragon” or “Moment”.

Glue the backing to the inside of the frame. Fold the seam allowance to the outside, and make folds from excess leather at the ends. Please note that the leather, lubricated with glue, stretches well. Therefore, at the edges of the blank for the leather bracelet, stretch it slightly.

Let the glue dry for a couple of minutes and use scissors to cut the folds as close to the plane of the bracelet as possible.

Decorate a women's bracelet with thin, beautiful leather and stone. To do this, take a segment three times larger in area. Apply clear glue generously to the middle and to the stone.

Mark approximately the center point on the product and start gluing the leather from this place. Place amber in the same place. While the glue is still wet, use your fingers to form folds around the stone. Cover the chipped area with drapery.

Add glue to the remaining surface and glue the leather decor along the entire outer surface of the bracelet.

Shape the decorative drapery to your liking. Fold the edges inward. If possible, try to keep as few folds as possible on the inside of the product. Trim off the excess.

After a couple of minutes, cut off as many folds of leather as possible from the inside of the bracelet.

Cut out another piece for the back side. Measure the workpiece by placing it against the surface.

Apply glue to the entire surface of the part.

Carefully glue the part to the inside, thus hiding the edges that are folded on the outside. Start gluing from the ends of the product.

Once the glue has completely dried, give your leather bracelet its final shape by pressing it into a small oval with your hands for a few seconds.


A thin metal base will help maintain its shape and add elasticity to the structure. Using this technique, you can decorate women's leather bracelets with your own hands and other elements, for example, shells, sea stones and glass, metal parts and even interesting beads. In any case, your masterpiece will be unique.

We also have a tutorial on making a leather bracelet with your own hands, but it uses a cord weaving technique. If you still have some skin left, decorate for yourself or as a gift. It’s very exciting to create; the end result is always an unusual souvenir or jewelry.
Other instructions for making jewelry using different techniques. Join us on social networks to receive news about publications, see crafts and other participants, and sell yours.