Do-it-yourself rag dolls: patterns and manufacturing technology. Traditional folk doll with your own hands. Master class How to make a doll from scraps for wealth
For centuries, people have created rag dolls and amulets with their own hands. Such dolls were supposed to protect family members from adversity and illness, bring happiness and prosperity to the house, and protect them from evil spirits. they were created from natural materials and improvised means, they were cherished, loved, and passed on from generation to generation.
[Hide]
What are amulets dolls and what is their function?
A small doll made of fabric, thread, straw or herbs, dressed in beautiful, embroidered clothes, was not intended for children's play. Only a woman could make a doll-amulet, as the continuer of the family and the keeper of the hearth; men were not allowed to do such a thing.
Craftswomen tried to create a doll without using sharp objects - scissors, knives or needles (needles were allowed when embroidering doll clothes). Another important condition is that the doll should not have a face so that evil spirits do not enter it through the eyes.
Such amulets-dolls helped in difficult life situations; they can be roughly divided into several groups:
- guardians of the home and family hearth;
- guardians of the life and health of children and adults;
- guardians of pregnant women and babies, assistants in childbirth;
- bringing good luck, prosperity, wealth;
- patrons of crafts, trade, agricultural work, good harvests;
- guardians of warriors and travelers;
- protectors from evil spirits and evil spirits;
- dolls for fortune telling.
Slavic
Girls began sewing their first amulets dolls with their own hands in childhood under the guidance of their mothers and older sisters. By the time she got married, the girl already knew how to make such amulets for various needs. The future bride also had in her dowry chest several dolls for her future home, a new family. The experience of creating amulet dolls was passed down through the female line, from mother to daughter.
The main Slavic doll amulets and their meaning are given in the table:
| Name | For what occasion was it made? | What did the doll look like, what materials were used to create it? | The meaning of the amulet doll |
| Bereginya | For birthdays, weddings, housewarmings | Red threads and red shreds | An assistant to a woman in household chores and childbirth. Guardian of the house from evil spirits. |
| Grace | April 7 or Christmas (as a gift) | Birch or rowan tree. She was depicted with her hands raised up. | Brings good news to the house, helps in raising children. |
| Ten-handle | As a wedding gift, the bride could also make such a doll for her own wedding | The doll has 10 hands to keep up with all household chores. | Helping the young housewife with numerous household chores. |
| Ash doll | For a wedding (cooked by a mother for her daughter-bride) | The doll's head was made from soaked ash. The doll had no arms or legs. Often Pelenashka was tied to the ash doll. | A symbol of motherhood and well-being in the home. |
| Kuvadka | For the birth of a child | A very simple motanka doll, shaped like a cross. | They helped the mother during childbirth, protected the woman and the newborn baby. |
| plantain | Before a long journey | A pinch of ash from the hearth was placed in the doll’s bag. | Helped with hardships on the road and brought good luck. |
| Bird Joy | To welcome spring | The doll was decorated with bright ribbons, feathers, and bows. | She took part in the ritual holidays of the invocation of spring. |
| Comforter | For small children | A stuffed motanka doll in the shape of a soft, fat woman. | The doll was given to the child only when it was necessary to console him. Didn't serve as a child's toy. |
Russian national
Russian folk dolls are closely related to national traditions and rituals. Ritual dolls were prepared for certain holidays, after which they were destroyed or stored until the next holiday.
The following dolls were made from:
- fabrics;
- thread;
- wood;
- clay.
There are three main dolls:
- Kupavka - a doll was prepared on the day of the Summer Solstice from two poles fastened in the shape of a cross. Bunches of straw were tied onto poles to create a human-sized doll. The doll was dressed up in real women's clothing - a shirt and sundress, with long ribbons tied to the sleeves. At the end of the Ivan Kupala holiday, Kupavka was released along the river.
- Kostroma (Maslenitsa) - the doll was prepared at the beginning of Maslenitsa week. Just like Kupavka, Kostroma was made to be human-sized or even larger, and dressed in women's clothing. Kostroma was burned on the last day of the Maslenitsa celebration.
- Easter (Verbnitsa) - the doll was prepared a week before Easter, on the eve of Palm Sunday. They tried to make the doll without scissors and needles from red scraps and rags. The finished doll was put out to the window for everyone to see, and on Easter it was placed on the table along with Easter cakes and colored eggs.
Kupavka Kostroma (Maslenitsa) Easter (Verbnitsa)
Rules for creating amulet dolls
When making amulets dolls, you should follow the following rules:
- Start work in a good mood. Remember that the doll absorbs part of the energy of the craftswoman, so you should not start working on the doll in a state of irritation, fatigue or illness.
- There should be no men or grown-up boys near the craftswoman. An exception may be young boys, but they should not distract the craftswoman.
- Create a doll not on the table, but on your lap. Cover yourself with a scarf to prevent hair from accidentally getting into the doll.
- Do not touch the doll with sharp objects (scissors, knives, needles) or glue. Clothes should be sewn separately and then put on the doll.
- Try to make the doll before you go to bed.
- Use natural materials without dyes to create a doll. This can be cotton and linen fabrics, matting, threads, ropes, ribbons, straw, etc.
- Finished dolls cannot be washed or thrown in the trash. If you need to get rid of a doll, it should be burned, buried in the ground, and floated down the river.
- The very first doll should be made for yourself and left in your home.
Instructions for making dolls
Motanka - from the word to reel. This is a doll made from scraps, all the elements of which are wound with a long thread. The thread cannot be cut, no knots can be made, only one knot is allowed in the navel area. When wearing a motanka, you must wear a long shirt, skirt and headscarf. The face cannot be embroidered or drawn; you should either leave a clean piece of fabric or tie the face crosswise with threads. 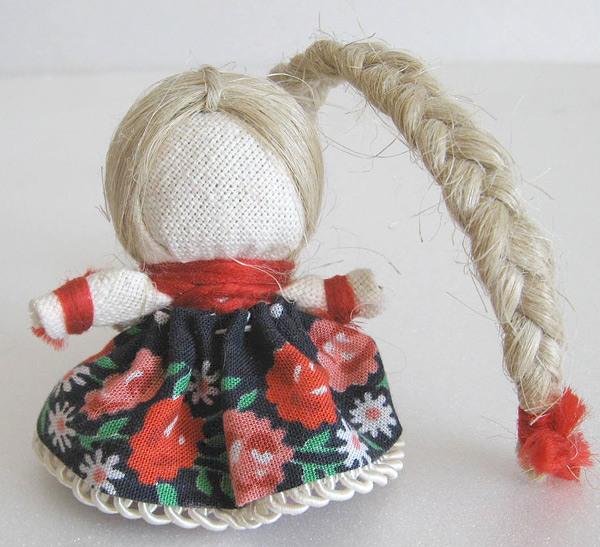
- two pieces of white fabric 10x10 cm;
- scraps of colored fabric;
- hair yarn;
- spool of red thread;
- synthetic padding tape for the head;
- ribbons, braid, lace for decorating and finishing the doll.
Step-by-step instruction:
- Roll a white piece of thick fabric tightly into a tube. These will be the doll's legs.
- For the shoes, we cut out two 5x5 cm squares from a colored scrap. We apply each square to the opposite ends of the tube and wrap it around them. We fix it with threads.
- Fold the tube exactly in half, step back 2 cm from the fold and wrap it with thread.
- Wind the padding polyester tape onto the fold marked with threads. This will be the head.
- Place the head in the center of the white flap, fold the fabric evenly around the head and wrap the threads around the neck.
- Make handles from the right and left corners of the flap by tucking the fabric inward. Secure the ends of the handles with thread.
- Make a body from the front and back corners of the flap, tying it with thread.
- Wind the yarn onto a book of suitable width. The thicker the winding, the more magnificent the doll's hair will be.
- Cut the winding at one end and tie it with a piece of yarn at the other.
- Place your hair on your head, spread it evenly and tie it around your neck with a thread very tightly. Braid your hair.
- Measure the height of the doll and sew her a sundress from a colored scrap. Put it on the doll.
You should always cut out and sew clothes for a doll separately so that the needles do not touch the doll’s body.
Watch how to make a motanka “Happiness” doll step by step in the video of the AllatRa TV Dnepr channel.
Metlushka
The Broom doll will sweep away all quarrels and troubles from the house. Such a doll was hung in the kitchen, right above the front door. If the doll fell from its place to the floor, it was believed that it had fulfilled its purpose, and a new Broom should be made.
Metlushka doll
To make a doll you will need:
- small broom (buy or make yourself);
- 2 square pieces of white fabric (size depends on the size of the broom);
- colored fabric (for sundress, scarf and apron);
- red ribbon;
- spool of white thread;
- spool of red thread;
- yarn.
Step-by-step instruction:
- Wrap the yarn around the broom handle to form a round head.
- Wrap the white piece around the head and wrap it with white thread.
- Make a slit in the center of the second white flap and place it on the broom. Form the doll's arms, securing them with red thread.
- Separately sew a colored sundress and an apron and put it on the doll.
- Cover the head with a scarf and decorate with ribbon. The Metlushka doll is ready.
When creating the doll's head, try to keep the face smooth and even, without folds or wrinkles.
Photo gallery
In the photo you can see how to make a Metlushka doll step by step.
Valdai doll Bell
To make a doll you will need:
- 3 round pieces with a diameter of 15, 20 and 22 cm (1 red and 2 multi-colored);
- 1 white piece 12x13 cm;
- 1 multi-colored patch for a scarf 15x15x21;
- small bell;
- a piece of cotton wool or padding polyester;
- red thick threads;
- red ribbon.
Step-by-step instruction:
- Roll the cotton wool or padding polyester into a ball and secure the bell to it with a thread.
- Place the bell-shaped cotton wool in the center of the largest round patch.
- Wrap the fabric around the bell cotton to form a head. Secure with thread.
- Wrap the second largest scrap around the first and also secure with thread.
- Wrap and secure the third flap in the same way.
- Lay out a white rectangular piece of fabric, fold the corners towards each other.
- Attach the flap to the head, carefully crumple the fabric so that it does not wrinkle on the doll’s face. Secure with thread.
- Form handles by tucking the long ends of the white fabric inward. Secure the ends of the handles with thread, stepping back a little from the edge.
- Tie a scarf. The Bell doll is ready.
Small bells can be purchased at a fishing store.
Photo gallery
Amulet doll made of linen threads
To make a doll you will need:
- undyed linen threads;
- red wool threads.
Step-by-step instruction:
- Take a thick book or box, about the height of your palm. Wind threads around it for three parts of the doll: the thickest for the body, 2 times thinner for the arms and for the pigtail.
- Cut the windings on one side. You should get three bundles of thread.
- For the handles, braid them and secure with red thread. Cut the braid on the other side and also secure with thread.
- Measure 1 meter of red thread. At the body, mark the head by tying it in the middle of a long thread.
- Tie the braid bun at one end with a knot, pull it through the head and secure it to the top of the head. Braid the braid and tie the end with thread.
- We insert a pigtail-handle into the body, fasten it crosswise with the ends of a long thread, and then tie it on the belt, leaving a belt.
- Tie the doll's head with a headband of red thread. The doll is ready.
Well-being
The Prosperous doll is the first assistant for the housewife; she will also take trouble away from the house, and will attract prosperity and well-being to the house. These dolls were given as gifts for weddings and housewarmings.
Blessed Doll
To make a doll you will need:
- white flap 10x10 cm (for the head);
- colored scrap 15x5 (for handles);
- a colored piece of round shape with a diameter of 12 cm (for a skirt);
- colored piece of triangular shape, 18 cm on the long side (for a scarf);
- ribbons (for an apron and belt);
- spool of white thread;
- cotton wool for filling.
Step-by-step instruction:
- Place a ball of cotton wool in the center of the white piece, wrap the fabric around it and wrap it with thread. The head for the doll is ready.
- Fold the strip for the handles in half and fold the edges inward. You should get a narrow four-layer strip of material. Tie a knot in the middle.
- Tie the handles with threads to the doll’s neck, raising them above the head.
- Gather the round scrap along the edge with a simple seam to create a pouch. Place a coin and cotton wool inside.
- Insert the head with handles into the bag. Tighten the thread and additionally wrap it around the doll to hold it tighter.
- Lower the doll's arms down, tie her an apron, a belt and a scarf. The Well-Being doll is ready.
Photo gallery
Swaddlers
To make a doll you will need:
- 2 white scraps 20x30 for the body;
- multi-colored scrap 25x25 for a diaper;
- red rag 10x10 for a scarf;
- red wool thread;
- beautiful lace.
Step-by-step instruction:
- Place two white strips on top of each other, fold in half, then in half again and roll into a tight roll. Tie the roll with red thread. This will be the body of the doll.
- Fold the red piece in half and put it on like a scarf on the body.
- We lay out the flap for the diaper on the table. We bend one corner towards the center and place the body on the diaper.
- We fold the diaper on the left and then on the right.
- We bend the bottom edge of the diaper and lift it up.
- We tie the doll with a string. The Diaper doll is ready.
Photo gallery
Bunnies dolls
To make a doll you will need:
- a piece of colored fabric 10x20 cm;
- cotton wool or synthetic winterizer;
- red threads.
Step-by-step instruction:
- Fold the fabric in half along the short side of the flap. Fold it into a corner, wrap it with thread three times and tie a knot (do not cut the thread). These will be Bunny ears.
- Roll a thick ball of cotton wool and insert it under the Bunny's ears. Cover with a cloth and wrap the neck with the same thread, forming a head.
- We wrap the remaining fabric inward, bend it 1 cm from the edge and tuck it under the neck. We wrap the same thread crosswise, forming paws. The doll is ready.
Step-by-step diagram for creating a Bunny doll
In the video you can watch a master class for beginners on making a “Bunny” doll. Filmed by the channel “U-mama. ru".
Lovebirds
Lovebirds - a man and a woman holding hands tightly - a traditional Slavic wedding talisman. Lovebirds were prepared on the eve of the wedding, and during the wedding they were hung under the arc of the horse carrying the newlyweds. Then the doll was kept in the young family, protecting marital love and fidelity in the house.
Lovebirds
To make a doll you will need:
- a thin, even stick about 30 cm long;
- a piece of white fabric 15–40 cm (for a stick);
- 2 pieces of white fabric 20x40 cm (for a woman’s torso) and 20x20 cm (for a man’s torso);
- 2 pieces of red fabric 15x30 cm (for a woman’s shirt) and 15x20 (for a man’s shirt);
- striped or colored patch 20x30 cm (for pants);
- multi-colored patchwork 20x20 cm (for a scarf);
- a dark-colored patch 10x10 cm (for a hat);
- braids and ribbons;
- padding polyester;
- beautiful fabric for an apron;
- a spool of thick red thread;
- wire and pieces of leather for boots (you can use cut off fingers from old leather gloves).
Step-by-step instruction:
- We wrap the stick in white fabric and secure the fabric with thread on both sides. These will be the doll's hands.
- Fold the white fabric 20x40 in 4 times, tucking it inward. You should get a long narrow strip. We fold it in half, stepping back a little, and tie it with red thread, outlining the head. We fill our heads with padding polyester. The body for the female figurine is ready.
- We put the body to the arm and fix it with a thread crosswise. We make the torso for the male figurine in a similar way - we fold the flap for the pants 4 times, tucking the fabric inward.
- We attach the pants to the hand and tie them with thread from the bottom. From a white 20x20 piece of paper we make a head for a man in the same way as we did for a woman. Stuff it with padding polyester and secure it with thread on your hand.
- We fold the red scraps in half and make simple patterns for shirts for women and men.
- We cut a hole for the head and put it on the dolls.
- We secure the shirts with beautiful braids or ribbons. We also put on an apron for the woman.
- We insert a wire into the boots and secure them with threads on the man’s feet.
- We tie a ribbon around the woman's head and cover it with a scarf. We apply the flap for the hat to the man’s head, wrap it around and bend the edges inward at the back of the head. Secure with braid or tape.
- We tie a thread to the Lovebirds so that they can hang them. The Lovebirds doll is ready.
Photo gallery
Krupenichka
To make a doll you will need:
- canvas or linen fabric 20x20 cm (for the body) and 7x20 (for the arms);
- wide lace ribbon 10 cm (for the undershirt);
- a flap along the width of the lace ribbon (for the outer shirt);
- a small piece of soft, plain fabric (for a warrior on the head);
- a piece of beautiful fabric 40x40 (for a scarf);
- embroidered apron;
- needle and thread;
- any cereal or mixture of cereals.
Step-by-step instruction:
- We sew an oblong bag from a 20x20 flap, pour the cereal into it and carefully sew it up or tie it in a knot.
- Wrap a lace ribbon around your waist and wrap it with thread. At the top, fasten a piece of the top shirt with a thread, leaving a gap between the edges 2–3 cm wide.
- We wrap the head with a soft piece of warrior material, hiding the sewn end of the bag under it.
- We twist a long strip of fabric on both sides with the wrong side inward. Then we lean the doll against the back so that the twisted arms are at shoulder level. We fix everything with thread.
- Using the same thread we attach the apron to the body.
- We tie a scarf so that the upper edges of the handles are hidden under it. The Krupenichka doll is ready.
Herbalist
The herbalist protected the health of all family members. Such a talisman was made for a sick person; often the doll was given to children to play with. This is not without reason, because the Herbalist is filled with medicinal herbs (chamomile, mint, lemon balm, St. John's wort, thyme, etc.) that help improve health, a kind of aromatherapy. The herbs in the doll need to be changed once a year.
History shows the appearance of dolls more than 4,000 years ago. Today, even for beginning needlewomen, making a doll with your own hands helps you realize your talents and use them in the development of your child.
The idea of the doll: preparation of materials, tools
Modern techniques of such hand made products are presented in different types: games for children, amulets, ritual, theatrical, interior. Making dolls with your own hands, both for beginners and experienced craftsmen, is preceded by the preparation of the necessary materials/tools.
Namely:
We sew a textile doll with our own hands
It is important to consider that a do-it-yourself doll created for beginners must necessarily consist of the following actions:

Fabrics for designer dolls
The experience of skilled craftsmen shows that for those who are just starting to create dolls with their own hands, it is best to use previously used clothing. Experienced needlewomen do not neglect such second-hand goods, along with remnants from new fabrics.
In all cases, it should be fabrics made of cotton, wool, knitwear, leatherette, natural silk, and leather.
It is very important to combine materials of different types, textures, plasticity and color palettes. The main requirement is their naturalness, attractive appearance, and the absence of artificial dyes.
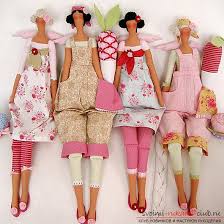
Tilda and its varieties
The first Tilda doll was created with her own hands by a young Norwegian designer, Toni Finager, in 1999. This is one of the toys that, even for novice needlewomen, creates rich possibilities for making various products. 
A distinctive feature of the man-made tildomania style is the use of environmentally friendly materials, the unusual smooth lines of the “body” and the size of its parts. These are elongated torso and limbs; small head, pastel complexion with miniature beady eyes, nose, mouth; bright rosy cheeks.
The desired colors can be achieved using natural dyes (tea, coffee, powder, pencil lead, etc.).
The fillings are padding polyester, padding polyester, holofiber and even calcined cereal. Attaching the arms/legs is done by sewing/buttoning them. For hair, pure wool yarn, floss and other natural materials are used. Colored prints, various accessories, ruffles, and lace are certainly used in the outfits.
Tildomania has found application in the manufacture of dolls in different images (blonde, brunette, country, romantic, etc.). Along with dolls, there are various toys of this stylistic trend in the form of fairies, angels, a variety of animals, as well as soldiers, airplanes, etc.
Such products can be used not only as children's toys, but also as interior decorative elements and creative gifts.
Making the doll's hair and hairstyle
The hair extension process consists of the following stages:

The correct choice of material, length, and fastening of hair allows you to vary hairstyles: shortening, braiding, creating “tails,” etc. Mixing multi-colored strands helps to achieve original combinations when creating a harmonious image of any doll.
How to make a doll face
There are different options for creating volume, reliefs, facial expressions using stocking techniques, overlays on the forehead, chin, cheeks, nose, and sculptural textiles. The first step in creating a doll's face is to paint it with paints. Moisture-resistant acrylic dyes are best suited for this, as they form a rubberized film on the fabric. 
In addition, they have a large color palette. First, you need to draw on the head filled with padding polyester/holofiber, eyes, nose, contours of the lips with a clear indication of their corners, and chin. After checking the symmetry of the arrangement of these parts, using a long needle and strong thread, “tightening” is carried out to form the necessary depressions/bulges of the face.
This unique analogue of stitching thick blankets allows you to create the necessary size and shape of the nose, eye shape, and the roundness of the face as a whole. After this, using a brush, the face is tinted with oil paint or pastels in different half-tones for the pupils and whites of the eyes, eyebrows, wings of the nose, lips, cheeks.
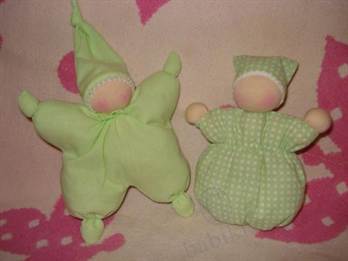
Master class: Waldorf doll
A properly made Waldorf doll with your own hands for beginners and experienced needlewomen is a chance to take advantage of the achievements of the most widespread alternative pedagogy in the world.
Its popularity is due to its focus on the systematic development of the child’s personality, the creation of a natural play environment, favorable conditions for introduction to creativity, culture, and spiritual development. A distinctive feature of this simple-shaped doll is its solid head, soft body, clear design of movable limbs, and roundness of all outlines.
The proportions of the model are determined by the correspondence of the anatomical and physiological structure of the baby’s body at different periods of development.
The “face” of a baby doll can change from a dispassionate, neutral expression to a pronounced one in “maturing” products. This allows you to give the toy different feelings, stimulating his imagination. Together with her, the baby seems to get an adequate idea of his real body.
It is important to know that a Waldorf doll can be made exclusively by hand and using only natural materials! 
When creating a pattern, the doll's dimensions must correspond to the age proportions of the child's body. For children under 2 years old, the head is from 1/3 to ¼ relative to its length, respectively: from 2.5 to 4.5 years - 1/5, and for 5-year-olds and older - 1/6. For one-year-old children, it is recommended to sew butterfly dolls, corners in bags, and diapers.
They lack hair, clear facial features and limbs, while “growing up” dolls already have them. The overall dimensions of the pattern increase independently.
Then you need to select the necessary materials for sewing the body, clothing, padding, hair (threads, scraps of white and flesh-colored knitwear, sheep wool, sliver, straw, yarn). It is not recommended to use heavy, dense, although natural, cotton wool as a filler.
One of the most popular options for making a doll for the smallest with a size of up to 15 cm consists of the following steps:

Features of a doll for a teapot
More than 200 years ago, a unique detail of the tea ceremony appeared in Rus' - hot water bottles with porcelain painted faces and insulated fluffy skirts. Today, hand-made teapot dolls are used as a colorful part of the interior. To create a doll you will need fabric, insulation, scissors, thread, floss, needle/sewing machine, and decoration parts. 
The work process consists of the following actions:
- preparing a doll pattern according to the height/volume of the teapot, transferring it to fabric for cutting out the parts and then sewing them together (except for the bottom);
- turning the workpiece inside out is obvious, placing the filler inside;
- preparing the lining and stitching it with filler, leaving a hole;
- sewing both pieces together around the circumference, and after turning them inside out through the hole - completely;
- making a wig from floss and gluing it to a head with a browned face, drawn eyes, lips, eyebrows;
- tailoring (dress, apron with frills, lace, buttons, etc.);
- complete design of the doll and placing it in the required place.
Motanka or amulet doll
These dolls have long been considered the guardians of the hearth and travelers, intermediaries between living and future generations. The skirt they wear represents the earth, the ribbon and scarf represent heaven, the shirt represents the present, future and past of life. Ancestors passed them on from generation to generation.
Important points are winding threads on the svarga (face) without eyes, eyebrows, nose, lips in the form of a sacred cross. 
It is here, on the symbol of the Mother of God Lada, that the main magic of the doll is concentrated. It is noteworthy that all parts of the body, hair, clothes are wound with threads (crosswise) in the direction of the sun without cutting them.
The work should be done in a good mood for one day. All this contributes to a happy fate, resistance to disease and damage, taming natural phenomena (drought, rain). Each turn symbolizes filling the doll with energy potential.
- There are 3 types of reels:
- diapers (for newborns);
- dolls in wedding dresses, which were intended for young wives before the birth of a child;
beregins - fertile, herbalists, wishers, Easter, willow, etc. They should have been located near the house or on its eastern part.
How to sew a doll from nylon tights
Making such a toy does not require special materials or skills. Here you will need nylon tights/stockings, padding polyester, threads (for sewing, knitting), a needle, scissors, pieces of fabric, ribbons for clothes. Along with interior “hosiery” items in the form of fairy-tale characters, children’s play dolls are popular. Even beginners can do them.
Step-by-step instructions: a doll made from a nylon sock 
Making a baby doll of a simple shape is considered the most affordable.
- The algorithm of actions is as follows:
- fill the sock with padding polyester and tie it;
- mark the place of the neck with a thin stitch, and then pull it off and wrap it a couple of times with thread;
- to form a nose, place a small circle on the head and pull it off;
- mark circles for the legs with stitches and pull them together;
- In place of the seam of the sock, make a navel-shaped hole by threading a needle from the back and grabbing the nylon from the tummy. The buttocks are designated similarly;
- ears, cheeks are made by pulling threads in the right places, eyes and eyebrows are embroidered with threads, and beads are used for eyes;
- the smiling mouth of the baby doll is made using red threads (the needle is stuck through the top of the head, where the knot will be located);
- the handles are made from scraps of excess nylon on the head, and then sew them to the body;
- hair is made from nylon socks of the desired tone;
The clothes are made of fabric, the socks are of different colors.
This technique will be the first step to mastering more complex models.
A variety of methods for making dolls makes it possible to combine different materials with lightweight plastic bottles of different sizes. They can be used both as a frame and as the main component of a toy for children of different ages.
There are different model options, namely:

These examples can be supplemented with user know-how or your own ways of creating exclusive models.
Author's frame doll
To make the doll's frame, aluminum/copper wire (length about 30 cm) of the same or different diameters is used. 2 loops are made on it, 12 cm long (for the head, torso) and 16 cm (for the legs). When making the frame of a doll up to 50 cm in size, up to 2 m of wire is required. 
The head is made separately from a part of a sock/tights with further formation of the oval and parts of the face, attaching the eyes and hair from yarn/an old wig. The palms are made from pieces of wire, the loops at the ends of the shoe legs are wrapped with padding polyester/insulating tape (the thickness is arbitrary).
A piece of sock/tights is put on the blank for the palms, on which the outlines of the fingers and nails are embroidered, and “shoes” made of leatherette are placed on the legs. The head is sewn to the body covered with padding polyester. The final touch is sewing and dressing the clothes. The attractiveness of such a doll lies in the mobility of different parts of the body, modeling its different positions.
Cut out a doll from paper
This method of making dolls has been popular for over 200 years. The blanks for them were colorful images on cardboard of characters in luxurious outfits. In times of shortage of toys, paper dolls were an alternative. Today, they are seen as an opportunity to realize the creative potential of children and adults at the lowest economic cost.
 A do-it-yourself paper doll for beginners is the easiest option for making a doll for a child.
Creating different models involves drawing a silhouette on thick paper (candy/shoe box), cutting it out along the contour and coloring it. Then comes the production of clothing and accessories with fastening by bending several “flaps” on them. Here you can give room for the flight of imagination for the kids themselves.
How to make a three-dimensional paper doll
One of the newest methods of manually creating three-dimensional toys is the use of 3D technology. For three-dimensional models, flat templates of princesses, Disney/fairy tale characters, angels, animals, birds, etc. are used, printed on thick paper. These can be either independent figures or in the form of inserts in books. 
When registering them, the following are used:
- gift colorful paper,
- fabrics,
- glue,
- threads,
- buttons,
- decorations
- other available materials.
Among the most acceptable techniques are:
- modular origami,
- Kusudami.
Each of them can be performed in various ways, which you can learn about in virtual master classes. As a result of borrowing the experience of others, you can create original creations that are different from each other, capable of becoming both toys and interior decorations, designer collections, and an exclusive gift.
Any method of making a doll with your own hands expands the possibilities of expressing your individuality. For beginners, this is a kind of test of patience, an opportunity to realize their fantasies. It gives experienced craftswomen a chance to further improve, and allows children to reveal their talents and appreciate work.
Video: DIY doll for beginners
How to sew a doll with your own hands, watch the video:
Do-it-yourself Tilda doll, master class:
Dolls will always be children's favorite toys, and not only because they make it easy to create your own unreal world, but because the variety of dolls is inexhaustible. In the whole world, dolls are made from different materials, colors and sizes, they are mass produced by large corporations, authors create single copies of dolls, and simple needlewomen are able to create an unimaginable miracle for their children - make a doll, putting all their love and care into it. You will learn how to make a rag doll with your own hands using patterns in the material below.
As it turns out, the easiest way to make a doll is to sew it. Rag dolls have always been and will be in fashion. Our grandmothers and great-grandmothers sewed dolls, Russian girls did needlework, embroidery and decorated doll outfits, and now ladies love to make lovely dolls from a large selection of fabrics and threads.
Making cute rag dolls does not require any special craftsmanship or DIY skills; basic knowledge of sewing and patterning is sufficient. Materials can also be prepared from leftover fabrics, old but in good condition clothes, pieces of faux leather or fur, and even old wigs can come in handy to create doll hair.
Let's start with a master class on creating a rag doll
Without a doubt, every needlewoman will be able to sew a rag doll with her own hands using patterns, because patterns are the best assistant. Correctly drawn patterns guarantee a beautiful and impeccable result.
Below is an example of a pattern that can be used to sew such a cute baby without any extra effort:

1) Take 2 types of fabric - colored for the body, arms and legs, flesh - for the face.
2) Cut out the required number of parts according to the patterns.
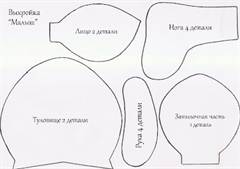
We place the head pattern on a light fabric, the rest on a colored one.
The patterns themselves always indicate the number of parts needed, so you can either cut out the required amount or simply fold the fabric in half, fasten it with needles, and the work will be half as much.
3) We sew the patterns together separately - the torso, arms, legs, head, while it is necessary to leave room for stuffing the doll with filler (it is better to use padding polyester).
4) Stuff the doll and sew the parts to each other - the doll is ready!
5) Mark the eyes and cheeks on the face using acrylic paints or cosmetics.
This simple doll is sewn using the same principles:

And also many other toys.
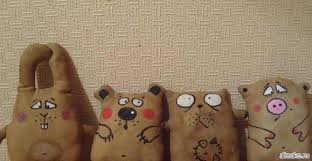
By the way, rag dolls do not have to look like people; figurines of animals or fictional characters are also sewn from fabric using the same technique using the necessary patterns.


We make Russian matrons with our own hands using patterns
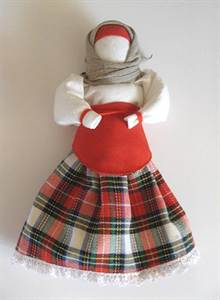
Dolls have always been reflected in the era of time. In Rus', dolls were given a magical meaning, according to which she was not only the keeper of the home and family hearth, but could also fulfill conceived desires or protect a person from black forces. Preserving the traditions of our ancestors, let's consider a master class on creating Russian rag dolls, which can also be made from pieces of fabric and always red threads. For some dolls, straw or twine is used. According to old beliefs, the doll must be made without the use of scissors and needles, so we will consider the traditional option for making a talisman doll - the plantain, which brings good luck on travel, and the second way to decorate and decorate the house is to make a simple rag bell doll according to patterns in Russian attire.
- Amulet doll plantain.
It is better not to cut scraps of fabric with scissors, but to tear them into squares of the required size with your hands.

Let's prepare a small square of light fabric and put a little cotton wool or rags in it.

This will be the head, tie it with red thread, and straighten out the remaining fabric.

We tie a satin ribbon on the head. If the tape does not hold well, you can secure it around your neck with thread.
We dress the doll - we tie a sundress made of a piece of square colored fabric around the body and also fasten it around the neck with threads.

The main feature of this doll is the little knot that should always be with her. You can put something in it that reminds you of home. Previously, they put a piece of bread or crackers, ash from a home oven, now you can put a handful of cereal.

We make hands from a piece of white fabric, folding it into a tube.
We tie the resulting part behind the doll’s neck.

We tie the bag to our hands with a thread.

The final touch is to tie a scarf on the plantain’s head.
There are many different options for making dolls from scraps.
But as a gaming option, I like this one the most.
You will need:
A piece of white thick cotton (about 40 by 30)
Shred for a dress (about 20 by 20)
Sleeve patch (approximately 17 by 17)
Threads
Wire
A book or thick cardboard.
Scissors
Pencils (I use watercolors)
During classes, I immediately bring many different scraps of all sizes and threads.
The children choose for themselves.
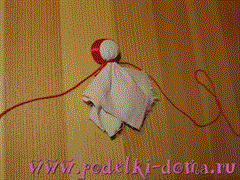
Choosing hair threads. We wrap them on a book or cardboard.
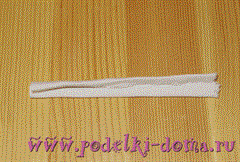
Fold the white piece into a tube.
We cut the hair threads along the edge of the book (cardboard). We fold the threads and the tube as shown in the photo.
Then we cross the threads around the tube.

And fold it in half.
We wind the thread, forming a neck. Already at this stage the toy comes to life)
We place the flap for the dress with the right side up, and place our blank on top, as shown in the photo.
Wrap it in a tube and feel the neck. At this point we wind it.
Turn it inside out. 
Sleeves. Place the flap with the wrong side up. Cut the wire to size. We twist it into a tube together with the wire.
We attach the sleeves to the doll and wrap them with thread.
We form palms by twisting the ends of the sleeves with thread.
We draw the doll's eyes and mouth.
Actually, this is where you can finish the work.
But it’s more interesting for the game if you make legs)
To do this, cut two pieces of white fabric in half. which is under the dress.
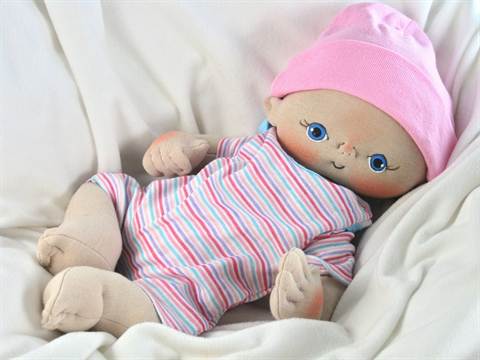
The history of the rag doll goes back several centuries. For our ancestors it was not just a toy, but also a magical amulet. As soon as a child was born into the family, such a toy was always placed in his cradle. It was believed that the amulet doll protected the baby from evil spirits and the evil eye.
As a rule, such amulets were faceless, since there was a belief that a doll without a soul (without a face) could not be possessed by evil spirits. Making a rag doll with your own hands is not difficult, the main thing is to make the right patterns and choose the material.
Russian folk rag dolls in traditions and rituals
Almost every family also made traditional dolls for rituals. They were made, as a rule, from the materials that were at hand: from pieces of fabric, straw, moss, dry grass, tree branches. Each such doll had its own “responsibilities”: “Ten-Handed” was given to a young wife so that she could cope with housework, “Fertility” brought wealth to the family, and “Goat” was made for the bright holiday of Christmas and brought prosperity to the house.
The tradition of creating rag dolls is still alive today: it is both a wonderful toy for a child and an interior decoration, and some craftswomen manage to create real works of art.
How to make a rag doll with your own hands: master class
Textile dolls are certainly a beautiful creation. When making such a toy for her child, a mother puts all her love, warmth and tenderness into its creation.
Materials required for work:
- fabric in two colors (plain and printed);
- threads of the same tone as the fabric;
- sewing machine (or needle if you decide to sew the doll by hand);
- scissors;
- pattern paper;
- thick knitting threads for making hair;
- filler (sintepon, holofiber, cotton wool, etc.);
- doll decorative elements: bows, ribbons, buttons, etc.
How to choose the right fabric?
When choosing fabric for making a product, you need to consider several important points. Firstly, to sew the body of a rag doll, it is better to take natural fabrics: chintz, satin, calico. You can also use synthetic material, but be sure to make sure that it does not fray or stretch. Secondly, it is advisable to select fabrics in beige shades so that the tone matches the color of the body.
If you were unable to find a suitable color, then you can use grandma’s old and proven method: dye the fabric in the desired color using brewed tea or coffee:
- To do this, you need to brew strong black tea (it’s better to take bagged tea) and dip the cloth in the solution for 15-20 minutes.
- After that, take it out, squeeze it lightly and lay it out on the table to dry.
The technology for coloring with coffee is the same. Just keep in mind that when using it, the tone turns out to be more saturated, and the fabric itself retains a light aroma of coffee for a long time.
Technology for making a rag doll with your own hands:
We print out the pattern template on paper (you can also draw it yourself on a landscape sheet).

We cut out the pattern elements and transfer them to the fabric. You need to cut out 4 elements for the arms and legs, and 2 for the torso and head.
We cut out the doll's body, not forgetting to leave seam allowances of 0.5-1 cm. If you want your doll to wear shoes, then when cutting the legs you need to use two colors of fabric.

We fold the parts of the arms and legs in pairs with the right sides inward and stitch them on a sewing machine or by hand.

We turn the stitched limbs right side out and stuff them with filler (but not too tightly).

We connect the head and body, not forgetting to leave two holes on the side for the arms and legs, and one on top (to fill the doll with filler).
Turn the workpiece right side out.
We place the arms and legs to the body and carefully sew them together, folding the fabric inward.
We fill the workpiece with filler through the upper hole and carefully sew it up with a hidden seam.

The blank for our rag doll is ready, all that remains is to “revive” it and dress it up.
Creating a hairstyle for a rag doll:
- To create a hairstyle, we will need thick plain knitting threads (choose the color at your discretion).
- Using a narrow board or notepad, we wind the thread onto the thread, then remove the skein and cut it on one side.
- It is better to sew the resulting strands in the middle (across), using a strip of fabric of the same tone. We made a wonderful wig!
- All that remains is to sew it to the doll’s head. To make the hairstyle neat, for ease of work, mark the sewing line with a pencil.

There are a lot of options for creating a unique image of our textile doll: it can be funny braids or ponytails with colorful bows. It all depends on your preferences.

Decorating the face of a rag doll
All that remains is to make the doll's face. There are several options:
- it can be painted with acrylic paints;
- embroider;
- use pieces of felt or ready-made parts for decoration (these are now easy to purchase in specialized sewing stores).
You can rouge your cheeks with a pink pencil or regular blush. And the doll’s facial expression and mood will depend on your idea.

Sewing clothes for a textile doll
And, of course, our beauty needs to be dressed up. To sew a dress, you can use a ready-made pattern or draw it yourself. To finally decide on the style of clothing, look at pictures of finished products in the magazine. And various decoration elements will help give your creation individuality: beads, buttons, lace, sequins, etc.
The rag dolls are very soft, absolutely safe for the child, it’s nice to fall asleep with such a toy or take it with you on long trips. And how much effort and love mom put into its creation! In addition, you can sew a doll together with your baby, because such activities develop the child’s fine motor skills, his imagination and are an excellent opportunity to realize all his creative ideas.
Show your imagination and skill, then your rag doll will definitely be bright and unique, and your efforts will not go unnoticed!