Gift bags. DIY paper gift bag A4 paper bag
We create a design from what we have at hand. There are stickers - we decorate with stickers, there are artificial or dried flowers - with flowers, appliques made from multi-colored paper are also good and effective. We offer to design packages using stamps. Therefore we need:
We take a sheet of paper of a suitable size and bend the edges towards the middle of the sheet, so that one edge overlaps the other by about 1-1.5 cm. 
It looks like this. 
We iron the fold lines properly - this is convenient to do with any blunt object.
We open one of the resulting “flaps” and apply glue or double-sided tape (which is undoubtedly more convenient) to the edge of the sheet, parallel to the fold line. 
The result is a blank for the future bag, which still bears little resemblance to it. 
We retreat a few centimeters - as much as the planned width of the side wall of the package and make new fold lines. The result is a kind of rectangular pipe. 
We connect the side edges in pairs, so that the middle of the side face “goes” inward. Already more like what we had in mind =) 
We decide on the “bottom and top” of the bag. At the bottom of the bag we begin to form the bottom. The bottom should be approximately the same width as the side walls. We bend it in one direction, iron the fold line, then bend it in the opposite direction and iron it too. This is necessary so that the fold lines are ready to bend in both directions. It is important. 
We continue to form the bottom. We bend the corners of the rectangle obtained at the previous stage so that the side of the corner coincides with the fold line separating the base of the package from its main part. We iron out the new fold lines and do the same in the opposite direction, so that our corners can bend well in both directions. 
And now the fun begins! Feel like almost magicians =) We straighten our blank to the state of a “pipe with a rectangular cross-section” (remember, we had such a stage?) And then, with a deft, elusive movement, we bend the sides of the bottom inward, forming trapezoidal parts. If all the fold lines have been ironed well, then this will be quite easy to do. They will almost fold themselves. 
To make gluing easier later, we “rehearse” the process - fold the bottom and iron the fold lines. 
We apply tape or glue to the places marked in the photo and glue the base of our package. 
Fold the bottom of the bag as you previously folded the sides in step 8. It will become flat again, which will make it easier to decorate. Then we bend the top of the bag. But only once. This will protect future content from accidentally falling out. 
Using a regular hole punch or a “single-toothed” crimper, we make holes in the upper part of the bag. They will help us make handles for a bag or tie a beautiful bow, as will be shown below. 
It's time to decorate the bag. You can use special stamps for scrapbooking... 
...or you can also use silicone stamps for soap. We take any mold with a flat bottom, attach a stamp to the outside, apply paint to it and make an impression. The result is no worse =) 
It’s already beautiful =) You can thread twine or any other decorative ribbon through the holes and tie a beautiful bow. 
Or you can add a beautiful paper napkin by making holes in it too (1). And for added effect, decorate the ends of the rope with beads or, as in our case, dried orange slices (2). 
In exactly the same way, you can make a bag from any other decorative paper, choosing a design to match the theme of the celebration and the gift placed inside. 
You can also decorate ready-made craft bags.
Bags with a seal made from ordinary postal sealing wax look luxurious. 

In general, everything is in your hands! Dare and create! There are a huge number of decor options! 
Place the cut paper in front of you on a flat surface. Place it in landscape orientation, with the long sides at the top and bottom and the short sides at the left and right.
- After finishing the paper decorating process, you should make sure that all the artistic elements are dry and stuck.
Fold the bottom edge of the paper up 5 cm and press it flat. When finished, unfold it back. This will later become the bottom of the bag.
Place the sides of the bag together. Maintaining the landscape layout of the sheet while working with it, fold the sides as follows:
- Find the center points of the top and bottom. To do this, measure the distance using a ruler or simply take the paper, maintaining the orientation, and place the short sides together, pressing the fold lightly on the bottom and top of the paper to mark the center on each long side. Mark these places with a pencil.
- Place marks to the left and right of each center point at a distance of 13 mm. When finished, you should have a total of six marks: three on one long side, and three on the other.
Fold the sides of the bag into place. Be sure to maintain the landscape orientation as you work to fold the sides as follows
- Place the right edge against the leftmost mark and fold. After smoothing, unfold it back. Repeat the same with the opposite side.
- Turn the paper over, re-attach the left and right edges to the center and glue them together where they intersect. Make sure you fold exactly the same way as before (note that the folds will be on the other side). Let the glue dry completely before moving on to the next step.
Turn the bag over with the adhesive side facing in. Make sure one of the open sides is pointing towards you.
Fold the side folds inward like an accordion. You need to arrange the sides of the bag so that it opens into a rectangle.
- Using a ruler, measure about 3.8 cm from the left edge of the bag. Make a mark with a pencil.
- Place the left side fold of the bag against the inside of the bag. Do this while the previous mark you made is on the outside edge of the fold line.
- Fold the paper down so that the pencil mark lines up with the new folded edge. When smoothing the paper, try to maintain symmetry between the top and bottom edges.
- Repeat the procedure on the right side. When finished, the base of the bag should fold inward on both sides, like a shopping bag.
Prepare the bottom of the bag. To determine its location, find the fold lines that you made earlier - this will be the bottom. Keep the bag folded.
- Fold and seal the bottom of the bag. Once you have determined which side the bottom is on, fold it up.
- Bend the bag 10 cm from the bottom edge and fold it along this line.
- Open the package slightly, keeping the main part folded. The inner folds of the bag should open to form a rectangle. Inside on each side you should have a triangle folded from paper.
Finish the bottom of the bag. You will need to fold several sides towards the center. Focus on their triangular shape so that the bottom is even.
- Fold the left and right sides of the open square down. Use the outer edges of the triangle as a guide. When you're finished, the bottom will be shaped like an elongated octagon - it will have 8 sides instead of the 4 it had before.
- Fold the bottom of the octagon up toward the center of the bottom of the bag.
- Fold the top of the octagon down toward the center of the bottom of the bag. The bottom should now be neatly closed; glue the intersecting edges and let them dry.
Today we will again talk about wrapping New Year's gifts, we have already told you how to wrap a gift using craft paper and shared very simple gift wrapping ideas in 15 minutes. Today’s article will be of interest to those who do not like banal solutions and welcome originality in everything. We will describe in detail three ideas for original packaging of your New Year's gifts.
Idea No. 1. Cone-shaped packaging
A charming bag with a small gift inside, decorated with a butterfly and a small note on which you can write a wish or the name of the person for whom the gift is intended.
You will need:
- Gift paper
Stapler
Scissors
Butterfly or any other decor
Step 1
We make a funnel-shaped cone out of gift paper, and to prevent it from opening, we fix the junction of the paper with a stapler or double-sided tape. It is advisable to take thick paper that can withstand the weight of the gift.
Step 2
We print a butterfly or a gift wrapping decoration of any other shape using a template. We also cut out a strip of paper on which the congratulation will be written (or printed). Instead of a butterfly, you can choose any other decor.
Step 3
We hide the gift inside the envelope and close it, fixing the butterfly and congratulations with a stapler.  1
1
Idea No. 2. Holiday package with ribbon
A very unusual, but at the same time simple idea for holiday gift wrapping, an excellent solution for a New Year's gift. 
You will need:
- Satin ribbon
Wrapping
Scissors
Buttons
Hole puncher
A book or box that will become the basis for the package

Step 1
We wrap a small book with gift paper, securing the edges with tape, but do not glue one side together. 
Step 2
Use a hole punch to pierce the open side of the wrapping paper, and thread ribbons through the holes created to secure the gift inside. We tie a bow, add decor, a greeting card - and the gift wrapping is ready.  1
1

Idea No. 3. DIY New Year's package
In the last paragraph, we will talk about a bag for gifts with your own hands. After following the simple instructions, you will have a paper bag with handles in which you can place a large gift. 
You will need:
- Wrapping
Scotch
Glue
A piece of paper from which we will cut pens
Step 1
We fold the paper in half and glue the free edges with tape from the inside. If you manage to find tape in a bright color or with a decorative pattern, it is better, of course, to use it - this way you can securely fasten the edges of the future package on both sides without sacrificing its appearance. 
Step 2
We fold the bottom, which will soon become the bottom of the bag, as in the pictures below, securing the edge with tape at the end. 


Step 3
We cut out the handles and glue them to the bag that we made in the second step. To create loops, you can use ribbons or thick paper. The loops need to be glued to tape or attached to the bag using a stapler. You can sometimes find blanks of such “handles” in craft stores; by using them, you will significantly reduce the time it takes to create such gift bags. An impromptu package for New Year's gifts is ready. 

Oh, and making boxes got me hooked. So what to do? We, hand-makers, can’t live without boxes ;), and the New Year is just around the corner - gifts need an appropriate festive atmosphere. And yet, I will try to add some variety, without departing from solving the main task of these days - preparing for the New Year's celebrations. Today we will make gifts paper bags.
Frankly speaking, I would most likely lose sight of this topic, at least until the New Year. Still do paper bags I didn't have to. And the fact that paper bags that I made myself appeared here, to my complete surprise, is all thanks to you, dear friends. Your questions and wishes encourage me to take a closer look around and in a timely manner (as far as I can, of course) find solutions to pressing problems. In addition, expanding your own creative horizons is not only useful, but also extremely interesting. I hope that the results of my experiments with paper bags will be useful to you too.
Find the answer to the question how to make a paper bag, now it’s not at all difficult. The network is full of photo and video master classes on this topic. However, as a rule, the authors make packages, as they say, “by eye and by hand,” and they are great at it. But beginners often have to practice for a long time before the result pleases them with the accuracy of the shapes and lines.
We will take a slightly different path and, as usual, use templates. Let's add more work to the printer so it doesn't have to sit idle :)
Let's see how templates should be used in this case, using the example of the smallest paper bag (its dimensions: 75x110x20 mm).
To get started, download the template for it:
This template can be printed on either the front or back of paper.
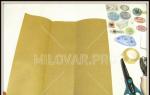
As you can see, on my desktop, in addition to easily recognizable tools, there is a printed layout of the package, decorated in Adobe Photoshop Elements 10.

I used Lomond photo paper with a density of 120 g/m², and I must say that for bags of this size this density is more than enough.
In addition, since the bag will have handles, I prepared a hole punch and 2 pieces of decorative cord.

1. Cut out the development along the contour, turn it over and draw scoring lines along the ruler, connecting the marks remaining outside the contour.

By the way, exactly the same creasing method is applicable for a matchbox cover if it is decorated in a graphic editor (using template No. 2).
2. Bend the paper along the fold lines.

3. Apply a strip of double-sided tape like this:

And glue the edges of the development.


4. Form the bottom of the bag:


Now we glue it together using tape.


5. Wrap the top of the bag inside

and punch holes for the handles with a hole punch.


6. Insert the cords into the holes, tying knots at the ends.

To make the remaining three bags, I used designer paper made using the napkin technique.
This bag has handles cut out of paper.

I did them like this:
- cut out according to the printed template and punched (the dashed lines are visible here - this is from a preliminary version of the template),

- glued double-sided tape over the entire area of the strip,

— I folded the edges towards the middle and glued them.


After that, I cut out 2 paper strips 1 cm wide and 7 cm long, and used them to glue the handles to the inside of the bag.


The template for this bag with paper pens (dimensions: 90x120x30 mm) can be downloaded here:
The decorative cord handles for the next package (dimensions: 90x165x30 mm) are attached in exactly the same way.

The template for this package is here:
The bag with the ribbon is also made according to the third template, and it closes like this:

At this stage, holes are punched:


I saw how to tie a ribbon in this video:
Good luck in preparing for the New Year!
And see you again in KARTONKINO!
Oh, and making boxes got me hooked. So what to do? We, hand-makers, can’t live without boxes ;), and the New Year is just around the corner - gifts need an appropriate festive atmosphere. And yet, I will try to add some variety, without departing from solving the main task of these days - preparing for the New Year's celebrations. Today we will make gifts paper bags.
Frankly speaking, I would most likely lose sight of this topic, at least until the New Year. Still do paper bags I didn't have to. And the fact that paper bags that I made myself appeared here, to my complete surprise, is all thanks to you, dear friends. Your questions and wishes encourage me to take a closer look around and in a timely manner (as far as I can, of course) find solutions to pressing problems. In addition, expanding your own creative horizons is not only useful, but also extremely interesting. I hope that the results of my experiments with paper bags will be useful to you too.
Find the answer to the question how to make a paper bag, now it’s not at all difficult. The network is full of photo and video master classes on this topic. However, as a rule, the authors make packages, as they say, “by eye and by hand,” and they are great at it. But beginners often have to practice for a long time before the result pleases them with the accuracy of the shapes and lines.
We will take a slightly different path and, as usual, use templates. Let's add more work to the printer so it doesn't have to sit idle :)
Let's see how templates should be used in this case, using the example of the smallest paper bag (its dimensions: 75x110x20 mm).
To get started, download the template for it:
This template can be printed on either the front or back of paper.
As you can see, on my desktop, in addition to easily recognizable tools, there is a printed layout of the package, decorated in Adobe Photoshop Elements 10.
I used Lomond photo paper with a density of 120 g/m², and I must say that for bags of this size this density is more than enough.
In addition, since the bag will have handles, I prepared a hole punch and 2 pieces of decorative cord.
1. Cut out the development along the contour, turn it over and draw scoring lines along the ruler, connecting the marks remaining outside the contour.
By the way, exactly the same creasing method is applicable for a matchbox cover if it is decorated in a graphic editor (using template No. 2).
2. Bend the paper along the fold lines.
3. Apply a strip of double-sided tape like this:
And glue the edges of the development.
4. Form the bottom of the bag:
Now we glue it together using tape.
5. Wrap the top of the bag inside
and punch holes for the handles with a hole punch.
6. Insert the cords into the holes, tying knots at the ends.
To make the remaining three bags, I used designer paper made using the napkin technique.
This bag has handles cut out of paper.
I did them like this:
- cut out according to the printed template and punched (the dashed lines are visible here - this is from a preliminary version of the template),
- glued double-sided tape over the entire area of the strip,
— I folded the edges towards the middle and glued them.
After that, I cut out 2 paper strips 1 cm wide and 7 cm long, and used them to glue the handles to the inside of the bag.
The template for this bag with paper pens (dimensions: 90x120x30 mm) can be downloaded here:
The decorative cord handles for the next package (dimensions: 90x165x30 mm) are attached in exactly the same way.
The template for this package is here:
The bag with the ribbon is also made according to the third template, and it closes like this:
At this stage, holes are punched:
I saw how to tie a ribbon in this video:
Good luck in preparing for the New Year!
And see you again in KARTONKINO!