Crochet pattern for girls' sandals. Crochet sandals: diagram with description, step-by-step master class. Crochet pattern for soles for booties-sandals
It's hot outside, what should you wear for your baby in hot weather? He should be comfortable, the shoes should not squeeze or float his feet. Bethanu, the author of original crochet patterns and ideas for children, comes to the rescue. She developed an easy crocheting pattern for sandals for little ones. Comfortable, soft and made with love, knitted sandals will save moms from the problem of finding summer shoes. The master class provides four size ranges for babies: from 0 to 3 months, from 3 to 6 months, from 6 to 9 months and from 9 months to a year.
Depending on the color you choose, you can knit sandals for girls to match any outfit. The work will take no more than one evening, and the result of the work will bring satisfaction and joy. Just look at these little legs, isn’t it adorable! Post your work knitted according to the proposed crochet pattern for children's sandals, and let's rejoice together at the excellent result. 
Crochet children's sandals
Schemes for ages from one month to one year
Translation into Russian was done by Handcraft Studio.
You will need:
- medium yarn in two colors (Knit Picks Mighty Stitch in rust and mint, pink and chartreuse);
- 3.75 mm hook (or another to obtain the desired knitting density);
- darning needle
Abbreviations:
ch = air loop
RLS = single crochet
PSN = half double crochet
CH = double crochet
2 dc together = knit 2 double crochets together
2 sc together = knit 2 single crochets together
conn. Art. = connecting post
n. = loop
Knitting density: 9 p. = 5 cm
0-3 months (approx. 8.9 cm)
Sole: 4 pcs. (2 for each shoe, knit in circles)
9 ch
1. 3 sc in second loop from hook. RLS next. 3 ch, hdc in next. n., dc in next. 2 sts, 7 dc in last st. Continue knitting on the reverse side: dc in next. 2 p., PSN in next. p., sc in next. 3 p. (22 loops)
2. Start at first sc: 2 sc in each of next 3 stitches. RLS next. 7 stitches, 2 sc in each of next 5 stitches. RLS next. 7 loops (30 loops)
3. *RS in next. p, 2 sc in next. p.* x 3 times, sc in next. 7 loops, *sc in next. p, 2 sc in next. p.* x 5 times, sc in next. 7 loops (38 loops). Conn. Art. next p and bind off the last stitch.
Take the second color. Match the 2 parts of the sole, and connect. Art. connect them, starting from any place, with the wrong sides inward. Fasten the end of the thread. (38 connection art.)
Upper part of the sandal
Take the second color. Mark the middle of the heel. Count 4 stitches to the right. Attach yarn. Make sure you work from the outside and knit through the joint. Art.
1 ch, sc in the same loop, 17 sc. Expand.
* 1 ch, sc in the same loop, 6 sc. Unroll* x 8 times (7 stitches in each row, do not unroll after the last row).
Turn 90 degrees and knit 7 sc along the top of the strap behind the side walls of the loops. Conn. Art. next knitted joint on a shoe.
20 RLS, close the connection. Art. Do not pin.
Heel
1. 1 ch, sc in the same loop, 8 sc. Expand. (9 loops)
2. Ch 1, knit 2 sc together, 5 sc, knit 2 sc together. Expand. (7 loops)
4. 20 ch, conn. Art. in the second stitch from the hook. 18 connection Art. 6 sc across the top of the heel.
20 VP, conn. Art. in the second stitch from the hook. Conn. Art. along the entire chain of ch.
Conn. Art. in the first st of the heel. Cast off the last stitch.
3-6 months (approx. 10 cm)
11 ch
1. 3 sc in the second stitch from the hook, sc in the next stitch. 4 ch, hdc in next. p., dc in next. 3 sts, 7 dc in last st. Continue knitting on the reverse side: dc in next. 3 p., PSN in next. p., sc in next. 4 p.
Place a stitch marker and move it after each round. (26 loops)
2. Start at the first sc: 2 sc in the next row. 3 loops, sc in next. 9 loops, 2 sc in next. 5 loops, sc in next stitch. 9 loops (34 loops)
3. *RS in next. p, 2 sc in next. p.* x 3 times, sc in next. 9 loops, *sc in next stitch. p, 2 sc in next. p.* x 5 times, sc in next. 9 loops (42 loops). Conn. Art. and secure.
Take the second color. Match the 2 parts of the sole, and connect. Art. connect them, starting from any place, with the wrong sides inward. Fasten the end of the thread. (42 connections)
Upper part of the sandal
1 ch, sc in the same loop, 19 sc. Expand.
*ch 1, sc in same stitch. 8 sc, unfold * x 7 times (8 loops in each row, do not unfold after the last row).
2 sc in the same stitch (you should have 3 stitches knitted together in the corner).
Turn 90 degrees and knit 7 sc along the top of the strap behind the side walls of the loops. Conn. Art. next knitted joint on a shoe. 22 RLS, close the connection. Art. Do not pin.
Heel
Start at the place where you closed the connection. Art.
2. Ch 1, knit 2 sc together, 5 sc, knit 2 sc together. Expand. (7 loops)
3. 1 ch, sc in the same loop. 6 sc. (7 loops)
6-9 months (approx. 11.5 cm)
Sole: 4 pcs (2 for each shoe, knit in circles)
12 ch
1. 3 sc in the second stitch from the hook, sc in the next stitch. 4 ch, hdc in next. n., dc in next. 4 sts, 7 dc in last st. Continue knitting on the reverse side: dc in next. 4 loops, hdc in next. p., sc in next. 4 loops. (28 loops)
Place a stitch marker and move it after each round.
2. Start at the first sc: 2 sc in each of the next 3 stitches, sc in the next. 10 stitches, 2 sc in each of next 5 stitches, sc in next. 10 loops (36 loops)
3. *PSN in next. p, 2 hdc in next. p.* x 3 times, PSN in the next. 10 loops
*PSN in next p, 2 hdc in next. p.* x 5 times, PSN in the next. 10 loops (44 loops)
Take the second color. Match the 2 parts of the sole, and connect. Art. connect them, starting from any place, with the wrong sides inward. Tie the end of the thread. (44 connections)
Upper part of the sandal
Take the second color. Mark the middle of the heel. Count 4 stitches to the right. Attach yarn. Make sure you work from the outside and knit through the joint. Art.
1 ch, sc in the same loop, 20 sc. Expand.
1 ch, hdc in the same loop, 8 hdc. Expand.
* 1 ch, sc in the same loop, 8 sc. Expand* x 6 times (9 loops in each row)
1 ch, hdc in the same loop, 8 hdc.
2 sc in the same stitch (you should have 3 stitches knitted together in the corner).
Turn 90 degrees and knit 8 sc along the top of the strap behind the side walls of the loops. Conn. Art. next knitted joint on a shoe. 23 RLS, close the connection. Art. Do not pin.
Heel
Start at the place where you closed the connection. Art.
1. 2 ch, dc in the same loop, 8 dc. Expand. (9 loops)
2. 1 ch, 2 dc together, 5 dc, 2 dc together. Expand. (7 loops)
3. 1 ch, sc in the same loop, 6 sc. (7 loops)
4. 20 ch, conn. Art. in the second st. from the hook, 18 connections. Art. 7 sc across the top of the heel.
20 VP, conn. Art. in the second stitch from the hook. Conn. Art. to the end of the ch chain. Conn. Art. in the first st on the heel. Cast off the last stitch.
9-12 months (approx. 11.5 cm)
Sole: 4 pcs (2 for each shoe, knit in circles)
ch 13
1. 3 sc in the second stitch from the hook, sc in the next stitch. 5 ch, hdc in next. p., dc in next. 4 sts, 7 dc in last st. Continue knitting on the reverse side: dc in next. 4 loops, hdc in next. p., sc in next. loop, sc in next. 5 loops.
Place a stitch marker and move it after each round. (30 loops)
2. Start at first sc: 2 sc in each of next 3 stitches. RLS next. 11 loops, 2 sc in each of the next 5 loops, sc in the next. 11 loops (38 loops)
3. *PSN in next. p, 2 hdc in next. p.* x 3 times, PSN in the next. 11 loops, *HDC in next stitch, 2 HDC in next stitch. p.* x 5 times, PSN in the next. 11 loops (46 loops)
Take the second color. Match the 2 parts of the sole and the connection. Art. connect them, starting from any place, with the wrong sides inward. Fasten the end of the thread. (46 connection art.)
Upper part of the sandal
Take the second color. Mark the middle of the heel. Count 4 stitches to the right. Attach yarn. Make sure you work from the outside and knit through the joint. Art. 1 ch sc in the same loop, 21 sc. Expand.
* 1 ch, sc in the same loop, 9 sc. Expand* x 10 times (10 loops in each row). 2 sc in the same loop (3 loops are knitted together in the corner). Turn 90 degrees and knit 9 sc along the top of the strap behind the side walls of the loops. Conn. Art. next knitted connection Art. on a shoe. 24 RLS, close the connection. Art. Do not pin.
Heel
Start at the place where you closed the connection. Art.
1. 2 ch, dc in the same loop, 8 dc. Expand. (9 loops)
2. 2 ch, 2 dc together, 5 dc, 2 dc together. Expand. (7 loops)
3. 1 ch, sc in the same loop. 6 sc.
4. 20 ch, conn. Art. in the second st. from the hook, 18 connections. Art. 7 sc across the top of the heel.
20 VP, conn. Art. in the second stitch from the hook. Conn. Art. to the end of the ch chain. Conn. Art. in the first st on the heel. Cast off the last stitch.
Assembly:
Use a darning needle to sew on the opposite side of the strap. Sew it to the sc on the other side of the shoe. Make sure that you carefully hide all the ends of the threads.
To make a bow, gather the strap with your fingers (gather it so that the edges are folded up and the inside is caved in) and tie with thread of the same color, leaving a long tail (do not tie it too tightly). Make sure the knot is on the bottom side. Then wrap the ponytail around the center 5 or 6 times. Tie the end of the thread. You can also secure it with hot glue.
During the hot summer season, many fashionistas prefer such stylish and seductive shoes as sandals. The fashion industry offers a huge range of these products: from the simplest to the most outrageous models. However, if you want to diversify your wardrobe with original shoes, pay attention to knitted sandals, especially since if you have the desire and imagination, you can make them yourself.
Knitted shoes are generally very popular lately. But if in the recent past, needlewomen knitted slippers and booties for babies, today the fashion trend is knitted sandals. Such shoes not only look attractive, but due to their texture they are unusually soft and comfortable.
Crochet sandals
Knitted sandals are especially suitable for women who constantly develop calluses when wearing regular models. 


 Such products are usually made with openwork crochet. Depending on the sole, these can be models with low heels, heels (including stilettos) or wedges. Knitted decor can also be found on wedge heels. It looks quite original and interesting.
As for the knitted top, it can be closed or open. In homemade models, of course, the second option is more common, since it is simpler to implement.
How to knit sandals yourself
Every girl always has old sandals in her wardrobe, the tops of which are torn or stretched. Using them, you can make yourself stylish knitted shoes (provided, of course, that the soles are still in good condition).
Pay special attention to the choice of yarn. For summer models, natural raw materials (cotton or linen) are ideal; only a small synthetic additive is acceptable.
Of course, natural threads are not as practical as synthetics. However, in such sandals your foot will not slip, which is especially important for summer shoes (sliding in high heels or wedges can lead to injury).
The color of the thread also matters. Too light colors (white, beige, pink), given the state of our roads, are very impractical.
 Melange yarn always looks original
When starting work, you need to pierce holes along the entire perimeter of the sole (at a distance of no more than a centimeter from each other). For this purpose you will need an awl. If the sole is soft enough, this will not be difficult to do. The holes should be wide enough for the thread to fit through.
The work is done with crochet. We connect the yarn with the fishing line and begin tying the sole with single crochets. You need to knit it extremely tightly so that when you wear the shoes, the top does not stretch out. We tie all the holes in this way.
Next, remove the fishing line and knit a few more rows with single crochets to form a dense fabric. And after that, we remove the fishing line and proceed to the main pattern.
Using yarn overs, we form an openwork mesh or any other pattern to our liking, knitting the heel and toe parts separately.
While working, you need to try on your sandals to make sure they are comfortable.
Some needlewomen knit the upper part of the sandals separately and then glue it to the sole, especially if it is thick and hard. Sometimes an insole is also knitted additionally.  To decorate the finished product, in addition to pebbles, beads and rhinestones, you can knit a flower from the same yarn.
Based on sandals with torn straps and, again, decent soles, you can build a product in the macrame style. Cut off the worn part, arm yourself with linen threads and start weaving.
 Watch detailed master classes: How to knit sandals and repeat such beauty!
How to knit sandals part 1
How to knit sandals part 2
If you don't know how to crochet, you can give your shoes a crocheted look using crocheted braid or lace. The lace makes the sandals simply luxurious.
Knitted items are becoming more and more popular every day. Mothers and grandmothers knit especially a lot for their babies. Knitted clothes look unusual, the light plays on them very beautifully, and the very texture of such a thing is very pleasant to the touch.
Crochet baby booties-sandals
The product can be light and airy, or dense and warm - it all depends on what function the connected item will perform.
Today, such cute little things as crocheted booties and sandals are gaining special love and popularity. Girls are knitted with love, with various decorations, cars, flowers, in various shapes and colors - all this can be realized by any needlewoman for her beloved child!

Necessary preparatory steps
So, a little later we’ll look at crocheting sandals according to a pattern with a description. In the meantime, you need to make measurements and small calculations. You should measure the length of your foot from the heel to the big toe. The most convenient way to do this is to place your baby’s foot on a piece of paper and circle the foot. For newborn babies and babies up to 3 months, the standard bootie length is about 10 cm. There is no need to take less, because booties are rarely worn on a bare leg, and a tight product will make the baby uncomfortable.
The next step is to decide on the height of the product. Crocheted sandals and booties look a little different. Sandals usually cover the heel and reach the protruding bone, and booties also cover part of the shin. Booties are more like low ankle boots.

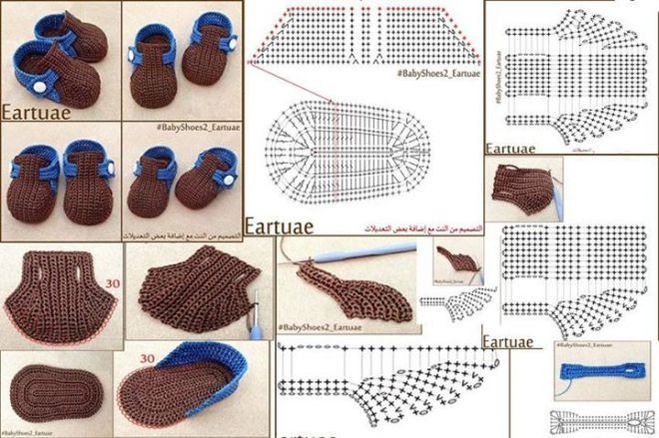
Crochet sandals: diagram with description. Knitting foot
The standard start is a set of air loops (circles in the center).
The columns in the diagram are double crochets. Not all columns are drawn, but this does not interfere with perception. For a bootie with a foot length of 10 cm, you need to cast on 10 air loops. Three more loops are cast on instead of the first stitch, and the first row is knitted with a double crochet. In the first loop you need to knit 2 stitches. Next, we knit one stitch into each loop, 5 stitches into the last loop of the row, then again one stitch into each loop, and two more stitches into the same loop where the first two stitches were tied. Thus, we knitted one row, which resembles an oval shape. The second row is knitted similarly, with increases added according to the pattern.

In order for crocheting sandals according to the pattern with the description to be successful, and the product not to become brittle, it is better to look not only at the pattern, but also at the product during the knitting process. With a sandal foot length of 10 centimeters, it is enough to knit three rows of double crochets. Depending on the thickness of the yarn, the product may turn out a little smaller or a little larger. The sample contains standard baby yarn for hand knitting from the Baby brand. For larger booties, you need to decide on the length by looking at the outline of your baby's foot. The bootie should protrude from all sides beyond the boundaries of the outlined foot by no more than 0.5 cm. You can knit an unlimited number of rows, but for large sizes it is better to combine double crochets, simple double crochets and half double crochets to create an ergonomic sole.

Knitting the side part
Crocheting the side part of a bootie or sandal is a continuation of crocheting the foot, and the number of stitches is the same as in the last row of the foot, but when grabbing the thread, the hook should not be inserted behind the upper loops of the stitches, but behind their “body”. In this way, perpendicular rows are obtained and the sandal “rises up.”
Starting from the second row, we make 2 decreases in each row on the heel. For open sandals, it is better to do 1 decrease in each row.
The product turns out to be open, and you can leave it in this form, but add a jumper so that the sandal does not fly off the foot.

You can crochet a jumper to decorate such a bootie-sandal, or make the nose a little more closed and decorate it with flowers, cars, and three-dimensional patterns. The jumper can be tied with simple posts or you can choose an openwork pattern, then no more decorations will be needed.
Another option is flowers, as in the example. They can be knitted according to this description: we cast on 50 air loops, from them we knit three double crochets in each loop for the entire first row. The second row is a double crochet with two or three yarn overs, which can be alternated for more volume.

You can also add green petals or a few roses, and the bootie will take on a finished look.
The remaining threads can be cut or used to secure the leaves.
With larger roses, using booties can be inconvenient, and smaller ones look unsightly.
Another interesting option is crocheting closed sandals according to the pattern with description, which is attached to the photographs.
As you can see, everything is quite simple, and the scope for imagination is unlimited!
First we knit a chain of air loops.
Next, we knit sandals according to the proposed pattern below: 
We need to knit two orange soles. 
And two of the same soles are yellow. As a result, for one pair of sandals we need four soles. 
We place the yellow sole on top of the orange one and tie it in a circle with a chain, threading the hook through both soles, grab the thread, pull it out and thread it through the loop. Next we knit in the round and stop in the first loop. 
We begin to tie both soles, starting from the side, with orange yarn so that we have 11 loops in the center. 
You should end up with such a beautiful sole, with top contrast stitching. 
We unfold the knitting and continue to knit 31 loops with single crochets in the opposite direction. 
Unroll the knitting again and knit 31 single crochets. In total we knit 6 rows in this way. 
Change the color of the yarn to yellow and make a loop. We thread the hook through the base of the sole and grab the loop. We knit a chain along the side wall of the sandal and from ten air loops we knit a chain for the future loop. 

We secure the loop with a connecting loop and continue tying the upper part of the sandal to the very base of the sole. 

We do the same action with the second sandal, the only thing worth noting is that we make the loop on the opposite side. We get two sandals like this. 
Sew on the daisy buttons using a tapestry needle. 
The booties and sandals are ready. 
Moms really want to pamper their little princesses, buy beautiful toys and dress them up in dresses. A little fashionista should have everything in an adult way, this even applies to shoes. Add variety to ordinary shoes, tie your beauty crochet baby sandals. Of course, you can’t walk in them on the street unless you sew them to the sole, but for home use or for riding in a stroller, they are quite suitable.
To work you will need:
- 50 g white yarn, 20 g red yarn. Yarn Gazzal Baby cotton (100% cotton, 50 g – 225 m);
- hook No. 3;
- 2 buttons;
- beads;
- needle;
- a thread.
Legend:
- VP – air loop;
- Dc – double crochet;
- RLS – single crochet;
- SP - connecting loop.
Description of the process of crocheting children's sandals:
When finished using the above yarn, the sole should be 12.5 cm long and 6 cm wide. This size is suitable for a 12-month-old girl. To calculate a sole of a different size, you need to measure the length and width of the foot, in this case the required length is 12 cm and width 6 cm. Make a chain of VP with a length equal to the difference of these two numbers (difference 12 cm-6 cm = 6 cm). The chain was made of 16 loops. For a shorter or longer sole, the knitting pattern for the toe and heel remains the same, only the number of intermediate stitches changes. The red yarn edging adds a little length. The top is knitted unchanged regardless of size and is suitable for soles from 10 to 14 cm long.
Knitting soles
We start knitting sandals from the sole according to the pattern. The pattern is quite simple and quick to knit; first we use white yarn.

We collect 16 VP and 1 VP for lifting. In the first row we knit 7 sc, 7 dc, 7 dc in the last loop. We turn the knitting and in the opposite direction we knit 7 dc, 7 sc and 4 sc in one loop. We close row 1 SP.

In total you need to knit 4 such parts.


Knitting the top
When the soles are ready, we continue to knit the top of the sandals with white yarn.
For the right sandal, count 8+5 stitches to the right from the center of the heel, fasten the thread, make 3 ch for lifting and cast on 4 dc towards the center of the heel. Then cast on 16 ch, skip 16 stitches on the sole and knit 5 dc and 20 ch on the left side of the sandal.

In the second row, perform 1 ch and knit the entire row of sc to the end.

In the third row, cast on 3 ch for lifting and knit the row almost to the end of the dc. Before reaching the end of row 4 loops, make 1 ch and skip 1 loop for the button hole.

Complete row 3 dc. Tie the entire edge of the sc with red yarn.
For the left sandal we follow a similar pattern, only we make 8+5 stitches to the left.

We cast on 3 VP, knit 4 DC, 16 VP and skip 16 loops on the sole. Next, 5 dc and 20 ch for the fastener.


We knit the second and third rows the same way, tying them with red yarn.

To knit the front of the sandals, we will use the pattern; it is the same for both sandals.

We leave 9 loops on the front central part of the sole, count another 10 loops to the right and begin knitting. To do this, fasten the thread and perform 3 ch for lifting, then knit 9 dc towards the center, knit 7 ch and skip 9 loops on the sole. We continue to knit further according to the pattern until the end of the row.
In the second row we cast on 1 VP and knit the entire row to the end of the RLS.
In the third row we begin to remove the loops; to do this we knit 3 VP, 1 Dc and 4 paired Dcs, thereby removing the loops. In the central part we knit 3 sc in one loop, then 1 sc and again 3 sc in one loop. We complete the row with ten DCs connected in pairs.
The fourth row consists of 1 VP and 12 RLS. In the fifth row we reduce the number of loops to three. To do this, we knit 3 VP for lifting and 3 dc in one loop, then in the central part we combine another 5 dc and in the left part we combine 4 dc. We finish knitting 1 joint venture, bringing together the beginning and end of the row.

We tie the sandals with red sc yarn. Knitting is finished.
All that remains is to sew on the buttons and decorate the sandals with beads.

If desired, they can be embroidered with beads on the front part, or connected with a jumper, as in the photo.


Our sandals are ready!
We hope that by following the diagram and description, you will get the same wonderful sandals for your little princess.
Share your result with us and leave comments.