Knitting vest for 1 year old boy. Knitted vest for a child. Knitting patterns
Very often, with the onset of cold weather, we think about how to quickly insulate our boys. And of course we start looking for beautiful knitted vests.

Another wonderful one vest for baby up to one year. Knitted from Lanagold yarn.


Vest for babies from birth to 2 years.
Warm knitted vest with a braided pattern. A vest for a boy is knitted from soft yarn beige and blue tones.


Jacquard vest for boys 2-8 years old . The front with a checkered pattern is knitted using stockinette stitch, and the back and edges are knitted with elastic. Such a vest can become universal; if you wear it with a T-shirt or turtleneck, then this model will become casual, and if you wear it with a shirt and trousers, then the vest will become festive.

To knit a vest you will need: yarn 100% cotton 50g/170 m - 1 (1) 1 (1) skein of blue and 2 (2) 2 (3) skeins of white, knitting needles No. 2.5 and No. 3, circular knitting needles No. 2.5 - 40 cm.
Dimensions: 2 (4) 6 (8) years.
Product width according to chest circumference: 64 (67) 71 (76) cm
Length of the product: 35 (39) 41 (45) cm


Another vest for a boy is knitted jacquard pattern. The back is knitted in stockinette stitch with blue thread, the neckline, bottom of the vest and armholes are tied with an elastic band. Original pattern the front is achieved thanks to the technique of elongated loops.


Age: 1-4 years.
To knit a vest you will need: blue and light blue yarn (100% cotton), buttons with a diameter of 13 mm.
This pattern is not as simple as it seems at first glance, but don't worry. Below is step-by-step master class on knitting a pattern.


Very beautiful vest for boy and you can tie for both 1-3 months and 3-4 years

Size: 1-3 (6-9, 12-18) months, (2, 3-4) years
Size in cm: 56-62 (68-74, 80-86, 92, 98-104) cm.
You will need: 100 (100, 100, 100, 150) g of DROPS BABY MERINO yarn (100% merino), 50 g/175 m, circular needles 2.5 mm, 3 mm. (length 80 cm.)
Shawl pattern: all rows are faces. P.
Double pearl pattern:
Row 1: *K2, P2, repeat from *
2nd row: faces. over face, out. over purl
3rd row: purl. above persons., persons. over purl
4th row: faces. over face, out. over purl
Button Hole: On the right placket, knit together the 2nd and 3rd stitches from the edge, yarn over.
Repeat holes:
For 1-3 months: 2, 6, 10, 14 cm.
For 6-9 months: 2, 7, 11, 16 cm.
For 12-18 months: 2, 7, 12, 17 cm.
For 2 years: 2, 8, 13, 19 cm.
For 3-4 years old: 2, 8, 14, 20 cm.
Reductions for the neck: do all the reductions from the faces. sides
Decreases for armholes:
- when the last knit stitches: knit 2 stitches together. .
- when the last loops are purl: 2 together.
- when the first stitches are knit: slip 1 st as knit, knit 1, throw the removed stitch over the knitted one
- when the first loops are purl: 2 together purl. behind the back wall
Rows with ribs:
1st row: faces. satin stitch
2nd row: faces. satin stitch
3rd row: purl. satin stitch
Knitting density: 24 p.*32 p.=10*10 cm.
Description: cast on 148 (168, 184, 204, 224) sts on 2.5 mm needles.
Knit: 5 stitches. knot (= planks), * k2, p2, repeat from *, k2, p5. knot (second bar)
Continue knitting this way: cut. 2*2 + 2 planks 3 (3, 4, 4, 5) cm long.
Attention! Don't forget about the button holes (see above)
Switch to 3 cm needles, then knit. satin stitch + 2 slats, at the same time decrease 32 (36, 40, 44, 52) sts along the row (do not touch the slats) - we get 116 (132, 144, 160, 172) sts. Add marks after 31 (35, 39, 43 , 45) sts on each side, we get 54 (62, 66, 74, 82) sts between the marks (back). At a height of 7 (7.5, 8, 9, 10) cm, knit: 5 boards. Uz., 21 (21, 27, 27, 31) persons. satin stitch, remove the last 16 (16, 20, 20, 24) sts. knitting needle (pocket cutout), knit faces. stitch until 10 (10, 12, 12, 12) stitches remain on the needle, remove the last 16 (16, 20, 20, 24) stitches on an additional stitch. knitting needle, knit 5 (5, 7, 7, 7). satin stitch, 5 boards. knot Next row, cast on 16 (16, 20, 20, 24) sts over each house. Using a knitting needle - we get 116 (132, 144, 160, 172) sts, continue knitting. satin stitch + boards knot
At a height of 13 (14, 16, 16, 18) cm, knit 2 scars (6 rows), then knit double pearls. knot At a height of 15 (17, 18, 20, 21) cm, knit 5 stitches. pattern, turned, 5 p. plats. pattern, turn 5 p. boards. knot, knit with double pearls. pattern to last 5 p., 5 p. boards. knot, turn, 5 p. plats. knot, turn, 5 p. plats. knot Next in the row, decrease 1 stitch for the neckline on each side in each person. row – 12 (13, 16, 16, 16) times
At the same time, at a height of 16 (17, 19, 20, 22) cm, knit 4 rows of boards. knot above the central 18 (20, 20, 20, 20) sts on each side (above 9 (10, 10, 10, 10) sts on each side of both marks), knit the remaining sts in a pattern
Close next row 8 (10, 10, 10, 10) sts from each side of both marks, finish back and front separately.
Back: 46 (52, 56, 64, 72) sts. knit double pearls. knots + 5 points each. knot on each side of the armhole. At the same time, decrease 1 stitch for the armholes in every second row - 5 (6, 6, 6, 6) times - we get 36 (40, 44, 52, 60) stitches.
At a height of 24 (26, 29, 31, 34) cm, start knitting the boards. knot on all sts. At a height of 26 (28, 31, 33, 36) cm. Cast off the central 16 (18, 20, 20, 24) sts, we get 10 (11, 12, 16, 18) sts on each side. height 26 (28, 31, 33, 36) cm. close all sts.
Left shelf: continue knitting double pearls. knot + board knot from the side of the armhole and neckline, continuing to decrease for the neckline until 10 (11, 12, 16, 18) stitches remain on the knitting needle, then knit the board. knot on all hinges. At a height of 26 (28, 31, 33, 36) cm, close all sts.
Right shelf: knit symmetrically to the left
Pocket: return the previously set aside 16 (16, 20, 20, 24) stitches on 2.5 mm needles. Knit with an elastic band 2*2 cm + knit. on each side - 2.5 (2.5, 3, 3.3) cm. Close the loops with an elastic band (2 together with knit stitches, 2 together with purl loops) Sew pocket holes on the sides. Repeat for the second pocket
Assembly: sew shoulder seams, sew buttons.

Knitted vests for school for 6-7 years


Practical boy's striped vest. The description is given for ages 2,4,6, 8,10,12 years.


Boy's vest with hood, warm and comfortable.

Age: For 5 years.
You will need: yarn “Svetlana” (50% wool, 50% acrylic, 250 m/100 g) - 200 g gray-beige color, knitting needles No. 3, 5 buttons.
Elastic band 2×2: knit 2 knits alternately. p. and 2 p. P.
Purl stitch: persons rows - purl. loops, purl rows - persons. loops.
Scythe: knit according to the pattern that shows only faces. rows, purl rows, knit all loops purl.
Knitting density: 20 sts x 26 rows = 10 x 10 cm.
Description of work
Back: Cast on 64 stitches on the knitting needles and knit 10 rows with a 2×2 rib. Next knit as follows: chrome. p., 10 p. satin stitch, 10 stitches braid, 22 stitches purl. satin stitch, 10 stitches braid, 10 stitches purl. iron, chrome p. At a height of 24 cm from the cast-on edge for the armholes, close on both sides 1 time x 4 p., 3 times x 1 p. = 50 p. Knit 17 cm straight, then for the neckline, close the middle 12 p. and then each side knit separately. To round the neckline, close from the inside in the next row 1 time x 5 sts. Close the remaining 14 sts of the shoulder at an armhole height of 18 cm. Knit the other side of the neckline symmetrically.
Left shelf: Cast on 32 stitches on the knitting needles and knit 10 rows with a 2×2 rib. Next knit as follows: chrome. p., 10 p. satin stitch, 10 stitches braid, 10 stitches purl. iron, chrome p. At a height of 24 cm on the right side for the armhole, close 1 time x 4 p. and 3 times x 1 p. = 25 p. At a height of 36 cm from the cast-on row, close on the left side 1 time x 5 p. and 6 times x 1 st. Close the remaining 14 sts of the shoulder at the height of the back.
Right shelf: knit symmetrically.
Hood: Cast on 120 stitches on the knitting needles and knit 10 rows with a 2×2 rib. Next knit purl. stitch 17 cm. Cast off all stitches. Sew the back seam.
Assembly: sew shoulder seams. Along the edge of the left front, cast on 84 sts evenly and knit 10 rows with a 2×2 rib. Make the strap for the right shelf in the same way, but in the 4th row evenly knit 5 buttonholes. To do this, cast off every 15th and 16th stitch. In the next row, in their place, cast on 2 new loops, knitting them according to the pattern. Along the edges of the armholes, evenly cast on 80 stitches on the knitting needles, knit 8 rows with a 2×2 elastic band, bind off the loops. Sew the side seams and sew on the hood. Sew on the buttons.
Knitting pattern, pattern and symbols:

Beige vest with a relief pattern. Model for a boy 10-11 years old.

In cold weather, parents always think about what kind of clothing could keep their child as warm as possible without hindering his movement. A knitted sleeveless vest in this case is the best solution! Knitted from high-quality threads, it will reliably retain heat and at the same time provide air circulation, protecting against overheating. In addition, knitting sleeveless vests for children is a very exciting and easy activity. You can choose suitable model– for walks, for school or for sports. Appearance Sleeveless vests are also very important, because children love beautiful things. We offer you several interesting options sleeveless vests.
Pink sleeveless vest for girls
Size: for a 4 year old child.
We will need:
- yarn, 100% merino wool, (50g per 105m) – 200g;
- auxiliary thread of contrasting color;
- knitting needles No. 3.5 and No. 4;
- buttons to match the color of the yarn - 2 pieces.
Patterns and techniques:
- purl smooth surface: in faces. R. Purl all stitches, purlwise. R. – facial;
- rice pattern:
1p.: *1l., 1i.* - from * to * repeat on all loops;
2p.: according to the visible pattern;
3p.: *1i., 1l.* - from * to * repeat on all loops;
- “braid” pattern: see Fig. 1;
- "rhombus" pattern: see Fig. 2;
- Italian set of loops: cast on the required number of loops with an auxiliary thread, knit 1 p. facial Then we knit 1 row with the main yarn. purl p. and 4p. with a hollow elastic band (1l., 1l., remove the thread without knitting before work). We will later weave the auxiliary thread.
Density: inside out satin stitch 23p. for 32r. equal to 10 cm by 10 cm.
Description
Back
We start knitting with an Italian set of knitting needles No. 3.5 87p. We knit 6p. "rice" pattern. Then we go to sp. No4 and knit: 1 cr., 15 p. purl Ch., 10p. “rhombus”, 1i., 2l., 2i., 9p. "braid", 5i., 9p. “braid”, 2i., 2l., 2i., 10p. "rhombus", 15p. purl Ch., 1 cr. According to this pattern, you need to knit with 22cm knitting needles. The diamond pattern needs to be completed at the top of the second diamond, in the last face. R. knitting instead of 2 crossed faces. p. 2p. in 1l. At the same height, 22cm, we finish the “braid” pattern and then these 9p. knit in stockinette stitch.
For the raglan line, close 3 stitches on both sides. and then in every even p. we make decreases 23 times by 1 point:
right side – 1cr., 1l., 2i., 2p. in 1i.;
left side - for 6p. to the end of the river: 2p. in 1i., 2i., 1l., 1cr.
Close the remaining steps.
Before
We knit this part of a sleeveless vest for children in the same way as the back. At 35cm for the neckline we close the central 11p. and we finish each part separately. We close the cutout on each half in even rows 1 time in 3 stitches, 1 time in 2 stitches, 1 time in 1 stitch.
Sleeve
We start knitting with an Italian set of knitting needles No. 3.5 53p. You need to tie 2p on them. "rice" pattern. Then we go to sp. No4. We continue knitting: 1cr., 1l., 2i., 2p. in 1i., 5i., 2l., 2i., 9p. "braid", 5i., 9p. “braid”, 2i., 2l., 5i., 2p. in 1i., 2i., 1l., 1cr. For the “braid” you need to knit only one repeat, then continue with knitting. satin stitch In each trace. even p. make decreases for the raglan according to the description of the back 18 times, 1 p. The remaining 17p. close.
Assembling a children's vest
Sew side and raglan seams. For the rolled-out collar, using knitting needles No. 3.5, we raise the loops by making an overlap of 4 sts on the raglan line on the right side. Knit the collar at 7cm height. Let's go to sp. No4 and continue knitting another 7cm. At the required height, we make buttonholes for buttons, knitting through 3 stitches. from the edge 1 yarn over, 2 p. in 1p. Sew on the buttons.
How to knit a children's sleeveless vest: video master class
Sleeveless vest with a kitten
For children 2-3 years old.
We will need:
- yarn, at least 50% wool, (100g per 200m), yellow color– 100g;
- the same mustard color – 50g;
- some black yarn for embroidery;
- sp. No4;
- hook No.3.
- persons smooth surface: in faces. R. Knit all stitches, purlwise. R. - purl;
- elastic band: 2l.x2p;
- pearl pattern:
1p.: *1l., 1i.* – repeat from * to *;
2p., 4p., - according to the drawing;
3p.: shift the pattern by 1p. - above persons. knit purl, over purl. – facial.
Repeat from 1 p. 4 rubles each
Description
Back
We begin knitting the back of a sleeveless vest for children with a set of 70p mustard-colored yarn. Next, you need to tie an elastic band at 4cm. Then we move on to yellow yarn and faces. smooth surface At 17cm from the bottom we close the armholes on each side with 6 stitches. and continue knitting the children's vest for exactly another 12 cm. We close the central 22p. and then we knit both sides separately. To round out the rollout, close it in the following way. 2nd r. 1 time 1 p. Close all stitches 15cm from the bottom of the armholes. The second half of the back of the sleeveless vest for children needs to be knitted in a mirror image.
Before
We start knitting the front of a sleeveless vest for children with a set of mustard-colored yarn 70p. Next, you need to tie an elastic band at 4cm. Let's continue pearl pattern by 5cm. We change the yarn to yellow and knit further according to the description of the back. Close the central 18 stitches 10cm from the bottom of the armholes. and we finish each part separately. To round the neckline, close it in every even row. on the inside 1 time in 2 p. and 1 time in 1 p. We close the remaining stitches at the height of the previous part. We tie the second half of the front in a mirror image.
Assembling a children's vest
We raise sts along the shoulders of the back with yellow yarn and knit a 2cm elastic band. We raise sts along the front shoulders with mustard yarn and knit a 2cm elastic band. We make holes for buttons on each shoulder, closer to the neck: 2p. in 1p., 1n.
We sew down the sides, the short sides of the elastic bands on the shoulders along the edges. Crayfish step We tie mustard yarn around the armholes and neckline. We embroider the kitten with black yarn using a loop-to-loop stitch.
Knitting a children's vest (sleeveless vest): video MK for beginners
Selection of schemes


made with a large pearl pattern in combination with stockinette stitch, garter stitch and 2x2 rib. The description of the vest is given for sizes 56/62 - 68/74 - 80/86 (92 - 98/104) cm.
Knitted vest for a child - knitting pattern
Size:
1/3 – 6/9 – 12/18 months (2 – 3/4) years
56/62 - 68/74 - 80/86 (92 - 98/104) cm
Knitting density: 24 p x 32 p in stockinette stitch = 10 x 10 cm
You will need:
- BABY MERINO (50 g = 175 m) 100-100-100 (100-150) color 19, gray,
- circular knitting needles 3 mm (60 or 80 cm),
- circular knitting needles 2.5 mm (60 or 80 cm) - for elastic,
- buttons: 4 pcs
Garter stitch (straight and reverse rows): knit all rows of faces.
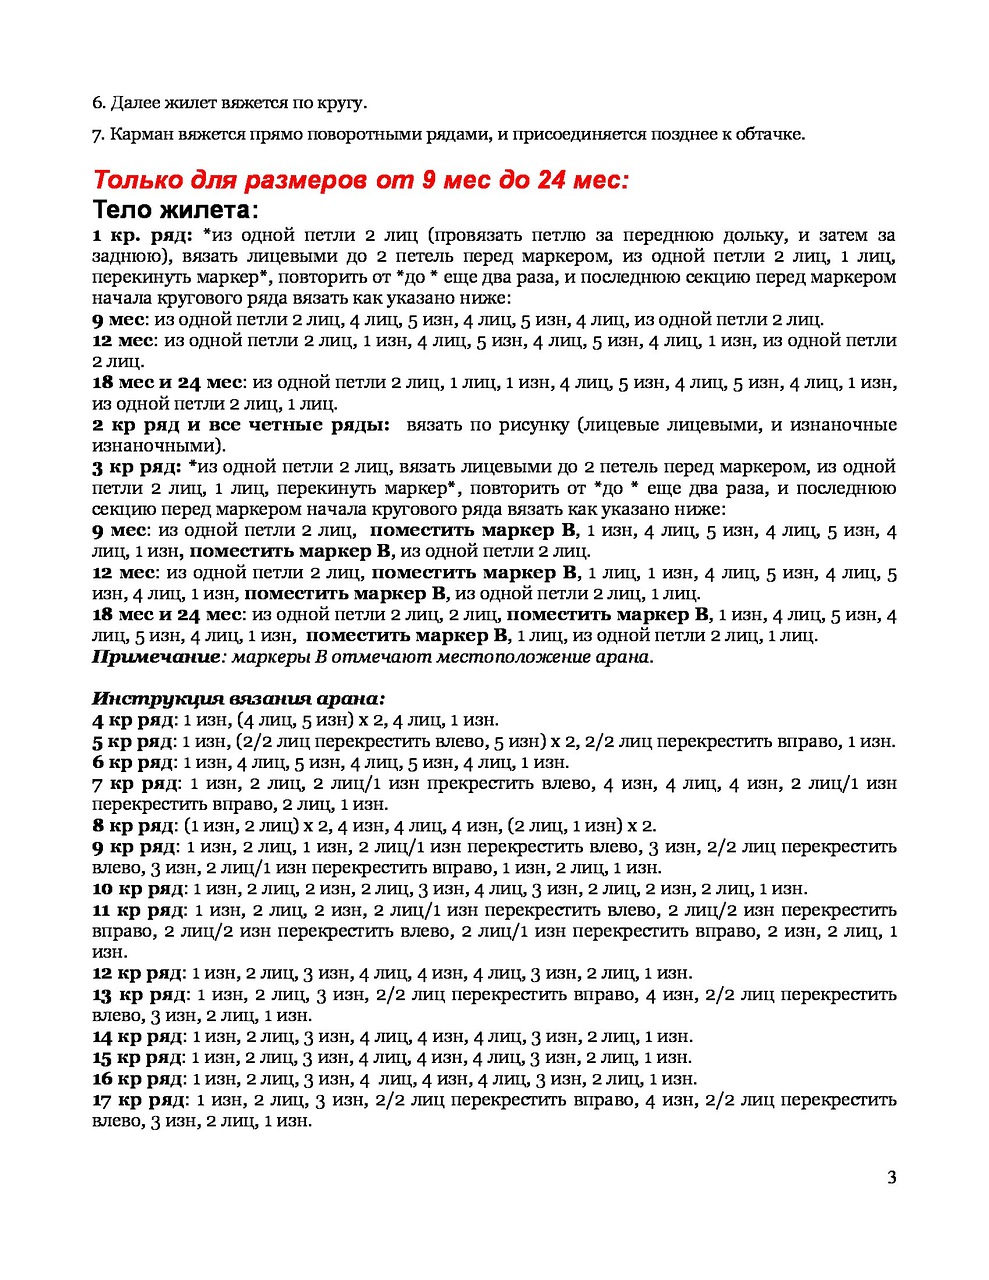
Double Rice Pattern:
Row 1:*K2, P2*, repeat from *-*.
Row 2: knit over knit and purl over purl.
Row 3: purl over knit and knit over purl.
Row 4: like Row 2.
Repeat rows 1 - 4.
Button Holes: close the loops for pet. faces on the right bar. 1 buttonhole = knit the second and third stitches together from the edge and make 1 yarn over.
Close the buttonhole loops at the height of the part:
- size 1/3 months: 2, 6, 10 and 14 cm.
- size 6/9 months: 2, 7, 11 and 16 cm.
- size 12/18 months: 2, 7, 12 and 17 cm.
- size 2 years: 2, 8, 13 and 19 cm.
- size 3/4 years: 2, 8, 14 and 20 cm.
Decrease for V-neck and armhole with Double Rice pattern:
All decreases should be made with LS.
Reduce the mark in front of the edge of the placket/sleeve:
when the last n must be persons: 2 vm. persons
when the last p should be purl: 2 vm. purl
Decrease the mark as follows after the edge of the placket/sleeve:
when the first loop should be knit: remove 1 stitch as when knitting, knit 1, broach.
when the first loop should be purl: 2 together crossed. purl (i.e. knit behind the back wall of the loop).

Vest for child description:
Front/back:
knitted in straight and reverse rows on circular needles from the middle front.
Cast on 148-168-184 (204-224) sts on 2.5 mm circular needles. Work the first row of the trail in the RS pattern: 5 sts (= placket) - see explanation above, * k2, p2 *, repeat from *-* until 7 sts remain, finish with k2 and 5 sts in garter stitch (= bar). Continue ribbing in the same manner with 5 stitches in garter stitch on both sides until the piece is 3-3-4 (4-5) cm high - Don't forget the button holes on the placket - see explanation above. Switch to 3 mm circular needles and knit in stockinette stitch, but continue the stripes in garter stitch as before.
At the same time, in the first row after the elastic, evenly decrease 32-36-40 (44-52) sts (do not decrease on the bars) = 116-132-144 (160-172) sts. Insert a marker at 31-35-39 (43-45 ) sts on both sides (= 54-62-66 (74-82) sts between markers on back).
Remember the knitting density!
At a piece height of 7-7.5-8 (9-10) cm, knit a trace, a row of a trace, in the manner with RS: 5 sts in garter stitch, 21-21-27 (27-31) sts in stockinette stitch, remove the last 16-16-20 (20-24) sts, which were knitted, on the stitch holder for cutting the pocket, knit until 10-10-12 (12-12) sts remain on the knitting needle, remove the last 16-16-20 (20-24 ) sts that were knitted, onto the stitch holder for the pocket cut, knit 5-5-7 (7-7) sts in stockinette stitch and finish with 5 sts in garter stitch. In next row, cast on 16-16-20 (20-24) new stitches over each of 2 stitch holders = 116-132-144 (160-172) sts. Continue in stockinette stitch and garter stitch until piece height is 13-14- 16 (16-18) cm. Now knit 4 rows - all knits on all stitches (= 2 scars). Then knit the Double Rice pattern - see the explanation above (continue the stripes in garter stitch as before).
Important! Read the next section to the end before continuing to knit!
At a piece height of 15-17-18 (20-21) cm, knit 2 sts in garter stitch on the first 5 sts on the knitting needle (do not knit the remaining sts on the knitting needle), then knit 1 row on all stitches before knitting 2 rows in garter stitch on the first 5 p on the knitting needle on the other side of the part (this is done for a neat V-shaped neck). Then turn it down for V-neck: Decrease 1 st every 2nd row (i.e. every row with RS) 12-13-16 (16-16) times in total.
At the same time, at a piece height of 16-17-19 (20-22) cm, knit 4 p in garter stitch on middle 18-20-20 (20-20) sts on both sides (i.e. on 9-10-10 (10- 10) sts on both sides of each marker) - knit the remaining sts as before. In the next row, bind off the middle 8-10-10 (10-10) stitches on both sides for the armhole and finish the front and back separately.
Back:
46-52-56 (64-72) sts. Work Double Rice pattern with 5 sts in garter stitch on both sides (= sleeve edges). At the same time decrease for armholes: decrease 1 st every 2nd row (i.e. in each row with RS) a total of 5-6-6 (6-6) times = 36-40-44 (52-60) sts. Continue with the Double Rice and Handkerchief pattern knitted until the piece measures 24-26-29 (31-34) cm. Now knit in garter stitch on all stitches until the desired length is achieved. At the same time, at a piece height of 25-27-30 (32-35) cm, bind off the middle 16-18-20 (20-24) sts for the neck = 10-11-12 (16-18) sts left for each shoulder. Now finish each shoulder separately. Continue with garter stitch until piece measures 26-28-31 (33-36) cm, bind off sts.
Left shelf:
continue with the Double Rice pattern and garter stitch, at the same time decrease for the armhole as on the back and continue decreasing for the V-neck as before. After the last decrease, 10-11-12 (16-18) stitches remained on the needle. Work in garter stitch on all stitches until the piece measures 26-28-31 (33-36) cm and bind off the stitches.
Right shelf:
knit like the left front, but mirrored.
Pocket cut:
return 16-16-20 (20-24) sts from one stitch holder to the needles. Work ribbing k2/p2 with 1 st in garter stitch and k2 on both sides (as viewed from RS). When the length of the pocket cut is 2.5-2.5-3 (3-3) cm, loosely bind off the stitches with knit over knit and purl over purl. Sew the pocket opening. Sew the pocket opening to the slit (where the loops were placed on the loop holder). Make the second pocket cut in the same way.
Knitting is an ancient craft that has long served not only for practical purposes. Even in our time it has not lost its value. After all, every woman can show her imagination, ingenuity and skill here. Even novice needlewomen can knit an original item for themselves or their child. And if you wish, you can improve your skills, develop your skills and learn to create real masterpieces.
For every woman, the greatest pleasure is knitting for her child. The best knitted items are created by mothers and grandmothers for their babies. After all, it is very important that children’s clothing is not only beautiful, but also warm and comfortable.
Besides, related products can grow up with your children from year to year. Besides, knitted items never go out of style. Their variety is great. These are sweaters, sleeveless vests, dresses, suits, sundresses, tunics, hats, mittens. On our website you will find patterns for every taste and age, as well as models for beginner needlewomen. Knitting a sleeveless vest is easy!
An item in the wardrobe of a child aged one year and older
Every mother knows that a sleeveless vest is an essential element of every child’s wardrobe. It will come in handy on cool summer evenings and cold winters, and in the off-season you simply cannot do without it. After all, sometimes you don’t know how to dress your baby so that it is not hot or cold, and most importantly, comfortable. In addition, you can’t have too many sleeveless vests; you can find the necessary patterns for every season on our website.
See below for an excellent pattern for beginners on knitting vests for children:


Also, knitted sleeveless vests are perfect for schoolchildren’s wardrobes. The assortment in stores is not particularly pleasing with the variety of models school uniform, especially for boys. With the help of a vest, you can not only provide your child with warm clothes, but also emphasize his individuality and distinguish him from the gray mass of clothes of the same type. On our website you will always find many original models of vests knitted using knitting needles. Our collections are constantly updated, don't miss out on new items.
Before starting knitting, especially beginner knitters, you need to familiarize yourself with some nuances. We suggest starting your creativity by creating a children's sleeveless vest with knitting needles.
It consists of only two fabrics, which are then sewn together, and for beginner knitters it will be easy.
And after you have a vest, you can move on to knitting more complex things.


1. To knit a vest for children, we will need two sets of knitting needles of different thicknesses, for example No. 4 and No. 6. Thinner knitting needles need to be used to knit elastic, and thicker knitting needles will be used to knit the main fabric of the product. Next, you need to take measurements from the person for whom the sleeveless vest will be knitted. Based on the desired length of the item, we take measurements of the circumference of the hips, waist or chest. We divide the result in half and get the width of our product. For example, our hip volume is 60, which means the width of the canvas should be 30 centimeters. Based on this indicator and the thickness of the knitting needles, we determine the number of loops that need to be cast on the knitting needles to knit one front of a sleeveless vest.


2. Next we knit a sample of elastic. To do this, just knit a piece of 10 by 10 centimeters. We measure the width of the resulting sample. For example, there are 3 loops in one centimeter. We multiply the required width of the canvas (ours is 30 centimeters) by three. We get 90 loops that we need to cast on. We add 2 edge loops to them, for a total of 92 loops.
3. We cast on the loops on 2 knitting needles folded together. Then we take out one of them and start knitting an elastic band. To do this, alternately knit 2 knit and 2 purl loops, about 10 centimeters high. In the last row you need to switch to thicker knitting needles.


4. It is necessary to knit the front from the desired length of the product. It is recognized by simply measuring the person for whom you are knitting a sleeveless vest. You also need to measure the length from the hip to the armhole and from the armhole to the shoulder. Based on these dimensions, the first shelf, usually the back one, is knitted. For the armhole, we begin to close the loops evenly on each side of the shelf, 1-2 loops in each row, in the amount of 6-7 loops. Next, we knit the product according to the measurements up to the shoulder. We close the row and the first shelf is ready.
5. The front part of the sleeveless vest for children is knitted in the same way. The only difficulty is that you need to make a neck in it. Its shape and depth must be decided in advance. For a beginner knitter, the easiest way to do this is v-neck. Having measured the length from the hips to the beginning of the neck in advance, we carefully monitor so as not to miss the right place.


6. Having reached it, we divide the knitting into two halves, marking it with a pin. We knit one half, gradually closing one loop in each front row. Having tied it to the shoulder, close the last row. We put the loop remaining on the pin on a knitting needle, tie a thread from a skein to it and knit it in the same way as the right half. Our product is almost ready.
7. Next, it is recommended to wash and steam the two halves, then carefully sew them together. To finish the product, you need to process the armhole and neckline. To do this, you need to tie 4-5 centimeters of elastic, having previously measured the width and sew it into place.

This was the easiest option for knitting a sleeveless vest for just beginning needlewomen. Subsequently, you will be able to diversify your work with interesting patterns, complex cuts and your own original styles. They will delight you and all your loved ones.
Watch a video about knitting vests for children.
Here is another pattern for knitting a children's vest from a year and older:


 Vest for girls
 Knitting is a skill that every woman can master. This is an amazing handicraft in which you will show your imagination and make unique things.
Women enjoy knitting things for themselves, for their relatives and, of course, for their children. You always want to see them neat, smart and different from other children.
In addition to beauty, you also need to take care of the warmth and comfort of the products..
The smallest children need warm and comfortable clothes. You can independently dress children aged 1 year in beautiful wardrobe items.
At this time, frequent walks are taken fresh air, and a warm sleeveless vest will be very useful. Currently, knitted products are very popular; sleeveless vests knitted with knitting needles are considered especially fashionable.
Mothers have many questions about raising children, including.
Knitting front
At the beginning, the knitting process is absolutely similar to the previous stage. Also cast on 69 stitches and knit an elastic band the same length as the back.
We begin to decrease the loops. We calculate the middle one on the front part and leave it, do not knit it. After this, to the right and left of it, gradually decrease 1 loop (in each row) - for 12 rows. The work can be considered completed at a height of 34-39 centimeters.
Collecting details
Take both parts of the future product and make one seam on the shoulder.
Now we make an edging at the future neck: lift the outer loops onto the knitting needles, those located at the edge of the neckline (don’t forget to grab the unknitted one in the middle) and then knit several rows with the selected elastic band (2*2 or 1*1).
Please note - in each row you must knit two loops together from the missing middle loop of the front part.
Are you done? You can sew the remaining shoulder seam and sew the edging at the neckline.
Now all that remains is to finish the armholes. At the edge of each armhole, take all the loops on the knitting needles and knit them with a similar elastic band (which was used when knitting the back and front). That's it, you can close the loops.
The final stage of work is connecting the remaining edges of the vest with threads that match the color of the yarn.
We hope everything worked out for you! We are very happy to be of service.
If you want to know how to crochet such a vest, write in the comments.
How to knit a vest - video
For another way to knit such a vest for a baby, see the following video: