What to knit using sectional yarn. Top knitting made from section-dyed yarn. Description, knitting patterns. Manufacturers of section-dyed yarn

A few decades ago, the choice of yarn for knitting was so small that you had to get out of the situation and combine different threads yourself. Indeed, despite the fact that materials for needlework were minimally available, craftswomen still produced handmade masterpieces.
Nowadays, many yarn manufacturers offer section-dyed threads and melange. Let's figure out what the difference is between these two types of yarn and tell you about rules of knitting with sectional yarn.
Melange yarn
So, melange yarn can be of absolutely any quality, that is, composition. The main difference from all other thread options is that the finished thread consists of two or more thin threads of different shades or even colors.

Sometimes there are variants of melange- sectional yarn.

If the yarn options that are offered in ready-made stores do not suit you in color or other characteristics, then you can easily create your own melange yarn. It is enough to select the required colors of threads and connect them into one ball. For the best possible result, you should use an electric spinning wheel, which will twist two or more threads into one.
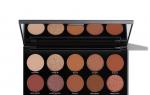
Section-dyed or section-dyed yarn
Sectionally dyed yarn includes all threads that have a non-uniform color throughout the entire skein. Sections different color combined into one skein of yarn. It could be completely different variants. For example, small pieces of yarn are dyed different colors. This coloring option can be briefly called sectional.

You can knit completely different products with this thread, just like when working with regular yarn of a uniform color.
But thread with long sections of different colors is used in work according to several rules, following which you can achieve exceptional results.


When knitting unpaired simple items, such as a scarf or hat, there are no special working conditions. But when knitting socks or mittens, it is worth considering that they should be symmetrical, that is, the same.

To do this, each product must start with the same piece of thread. Let's say we start knitting socks with yellow color. In this case, they should turn out the same. This rule only applies to yarn whose sections are long enough. With short sections, you don't have to start with one color. The difference between socks or mittens of the same pair will not be noticeable.
When working on a raglan sweater, it is best to start the sleeves in the same color.
If sectionally dyed yarn is used on products with seams, then it is worth considering that the back and front of the product must match the color of the seams. It is for this reason that it is best to knit such products from the bottom up.
There is no need to worry that during the washing process, items made from melange yarn or sectionally painted ones will lose their appearance and fade. If you follow the care recommendations given by the manufacturer, the yarn perfectly retains its original appearance.
We hope everything worked out for you.
Share your result with us and leave comments.
Author Marina Nikitina.
The variety of yarn allows craftswomen to experiment and create unique things. Modern ones have many names that differ in composition, color and properties.
Sectional dyed yarn can be classified as fancy due to its interesting and sometimes unexpected color solutions. The good thing about this yarn is that you don’t need to select and combine colors for the product yourself.
Single-color sections can be short or long, allowing for control over the knitting. Yarn (sectional yarn) with short sections produces a bright, slightly variegated fabric. This thread is ideal for knitting children's clothes or accessories - scarves and hats. Large sections fit into the product in wide, well-combined stripes.
Knitting from section-dyed yarn can be done either by crochet or knitting. Depending on the chosen tool and working technique, a fabric knitted with the same thread may look different.
Manufacturers of section-dyed yarn
Knitting with yarn (sectional yarn) always begins with choosing the ideal yarn composition and color combinations. Fortunately, there are many options - almost all major yarn manufacturers produce a sectional line. The most famous of them:
- Alize Burcum Batik. 100% acrylic (100 g/210 m). The thread is ideal for baby knitting and for owners sensitive skin prone to allergic reactions. The yarn is very soft, pleasant to the touch, does not squeak or curl during operation. Pleases with noble color combinations.
- Alize Angora Gold Batik. 10% angora, 10% wool, 80% acrylic (100 g/550 m). Thin, delicate fluffy thread of sectional dyeing. It makes light, airy stoles, shawls, and dresses.
- Vita Cotton Coco print. 100% gas-colored mercerized cotton (50 g/240 m). This cotton thread makes wonderful summer items. Looks best in lace and openwork patterns. Color combinations as if they were specially created for bright things for spring and summer.
- Magic. 100% wool (100 g/200 m). Winter knitting is incomplete without this thread. The yarn (sectional yarn) of this brand makes very warm and beautiful things. It is suitable for creating bright, stylish cardigans and sweaters, hats and scarves, socks and mittens.
- "Kamtex". "Chrysanthemum Print". 40% mohair, 60% acrylic (100 g/350 m). Yarn from a domestic manufacturer is ideal for knitting openwork shawls and stoles with a smooth transition of colors.

What to knit from section-dyed yarn
Handicraft magazines and thematic websites offer many patterns that can be used to knit from sectional yarn. Models vary in complexity and styles, but even the simple execution of some models due to complex thread dyeing makes things original and stylish.
From the “sectional” you get not only beautiful large items, such as dresses and jumpers, but also small accessories, for example, sets of hats and snoods, knitted knee socks and socks. For small products, yarn with short sections is more suitable, for large ones - with long sections.
Knitting bactus

It is better to start knitting from yarn (sectional yarn) with simple product, for example, bactus, which is very fashionable now. On it, the colored sections will reveal themselves in the most advantageous way due to its triangular shape.
Bactus can be knitted with knitting needles or you can get an original product in the style of Bosnian knitting. The scarf begins to be knitted from one edge, gradually widening and then shortening the rows where the bactus narrows.
You can start working with knitting needles from the center, gradually expanding each “wing” of the bactus. Ready product can be decorated with tassels or fringe.
Prepare circular knitting needles and sectional dyed yarn. We will knit such a wonderful top.
Size: 36-38/ 40-42/ 44-46.
You will need: 350/ 400/ 450 g yarn SMC Cotton Bamboo Batik, color number 00083
2 pairs of circular needles No. 3-4
Patterns and types of loops
Pattern: faces. R. and out. R. elm. according to the scheme. In purl. R. elm. double sts and yarn overs. reception, the remaining p. elm. according to the drawing.
Yarn over extends the rapport by 1 st in the 2nd row, then by 2 sts in every 2nd row. Elm 1-5th r.. repeat. 3 times 6-13th r. and 4 times 14-21 r. = 61r., repeat. 22-25th r. to end.
Chrome. p.: at the beginning R. n. 1st p. persons. reception, thread at work, at the end of the river. elm. last p. persons. reception.
Sn. p.: 1 persons. n. in persons r., in purl. R. n. 1 p. purl. reception, thread before work.
Ub. 1 p. at the beginning piz. r.: elm. chrome p.. sn. n. persons reception. 1 person p.. stretch sn. p. through the knitted one.
Ub. 2 p. at the beginning persons r.: elm. chrome p.. sn. n. persons reception, 2 persons. p. vm., stretch sn. p. through knitted. 1 or 2 p. at the beginning. purl r.: elm. chrome p.. sn. n. out. reception, thread before work. elm. persons or purl. We use 2 or 3 stitches.
Knitting density 10 x 10 cm = 16 p. x 32 r. pattern.
Note. Knit, starting from the bottom edge of the neckline (the direction of knitting is indicated by arrows on the pattern drawing). Knit each piece in the sequence indicated by the numbers on the pattern drawing. Part 1: beginning elm. from inside r., parts 2-6 -beginning. elm. from persons R. To complete parts 2. 3 and 5, remove the corresponding part onto the 2nd circular needle, leaving the remaining stitches on the 1st circular needle.
Completing of the work
Back: beginning elm. from part 1. Cast on 7 sts and in the 1st purl. R. elm. chrome p.. 5 p. p.. chrome. n. Cont. perform the pattern next.
way: chrome. p.. 4 times repeat. rapport, 1 double stitch, chrome. p. At a height of 17 (18.5; 20) cm (= 55 (59; 63) r.) from the cast-on p = 219 (235; 251) p. on the knitting needle - part 1, elm. detail 2 next way: chrome. p. and next 54 (58;62) p. Simultaneously perform dec. to form a shoulder bevel trace. way: in the beginning track. persons R. ub. 1 (2;1) p., as shown, then dec. in every 2nd r. *3 times for I p, and 1 time for 2 p*., repeat. 5 times from * to * (dec in every 2nd p. 2 p. then * 3 times 1 p. and 1 time 2 p. *, repeat 5 times from * to *; dec in every 2- m r. *2 p. and 2 times 1 p.*, repeat 7 times from * to *, then 2 more times 2 p.). At the same time at the beginning 1st purl. r., or in the 56th (60th; 64th) r. to make an armhole ub. 1 p., then in every 2nd p. 23 (24; 25) times 1 p. Close off the last 2 p. Elm. second shoulder bevel = part 3 symmetrically at 55 (59; 63) p. Dec. for the shoulder bevel at the beginning. purl r.. perform the armhole at the beginning. persons R. Elm. remaining 109 (117:125) stitches on the bottom edge of the back. Further beginning elm. from detail 4. At the same time elm. double p. at the beginning R. and sn. p. at the end of the river, approx. 1 chrome each n. on both sides. =111 (119; 127) p. In the beginning. each person. R. and out. R. ub. 1 p. and elm. 1 yarn over on both sides from the central point. At a height of 12.5 (10; 7.5) cm (= 40 (32; 24) r.) from the beginning. details 4 elm. first 55 (59; 63) p. in the beginning. R. for part 5 trace, in this way: from the right edge dec. 1 p. at the beginning each person. R. At the same time elm. persons taking chrome p. at the end of the river bottom edge of the top vm. from previous p.. until 3 p. remain. Elm. these 3 p. persons. reception of vm. next persons R. Cut the thread and pull through the remaining sts. For part 6 of the lower edge of the back, close the 1st st = central st of the back at the beginning. 1st person r., then elm. for part 6 symmetrically 55 (59; 63) p. trace, like this: in the beginning. persons R. ub. 1 p., as shown, at the end of knit. R. elm. persons reception sn. p.vm. from previous n. The total height at the center of the back is 65 cm.
Blouse made from Kauni yarn

So. Be sure to knit a sample to calculate the required number of loops for casting on. The jacket is knitted practically without seams, from the outer edge to the inner, so in case of an error in the calculations you will have to unravel a lot. It would be ideal if the number of loops was divided by 5. I strongly recommend drawing a mini pattern on a checkered sheet on a scale: 1 square - 5 loops. Here's my pattern: 
Line A-B this is the middle of the back, line B-C - half of the circumference of the hips, line C-D middle front
In my case, the length of the back is 120 loops, half of the OB is 110 loops, the middle of the front is 65 loops (the last figure is obtained automatically if you draw the D-E line strictly diagonally!).
On the knitting needles we cast on 120+110+65+5=300 loops. The extra 5 stitches are 2 edge stitches, 1 middle loop on line B-G, 1 middle loop on line C-G, and 1 middle loop on line D-E. We mark them with markers!
We knit in garter stitch, in each front row on lines B-G and C-G knitting 3 loops together, and along the D-E line adding one loop on both sides of the middle loop. Thus we form a straight front line.
If you want to fit your blouse, triangle B-G-C You can subtract a few stitches, but we must not forget that at the same time the same number of loops on the E-D line must be added!
In this way we knit until the vertex of the triangle at point G is one loop.
Then you can sew piece G-F, leaving on the knitting needles the loops necessary for the sleeve (F-E). They are simply knitted further until the sleeve length is reached. You can narrow the sleeve, or knit it straight, if desired.
Here we already have half of the jacket ready. We knit the second half in a mirror image. We assemble the loops in the middle of the back from a ready-made part.
All that remains is to sew the shoulder part and decide on the collar. Knit a collar or hood, if desired.
Sorry if anything in the description is not clear. I composed everything as I knitted. There are already several jackets linked on our Latvian forum under the code name Lapsas jaka (Fox Jacket), some changes have been made to each. I am also going to repeat this model from Kauni in the fall. I will definitely take a photo of the process.
Difficulties begin when the number of loops changes: knitting necklines, armholes, darts. For beginners, I recommend choosing models with a simple cut, without darts, with rectangular armholes and a neckline. Then we reduce the armhole strictly by 1 pattern repeat (by large size– for 2 rapports) – this will allow you to maintain its regularity. We do the same with the neck.
to photo hosting → to photo hosting →
If the neckline turns out to be too wide, it can later be corrected with additional binding, lace and other types of trim. We also knit the sleeves rectangular; their width should be a multiple of the pattern repeat.
A more complex option is products with vertical darts. In the sample, the jacket has waist darts formed by decreasing - increasing along the side line and in the middle of the details. The number of loops becomes variable, moreover, the changes affect the center of the canvas. Naturally, the rapport breaks down.
In my case, I didn’t fight it, but made it a design element. Vertical stripes on the hips and waist are replaced by a motley pattern at the waist, imitating a wide belt. Above the “belt” the pattern again reaches a regular rapport. To support the concept, a variegated pattern was also chosen for the sleeves. Also, with a variegated pattern, it is easier to knit the head of the sleeve (I tied the sleeves because I didn’t like the fit).
to photo hosting → to photo hosting →
Please note that the patterns on both shelves and the back are almost the same (only the colorful “belt” at the front is a little wider). And because We make a turn along the edges in the middle of the rapport, then the side seam is completely invisible. Compare with magazine model
to photo hosting →
Further, the product has deep vertical bust darts and \/-neckline. If the decrease in loops in each row is approximately a quarter of the repeat (in my case - 4 loops), then the pattern is not broken, but begins to shift - the stripes become inclined. We also try to make the most of this effect.
Red crosses indicate decreases that form the chest dart
to photo hosting →
Additional adjustments may be required at the edges:
1.increase-decrease 1-2 stitches (the unevenness of the edge will then hide the seam)
2. Pulling out part of the thread until rapport is restored (as in the previously described case with defects).
3. Sometimes you can allow a shift of half a repeat - then in some areas, instead of alternating white and blue, you get two white or two blue rows in a row (this is almost invisible in the drawing).
It is extremely difficult to ensure complete symmetry on both sides of the figured panel. Therefore, we make every effort to maintain a regular pattern in the most noticeable areas. In our case, a flawless neckline is necessary, and slight deviations can be allowed at the armhole line. It is this edge that we use for correction.
We also make a decrease along the armhole line based on the requirements of the pattern along the neckline.
to photo hosting →
As a result, the stripes on the shelves gradually become slanted from vertical, which wonderfully emphasizes the neckline and chest line. You must admit that it is difficult to knit such a pattern simply by alternating several colors of yarn. It would require longitudinal knitting with a complex system of increases and decreases. In the case of using sectionals, these stripes are determined by the yarn’s own print and the model lines of the jacket and arose almost automatically. All it took was an understanding of the “character” of the drawing and reasonable adherence to it.
I hope that my experience will help you in some way!