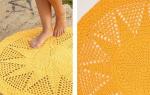
Crocheted chrysanthemum patterns. Knitted flowers and patterns for them. Crochet hat
Thread - begonia, hook 2.1. 1 skein was enough.
I'll try to write how I knitted (from memory)
I knitted a strip around the circumference of my head from loin mesh(4 rows) - in a circle - the bandage turned out like this
Then I attached the thread and knitted the strip on top with fillet. I tried it on my daughter. The holes were large. I tied them with fans, but at the same time adjusted the pattern so that it did not expand, but vice versa
Fields:
When moving to the brim, I knitted 1 row of sc (I always knit 2-3 rows of sc, but here I didn’t knit it and the hat doesn’t fit so tightly to the head - I did this deliberately so that the hat would be looser at sea)
then 3 rows of arches from 5th century. P.
And then fans according to your favorite pattern
Then I tied a double ring of regilina sc, then lobster step.
Hat “Little Lady”
diagram and description of the side part
Diagram of the bottom and crown for exhaust gas 49-50 cm.
My yarn
My connected 13 rows of the bottom:
Up to the 13th row inclusive, we knit the same for all sizes.
* * *
ATTENTION:
When knitting a pattern in those places where we stick the hook into the post, it is advisable to use the “deep” sticking method. The hook must be inserted not under the two upper half-loops of the column, but into the body of the column itself. This method will not allow the pattern to shift when we knit with the crown.
* * *
Starting from the 15th row for all sizes we knit according to the pattern. Repeat rows 15-20 two more times.
They differ from the 15-20th only in the last row. Instead of a dc, I knitted a sc.
We also knit rows 33-38 according to the pattern.
38th row - RLS in each column.
The fields start from the 39th row.
We finish with the CROWN and insert the FIRST regelin equal to the circumference of the head. I made one vein. This is where we complete the work of the RLS. Steam.
We knit the BRIMS of the hat.
In the 39th row we make increases in every 3rd column,
In the 45th row - every 4th, in the 51st - every 5th.
The point is that in each row with increases you need to add 56 CH (7 reports). That is, in the 39th 168/56 =3, in the 45th (168+56)/56=4, etc.
STRENGTHENING FIELDS.
After the last row of fields is knitted, they need to be steamed well.
On a horizontal table surface, the fields should have the shape of a flat circle.
We take the SECOND regilin (TWO veins at once) and tie it with RLS. The length of regilin is not measured in advance!!! They just cut off the excess later.
We straighten the fields well.
Let's steam!
We tie the same row of RLS again. And we tie the last row with a “crawfish step” through the post.
On a plane, the fields should still be shaped like a flat circle.
Once again we steam the fields with an iron through a damp cloth!!!.
To add rigidity, I used SALVITOSE, which is used in felting.
Air dried.
DECORATION.
It must be removable - on a pin or button.
Knitting daisies is very easy.
Dial a chain of 2 v. n. In the first of them, knit 8 half-stitches and close them in a circle in the 1st half-stitch.
When the whole chamomile is ready, tie each of its petals in succession. connecting posts. This will allow them to keep their shape and not curl.
For the centers of the daisies, make small pom-poms using a regular dinner fork.
We wind the thread around the teeth of the fork. Then we tie it with an additional thread in the middle, remove it from the fork and tighten the knot. Then fluff and trim. Sew to the center of the daisy.
Two daisies are small, and one is slightly larger. For it, the scheme is the same, only for the petals we dial not 7, but 9 v. P.
I made a decoration on a button clasp for bags.
We will need a button and a knitted circle - this is what the daisies will be sewn on:
In finished form:
We attach the button to the hat
Scheme (for petals only):
Designations: the sketched dots on the diagram are the loop that is on the hook; the numbers in brackets are the number of loops that we pull from the connected column (to make it easier to count loops)
Blind (connecting) loop
I knit from Soso threads (50g=240m) with a regular hook No. 1.5 (without a handle)
Step by step photo process:
1. We knit 6 single crochets into a sliding loop
tighten the thread and close it in a circle.
2. Grabbing only the back half of the loops, we knit 11 single crochets (1 sc in the first half and 2 sc in the subsequent ones), connecting in a circle.
Half loops of a smaller circle will be needed for the upper petals.
3. We knit arches for the lower petals: cast on 5 air loops (c), skip 3 loops of the circle, fasten to the fourth; repeat 2 more times, fasten the last arch into the loop from which the first arch was knitted.
4. We begin to knit the first lower petal: Cast on 4 stitches. p. If you turn the knitting a little, the back (purl) jumpers will be visible
there is one loop on the hook (shaded dot in the diagram), we pull out one loop at a time from the purl jumpers (4 sticks), we pull the last one out from under the arch (outermost stick)
there should be 6 loops on the hook
5. Close the row: grab the working thread and knit loops in pairs on the hook (grab the working thread and pull it through 2 loops, grab the working thread and pull it through the next 2 loops). We have the first row (connected column)
6. If you turn the knitting a little, the purl jumpers will be visible,
We knit one in. P.; we pull out the loops from the purl jumpers (1 on the hook + 5 from the jumpers + 1 from under the arch = 7 loops).
We close the row in pairs.
7. Next, we begin to cut the loops. In the sixth row, we begin knitting from a blind loop (insert the hook into the first jumper, grab the working thread and pull it through the loop on the hook). from further jumpers we pull out a loop and the last one from under the arch
We close the row in pairs.
To finish the first lower petal, we knit a blind loop into each purl jumper, and one under the arch
We make one blind loop in the next arch and begin to knit the second lower petal in the same way as the first. After you tie all three arches, it will look like this
To move to the upper petals, make 1 in. p insert the hook into half the loop of the small circle and knit a blind loop
On a small circle you need to tie 3 arches from 4 in. p (2 arches for petals and 1 for the core)
8. Dial 5 v. p and knit the first connection. upper petal column
First upper petal:
Two petals
We tie the upper petals with single crochets (I laid them along the contour thin wire to better keep their shape). The lower petals were tied with stbn (without wire). It turned out like this
Sew on beads, you can small beads, and admire
Starching caps
1. Wash the cap in warm water (30-40 degrees). I use bleach to wash my white hats. washing powder, for colored - powder for colored things.
2. Prepare the starch. To do this, pour 2 tablespoons of starch into a bowl and dilute it with 1/2 cup of cold water (to avoid the formation of lumps). Then pour boiling water, about 1 - 1.5 liters, stirring constantly. The mixture should be thick and transparent. Leave to cool.
3. Thoroughly starch the washed hats, squeeze them out (without twisting), removing excess starch.
4. To dry the hats, I use regular inflatable balloons, after inflating them to the desired size.
5. During the drying process, I periodically give the fields the desired shape, fields openwork hats I iron through a layer of fabric.
MORE HATS AND FLOWERS WITH THEM WITH DIAGRAMS
click on the picture to enlarge
Volume flower
Bright volumetric crocheted flower framed with emerald leaves. Knitted flower looks colorful and elegant, will look good as a brooch, decoration for a hat, bag or blouse.
To knit a flower you will need: the remains of red cotton yarn for the flower and emerald for the leaves, hook number 2.5.
Description of knitting flower: Cast on a chain of 7 chains. loops, close it into a ring with a connecting loop and knitfirst row , making 3 air. lifting loops, 15 tbsp. s/n.

In the second row
to start the petals we knit 8 arches from 3 air loops, knit *st. b/n between the columns of the previous row, 3 air. loops, st. b/n through 2 columns of the previous row, repeat from * 8 times. Finish the second row with a connecting loop in the first sc and knit3rd row
petals, knitting from arches st. b/n, 3 tbsp. s/n, art. b/n. Finish the 3rd row with a connecting loop.
In the fourth row knit arches of 4 chain loops for the next row of petals. Secure the arches with single crochets, inserting the hook behind the base of the previous arch.

Fifth row:
knit the second row of petals from arches - st. b/n, half-column, 4 tbsp. s/n, half-column, st. b/n.
Sixth row
: knit arches from 5 air. loops for the next row of petals, fasten st. b/n also for the base of the previous arch.
Seventh row
: knit the petals - art. b/n, half-column, 6 tbsp. s/n, half-column, st. b/n.
Having finished the 7th row, cut, fasten the thread and begin knitting leaves with green thread. For the leaves at the beginning we also knit arches from 8 air stitches. loops, securing them to the bases of the previous arch. Having knitted9th row arches, in the 10th row knit leaves, knitting from arches: art. b/n, half-column, 2 tbsp. s/n, 5 tbsp. s/2n, “pico”, 5 tbsp. s/2n, 2 tbsp. s/n, half-column, st. b/n.

Hat "Oleander Flower" from Victoria


hat diagram No. 1
When I saw this beauty, I immediately decided that I needed to adapt it somewhere


hat diagram No. 2

Beautiful flower from Flowers from "Osinki"

Threads- Bella Batik from Alize.
Description of the flower(In fact, everything is very simple)
Cast on a chain of 5-6 loops, close it in a circle and tie 10-12 dcs, and then in each row you knit 3 dcs in each column, from the 3rd row I alternated - 2 dcs in one loop and 3 dcs (the more columns, the fluffier the flower; the thicker the yarn, the fewer columns are needed and vice versa). Row 4 is just a DC, you can also tie it with a thread of a different tone.
Crocheted flowers with beautiful curling petals are made according to the same knitting principle. Different patterns of knitting the petals result in each flower being beautiful in its own way.
The knitting pattern for these flowers begins with knitting the base of the flower and is approximately the same for everyone.
For example, consider a flower with openwork petals:

To start knitting a flower, cast on a chain of 6 chain stitches and close it into a ring with a connecting stitch.
Then knit 16 or 18 double crochets into the ring according to the flower knitting pattern. Next, you begin to knit the backbone of the flower in the form of a circle, alternating chains of air loops and double crochets. First, cast on the required number of lifting stitches, which corresponds to the height of the double crochets to be knitted. Then *knit a chain of chain stitches according to the pattern and knit a stitch with the required number of yarn overs, inserting the hook through one loop of the previous row, then repeat from *.

So the base of the flower is ready and we begin to knit the petals on it: we tie the 1st row of double crochets with a chain and the next double crochet.

Then we turn the work and tie the 2nd and 3rd row of petals back and forth according to the pattern. Having finished the 3rd row, secure the petal by knitting a connecting post into the next loop of the initial ring, so that the petal does not puff up.

Next, knit the 4th row and the final 5th row with a decorative stitch, alternating between a connecting and an air loop. Finish the decorative binding at the beginning of the next chain, on the wrong side with connecting posts go to the beginning of the chain and begin knitting the next petal.


Thus, knit all the petals according to the chosen pattern.

If you end the last row of petal binding at its top, move to the beginning of the next chain, knitting connecting stitches, inserting the hook into the back half-loop from the wrong side.


If you stopped at the initial ring, proceed to the beginning of knitting the next petal, knitting a double stitch from the wrong side along the edge stitches of the previous rows.


Competition work No. 11 - Hat “Chrysanthemum”
Hello!
My name is Alesya. With the birth of her daughter, creative breathing opened up: she began to sew and knit. At the invitation of a friend, I decided to take part in the competition and present two of my works for my daughter for the summer:
The first work is the Chrysanthemum Hat.
To knit a hat you will need: Begonia threads blue color from Yarnart a little larger than a skein, white - Narcissus, hook 1.5, regilin.

Hat master class presented
scheme 1.

Scheme 2

Field scheme

Description of the flower “Chrysanthemum”
The petals are arranged in tiers.
First, knit a chain of 5 air loops and close it into a ring.
We knit a *double crochet and 2 chain stitches into a ring. Repeat from * 7 more times. We finish the row with a connecting column. We got 8 arches from 2 air loops.
Now in each arch we knit: a chain of 13 chain stitches and down the chain we return to the middle of the flower: in the 4th loop from the hook we knit a single crochet, in the 5th - a half double crochet, in the 6th - a double crochet, then 4 double crochets, 1 double crochet, 1 half double crochet, single crochet and a connecting stitch in an arch.
Bottom row petal:
we knit a chain of 17 chain stitches and down the chain we return to the middle of the flower: in the 4th loop from the hook we knit a single crochet, in the 5th and 6th half double crochet, in the 7th and 8th double crochet , then 4 double crochets, 2 double crochets, 2 half double crochets, a single crochet and a connecting stitch in an arch.
We tie the petals in half-columns.
Now the hat is ready!!!
We invite everyone to take part in the competition “We knit Panama hats and hats for the summer” along with the competition children's drawing. Full terms and conditions competition -
I knit hats professionally.
I like to come up with new models and write descriptions for them.
Knitted hat "Chrysanthemum" is one of my favorite patterns.
But for some reason there is not much interest in her. Probably because the description is publicly available. But the description was made a long time ago, since then I have a little secret: how to make sure that the brim of the hat does not warp, as happened before.
Take a look and notice the difference.

You can see the color combinations for the hat here. http://www.stranamam.ru/album/6088772/
Photo finished works
http://www.stranamam.ru/album/8074321/
I invite everyone to knit my favorite hat about me!
Usually I make sequential descriptions, but since there are many people who want to knit a hat, and everyone’s density is different, I won’t describe them in rows.
You will need:
200g yarn 250 - 300m/100g
Hook No. 4, No. 5, No. 3.
Abbreviations:
V. p. - air loop
Sc - single crochet
CC - connecting post
СС1н - double crochet
SS2n - double crochet stitch
Hats are also used when knitting convex columns without a crochet.
Description:
Size 56.
The hat is knitted from top to bottom.Knit a hat in 2 threads, knit a flower in one thread!!!
The bottom of the hat
Tie with single crochet stitches in a spiral (without closing the circular row with a connecting stitch)
crochet number 4 circle diameter 19 cmfor the bottom of the hat.
Mark the beginning of each round with a marker or contrasting thread.

If your size is larger than 56, increase the diameter of the circle by 0.7 - 1 cm when increasing the size (57 - 20 cm, etc.)
***
If you want the hat to be loose at the top, knit the bottom 1 cm more: 20 cm for size 56, etc. .***
I like this option better.
Link to the tutorial on Knitting a circle for the bottom of a hat in the comments.
Finish the last row of the bottom with a connecting post to close the circular row.
Tulya(flat part of the hat)
Work approximately 7 cm in single crochet stitches in circular rows, ending the circular row.
Start each new row with a 1ch rise and end with a connecting stitch.
***
Knitting the crown in circular rows with the circle closed will eliminate the distortion of the knitted fabric.
The flower is sewn on the seam formed when closing the circular row, so you don’t have to worry about your seam not looking perfect.***
Crochet single crochet in circular rows with row closure. Smooth seam. http://shapkidesign.ru/blog.php?user=olga9172&blogentry_id=1363
Try on a hat. The last (bottom) row should be approximately 2 cm below the top of the ear. Cut the thread.
Determine a place for the flower. The flower is supposed to be made on the side; it will cover the seam formed during the transition to a new row.
Mark the middle of the back of the hat - this will be the beginning of the next round.
Attach the thread to the marked place.
Continue knitting in circular rows, closing the row with a connecting stitch.
Knit 3 rows with convex sc.crochet number 3.
4 rows with convex sccrochet number 4.
4 rows with convex sccrochet number 5.
Convex single crochet.
Insert the hook from right to left under the leg of the next column of the previous row from the front side, yarn over the hook and pull the thread from left to right under the leg of the column, knit 2 loops on the hook.
Along the edge of the hat front side tie a row of connecting posts with crochet number 5.
Tie a row with connecting posts along the line between the last row of sc and the first row of convex posts.
Flower
The flower consists of 4 parts, which are knitted separately, then overlapped and sewn into the hat.
I knit hats professionally.
I like to come up with new models and write descriptions for them.
Knitted hat "Chrysanthemum" is one of my favorite patterns.
But for some reason there is not much interest in her. Probably because the description is publicly available. But the description was made a long time ago, since then I have a little secret: how to make sure that the brim of the hat does not warp, as happened before.
Take a look and notice the difference.
I invite everyone to knit my favorite hat about me!
Usually I make sequential descriptions, but since there are many people who want to knit a hat, and everyone’s density is different, I won’t describe them in rows.
You will need:
200g yarn 250 - 300m/100g
Hook No. 4, No. 5, No. 3.
Abbreviations:
V. p. - air loop
Sc – single crochet
CC – connecting post
СС1н - double crochet
SS2n - double crochet stitch
Also, when knitting a hat, convex single crochets are used.
Description:
Size 56.
The hat is knitted from top to bottom. Knit a hat in 2 threads, knit a flower in one thread!!!
The bottom of the hat
Tie with single crochet stitches in a spiral (without closing the circular row with a connecting stitch)
crochet number 4 circle diameter 19 cm for the bottom of the hat.
Mark the beginning of each round with a marker or contrasting thread.
If your size is larger than 56, increase the diameter of the circle by 0.7 - 1 cm when increasing the size (57 - 20 cm, etc.)
*** If you want the hat to be loose at the top, knit the bottom 1 cm more: 20 cm for size 56, etc. .*** I like this option better.
Finish the last row of the bottom with a connecting post to close the circular row.
Tulya(flat part of the hat)
Work approximately 7 cm in single crochet stitches in circular rows, ending the circular row.
Start each new row with a 1ch rise and end with a connecting column.
***
Knitting the crown in circular rows with the circle closed will eliminate the distortion of the knitted fabric.
The flower is sewn on the seam formed when closing the circular row, so you don’t have to worry about your seam not looking perfect. ***
Crochet single crochet in circular rows with row closure. Smooth seam. http://shapkidesign.ru/blog.php?user=olga9172&blogentry_id=1363
Try on a hat. The last (bottom) row should be approximately 2 cm below the top of the ear. Cut the thread.
Determine a place for the flower. The flower is supposed to be made on the side; it will cover the seam formed during the transition to a new row.
Mark the middle of the back of the hat - this will be the beginning of the next round.
Attach the thread to the marked place.
Continue knitting in circular rows, closing the row with a connecting stitch.
Knit 3 rows with convex sc. crochet number 3.
4 rows with convex sc crochet number 4.
4 rows with convex sc crochet number 5.
Convex single crochet.
Insert the hook from right to left under the leg of the next column of the previous row from the front side, yarn over the hook and pull the thread from left to right under the leg of the column, knit 2 loops on the hook.
Along the edge of the hat on the front side, tie a row of connecting posts with a No. 5 crochet hook.
Tie a row with connecting posts along the line between the last row of sc and the first row of convex posts.
Flower
The flower consists of 4 parts, which are knitted separately, then overlapped and sewn into the hat.