Do-it-yourself New Year's topiary on. Do-it-yourself New Year's topiary: a decorative tree that will decorate the winter holidays
New Year's topiaries are an excellent element in a festive interior. To celebrate the New Year 2019, you can make some charming mini-trees with your own hands. It will not take much time, and the result will please the eye for a very long time. Below are a few the best options New Year's topiary for 2019 with their own hands. According to the instructions and step by step master classes you can duplicate the products or use them as a basis for creating your own version of the decoration.
classic herringbone
Materials:
- base: small flower pot (or decorative bucket), gypsum (cement or polyurethane foam);
- trunk: pencil, or wooden sticks, or “Chinese stick”, or cylindrical from ice cream, or a branch (it is desirable that the diameter be at least 5 mm);
- crown: a foam cone (you can buy it at a decor store or make it yourself by cutting it out of a foam plastic cuboid), or from thick paper;
- decor: New Year's tinsel, small balls (you can use different colors), cotton wool;
- for fastening: adhesive tape (regular and double-sided), super glue (or glue gun), twine (any other thick thread).

Step by step master class:
- For the future crown, a ready-made foam or paper cone is used. To make a paper crown, you need to take cardboard and draw contours on it.
You can print a template, or put a compass in the corner of the sheet and draw an arc. If there is no compass, use a pen with a thread tied to it. The free end of the thread is held at the point of the corner, the handle is pulled to the required length of the cone and an arc is drawn. The resulting cone is cut out and glued with adhesive tape along and across the connecting seam.
- In order to get the barrel, you need to take a flat stick or pencil. If the sticks are thin, then they are tied together to obtain a trunk of the desired thickness. The trunk can be covered with paint or wrapped with twine or thread. It is not necessary to paint or wrap the entire barrel, just the part that will be visible is enough.

- The trunk is fixed in the base (flower pot) in a special hole that is designed for water, using super glue. If there is no hole, then you can put a small piece of plasticine on the bottom and stick it into its trunk. To fix the base well, gypsum (cement or polyurethane foam) is poured into the pot.
Important! When working with mounting foam, it must be borne in mind that it will increase in size.
- While the base dries, it is necessary to make the bottom of the crown. To do this, the base of the cone is circled and the resulting circle is cut out. You can use green cardboard. In its center it is necessary to make a hole for the trunk. The base is glued to the cone with adhesive tape.
- The crown is placed on the trunk.

- Next, decorate the resulting Christmas tree. First you need to glue the balls with super glue or tape, evenly distributing them over the crown. It is better to use double-sided tape for this. With its help, tinsel is also glued: a piece of double-sided tape is placed on the top of the cone and the edge of the tinsel is glued to it. Then they wrap the entire trunk with it, fixing it on double-sided tape.
- The pot can also be wrapped with tinsel around the circumference, fixing it with double-sided tape.
- To decorate the base, cotton wool is placed in the middle of the pot. You can use grain, or sawdust, etc.

- Additionally, the Christmas tree is decorated with a small star at the top, beads, and small gifts can be placed under the crown.
fruit topiary
New Year's topiary can be not only part of the interior, but also decorate festive table. To celebrate the New Year 2019, you can make a topiary dessert or.
Materials:
- base: a flat small plate and a large apple;
- trunk: long carrot;
- decor: kiwi, grapes, strawberries, carambola (has an asterisk in the cut), orange and any other fruits, parsley or fresh mint leaves;
- toothpicks are used to connect the decor.

Performance:
- The bottom of the apple is cut off so that its base becomes flat and stable.
- In the upper part, a recess is made that matches the diameter of the base of the carrot. A "barrel" is inserted into it.
- Toothpicks (they should not be too long, so they can be broken) are evenly and densely stuck into the apple base and carrots.
- Next, fruits are strung on them. The voids and the bottom of the "Christmas tree" are decorated with greenery.
Topiary from tangerine
Another delicious New Year's topiary with which you can celebrate the New Year 2019.
Materials:
- base: flower pot, gypsum (mounting foam, cement);
- trunk: branch;
- crown: foam ball or round floral sponge;
- decor: small tangerines, green sisal;
- connection: PVA glue, toothpicks or skewers.

Step by step:
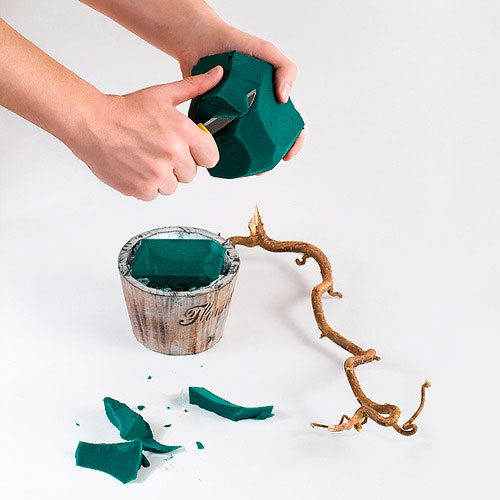
- Fix the branch in a pot with plasticine or a small piece of floral sponge. Filled with gypsum (mounting foam, cement).
- A floral sponge or foam ball is glued to the branch.
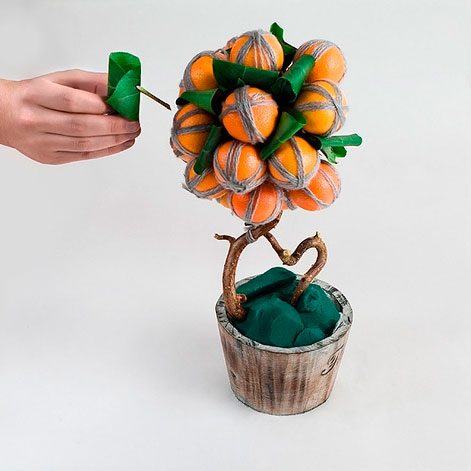
- Tangerines are attached to the ball with toothpicks or skewers. Fruits should be small in size so that they are securely fastened and do not fall.
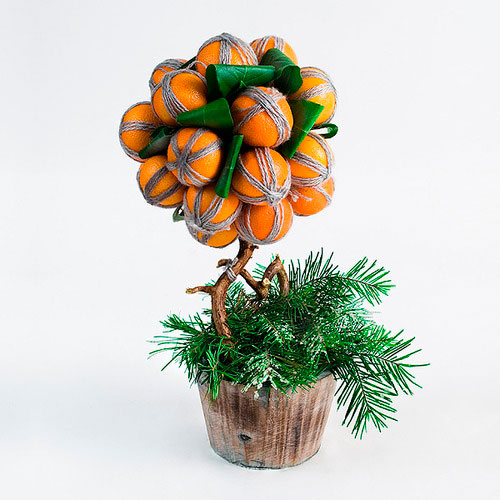
- The gaps between the tangerines and the base of the pot are decorated with green sisal. You can also use corrugated paper cut into strips.
Candy topiary
The principle is the same as in the previous version of the topiary, only marmalade is used as decoration. Children like these very much.
Materials:
- base: foam ball or cone;
- decor: marmalade sweets (it is better to use red, green and white for the New Year tree);
- fastening: toothpicks or skewers.

How to do:
The implementation of such a topiary is quite simple: marmalades are alternately pricked onto the base with the help of skewers or toothpicks. The length of the skewers can be adjusted with scissors or wire cutters.
A child will like to make such a tree very much. It is only necessary to stock up on a sufficient amount of marmalade, since in the process of creating a masterpiece, most of them can be eaten.
Pebble Topiary
Materials:
- base: flower pot, gypsum (cement or polyurethane foam);
- stem: stick;
- crown: foam cone;
- decor: pebbles (or large oval beads), paper napkins with a pattern in green tones, seeds (seeds, flax, grain, ready-made mixture for birds), twine or twine;

Master Class:
- In a pot, fix the trunk with plaster. You can additionally decorate the pot with a twine bow.
- Glue the cone to the barrel with PVA glue or a glue gun.
- Cut out circles from napkins and wrap pebbles or beads around them. Napkins are well glued with PVA glue.
- Glue the stones to the conical crown (it is more convenient to use a glue gun here).
- Wrap the resulting Christmas tree with twine or twine smeared with glue.
- Pour the grain into the pot. So that it does not get enough sleep, PVA is first poured into it.
Ball topiary
Materials:
- base: decorative bucket or flower pot;
- crown: foam or foam ball, or round floral sponge;
- decor: small plastic, twigs artificial christmas tree or tinsel, decorated tape, snowflake stickers or stencils for snowflakes and White paint, silver paint;
- connection: PVA glue or glue gun.

Performance:
- Repaint a flower pot or bucket in silver.
- After the paint dries, stick snowflakes on it or paint them in white.
- Glue the sides of the pot or bucket with decorated tape.
- Glue the ball to the base.
- Pull out the fasteners from the New Year's balls and glue the balls to the ball.
- Decorate the gaps between the balls with tinsel or Christmas trees.
How to make a New Year's topiary 2019 with your own hands: video master class
The composition with the unusual name "topiary" is attracting more and more attention of needlewomen and interior designers. The miracle tree is a small craft in a pot topped with a decorative crown. For the design of topiaries, the most unexpected materials and bright colors are used. color solutions. This gives the "European trees" the appearance of fabulous alien plants. Learn all about New Year's topiary and stock up on a couple of fresh ideas!
History of the tree of happiness
Although topiary appeared in our homes recently, their history dates back several thousand years. The art of curly haircut (topiary) of trees appeared in Ancient Rome, and reached its peak in the 16-17th century. The parks of the then monarchs and aristocrats were labyrinths of plants of the most bizarre forms - from balls and cones to figures of animals and people.
Examples of exquisite flower topiary
Today the word "topiary" means decorative composition size from 15 to 50 centimeters. Why is the craft called the tree of happiness? This is the merit of a teaching that is popular among Europeans. According to him, the tree in the house - no matter artificial or living - is a talisman for the whole family. The roots of the plant absorb negative energy Sha, and the spherical crown radiates positive Qi energy.
Be that as it may, the topiary is a stylish and non-standard piece of furniture. An artificial tree can easily replace ordinary flowerpots and help create an atmosphere of comfort and joy in the house. And the most interesting: topiary can be easily made with your own hands. For example, in honor of You may not be able to create a complex multi-layered composition the first time. But even a beginner can make a small topiary.
Topiary components
Despite the variety of topiary, they are all made according to the same principle. The tree consists of several parts fastened together with glue.
 Topiary crown can be assembled from anything - from grains to coins!
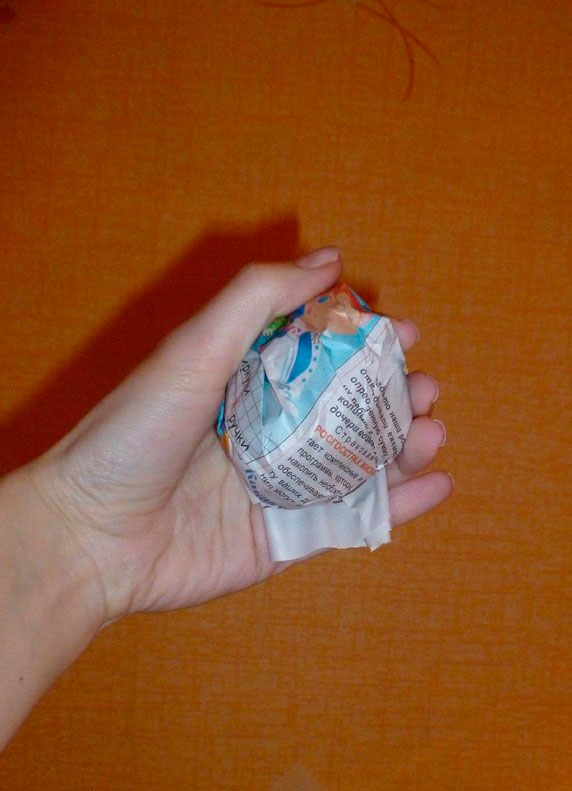
 - The foundation. This is the "crown" of our tree. Most often it has a round shape, but there are bases in the form of a cone, heart, number or letter. The basis can be a foam blank purchased in advance at a needlewomen store, or porous floral foam. The top of the tree of happiness can be made with your own hands. To do this, crumple several sheets of newspaper into a ball, wrap it in another page and wrap it with thread or tape. Then wrap the ball with padding polyester - and the job is done.
- Trunk. As a rule, a tree branch coated with varnish or stain is used in this capacity. The trunk can be a cardboard tube, a piece of thick wire, a set of wooden sticks or twigs tightly tied together. A pencil is also suitable for a miniature topiary. An unpretentious trunk can be decorated beautiful ribbon or twine.
- Crown. This is the highlight of our topiary. Almost everything is suitable for its creation: shells, artificial flowers, shiny coins, as well as ribbons, pebbles and sparkles. You can even meet topiary from banknotes and sweets! And decor elements such as cinnamon sticks, coffee beans or orange slices, you can easily find in your kitchen.
- Stand. Mostly it is a flower pot, a sturdy box or a nicely decorated jar. The container can be decorated with an elegant fabric or wrapped with colored thread. The stand should be filled with material to which the trunk with the crown will be attached. A solution of sand and alabaster is best suited for this role. On top, you can put a handful of artificial grass or moss, or sprinkle with "snow" - white sea salt.
Christmas tree of happiness
Topiary is a great gift for any occasion. Crafts for Valentine's Day are unthinkable without hearts and bows, and paper flowers will be appropriate on the topiary in honor. Well, the New Year's tree of happiness should be decorated with coniferous branches or sisal, cones, tinsel - everything that reminds you of your favorite winter holiday.
 Fancy New Year's topiary from tulle and Christmas decorations
Worth paying attention to color scheme products. It is advisable not to use more than 3-4 colors in one topiary. Classic New Year's combinations are duets of red and green, blue and silver or gold. Since the year is coming, scarlet tones will be in use. We have put together a few ideas that will help you decide on the decor of the topiary.
evergreen topiary
 Boxwood topiary is useful to you at any time of the year
 A real mini-Christmas tree can be built from boxwood twigs or artificial leaves of another plant. You will also need decorative flowers, moss, twigs and wire for the trunk, a foam ball, gravel and a pretty coaster. Insert artificial branches into the base so that there are no gaps between them.
 Step by step manufacturing topiary from living plants
 Fasten the twigs with wire. Make a hole in the base and place the “trunk” there. Insert the tree into the stand, pour gravel around and mask it with moss. Decorate the crown with artificial flowers or bows. Such a "herringbone" will not need to be thrown away after the holidays, because it can please the eye all year round!
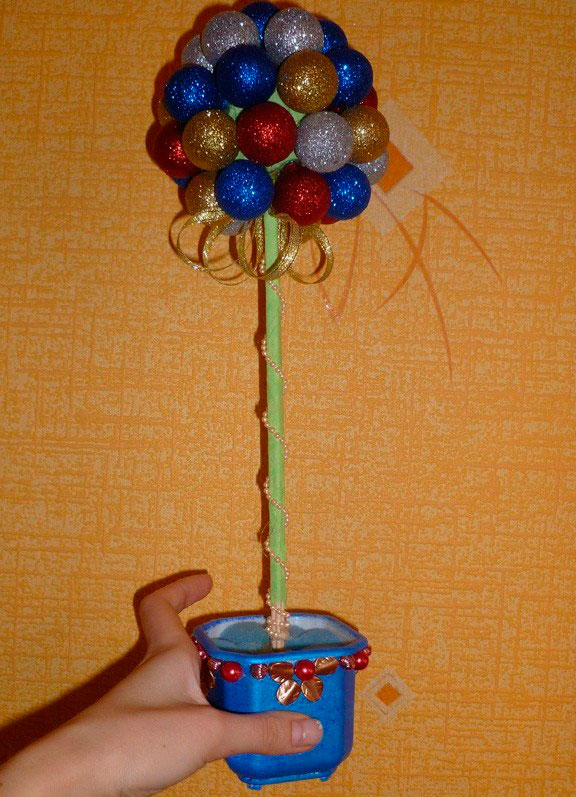
Topiary from Christmas balls
 Stylish New Year's topiary in
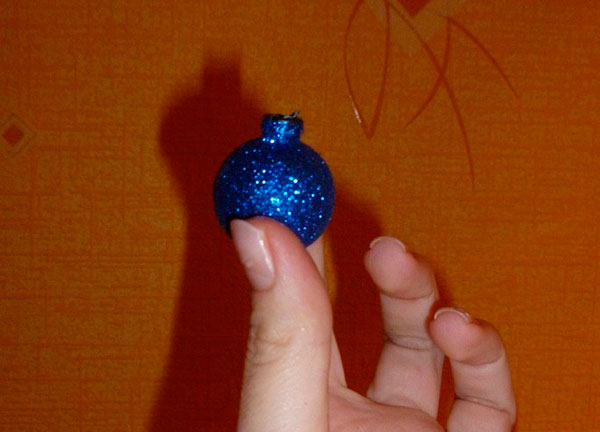
 Is there a box of old toys gathering dust on the mezzanine? It's time to give them new life! Find a suitable material for the "trunk" of the tree and cover it with white or silver paint. Connect with a round base. Select Christmas balls of several colors and unhook the hanging mounts from them. Lubricate the "neck" of the toy with glue and attach to the base.
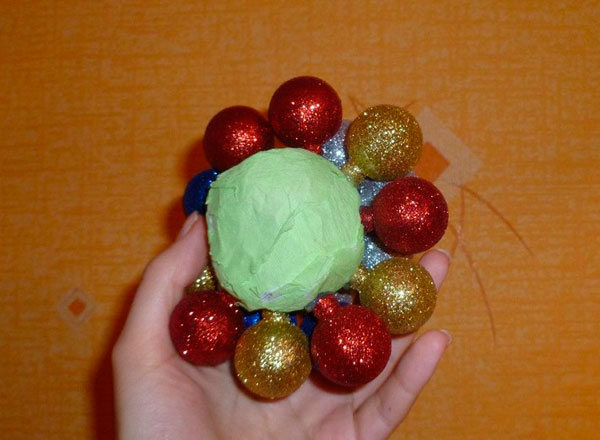
Arrange the balls in diagonal rows starting from the center. Alternate stripes different colors, as shown in the photo, or decorations in larger and smaller sizes. Decorate the stand in the style of a Santa costume. Paint the pot red and draw a black belt in the middle. Place a piece of plasticine or some kind of bulk material inside, insert the topiary and decorate the stand with a “snowball” of cotton wool.
Candy Topiary
 Examples of festive topiary from candies of various shapes
 New Year– the best time to arrange yourself! And in the literal sense. From the topiary in the form of a huge candy, the sweet tooth will be delighted. In addition to the main components of the tree (base ball, trunk and stand), you will need an elegant colored ribbon, 200-300 grams of brightly colored candies, a sheet of green paper and a bag of sparkles.
 Step-by-step instruction for making candy topiary
 Put a piece of floral foam in the tree stand. Close it with a green sheet of the appropriate size, and sprinkle glitter on top. Tape over the ball and put it on the "trunk". Preferably a tube white color- so the topiary will look more like a lollipop. Then lay out the circles of sweets, lubricating them with glue and applying to the foam. A cute bow will complete the craft.
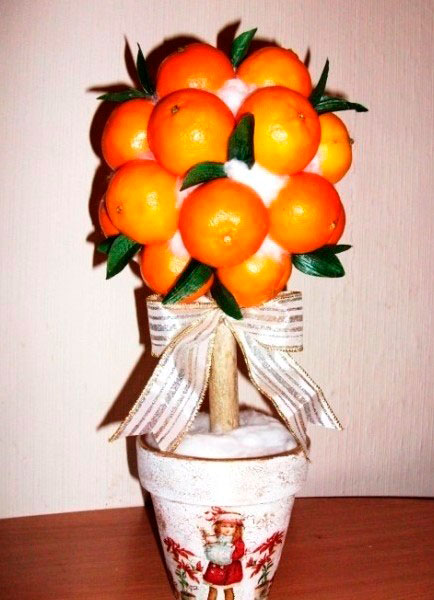
 Spectacular topiary from the most New Year's fruit
 What is the New Year without fragrant citrus fruits? But they can decorate not only the festive table, but also unusual craft. To create it, you do not need a base of foam or paper. It is enough to stock up on the following materials:
- 8-10 tangerines
- linen rope
- stand
- tree branch
- spruce needles
- foam or foam
- wire or invisible hair
- artificial snow
 Step-by-step instructions for making topiary with tangerines
 Wrap the fruit with a rope crosswise. Attach wire to them. Apply glue to the spruce branches and dip in a bowl of artificial snow. Give the foam a shape so that it fits into the stand. Fix the "trunk" of the tree in the foam. Carefully attach fruits to it, decorate them with green ribbons. Put spruce branches in the stand. A beautiful and fragrant decoration is ready!
 A decorative coin tree will bring good luck to your home!
 The money tree is a great talisman gift. To create it, you will need new shiny coins, a golden ribbon, rhinestones, hot melt adhesive. Various decorative little things like openwork leaves and golden beads will come in handy. Let's not forget about the main components of the topiary: the base ball, the stem from the branch, the pot (you can use a glass) and its fillers.
 Creating a topiary crown from a foam base and coins
 First step: make a balloon and cover it with coins using hot glue. Lay out the first three pennies as shown in the picture. Place the second row at a slight angle so that the coins “step” a little on their predecessors. Thus, glue the entire ball. The last coins are the hardest to attach, so please be patient beforehand.
Master Class. DIY interior decoration for the New Year
Christmas tree - do-it-yourself topiary
Tsybanova Galina Anatolyevna, Lecturer, Tver Trade and Economic CollegePurpose: I like to decorate my study room for the New Year.
But in the computer class, every square centimeter is occupied, so a small Christmas tree-topiary will come in handy. It is not a shame to give such a tree, you can even put it on the festive table.
Target:
- develop creative abilities
- cultivate imagination and fantasy
Hello, New Year's holiday,
Christmas tree and winter holiday!
All my friends today
We'll invite you to the Christmas tree.
Shine, Christmas tree lights,
Call us for a holiday!
Fulfill all desires
Make all your dreams come true!
For work we need:
1. Materials for the Christmas tree itself:A sheet of thick A4 paper (I use drawing paper)
Aluminum wire 40 cm long
Styrofoam 8x8 cm
Lining fabric 10x10 cm
Green thick threads for the Christmas tree itself and brown for the trunk
PVA glue
Glue "Moment"
Two types of sequins
Christmas tree beads 50 cm
Braid for the bottom 30 cm
Ribbon for bows 30 cm
2. Materials for the pot:
A plastic cup
Building plaster
Burlap 20x8 cm
Lining fabric 8x8 cm
Sintepon 8x8 cm
Ribbon for decoration 20 cm (2 pcs)
Candy wrappers (for "gifts")
3.Tools:
Scissors
Ruler
Pen (or pencil)
pliers

Christmas tree making process:
1. Fold the "bag" from a sheet of paper, adjust its width along the bottom.
Coat the edges of the paper with PVA glue and press firmly.
2. Attach a ruler to the top of the cone and measure it in the shortest part
(this is the maximum possible height of the Christmas tree). Then, holding one end of the ruler
and gradually turning the cone, make marks of the same length along the entire lower part.

3. Cut off excess paper with scissors. The base of the tree is ready.

4. Put the cone on a piece of foam, circle the circle and carefully cut out the bottom.

5. Prepare the “trunk”: wrap a piece of wire on one side with brown thread
about 1/4 of its length. (I did not do it right away, so I experienced inconvenience)
6. With the upper part of the “trunk”, pierce the center of the foam circle and insert it
into a cone so that it protrudes 7-10 cm above the top and bend it with pliers.

7. Lubricate the bottom on the sides with PVA glue and insert into the lower part of the paper cone.
You can additionally stuff crumpled paper (newspaper) inside the cone so that the cone itself
did not deform during subsequent manipulations.
8. Make a hole in a piece of lining fabric 10x10 cm, put it on a wire
from below and carefully glue with PVA glue to the bottom, covering the entire foam.
For insurance, you can wrap the edges of the fabric along the bottom of the cone with several turns of thread.
I wrapped the entire cone with a thin thread lubricated with PVA glue for a better subsequent
adhesion to the main thread.

9. Fasten the green thread at the base of the cone, grease the cone
about 2 cm with PVA glue and wrap tightly with thread so that there are no gaps.
Then grease and wrap the next 2 cm, etc.
I did it in such a way that it was more convenient to hold the product and not get my hands dirty.

Here it is done...

10. The turn has come to the pot. Prepare the required container:
if the pot is small, the tree may collapse, and if it is too large, it will be ugly.
I cut off the yogurt cup.

The bottom was covered lining fabric 8x8 cm, glued on PVA.
The sides were pasted over with burlap. The excess burlap was folded inside the pot.

11. Then you need to prepare a solution of gypsum, diluting it with water to a pasty state.
Here I cheated a little: I added a handful of river sand to the finished solution - and I saved gypsum, and the solution turned out to be heavier, which means that the stability of the future product is better.

The pot must be filled with gypsum mortar almost to the top.
12. It's time to insert the base of the tree trunk and the center of the pot and tamp the mortar around it.
You can use the blunt end of the pencil, after wrapping it in cellophane.
The solution will "settle" and there will be a place for "snow". Now we need to leave our product for a couple of hours or until the next day, so that the solution hardens properly.
I had to put the Christmas tree "in the corner" for preservation.
Here I was so carried away that I forgot about the camera
13. Decorate the pot. The junction of the burlap can be sealed with tape.
Lay a synthetic winterizer around the trunk.
Glue the braid with Moment glue on top of the pot and around the base.
Attach bows and sequins if desired.
Under the Christmas tree - "gifts" of candy wrappers (there are also candy wrappers inside).

14. The final stage: decorating the Christmas tree itself. Attach tape first
along the bottom of the cone to further secure the threads and cover up possible flaws.
Then Christmas tree beads, individual beads, sequins, bows - and everything is glued "Moment"
(PVA dries for a long time).
Here is our beauty with her friends from "grass" and "swan's down"

And two more babies are born :)

And she herself has already taken pride of place in the computer class and reminds my students that the New Year is coming soon and it's time to take tests

P.S. Thank you for your attention.
This is my first masterclass. Lots of work, lots of ideas.
I already see my mistakes and lack of photos, I promise to improve
Almost everyone wants to do something with their own hands for the holiday. And if until now you have not practiced making topiary, it's time to start. The Christmas tree is traditionally made in the form of a Christmas tree. But from what the Christmas tree itself will be made, the master class (MK) will tell you.
Lovers of such a fragrant drink as coffee will definitely like such a gift. But just a coffee topiary is too banal, let it be a coffee ... Christmas tree!

To make it yourself, you will need:
- Grain coffee (about 200 grams);
- Cardboard cone and cardboard circle;
- Stick (pencil or skewer);
- Glue moment;
- Double-sided tape;
- Gypsum;
- Plastic cup for stand;
- jute twine;
- Sackcloth;
- Ribbons and beads.
The first thing you will do with your own hands according to this MK is to prepare the barrel. Take either a pencil or a skewer, wrap it with twine. After that ready cardboard cone put on this trunk. This master class also offers such a solution - you can weave pigtails from twine, tie a thread to the pigtail in the middle, thread it from above into a cone and fix it on a skewer.

Then fill the inside of the cone with napkins so that it is not hollow. This master class suggests taking napkins as a simple option, but it can be anything - cotton wool, fabric, etc.
Glue the cardboard circle on the bottom with adhesive tape. The basis for the Christmas tree made of coffee is ready. Make sure it is strong enough, because the next step is to form the crown.
Topiary coffee tree: decor master class
Glue the grains alternately, tightly to each other.
The master class continues as follows:
- The first layer of coffee beans dries for about half an hour, and only after this time you can stick the second one.
- The crown is ready, now it, or rather a tree, needs to be planted somewhere, in some kind of pot. It can also be made by hand. Take a simple a plastic cup, pour plaster there, and put a Christmas tree in it. Make sure it is firmly in the pot.
- Now, following the MK, the pot needs to be decorated, it should also be in a smart way. You can do this like this: wrap a cup with burlap, weave another pigtail out of twine with your own hands and wrap the pot around it.
- You can also easily make a bow out of twine, in the middle of which you can decorate with a bead of coffee. Such bows can also be at the ends of the pigtail, which you brought out through the cone, as a Christmas tree decoration.

The main part is ready, and now you can improve this universal master class. For example, the top layer in a pot to close the plaster, sketch fir cones. Or dye the same coffee beans golden acrylic paint. Such a Christmas tree in the form of a coffee tree will definitely surprise your friends and relatives.
Topiary Christmas tree made of coffee (video master class)
Topiary Christmas tree made of threads: original do-it-yourself decor
A Christmas tree made of threads is already, in its own way, a classic of the genre. There are many MKs that describe the process of creating such a tree. This may not be the most traditional topiary, since there is no habitually high trunk, the pot can simply serve as a stand, etc.

Master class - Christmas tree made of threads:
- Ideal if you have a foam cone. It will be the best base, and you will not worry if the topiary is durable. But if there is no such blank, you can make something similar with your own hands.
- Make a simple cone out of cardboard or any other dense material. A papier-mâché blank is also suitable, although you will have to tinker with these.
- Almost no MK “takes” to paint a foam plastic cone, while the other cone, the same cardboard one, needs to be painted to match the color of the threads (so that everything is in the same form).
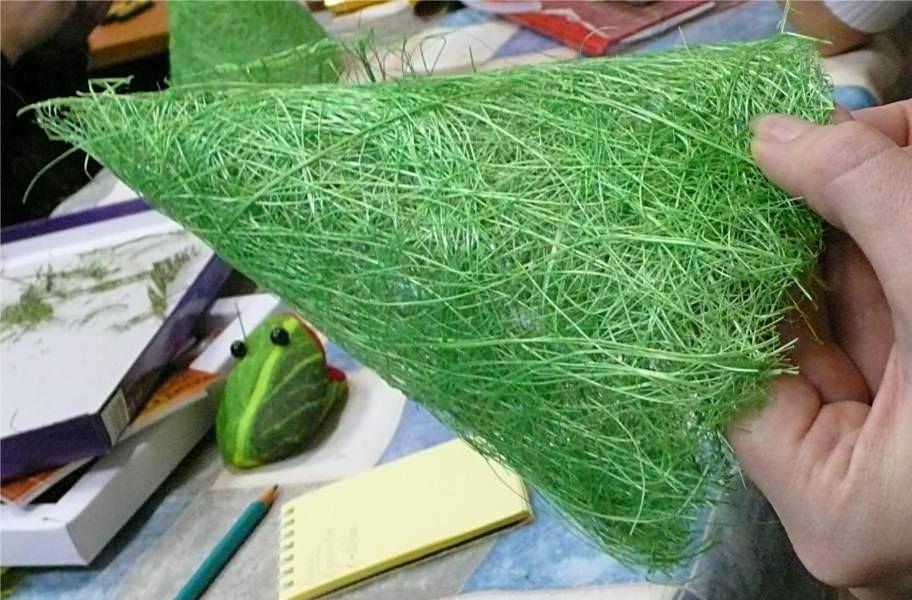
- The cone needs to be wrapped with thread. Decide for yourself which threads to take - heterogeneous ones are better, for example, white-green, fluffy.
- Fix the ends of the threads with glue. So that they do not “run away” during the work process, they can be fixed to the base with pins. The winding goes in the "bottom-up" direction.
- When the entire cone is wrapped, fasten the threads again with pins. To make the spruce fluffy, and nothing peeps out from under the threads, wind the threads with one more layer.

Now the topiary spruce can be decorated. Decorative berries, beads, rhinestones, buttons - in the process of work it will become clear what is useful.
Topiary Christmas tree made of threads (video master class)
Do-it-yourself topiary Christmas tree: final design
It's time to make this Christmas tree look like a traditional topiary. This means he must have a trunk and a pot.
Use a wine cork as a stem. There are MKs that offer to simply paint the cork, you can wrap it with thread or twine. In a word, make such a transformation of the cork with your own hands so that it looks like a trunk.
Next, the master class suggests gluing the cork-barrel to the cone. A thermal gun will come in handy. Well, it remains only to choose a pot. You can do this: wrap a regular plastic cup with sisal. Sisal has a pleasant texture, you can also choose any color. And then the master class depends on you: ribbons, lace, twine, mini-Christmas balls, tinsel ... You can decorate the pot with your own hands in the way that suits your spruce, which should blend harmoniously into your interior.

Here are some more ideas from different MKs:
- Such a spruce also requires gifts at its foot! A small case with an elegant decoration - here the best master class presenting gifts for the New Year.
- Some MKs offer to combine the same threads and sweets, or threads and coins as the top layer of the pot, so that financial success does not bypass you in the new year;
MK with spruce is also popular, the top of which is slightly twisted; an aluminum cable will help to create such a bend.
Making a Christmas tree topiary (video master class)
Such a tree will not only become a decoration of the house. You can create something similar as a craft in Kindergarten your child will definitely be happy! And it will take only one evening to complete not the most difficult task.
Christmas tree topiary for the New Year - design


The latest fashionable gift trend is the tree of happiness. This is a winning option for most holidays. The New Year is no exception, when such a gift is more than appropriate.
Tools and materials Time: 3 hours Difficulty: 4/10
- flower pot;
- alabaster or plaster;
- stick or unnecessary pencil;
- base ball;
- decorative details for decoration;
- glue gun.

The tree of happiness is also called topiary, so our Christmas tree happiness can still be considered a New Year's topiary.
You will need:
- massive flower pot;
- foam rubber;
- small Christmas decorations;
- large and small beads;
- double-sided tape;
- glue gun;
- sweets, preferably round;
- food film;
- crepe paper;
- newspaper;
- mesh is shiny;
- toothpicks;
- barbecue skewers;
- primer base, varnish and acrylic paint.
How to make New Year's topiary:
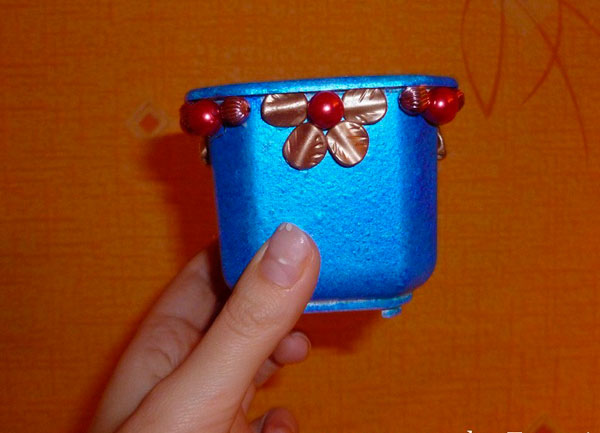
We apply a primer to the flower pot, and after it is completely dry, paint. Then dry and varnish. Everything, our pot is ready.

We lay out the ornament from the beads, fix it with a glue gun.
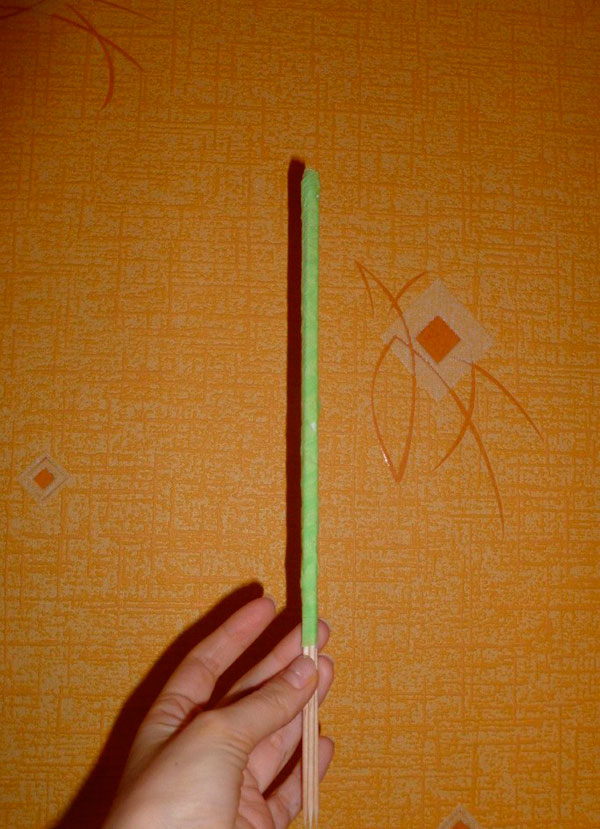
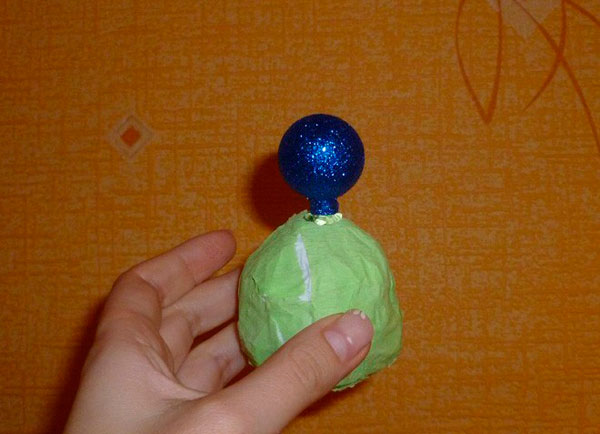
We take 5-6 skewers wrapped with double-sided tape, and on top with green paper for the barrel.

We make the base - a ball from a newspaper, you can take a ready-made ball, for example, plastic or foam. Then it must be glued with tape and wrapped well with paper.


Carefully cut off the tops of Christmas toys, attach decorations with a glue gun, evenly distributing over the surface of the ball.

Fill the pot with foam rubber.


We put the trunk in foam rubber. We fix the thread with beads along the entire length of the trunk with a glue gun.

We install a ball with toys on the barrel, carefully fix it with glue. We decorate the junction of the ball and the barrel with ribbons.
We fill all the gaps that remain on the ball with large beads, fixing them with glue.

Now you need to decorate the foam rubber. For this purpose, we take sweets, insert toothpicks into them and wrap them with cling film, fixing it with tape.

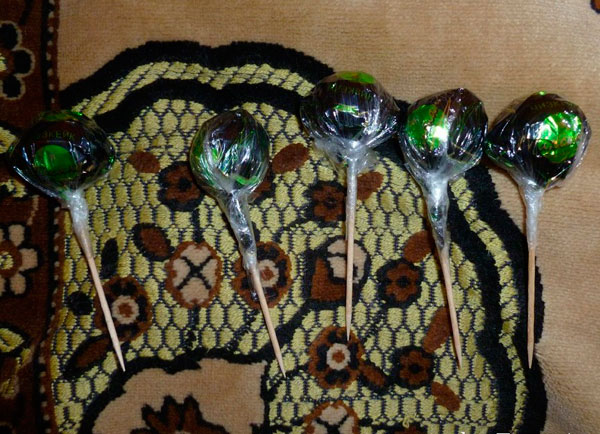
We cut out squares from the grid, attach them with adhesive tape to the blanks that we insert into the foam rubber.


Our New Year tree of happiness is ready!

Christmas topiary
Tools and materials:
- stick for the trunk;
- screwdriver or drill;
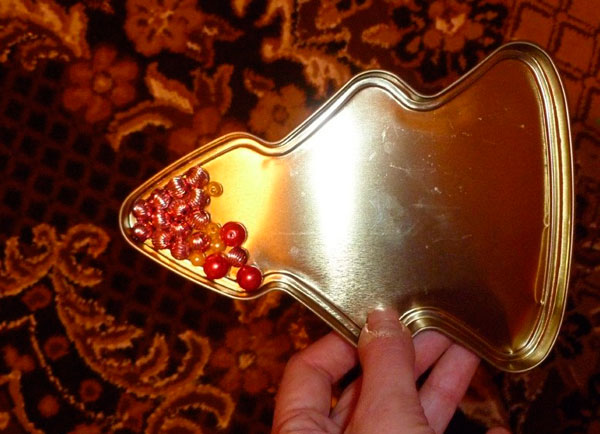
- beautiful tin box;
- spruce branches;
- glue gun;
- gypsum;
- PVA glue;
- gold paint;
- beads.
How to make a tree of happiness
We paint the stick in gold color. As soon as it dries, we make holes. The distance between them should be 1 cm.

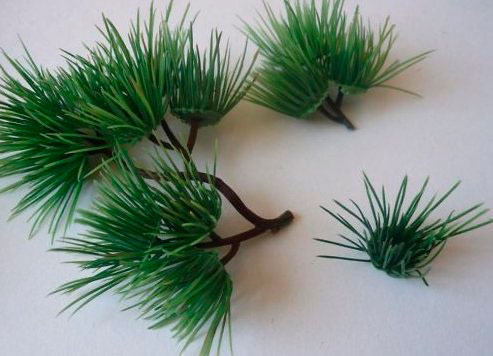
We fasten small spruce branches with glue to the trunk, inserting them into the holes.

We put the tree in a box. After that, you need to plaster well.
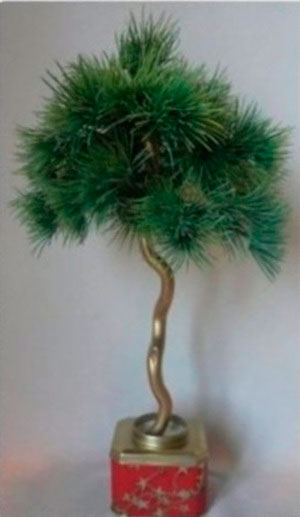
Let dry for 2-3 days. After that, we cover the gypsum with PVA glue, and on top we make one layer of beads. After it dries, make another layer of glue and pour another layer of beads.

We decorate green branches with golden cones and, of course, multi-colored balls. Everything, our Christmas tree topiary is ready!

tree of tangerines
Materials:

- tangerines;
- laurel and spruce branches;
- stick for the trunk;
- white beads;
- wire;
- threads;
- pot;
- flower sponge.
How to make a tangerine tree
We make a ball from a sponge and fill the pot with it.
Cut the wire into 10 cm pieces. We wrap the tangerines with threads.

Lubricate spruce branches with glue and sprinkle with white beads.

We put the bottom of the stick in a pot, and put a sponge ball on top. We stick a wire with tangerines into it. And between them - laurel leaves, folding them in half. We decorate the bottom with sprigs of spruce.
Basically, tangerine tree ready.
Alternatively, instead of laurel leaves, you can take multi-colored rain, cotton wool or serpentine.

May the process of making Christmas trees bring you pleasure, and the fruits of your labor bring you happiness in the New Year!
You can also see how the New Year tree of happiness is made in the bonus video.