Introduction to Hardanger embroidery - basic techniques. Norwegian Hardanger embroidery technique for beginners Embroidery in Hardanger style patterns
Hardanger embroidery attracts the attention of others with its lightness and airiness. Despite this, embroidering products in the Hardanger style is very simple - even novice needleworkers can learn this.
Hardanger embroidery - the basics of creativity
Interesting name for handicraft " hardanger"came from the Norwegian settlement of the same name in the 17th century - it was during this period that creativity flourished. Creativity is based on alternating blocks of geometric shapes with each other - usually rounded corners and there are no circular patterns in embroidery.
Pay attention to the type of fabric you select for work - give preference to denser fabric, in which the number of threads of transverse and longitudinal weaving is the same. For example, beginners can practice on canvas that is used for cross stitch.

Each individual embroidery element is made in the form of an independent block on an area measuring 4x4 threads. Depending on the pattern you choose, the block may consist of a square, a star, a window cutout, or any other shape you choose.

Except special fabric you will need several types of threads, which are selected based on the patterns that form the pattern. For example, edge elements and satin stitch embroidery are done with thick threads like iris or pearl, while when working on small details and openwork patterns it is better to use floss.
Hardanger for beginners: master class on embroidery of basic elements
This type of creativity has many already existing elements, in addition to which new ones appear all the time - hardanger masters borrow them from other types of embroidery, weaving, knitting or invent them themselves.
Despite this, it is enough for a novice needleworker to learn a few basic elements in order to understand the principle of operation and be able to understand the circuits.
Spinal suture
One of the main embroidery patterns, which is used for edging the pattern along the contour. The second name of the seam - looped - appeared thanks to its appearance: It looks like there is a loop at the edge of each stitch.
- Remove the needle from the front side on the outer line. The place on the diagram is indicated by point A.
- Insert a needle into the fabric in the area of the inner line of the block so that front side there is a loop left.
- Using the needle, bring the thread back onto the face near point A so as to wrap the air loop around it and tighten.
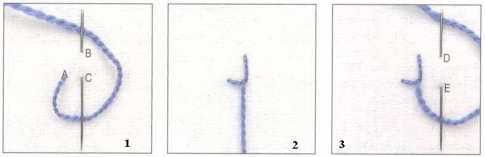
The diagram is quite conventional, but accurately reflects the technique of making a seam. When doing hardanger embroidery, place the threads close to each other so that there are approximately 5-6 stitches on one calculated square for a block of 4x4 threads.
Satin blocks
This element of embroidery can hardly be called a seam because it consists of many elongated stitches made close to each other in the same way as during satin stitch embroidery. To fill the 4x4 thread squares with thread, you need to place about 5 stitches of thick iris thread side by side.

Remember: on the wrong side of the work, the threads connecting the elements of the satin stitch should be clearly under the blocks, without blocking the open spaces. If you make a similar mistake, there is a possibility of cutting the working thread while creating holes in the fabric.

As a rule, satin embroidery blocks are used to process the edges of the work or to design those places in the pattern where cuts are supposed to be made inside.
Peephole
The element got its name due to its appearance, similar to an open eye with long fluffy eyelashes sticking out in all directions. Embroidery pattern hardanger takes on an intricate shape, but is actually very simple to embroider.
- Mark a 4x4 square of thread.
- First embroider a plus sign in it, and then a cross, tightening the rays. Both figures must have the same center.

By tightening the stitches, you open the hole, which has conventionally become the center of the embroidery, forming a peephole. As a rule, eyes with eight or sixteen rays are embroidered - use thinner threads for them than for the previous elements.
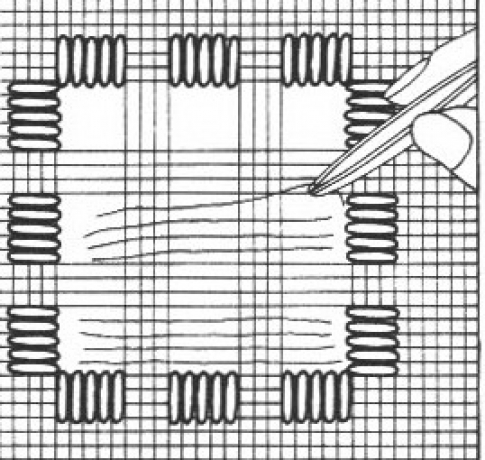
Hardanger technique: thread cutting
In addition to creating products using the hardanger technique, they are decorated with openwork holes in the fabric, giving your embroidery special expressiveness and effectiveness. Despite the apparent complexity, it is very easy to make beautiful carved patterns!
Use this image to help you cut the threads correctly so that your embroidery will not be damaged and the threads will not fray.

To make the job easier, choose miniature nail scissors with thin blades instead of wide household ones.
After you have made the cuts, remove the excess fabric threads with your fingers or tweezers.
The resulting windows with thread stripes can be left in this form, but resourceful craftsmen have come up with a way to decorate them - braid them using the picot element, which is used in tatting.
Another way is to wrap it with thread. Secure the thread and needle in one of the edge embroidery blocks on the left near the four threads that you will be decorating. Pass the thread over the two leading fibers and release it inside out. Finish pulling the thread under the remaining two and bring it to the front part.

Place the thread on the two leading fibers, embroidering in the opposite direction. Continue to repeat these steps until you have something like a double rope.
Hardanger - simple napkin patterns
The beauty of the hardanger technique is that it can be used to work on any size fabric. For example, if you have a small piece of fabric, then by placing one diagram on it, you will get a beautiful openwork napkin.

If you have a long piece, trim it along the edge and in the center to create a beautiful tablecloth with edged sides.

Use proven schemes - their symbols quite simple. The eyes are presented in the shape of stars, the satin blocks are squares with several lines inside. If the square is decorated with a thick line along the contour, it means that the blocks consist of langet seams using the Hardanger technique.

Finally, watch a simple master class that will answer all your questions and explain how to embroider simple elements using the technique hardanger.
Hardanger embroidery is an ancient Scandinavian technique. hand embroidery, named after a city on the southwest coast of Norway. It originated in the Middle East, and by the 17th century it reached Europe and further north.
Hardanger has many related trends in embroidery: Cypriot lefkaritika, Italian punto antico and reticella, Russian lattice embroidery.
Some elements traditional for Hardanger - square, rectangle, cross - belong to Assyrian and Egyptian traditions,
and the famous eight-pointed star - for Indian embroidery.
Traditionally, hardanger embroidery was an element of clothing and was used in the Norwegian national and wedding costume bunad as embroidery on the apron.
Later, in the 19th century, the technique was also used to decorate home textiles.
The Hardanger style belongs to the counted types of embroidery and is reminiscent of the familiar hemstitching. But hemstitching is more of an “edge”, edging technique of embroidery, and with hardanger you can fill the entire space of the fabric and get amazingly beautiful patterns.
 Quite often, hardanger is called counted stitch, and this name perfectly reflects the essence of the technique, because it is based on satin stitches, but strictly ordered by length and number.
Hardanger embroidered on fabrics of uniform weave(those in which there are the same number of lobar and transverse threads per 1 cm). This is an indispensable condition, because the main element of patterns in the hardanger technique is a square block of 4x4 threads.
For embroidery, fabric of 25-27 count is mainly used and threads such as Iris or PERLE for blocks and thinner ones (floss or thin Perle can be used) for brids and openwork.
You can also embroider ,
but it is more difficult to embroider with them - click on this for more details in the supplement to the article.
LINGET (loop) seam
Used to embroider the outline of a product, along which it will later be cut.
Sometimes a langet stitch is used to add volume to the inside of the embroidery.
Insert the needle from the wrong side directly on the marking line at the start of the seam and pull the thread onto the face,

leaving a tail up to 6-8 cm long on the wrong side (this tail will then be secured, so it should be of such length that it can be inserted into a needle and secured.)

From the starting point, we retreat one thread to the right along the marking line, rise above the marking 4 threads up and make the first stitch, bringing the needle back onto the marking line vertically so that the thread coming out of the fabric at the starting point is under the point of the needle and pull the thread so that I got the first stitch.
In general, the width of a langet seam is equal to 4 threads, so we always go up by 4 threads of fabric.


Again we move one thread to the right and four up, insert the needle into the fabric and bring it to the marking line so that the tail of the thread is under the needle.


In this way, straight sections of the langet seam are sewn off.
The number of stitches in a langet seam is usually a multiple of 4+1 stitches.
This is because the hardanger is based on 4x4 blocks of thread, and so that all the threads of the fabric are secured (as if they were between the embroidery thread) and make one stitch more.
That's how we got there to the first corner
.
Here is a diagram of the corner, it is performed on a section of 4x4 threads

First I’ll show you a diagram of sewing a corner

All corner stitches in this pattern converge at one point V, one square is equal to one thread of fabric.
Having made the last, 28th stitch, we insert the needle again into the upper point of this 28th stitch (point V in the diagram), and bring it out through 2 (two) threads to the right (point W in the diagram).
Done first corner stitch .


We again insert the needle into point V, and bring it out at the point, retreating one thread to the right and one thread up (to create a diagonal through one thread of the fabric) - point X in the diagram.
Done second corner stitch .


Third corner stitch.
We insert the needle at point V, and bring it out at the point, stepping back one more thread to the right and one thread up (the result is a diagonal of three points through one thread of fabric) - point Y in the diagram.
From the marking line, this point should be 2 threads of fabric higher.

AND the last, finishing stitch of the corner.
We again insert the needle into point V, and bring it out at the point, stepping back two more threads up relative to the last point (the result is a straight stitch with 4 threads of fabric perpendicular to the already sewn straight section) - point Z in the diagram.
From the marking line, this point should be 4 threads of fabric higher.


This is the first corner.
From point V we have 5 stitches: two straight and three diagonal.
Now the scheme goes straight section with 5 stitches
.
But since we already made the first straight stitch when we finished our corner, we need to make 4 more straight stitches.

As a result, we should have 5 straight stitches, and between them 4 threads of fabric. And again a corner.
We repeat completely all the steps that we did for the first corner (I won’t describe it in words, I’ll just show you in some more photos)


After completing the second corner, sew a straight section of 5 stitches (total).
Our reverse side should look like this.

Here you can clearly see that the threads are all running evenly, there is no thread anywhere that has gotten out of the boundaries of the 4-thread seam.
On the wrong side it is also very good to control yourself when you embroider a corner.
Here you can see that the corner stitches create a diagonal of three points.
I always control myself in the same way, turning the work inside out if I doubt the correctness of the needle at the corner.
And if suddenly somewhere an error will occur and the needle comes out at the wrong point, on the face it will be unnoticeable or will look like a loosely tightened seam loop, then on the wrong side all the flaws are very clearly visible.

We came to a place on the diagram with a transition from one straight section to another with a clockwise turn of 90 degrees (circled in red on the diagram)

Pull the working thread down a little so that the point of the last needle exit on the face is visible, count 4 threads of fabric straight up from this point, insert the needle into this point and bring it out at the same point where the thread comes out of the fabric.


When do this first stitch, pull the working thread slightly upward to the left so that the resulting loop lies evenly and the seam is neat (pull as in the photo)


Well, now we look at the diagram and sew all the corners of the wing, its outfit, etc. according to the scheme

Sooner or later, any thread ends and you need to start a new one.
My advice is not to sew the thread to the very end, leave a tail of about 6-8 cm so that it can be easily secured on the wrong side.
And one more moment.
It is better and easier to introduce a new thread on a straight section of the langet seam than on rounded corners or during a “right turn”.
Therefore, we look at the tail and if it is no longer very long, then it is better to leave an extra couple of centimeters of the tail and introduce a new thread in a straight section, rather than twisting at the corners.
So.
The tail in the needle is about 6-8 cm. Having made the last stitch with this thread, we leave it on the face without removing the needle yet.

We take a new thread, insert it into the second needle, and insert this needle from the inside out onto the face in the next hole in the fabric, i.e. stepping back from the hanging old thread one thread of fabric to the right.

Then, pulling a new thread onto the face and leaving its tail 6-8 cm long on the wrong side, step back from this point one thread to the right, go up 4 threads and make the first stitch with a new thread (this happens exactly the same as when starting splint suture).

We sew 2-4 stitches with a new thread, put it aside, take a needle with the old thread and insert its tip into the first loop formed by the new thread (and the free space above this loop glows, as if a stitch was missed).

Holding the tail of the new thread on the wrong side with your fingers, insert the needle with the old thread into a point at the top of the seam, located 4 threads of fabric away from our loop, and take the old thread to the wrong side.


There should be two tails: below from the new thread, above - from the old one. We tighten both tails a little so that both the loop and the stitch are neat and lie evenly in a row.

This is what our back should look like.
We remove the needle from the old thread and do not hide it far away; it will be useful to us the next time we change the thread.

Thus, we sew the entire contour according to the pattern.
If you did everything correctly and didn’t make a mistake anywhere with counting the stitches, then the outline should fit together thread by thread according to the pattern, and there shouldn’t be any extra or missing stitches anywhere.
We finish the contour in the same way as introducing a new thread, only there will be one working thread, and at the very end we insert the needle into the very first loop with which our contour began.

Then we insert the needle into the point above the loop (it will already be occupied by corner stitches) and take the thread to the wrong side. This is what we should get as a result (along with the wrong side)

Now we need to secure all the tails so that the reverse side is neat.
We take the first pair of tails.
We put a needle on one of them and pass it under several stitches to the right, while we kind of cross the tails themselves so that there is no emptiness in this place.

We pulled the needle out from under the stitches and take a small (1-2 threads) step with the needle back in the same way as a backstitch seam is made, and again draw the needle under a few stitches to the right, tighten the loop and bring the thread up and cut off the tail.


We repeat all the same actions for the second tail, only in the other direction - to the left.


This is what the inside should look like

 We looked at the LANGET (loop) stitch, which is used to embroider the outline of the product.
Now let's start decorating the angel's skirt and do it with satin stitch blocks.
Let's start with a practical example to learn how to sew a hardanger!
We will write theory here only as needed.
You can receive a virtual certificate from the Master of Needlework portal about completion of the online course "Basics of Hardanger Embroidery". To do this, you need to post a photo in the topic of Hardanger lessons on our forum finished work and some photos of the embroidery process. If you have any questions about the topic of the lesson, you can also ask them to the author on the forum.
We offer a free design from Victoria Sampler Crystal Waters
Necessary materials:
Fabric of uniform weave is 28 counts (i.e., the number of crosses per 1 cm corresponds to 14 aida), but it can be larger or smaller.
Embroidery size - approx. 40 by 40 REGULAR crosses, i.e. 80 by 80 threads Color range we select according to our wishes - I will write according to the key
Threads- ideally Perle DMC No. 8 No. 12 white, but you can use Russian iris and floss to match it .. (or thicker sewing threads - for example, 10)
Table of approximate correspondence of Pearl threads and Gammov cotton yarn

Beads: 16 pieces each of white and blue (this is according to the key)
Tools- a blunt needle, sharp scissors with thin tips, tweezers for removing threads, a hoop, a bead needle, a piece of fabric for the backing
Instructions: DMC Perle Cotton #8 (or Iris) stitch all the blocks where a satin stitch is used (in the diagram these are long black lines). Please note that the blocks are different in shape at the edges of the product!
To see how these stitches are made, go here, select Hardanger - Kloster Blocks stair Stepped and press Play

The thread must be drawn from the inside out so as not to get into those areas that will be cut out later...
I started from the top corner. The photo shows the outermost row of embroidery.

second row


Trim the threads in those places in the diagram where I drew red lines.

To see how to trim threads, go here, select Hardanger –Cutting Prep
Carefully pull out the cut threads. I hope everything is clear in the photos..
Here the threads are just trimmed:

Removed short threads

Now let’s remove the long ones:


For example, canvas, which can have a more or less large mesh of weaves, is perfect. For beginners, a canvas with about 6-7 threads per 1 cm is more suitable.
Hardanger is usually embroidered with beaded threads: No. 5 for satin stitches (for counted satin stitches) and No. 8 for bridles, air loops, back stitches, etc.
Attention: threads should always be matched to the fabric.
For example, if you will embroider on a canvas with less than 6 threads per 1 cm, then for the counted satin stitch it is better to take bead threads No. 3, and for the remaining stitches - No. 8.If you embroider according to a ready-made pattern, be sure to read in the instructions what fabric the embroidery is intended for, because if you use another fabric for this embroidery, the size of the model will automatically change. 
The hardanger is embroidered using a counted pattern. Each square in the diagram is equal to a hole between the threads on your fabric. The stroke height determines the stitch height. Embroidery begins with the outer edges, which are embroidered using a langet stitch (the thread lies under the needle). This outer row and at the same time the second row (the control one, as a rule, these are counted satin stitches) are performed around the entire work, along all cuts, until complete readiness, and only after that they begin to perform internal motifs.
The beginning of embroidery of individual elements is indicated in the diagram by an arrow - single or double. Rapport (repeating pattern) is performed from the arrow, and to the arrow b. 
Basic stitches
On 4 threads of fabric, 5 stitches are sewn alternately vertically and horizontally. The last stitch of a vertical row and the first stitch of a horizontal row have the same needle entry point.
Embroidery on the corners
First, 5 vertical stitches are made on 4 threads of fabric, then 5 diagonal stitches are made from the same needle insertion point as the last vertical stitch. Then, from the same needle insertion point, the first stitch of the horizontal row is made (entire first element = 5 stitches on 4 threads of fabric). This means that from one needle insertion point at the corner, 1 vertical, 5 diagonal and 1 horizontal stitch are performed alternately.
Cutting fabric
Using small scissors () with sharp blades, 4 threads of fabric are cut off inside the motif one by one and left. Along the edges of the embroidery, the fabric is cut close to the stitches.
Decorative stitches
Madeira eyes
On 2 threads of fabric, make stitches in a circle 16 times from one center point, while pulling the thread so that a small hole is formed in the center - a peephole.
Star eyes
Embroider one straight and one diagonal cross onto 4 x 4 threads of fabric. At the same time, tighten the thread in the same way as when making “Madeira” eyes, see above.
Double stitch "back needle"
Performed diagonally on 2 threads of fabric. This is a stitch for covering - a backing stitch for the top stitches of embroidery so that the embroidered motif is more convex and flexible. This stitch is convenient for embroidering corners (of which there are a great many in hardanger) in one step using straight stitches.The first 3 photos show the process of embroidering one of the corners, then the stitches are made in a straight line to the next corner (4th photo).
Back stitches are made in parallel rows, the needle is inserted in one row, then a stitch is made, after which the needle is inserted into the parallel row at the point where the needle came out of the previous stitch of the parallel row. This is how rows of stitch by stitch are embroidered until the next corner, where the direction of needle insertion changes first vertically, then diagonally. 
Darning stitch
As with darning, wrap 2 pairs of threads from the middle up, again to the middle and then down and again to the middle, etc.
Wrapped around the mesh
Every 4 pairs of bridle threads (the remaining threads of the fabric after pulling the mesh, see “Lacy border around the edge”) are wrapped with a darning stitch in one step so that the wraps are quite tight.
Pico
For picot in the mesh window, you need to wrap the brid only halfway with a darning stitch, then lay the thread up in a loop and draw the thread again to the middle from the back side, while not tightening the knot that appears too much. Repeat the same on the other side of the bridge.
Filling the mesh windows with air loops (“spiders”)
When the mesh window brid is 2 thirds wrapped around with a darning stitch, insert a needle from half of the brid to the left into the finished brid, with the thread lying under the needle, and pull the thread through. Repeat the same upwards to the right. Make the last stitch from the wrong side in half of the brid and then wrap the brids completely with darning stitches.
Openwork border around the edge
After filling the edge with satin stitches, 5 horizontal and 5 vertical stitches, 4 threads are alternately pulled along the edge and 4 threads are left. Loose threads - brids (at the corners and in front of the stitches they must be fixed with a glue stick for textiles) are gradually wrapped around with a darning stitch, while 7 langet stitches are made along the edge at the corners.
Assembly
Cut off the embroidery allowances close to the embroidery and secure on the wrong side with a textile glue stick.Photo: BurdaStyle
Material prepared by Elena Karpova
Hardanger refers to counted openwork embroidery. It got its name from the Norwegian fjord Hardanger.
Embroidery in Hardanger style
The exact origin of this type of embroidery is not known for certain. Scientists believe that it originated in ancient Persia and Asia. Experts consider such traditional elements as the square, rectangle and cross to be related to Assyrian and Egyptian needlework, and the eight-pointed star to Indian embroidery.
The Renaissance brought popularity to this technique in Italy. There it gradually transformed into the reticello style and the famous Venetian needle lace.
In the 17th century, varieties of hardanger spread to northern Europe. Here they were transformed into Danish and Dutch lace, as well as Scottish Ayrshire embroidery.
From the mid-17th to the mid-19th century, hardanger developed in Norway. This embroidery was used to decorate national and wedding costumes, and later home textiles.
Hardanger became widely known thanks to industrialists who visited Norway. The whole world liked the original ones Hardanger products, and their patterns and diagrams began to be published in printed publications. At the Paris Exhibition of 1900, an apron with this embroidery received an award.

During the world wars, interest in embroidery noticeably weakened, but in the 70s of the 20th century, needlewomen again turned their attention to hardanger. This technique is used to embroider tablecloths and napkins, pillows, pincushions, covers and boxes, Christmas tree decorations and much more. And how elegant the napkins under the candle will look!
Peculiarities
The basis of hardanger embroidery is satin stitches, which are made in blocks of an odd number of stitches (often 5) on an even number of threads. They must be positioned strictly along a straight or oblique thread.
To make a stitch mesh, part of the threads from the fabric is cut out and removed, and the remaining threads are twisted or embroidered. In addition, the stitching mesh can be decorated around with other types of seams.

All operations must be performed in strict sequence, cutting the thread only after all the necessary stitches have been completed.
Fabric and canvas
For hardanger embroidery, it is better to use highly structured materials so that it is easy to count the threads on the surface of the fabric. Also pay attention to the properties of the fabric: if it is difficult to wash, it is better to discard such material.
The special Hardanger canvas is very easy to use. In this canvas there are 22 cells in 2.5 cm of fabric. When embroidering on such a canvas, you must take one square of canvas for one intersection of threads. The special canvas is quite rigid, it is convenient to study on, and for work that requires finesse, professionals often use other fabrics of uniform weave: cotton fabrics, linen and cotton blends or linen with the addition of synthetics). Very popular and provides big choice uniform fabrics from Zweigart.

Threads
This stitch is usually made using a strong cotton twist thread such as iris or snowflake. However, the threads should not be too twisted. The thickness of the thread should be such that there are no gaps in the fabric when embroidering. Ideally, you should use special Perle threads; in Russia, craftswomen call them “perlovka”. These threads are more convenient to work with and have less frizz.
Perle threads are produced in different thicknesses. It is determined by number - numbers 3, 5, 8, 12 and 16. The thickness of the thread decreases as the number increases (number 3 is the thickest, and 16 is the thinnest). There are different types of Perle threads, the most famous are DMC and Anchor threads.
Thick threads are used for embroidering all satin stitch groups, structural elements and edges. But in addition to thick threads, you can also use thin threads (floss). They perform bridging and openwork cutting.

Tools
For embroidery, it is better to use a needle with a blunt tip, but scissors, on the contrary, are needed with sharp tips so that they can be used to cut through openwork elements and decorate the edge.
It is also convenient to carry out embroidery by first securing the fabric in a hoop, although some craftsmen prefer to work without them, especially if the work is large and does not fit completely into the hoop. It is better not to move the work in the hoop so as not to disturb the cut threads.
Small tweezers may be useful for work, and textile glue can be used to correct small flaws in the work or strengthen the edge.
Seams
The execution of hardanger seams is divided into 2 groups - satin stitches and openwork elements. All of them are quite simple, but you need to carefully count the stitches and constantly check the diagram so as not to make a mistake. Usually satin stitches are made first and only after that the slits and openwork elements are made. Due to the combination of many elements, the embroidery turns out to be complex and sophisticated.

The main satin stitches are satin blocks, langet stitches and stitching tracks. Openwork elements are the Edelweiss element, an eight-pointed star, and a Maltese cross.
Another important point in this type of embroidery is accuracy when doing it. Since quite often a variety of tablecloths and napkins are made using this technique, the wrong side does not tolerate sloppiness! When embroidering, no knots are made, and all the ends of the threads are carefully tucked under the stitches on the wrong side.