What can be made New Year's from paper. What can be done for the New Year with your own hands from paper: photo. Striped paper snowflake
Making Christmas toys is an exciting activity that will bring the whole family together. Moreover, to make crafts, you will need a little patience, inspiration, inexpensive tools and materials: colored paper and cardboard, scissors, glue. Simple techniques will allow even kids to create original and elegant Christmas tree decorations made of paper for the New Year (photos are presented in this material).
Making Paper Christmas Decorations: The Best Ideas
Some holiday crafts are not new and everyone knows how to make them. To add variety, you can use non-standard materials at hand (for example, beads, bright buttons, foil) or unusually combine several techniques.
The easiest and most popular way to decorate an apartment or office is to hang openwork snowflakes. Decorating is easy enough. Here is the instruction:
- A sheet of paper is folded several times.
- A pattern is drawn.
- The snowflake is carefully cut out with scissors.
An expanded paper pattern is attached with tape to the window or pinned with a thin needle to the wallpaper on the wall. If there is little experience in cutting snowflakes, you can practice on thin notebook leaves.

Snowflakes cut out of white A4 paper look fresh and elegant. An interesting idea is stylized patterns. An ornament is applied to the sheet with preliminary sharp movements with golden or silver paint.


New Year's white paper decor will help create beautiful "frosty" pictures (or letters) on the window. The main working tools are scissors, knives. Exquisite carved patterns are made from white or colored paper. The process of making crafts in stages:
- The template is printed out (or drawn independently), cut out and put on paper.
- If the sheets and the stencil are carefully fixed on the plywood with adhesive tape, then it will be easier to cut the protrusions.
- Gradually cut through the picture (first of all, small internal details of the pattern).
- Finish the work by cutting out the contours.
To make several decorations for the New Year out of paper, 3-4 cardboard sheets are placed under the template at once. Fix crafts on glass with adhesive tape or soapy water.


Delicate paper angels will bring winter magic to the room. With the help of stencils-figures it is easy to paint windows. Magic figurines look beautiful from corrugated paper or in bulk form. It is easy to create crafts, even kids will love to collect angels. The scheme is printed on a printer, a figure is cut out, cuts are made and the base is twisted, then the craft is fixed with cuts.

A composition of several Waldorf angels, mounted on a chandelier, looks elegant and easy. It is advisable to cut out large and small figures and hang them on threads of different lengths.


A fashion trend is the creation of crafts that look equally elegant on the Christmas tree or under it as a gift. A beautiful house is easy to create:
- They make a printout of the drawing on a printer or independently draw a blank of a large house on a piece of drawing paper.
- The drawing is decorated: tiles are depicted on the roof, they are drawn
- windows, doors.
- The template is cut out along the dotted lines and folded. The easiest way is to fasten the parts with transparent tape.
The box-house can be filled with sweets. Additional decoration will give the craft a magical and original look. On the roof, small pieces of cotton wool are usually glued in the form of snow. With the help of contour paints, it is easy to give the look of a gingerbread house. For this, tiles are drawn with contours, windows and a door are outlined. The roof is covered with a transparent varnish and sprinkled with silver sparkles.


An indispensable green attribute of the New Year holiday gives the interior an elegant look. With the help of thin napkins, you can make an unusual three-dimensional Christmas tree. Openwork snowflakes of different diameters are cut out of the sheets (according to the snowflake technique). Wooden beads are strung on pre-prepared sticks and glued with a thermal gun. Napkins are put on top of the beads. Thus, a multi-tiered Christmas tree is created.

A great idea is to assemble a small winter forest from Christmas trees of different sizes (crafts are glued onto thick cardboard or a piece of plywood). The air composition is installed on a windowsill or chest of drawers. Pieces of cotton wool between the trees or a layer of small foam balls will give the forest a snowy look. You can also lay a garland with small multi-colored lights between the trees.


Paper crafts are a great opportunity to decorate the Christmas tree in a different style every year. An unusual look to the green beauty will be given by beautiful New Year's decorations made of paper, which will unite some common feature. Suitable options:
- large and small multi-colored cubes suspended on shiny ribbons;
- pyramids, cubes, cones, paper sweets made from the same cardboard (golden, silver) or in a specific color palette (turquoise-blue, lavender-violet, yellow-lemon).
Stylish decorations made of corrugated paper for the New Year - fluffy circles. To do this, square sheets are folded like an accordion, tied tightly in the center. The accordion is unfolded, and the edges are glued. You can hang crafts on multi-colored satin ribbons.


New Year's holiday cannot be imagined without sweets. Any child will love making sweet decorations with their own hands. The deer has become the same symbol of the winter holidays as Santa Claus and the Snow Maiden. Therefore, an unexpected duet of the sweet Chupa-Chups candy and a deer muzzle will come in handy.
Moreover, the manufacture of crafts does not take much time. It is enough to draw the muzzle of an animal on a thick sheet of paper, color it. The template is cut out, a hole for the candy is cut in the center. You can fix the paper blank on a stick with transparent tape.


Corrugated paper is great for making custom Christmas tree decorations. The basis of a funny craft in the form of a snowman is cut out of thick cardboard (two circles of different diameters). Corrugated white paper is cut into strips 5-7 cm wide and twisted into tight bundles. The cardboard base is covered with PVA glue and the bundles are laid out on it in the form of a spiral (starting from the center). An element in the form of a bucket is cut out of black paper, and a carrot nose is cut out of red paper. Details are glued to a smaller circle of the figure. Eyes are drawn with felt-tip pens. Handles are formed from small branches and inserted into the corrugated base.


cones
A great option for Christmas crafts is paper cones. Brown paper with gold or silver stains is a suitable material for the job. The process of creating a cone step by step:
- Strips of paper are cut (the first is 20x1.5 cm in size, the second is 16x1.25 cm, the third is 12x1 cm).
- Each ribbon folds into a small accordion.
- The narrow edges of all strips are glued together and form a circle-fan.

simple garlands
The best option to quickly give a festive look to a room of any size is to hang paper garlands for the New Year. It should be borne in mind that you can decorate with everything that is at hand (for example, figurines of roosters, pigs, dogs), so it will not be difficult to create an original product.

Lightweight paper crafts weigh a little, so they can be of any length. Multi-colored balls created from stripes look airy and weightless. To collect the ball, 3-5 identical strips are cut. To form a sphere, several stripes are connected, glued together in the form of circles.


Garland of flags
A craft familiar to everyone since childhood. To bring a little novelty, you can modify the shape of the garland. Triangular flags are glued onto a ribbon 1-1.5 cm wide. If this ribbon is twisted several times, the garland will take on an original three-dimensional look.
Garland of figurines (snowflakes, snowmen, ballerinas)
Non-standard decorations are obtained using different materials and New Year's figurines. When creating a snow garland, you can string openwork snowflakes on a transparent fishing line - the effect of weightlessness will appear. A great idea is to fasten figurines of ballerinas with voluminous skirts made of thin napkins to the ribbon.
Figures of funny and mischievous snowmen cut out of thick paper are best fixed on the tape with colored clothespins. This will give bright accents to the snow-white garland.
flower garlands
These crafts look massive, so they should be strung on strong ropes. A harmonious look of the New Year's setting will be given by short garlands, fixed along the doorway or around the windows. To make the decor have a New Year's look, you can combine snow-white artificial flowers, green twigs and small silver or golden balls.
New Year's lanterns are a win-win option that gives the hall a festive look. It is not necessary to specifically buy elegant decorative lamps. It is enough to make several multi-colored ceiling lamps with your own hands.

Striped lantern
Probably, many people know this popular craft. Building lanterns is a great way to get the kids involved in decorating your home. The process of creating a product is very simple: a rectangular sheet of paper is folded in half, cut perpendicular to the fold line. One side is glued, it turns out a light and wonderful New Year's decor. Lanterns are hung on a Christmas tree and a garland.
Chinese lantern
A delicate Chinese lantern is created according to the same principle as a paper lantern. An important nuance: in order for the product to retain a voluminous beautiful appearance for a long time, it is recommended to insert a paper cylinder of any length inside. The lower and upper parts of the flashlight are glued to the cylinder. The composition of several red or golden lanterns of different sizes, fixed at different levels, looks especially elegant.

sky lattern
An exciting activity on a festive night is the launch of lanterns. It is easy to create a craft with your own hands. You will need cocktail tubes, wire, rice paper, a candle, glue. Work progress:
- A wire is threaded through the straws.
- A cube is formed, the sides of which are pasted over with paper.
- Only the lower edge is left open, on which a wire cross is fixed and a small candle is fixed.
This craft is quite a fire hazard, so it is recommended to experiment with launching on the street.
A stylish decoration of the New Year's room will be a bright composition of a variety of stars, collected with your own hands.

3D star
The easiest way is to download a template from the Internet. The model of the star is cut out, with the help of simple manipulations it is folded along the central ribs. If you simultaneously make simple patterns on the workpiece (like a snowflake), you will get a voluminous openwork star. The craft is hung near the window opening in any room.
star of bethlehem
The star of Bethlehem has become an elegant attribute of Christmas. It is enough to work with paper or cardboard for 5-10 minutes, and such a symbol of the holiday will elegantly decorate the room. A star is formed from a square sheet of paper using the origami technique. Four beams are left long, and four are short. The edges of the workpiece are carefully smoothed from the front side. The star is glued to a thick sheet of paper or cardboard. The excess is cut off, the craft is hung on a ribbon on a Christmas tree.

eight pointed star
A voluminous craft is obtained from two parts, which are easy to create in 2-3 minutes. Four-pointed blanks are cut out of two sheets, each beam is folded and glued separately. Then two identical parts are connected, forming an eight-pointed star. In the work, you can use colored or shiny paper.
five pointed star
A stylish star of small size, made of thick silver or golden paper, will decorate postcards or posters in an original way. To create a craft, you need to fold a square sheet in a certain way and cut out pointed rays. If the resulting figure is glued to thick paper and cut along the contour, you will get an unusual three-dimensional decoration for the house for the New Year from colored paper.
It takes a little time, imagination and colored paper to create beautiful crafts. The simplicity of the quilling technique allows you to make exquisite decorations even without experience in needlework. Original compositions from paper spirals turn into exquisite openwork patterns and paintings. To create details, professional paper 30 cm long is cut into strips of different widths (from 0.3 cm to 0.9 cm).

Ded Moroz and Snegurochka
An elegant poster with these fairy-tale characters is easy to create. First, a sketch is made on a sheet of paper, drawing the details of the figures. You will need white, blue, blue, pink paper. If you use more shades, then the picture will visually turn out to be more voluminous. To simplify the work, first make colored blanks of different shapes.
Separate sections of the drawing with the figures of Santa Claus and the Snow Maiden are smeared with glue and filled with paper spirals. To give the picture expressiveness, a Christmas tree is laid out next to the figures, on which painted bullfinches comfortably settled down.
A simple picture with a candle will elegantly decorate a Christmas card. A child can help make paper blanks in lilac-pink shades.
The initial stage - a sketch is drawn on a postcard from white paper. The candle flame is laid out in oblong spirals of red-pink and purple hues so that the pattern becomes expressive. Stylized spruce branches are created from strips of fuchsia-colored paper.
It is very simple to give the New Year mood to the application: two carnation-colored paper bells and an openwork metal snowflake are glued onto the postcard.

New Year's wreath
Spirals in the quilling technique can have not only a round appearance. A Christmas wreath is assembled from elements in the form of leaves, berries. In order for the craft to acquire volume, large sheets are made of dark green paper, and small ones are twisted from light green paper.
Berries are made from red cardboard. Collect a wreath on a cardboard circle. First stick large green leaves. On the inside of the circle, over dark green leaves, red berries are fixed. The space between the red elements is filled with light green leaves.
Different forms of elements, the possibility of their fastening allow you to create non-standard decorations for a Christmas tree, an apartment. Top Christmas products:
- Original openwork snowflakes are cut out and laid out from white and blue crepe paper. To give the crafts a more decorative look, you can glue beads or use shiny paper in your work.
- A Christmas tree pattern is drawn on the sheet. Five blanks are cut out of green paper, which are fastened together with PVA glue. A voluminous Christmas tree is decorated with multi-colored beads, satin bows. Crafts are hung on satin ribbons;
- A bright, weightless garland of multi-colored cubes will gently encircle the green beauty. Cubes can be collected in the same size or different. The elements are strung on a ribbon, fixing their position with the help of knots.

These are popular crafts that are easy to do with your own hands.
New Year's Eve is special and bright. Decorating a Christmas tree and housing is an entertaining and joyful activity, the kids are looking forward to it, especially if the crafts were created the day before. Non-standard paper room decor for the New Year will be the pride of the family and will be appreciated by the guests.
New Year paper crafts
Do-it-yourself volumetric paper snowflake
Such a voluminous snowflake made of paper is a wonderful New Year's decoration for any interior. A paper snowflake will surely please your children, relatives and guests.
For a large size snowflake, we use only thick paper, and also add more lines.
The snowflake can be made from paper of any other color - it all depends on the color of your Christmas decor. You can also use wrapping paper.
materials, needed to make paper snowflakes:
six squares, cut out of paper, preferably white and the same size.
Any paper is suitable for making snowflakes. The side of each square cut out of paper can be from 10 to 25 cm.
Instruments:
- ruler;
- simple pencil;
- scissors;
- stapler.
How to make a three-dimensional paper snowflake:
1. Bend each of the six squares diagonally in half. We make markings of three parallel lines on each of them. The width of the segments should be the same. We draw the lines with a simple pencil (in the photo they are drawn in red only so that they can be better seen). Then we cut the outlined lines with scissors, starting from the edge and not reaching a little bit (leaving a couple of millimeters) to the middle.

2. Now we open the square folded diagonally and put it face up in front of us.


4. Then we turn the snowflake to the other side and connect the next two strips closest to the center, fasten them with a stapler.

5. We continue to turn the snowflake over and staple the remaining strips with a stapler.

6. We do the same with the five remaining squares of paper. Then we staple the three parts of the snowflake together in the middle with a stapler. We do the same with the remaining three parts of the snowflake.

7. Now we connect these two large parts of the snowflake to each other.

8. At the points of contact of each individual part of the snowflake, we also fasten it with a stapler. This is necessary in order for the snowflake to keep its shape.

9. Now we decorate the snowflake according to our own taste, for example, you can stick sequins, sparkles.
That's all! Christmas decoration is ready! A snowflake can be hung on a Christmas tree, a window, a wall ...
Another version of the snowflake. It is made from two sheets of plain or thicker paper.
1-2. First we bend the sheets as in the figure.
3. Cut out a checkmark from the resulting triangle.
4. We make cuts on the remaining checkmark, but do not cut through to the end, otherwise the snowflake will break.
5. We bend the rays so that the snowflake is voluminous.
6. We bend each middle beam on all four petals of the snowflake inward and glue it in the center.
7. Repeat operations 1-5 with the second sheet of paper. Then we put it under the first half of the snowflake, so that the lower rays are between the upper ones. Then we bend as in paragraph 6, but we glue the rays not in the center, but at the points where the rays diverge at the top snowflake.


Snowflake from strips of paper

See the photo master class for the sequence of making snowflakes:
Prepare two snowflake fragments, each of which is 6 strips of paper, then connect them, as in the photo

We glue the strips, as in the photo, and fix them with paper clips until completely dry.

4.

We made two “half-snowflakes”: 
Place them back to back
Connecting with glue 
We fix with paper clips, we wait for drying: 
This is how the junctions of the ends of the strips look like: 

And once again, all in one photo:

A more complex version of a snowflake made of stripes:


Balls imitating cones from strips of colored cardboard of different lengths, rolled accordion


You can also make such snowflakes from old magazines
master class from Tiffany Lin

Tiffany marked out inch petals for future snowflakes. We can focus on two centimeters, for example.
In total, you need to cut 140 strips. Of these: leave 20 strips along the length of the page, cut the next 40 by 1 cm, cut the next 40 already by 2 cm, and cut the last 40 by 3 cm shorter. Refer to the photo above.

Fold each petal using 5 strips of each size. The longest strips, for the central beam of the snowflake, are taken once, the rest twice (once on each side).

We glue and place under the press for the time of gluing.

For reliability, you can temporarily tie the tip of the petal.

In addition, we cut out more strips for the central part of the future snowflake.

We also glue this ring and fix it for the successful setting of the glue.

When the petals are glued, we process the end of the workpiece with a glue gun.

Glue is not to be regretted! We are processing well.
Then glue the petal blank to the central ring.

We act in this way with four petals, gluing them so that we get a cross.

Then glue the remaining petals. This method allows you to glue all the blanks symmetrically.

After that, we glue the petals together so that the snowflake does not fall apart.


Decorate the snowflake with sparkles. 
How to make such snowflakes

Birds of happiness for your home:
Fold the paper in half and cut it out as in the photo on the left: Then unfold the wings and fasten them to the body of the bird. Glue the body halves.


How to make such a snowflake:
Nov 28, 2016 Galinka
Time inexorably runs forward and now white flies are flying outside the window, slowly sinking to the ground and covering everything around with a snow-white fluffy veil. However, despite the cold, the soul is warm and joyful. And all because suddenly appeared snowflakes herald the onset of the New Year. The most important holiday of the year is already very close, which means it's time to think about New Year's decor, gifts and, of course, crafts.
The days are getting shorter and the evenings are getting colder and longer. What to do with yourself, and even more so with your little fidgets, when it is already too dark for outdoor winter fun? Well, crafts, of course. New Year's crafts can be made from the most unexpected materials: cocktail tubes and much more. But there are also more traditional materials, such as paper. In this article, we have collected for you more than 60 step-by-step master classes for making paper crafts for the New Year. If you still think that only applications can be made from paper, then drop everything and carefully look at our article! Well, for those who are looking for something unusual and know what miracles can be created from plain paper, we can only advise you to start the process of creating New Year's paper crafts according to our schemes and templates without delay.
One of the simplest New Year's paper crafts can rightly be considered a garland. We all remember well from our childhood how they decorated the Christmas tree with such paper garlands not only at home, but at school or kindergarten. A paper garland is made very simply: colored paper is cut into strips of the same width, the first strip is glued into a ring, and each subsequent one is threaded into the previous ring and also glued. This paper craft is perfect for 4-5 year olds.
If the task of entertaining children is not worth it, but you need to decorate the house, then here's another version of a paper garland for your note. It is made even easier than the previous one, but you will need a sewing machine. So, to create such a New Year's paper craft, you will need: a lot of circles of different diameters (the number depends on the size of the garland), a sewing machine. Sew circles through the center on a typewriter and hang a garland. From any gust of air, such a garland will “come to life”.

So, if you decide that the issue with garlands is closed and there is nothing else to think of here, we hasten to upset you - this is only the very tip of the iceberg. Simple paper garlands are an activity for beginners. Professionals prefer more complex tasks, such as voluminous paper crafts. Below is a master class on making a volumetric garland in the form of light bulbs.

By the way, you can decorate an ordinary LED garland with paper lanterns. This New Year's paper craft looks very cool, especially if you decorate the wall with this garland.

Interested in a garland? Then see more ideas:

New Year is the most beloved holiday associated with miracles and magic. The celebration of the new year is characterized by folk festivals and joyful meetings. It is impossible not to love this time of the year, when everything around is transformed, and every house or shop window becomes like scenery for a fairy tale. Everyone wants to participate in this transformation, and therefore they try to decorate their homes […]
Since we are talking about the decor of the apartment, it would be strange not to mention Christmas wreaths, or as they are also called New Year's wreaths. Everyone can make such a paper craft, in addition, a New Year's paper wreath is a reusable decoration that will not deteriorate and will not lose its appearance over time.

A very cool paper craft for the New Year is a wreath of roses. You will have to work hard to create such a craft, so if you decide to make yourself such a paper wreath on the door - stock up on patience and mood!

If you're planning a New Year's themed party, say Cuban or Hawaiian style, then you'll definitely need some kind of decoration to set the atmosphere. Here is such a simple, but very original wreath made of paper will come in handy!

Surely your child at school or in the garden was asked to make a Christmas wreath with their parents. Allegedly for a competition, but the main task of this task is to get parents to spend time with their children. But maybe you should not wait for a task from school, but spend time with your child yourself. In addition, with such a New Year's craft, you can decorate the house in a very original way, and most importantly, get a lot of positive emotions!

Need a Christmas wreath? See more ideas:

Preparing for the New Year is sometimes even more pleasant than the celebration itself. The whole family, including the youngest residents, can take part in the process of decorating the interior. You can decorate an apartment or house for the New Year holidays in a variety of ways, but recently New Year's wreaths, which are better known to us from romantic Hollywood Christmas films, have been very popular. However, trendy […]
So, we continue to decorate the apartment. There is a garland, there is a wreath. Something is missing? Oh, of course, Christmas trees! If you prefer to put a big forest beauty on New Year's holidays, it doesn't matter. By the way, read on. Small paper Christmas trees make a great addition to the decor, and they can also be used as small souvenirs for guests!
# 10 New Year's paper crafts with our own hands: we make a Christmas tree toy "Herringbone"
A Christmas tree made of paper does not have to be on the table or somewhere in the house. You can make a craft out of paper, which you can then hang on the Christmas tree itself, and if there is no Christmas tree, then you can simply hang such voluminous paper Christmas trees around the house. The scheme for making a Christmas tree is quite simple, but if you don’t quite understand what the essence is, or you just don’t have time to figure it out, then you can download a ready-made template.

A very cute Christmas tree can be made from corrugated paper. This paper craft looks very realistic, but it is done quickly and easily.

If you are still interested in a paper Christmas tree, but you want to make something unusual, then use this master class.

The tree does not have to be on the floor, it can also be hung from the ceiling. An excellent Christmas garland will turn out from plain paper.

How to distinguish the New Year's table from the usual festive one? Everything is correct! According to thematic elements of decor. And how to make a suitable New Year's dessert, see.


Do you want more workshops on making paper Christmas trees? See:

The Christmas tree is, of course, the main attribute of the most important winter holiday. It will not be possible to do without the forest beauty, the atmosphere is not the same, and where does the good grandfather put the gifts? It so happened that a Christmas tree is decorated in the house for the New Year holidays: someone puts a live one, someone prefers an artificial one, and someone paper. A paper Christmas tree can not only replace a Christmas tree […]
#17 Christmas paper crafts: making a movable card with wishes
From paper, you can make not only flat or voluminous crafts, but also movable ones. With our ready-made scheme, you can make a postcard with an encrypted congratulation or message. Such an unusual gift will please not only children, but also adults! You can download the finished scheme below.


In winter, wild flowers are not to be found, even in flower shops. But there is nothing to worry about, flowers can be made from paper with your own hands. And our step-by-step master class will help you with this.

A wide variety of flowers can be made from paper, the whole secret is cutting out the ends.


If you want to make a big Christmas star for decorating a wall from paper tubes, then this master class is especially for you!

A very themed New Year craft made of crimped paper. Such a paper cone looks very natural and is quite difficult to distinguish, especially if it is used as a decoration. With our master class, you can easily cope with such paper crafts.

There is another technique for creating paper cones with your own hands. This method is more labor intensive and will take you more time. In addition, to create such a New Year's craft, you will need: paper, a foam blank, a lot of safety pins, a ribbon and beads for decoration. However, if you have the time and desire, then pay special attention to this scheme for making a cone, especially if you want to impress.

From paper, you can make very special crafts using the Japanese origami technique. Our step-by-step master class will help you create a New Year's paper ball that can be used to decorate both a room and a Christmas tree.

A step-by-step diagram for creating an origami star with your own hands. You can decorate the top of the Christmas tree with such a star, you can simply create a festive atmosphere in the house, or you can combine it into one big garland.

You can make the base yourself, as in the first picture. Or you can download the finished pentagon blank and, depending on the size of the pentagon, the size of the finished star will change.


At your service is a step-by-step scheme for making a three-dimensional paper snowflake. Follow the instructions and you will definitely get such a miracle.

#34 We decorate the apartment with cones: do-it-yourself Christmas paper crafts
In continuation of New Year's paper crafts, I would like to offer you another scheme for making paper cones. In addition to paper circles, you will need an oval or round blank, glue and fir branches for decoration.

Another great option for decorating an apartment with your own hands is a large voluminous snowflake on the wall. A snowflake can be not one, but a whole ensemble. In addition, on such a New Year's background, you will get great photos!

New Year's gift must be in a beautiful package. In my opinion, the gift itself is not so much important as the intrigue around it. After all, it is this intrigue that will remain in the memory, this is a pleasant expectation and unfolding the paper. Use our scheme for making paper flowers with your own hands and decorate gifts for dear and close people.

It is customary to decorate a Christmas tree with toys, but these toys do not have to be purchased. Even better if they are made by hand. And what could be easier than making a Christmas tree toy out of paper. Use our step-by-step instructions and make your own paper Christmas ball.

Very simple, but incredibly cute voluminous lanterns can be made from ordinary colored paper. Even children can handle this craft, so feel free to get to work if you have little helpers. Well, if not, then you can do it yourself!

You can make completely unexpected crafts out of paper, including gift boxes. And not just boxes, but in the form of delicious sweets. For such a gift box you will need: cardboard cylinder, colored paper, glue, scissors, satin ribbon.

In continuation of the question of gift wrapping, we want to offer you another budget, but very charming option. You can make such a gift elf with your own hands using our master class.

Here is another version of the original packaging of a New Year's gift with your own hands.

Need more gift wrapping ideas? See:

On the eve of the New Year holidays, shop windows are full of gift boxes, decorative bags, wrapping paper for every taste. Smiling sellers helpfully offer to provide services for wrapping New Year's gifts. And all this seems to be great, because you must admit, it is much more pleasant to receive a New Year's trifle in a beautiful package. But on the other hand, the whole meaning of the gift is lost, the very gift that […]


Want more Christmas ball ideas? See:

Today, on the shelves of stores you can find a huge number of a wide variety of Christmas toys, so turning an ordinary Christmas tree into a real festive beauty is not difficult. However, the New Year is a special day! The day when the old year is left behind, and new adventures, new events, new victories await. But after all, the old year did not pass without a trace, […]


#55 A simple paper snowflake pattern: decorating a room for a party

#56 Do-it-yourself voluminous paper crafts: making a snowflake. Scheme


#58 Christmas paper crafts: decorate the house with diamond crystals
Download ready-made schemes and make your own paper diamond crystals.

#59 New Year craft paper ball "Mistletoe" with your own hands
Here you can make such a mistletoe paper ball with your own hands, using ready-made cutting templates. Stock up on patience and New Year's mood!


You can decorate a house not only with standard snowflakes or stars. You can make such a wonderful vase out of paper. Download the finished scheme and assemble the vase following the instructions in the master class.

A wide variety of decorative elements can be made from plain paper, just download the finished scheme, print it, cut it out and glue it. A wonderful Christmas paper craft is ready!

#64 Christmas patterns for cutting: a great photo shoot for the new year
Note! The templates are very large and of good quality, so the download may take some time.

Simple Christmas decorations can be made from paper. In our master class, an example with a ball is given, but it can be other shapes: hearts, stars, Christmas trees and much more. You can download ready-made templates below.

You can make a simple and original Chinese lantern with your own hands using our ready-made scheme.

An excellent decoration for the new year will be a composite paper star. You can download a ready-made template for gluing below.

In our time, you will not surprise anyone with ordinary paper cutters. Volumetric crafts cause much more delight. In this master class, a scheme for creating a simple volumetric star is described step by step. You can download a ready-made template with a large, medium and small star from the link below.

It is quite difficult to imagine a New Year's decor without all sorts of variations on the theme of stars. In this master class, you will learn how to make a volumetric double-sided star out of paper with your own hands. You can download the finished scheme below.

#70 Christmas paper masks
Carnival masks must be included in the list of New Year's paper crafts. Well, what New Year's party can do without masks? That's right, none! In fact, there are a lot of options for making paper masks, and if you turn on your imagination, you can make many wonderful crafts!

Without a doubt, the best gift is a handmade gift. But this does not only apply to gifts, but also decorations for a Christmas tree, a wall, a closet, etc. More on everything later in the article.
Snowflakes
The first and most probably simple is snowflakes, a symbol of frost. They are different. I'll start with the simplest option.
So, I will prepare:
- Scissors.
- Paper (a4 size).
- Simple pencil.
- Eight-beam snowflake
The blank is folded from a square sheet of paper, so I cut off the excess part.
Since the square is folded in half, we should get a triangle. We fold the resulting triangle in half perpendicular to the base. Then I fold in half again.
After that, I fold it again, and cut off the excess part. I outline the outline of the snowflake. I lay out the cut out - I should get a snowflake. And now let's make a six-ray snowflake.
For this snowflake, I need a square piece of paper. I fold a square sheet of paper in half. Then I fold the resulting blank, but do not fold it, but only compress it at the first fold, thus forming a notch in the center of the folded sheet.
In the same way, I bend the second corner, just make sure that the second corner overlaps the first. Next, I fold it in half along the vertical axis, drawn from the serif. After that, I take a pencil and draw the outline of a snowflake. Then I cut along the contour.
herringbone
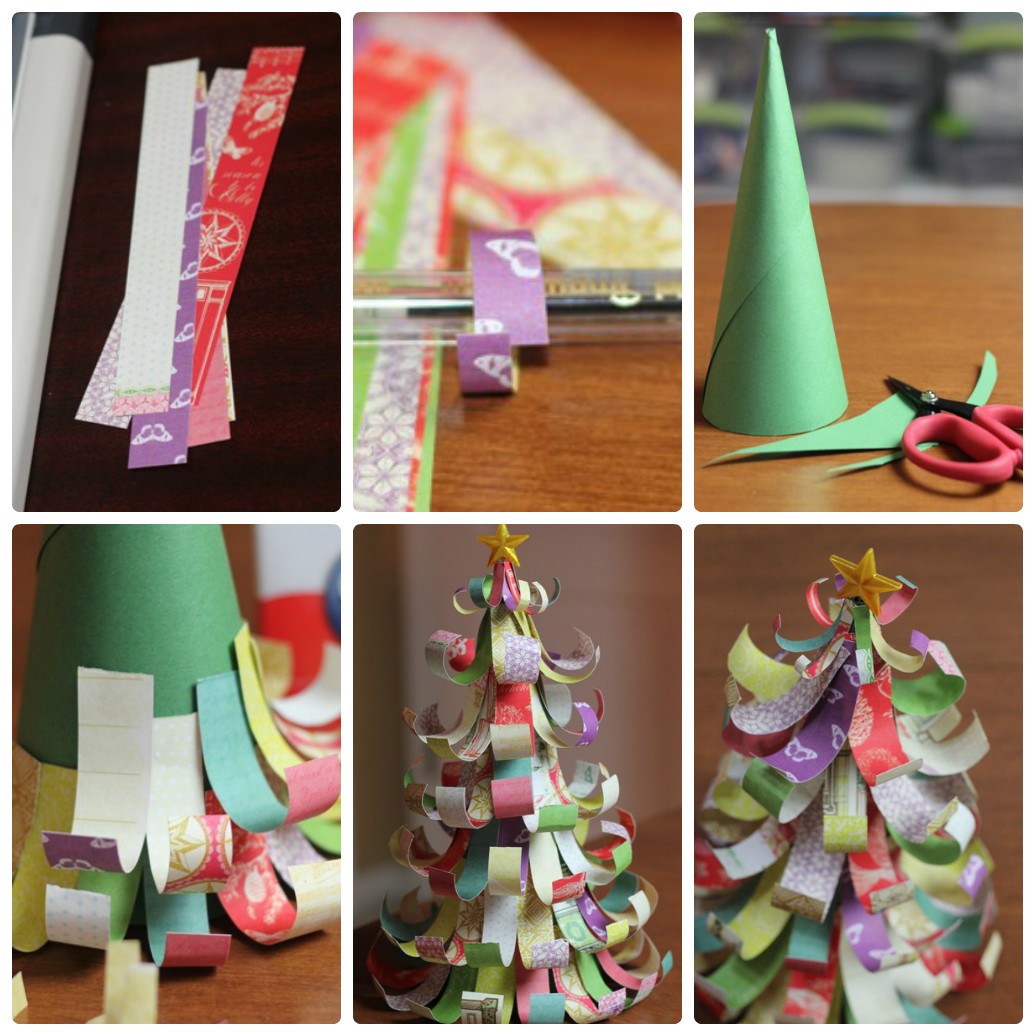
What is the New Year without a green beauty? For our first idea, we need to make a paper cone. The “branches” for our Christmas tree will be roses made from napkins.
I fold each napkin in half, and then in half again. After that, I fasten it all with a stapler in the middle. After I fastened, I cut out a circle from a napkin. I need it to be multi-layered.
I take the top layer and twist it. This is how I do it with all layers. When I've done everything, I straighten a little rosette. Now you need to glue the cone with roses so that there are no gaps and bald spots.
Christmas toys made of paper
We turn to Christmas tree decorations made of paper. What kind of Christmas tree am I without balls, icicles, cones and other decorations?
So let's make Christmas decorations for our forest beauty, shall we? For this I will need:
- Thick paper.
- Old magazines, cardboard boxes and candy boxes.
- Scissors.
- Glue.
- Compass.
To begin with, I take cardboard and trace twenty-one identical circles and cut out the resulting circles with scissors.
Each circle needs to be folded to me as follows: I bend the circle in half twice, on one side and on the other. After that, I unbend and outline the center of the circle. Then I bend again, but already on one side, so that the edge of my circle is exactly in the intended center. I fold it again on both sides. I should get a triangle.
In one of the twenty circles, I need to cut out this triangle, which will serve as a kind of stencil. Next, all we need to do is to impose a triangle on the rest of the circles, circling it and bending the edges of the circles outward along the contour.
Now I need to take the first ten circles and glue them in a strip, alternating: five down, five up. Now I need to glue the strip into a ring, which will serve as the basis of our toy.
Now I'll take care of the top and bottom cover. I need to glue them to the base in exactly the same way. And now it's time for the loop for which the toy will be hung.
flashlight toy
I'll start by taking two sheets of paper of different colors. For example, white and red. Next I cut out two rectangles. White will be 100 by 180. Red will be 120 by 180.
I'll start with red. I fold it in half and make cuts so that there is room around the edges. We do white in the same way as red.
Star
To do this, I need to prepare 10 by 10 squares. First you need to fold twice, and then fold diagonally. After that, I need to make cuts and fold into the corners. Next, glue the corner in the center.
Repeat the procedure with the second sheet of paper. Then we glue the two halves.
Charming ball
For this venture, I needed eight circles. Then I cut out two more circles, which should be half the size of the previous ones.
I folded each circle in half, and then in half again. Now you need to glue four large circles onto one small one. Next, you need to correctly position the quarters. We straighten the pockets that turned out. Now you just need to do the other half of the ball as well. It remains for me to glue the two halves and the ball is ready!
Candles
It is necessary to prepare two strips of paper approximately 20 millimeters wide and 30 centimeters long. I will also need red and yellow paper in order to make the "flame".
I glue the ends of the strips at a right angle.
I fold the body of the candle from the strips so that they find each other.
I cut out the candle flame and glue it to the candle body.
Now you need to bend all the piles in half and collect snowflakes into a crystal. I tied the end of the workpiece with a fishing line. I need to make eight more. It's not an easy job, let me tell you.
One pack of strips must be bent and secured with fishing line, but already along the outer edge. It must be a circle.
I fasten all the crystals with hot glue to the prepared circle. Almost forgot. And four more blanks must be inserted into the gaps between the first.
I also fasten the side parts of the crystals.
Sprinkle with sparkles and the openwork snowflake is ready.
Do you think that's all? But no! Finally, I left the most interesting thing - a voluminous snowflake. Don't worry, it's very easy to make.
Option 1 volumetric snowflake
I draw a sheet of colored paper into rectangles measuring 5 by 6 centimeters. Next, we do it with white paper, but already rectangles measuring 3 by 4 centimeters.
After that, I take 3 by 4 rectangles and also twist the icicles and glue them onto a workpiece with large icicles. I glue a small circle with sequins and glue in the middle of the resulting workpiece.
Option 2 volumetric snowflakes
For this venture I will need:
- Glue.
- Scissors, stapler.
- Stationery.
- Paper.
- I warn you right away that this snowflake is much more difficult to make than the previous one.
To begin, I will prepare a stencil. For the stencil, we need cardboard. We draw six lines on it at right angles. The lines should be 1 cm apart.
Now we have to bend six album sheets diagonally and make stencil cuts. I should end up with 6 triangles with cuts running parallel to each other.
After that I take one of the triangles and unfold it. That is, I should get a square in which even smaller squares are located. You have to start from the center. I turn the corners of the central square to the center. I glue it. I turn over to the other side and do the same as with the central square. In the end, I should get an icicle.
It remains the case for the small. Fasten all my icicles together and our snowflake is ready.
Option 3 volumetric snowflakes
For this option I will need:
- A4 paper.
- Threads.
- Needle.
- Red patch.
- Stationery.
On a piece of paper I draw four circles, which must be of the same diameter. I cut out circles and outline eight equal parts. I make cuts along the marked lines towards the center. After that, I bend the tip of each such “petal” and glue it.
I do all the same manipulations with the rest of the circles and sew. The red patch is needed in order to complete the product. Cut out a circle from the scrap and glue it.
Having rummaged, again on the Internet I came across another version of a three-dimensional snowflake. This snowflake is made from strips of paper. So, I'll cut the paper into strips. The strips should be five millimeters and 21 centimeters long.
The snowflake consists of two halves. That is, for one half you need 10 strips. I glue the first two strips so that I get a cross. Then I glue two more strips.
Next, I pass two strips through the beam and glue. There should be two free stripes left. After that, I also do the second half. I fasten the halves with free strips and intertwine them with each other.

Hello everyone. It's no secret that it is often more pleasant to be in a beautifully cleaned room than in it in its usual state. That is why in this article I will tell you about DIY Christmas decorations that will be relevant in 2020 and beyond.
Everyone knows the classic decorations for this holiday - garlands, balls, etc. But today we will plunge into the world of original solutions for this case.
DIY Christmas decorations for 2020: 100 simple ideas
If you want to properly prepare for the New Year, then for this case I have prepared for you 100 interesting ideas that you can easily do very quickly, but also use the most accessible materials.
What and how to decorate
As a bonus, I will give you a plan for decorating. It sounds scary, but it doesn't mean anything terrible at all.
This is the order I suggest:
- Doors. Classics of the genre - Christmas wreaths. But in Russia, this is more of an adopted American tradition than a traditional New Year's decoration. In this case, you can decorate the door handles with pieces of garlands and lay out interesting patterns using them.
- Window. Garlands on them, of course, can also be attached. But it is better to purchase special stickers for windows, or cut out traditional snowflakes by gluing them on soap. Also, so-called vytynanki can be made from paper - beautiful patterns and paper figures (snowflakes are a subspecies of this ancient Slavic art form). They can also be used for cabinets, especially with glass inserts.
- Other passages and transitions. Once upon a time, curtains in transitions were popular, forming an air cascade of threads. So for the New Year, you can remember this good old fashion trend and make a kind of rain - hang a few garlands or threads with flowers, animals, toys, made by yourself or purchased.
- Walls. It is impossible not to remember them) Of course, the garlands will serve well here too.
- Ceiling. We also include chandeliers.
Decorations for the New Year from paper: master classes and photos
The first material for creating decorations for the New Year is, of course, paper and cardboard. After all, they are in every home, and it is quite simple to acquire an additional volume of this pliable material.
Paper decorations for windows with templates
Various types of window decorations are very popular in paper winter creativity. In the coming year, its symbol, the White Metal Rat, will play a special role. To decorate windows with these animals, I suggest you look at these patterns.
Want to bring good luck to your home? Cut out rats from white paper and add silver sparkles.


Here are the templates for the rest of the protrusions (namely, this is the name of window-winter paper art). Among them you will find snowmen, bluebells, snow-covered expanses with fir trees and much more. Cut with pleasure!


Paper cubes-boxes with Santa, Christmas tree and snowman
In fact, there will be even more of these original and creative cubes! Along with them, you will find little elves and a reindeer from Santa's cart. In these you can put small surprises for children or use as an independent decoration of the apartment.
Here is such a cheerful Santa.

Reindeer Rudolph, without which Santa Claus is nowhere. 
Snowman looking forward to the New Year.

Decorated Christmas tree.

And finally, the elves helpers - three kind kids.

These boxes were created by a wonderful girl under the nickname hello happycrafts. Thanks to it, you can download the scans of these holiday boxes in a large extension, which will allow you to experiment with the sizes of the finished decorations:
Download box scans
Of course, it is best to print them on a color printer, and then cut them out. But if this is not possible, then you can stick elements of colored paper on a black and white printed scan.
Other paper and cardboard interior decorations
If you have heavy metallic cardboard, a few rhinestones, glue and ribbon, then create a deer pendant as shown below. The laconic design will appeal to those who do not like the abundance of details.
To make a whole interior composition, stock up on several deer of different colors and sizes. Fix them with zaponlak (in case of absence - PVA), sprinkle with sparkles.

From the same series, a patterned New Year's star. You can cut out both decorations if you save each of the options to yourself, and then print.

It is easy to make a fascinating garland out of cardboard. To do this, you just need to cut a few hundred circles and sew them on a sewing machine, connecting them in series.
If there is no typewriter or there is no confidence in the result, then slowly glue the circles to the thread to get the same garland as below. As a hanging ribbon, use a satin ribbon or a regular cord.

Another version of the garland with stars. The do-it-yourself technology is exactly the same as the first one.

A few snowflakes made using the quilling technique can complement the garlands. With such it will be easy to decorate not only the room, but also the school, classes. You can even devote a couple of labor lessons in elementary school to creating such snowflakes! After all, you only need to twist strips of paper, sometimes squeezing the edge, and glue them together.

Don't know how to bake Chinese fortune cookies, but really want to try your luck? Make them look like double-sided cardboard or thick paper. You only need to cut out a circle and fold it in a special way, putting a wish or prediction inside.
A small crepe paper decoration can be made by folding three green and red rhombuses into an accordion, and then connecting them with a ribbon.

If you want to make street lanterns, then I offer two options at once.
In the first of them you will need to fold the box using the origami technique. Such boxes can then be placed on a diode garland, creating an unusual diffused glow effect.

Fans of the exotic are waiting for the Chinese New Year's lantern. For him, prepare red and gold cardboard, floss threads, a gold marker and scissors with glue. Cut out the blank, as shown in the photo below. Circle the edges with a marker, make a floss tassel and gold cardboard cylinders on top and bottom of the lamp.
Such lanterns will decorate your garden or private house, becoming a highlight in the holiday decoration.

We decorate the house, kindergarten and school
You can decorate a room for a holiday in a variety of ways, from a wreath on the door to snowmen from cans with a variety of contents.
Made of felt and fabric
The most durable jewelry is obtained from these materials. Decorate the door with a winter wreath. It can be made from a base ring, terry yarn and felt elements chosen to your taste. Felt wreath details below:
- three oak leaves
- birdie,
- three double flowers
- three snowflakes,
- cat,
- additional accessories: snowflake sequins, satin ribbon, buttons, feathers, artificial twigs.

Funny deer made of fabric will turn out to be much more attractive if their legs and horns are made from twigs wrapped in threads.

When we talk about New Year's toys, we think only about Christmas toys. But these photo ideas are actually cute winter toys. Deer, bear cubs and penguin are made of fleece.

Insanely simple Christmas tree, the patterns of which can be removed directly from the photo. This can be sewn in just a couple of hours, and in a couple of days you can fill up the whole house with plush Christmas trees! Decorate it with braid, embroidery, buttons, rhinestones and more.

Burlap angels are even easier to make, they literally consist of two parts sewn together. Interesting decorations in the "rustic" style are obtained, especially if you add natural material as a decor (dried leaves, flowers, etc.).

Launching satin ribbons
A very large number of New Year's decorations of a very different plan are created from ribbons. And both as an additional element, and in the main role.
The next option is suitable both for decorating a doorway and as an independent decoration (in case you have a large photo frame). You will need satin ribbons and empty transparent balloons that you can fill with whatever you like. The frame can be painted to enhance the festive effect.

The next wreath is suitable for both home and office space. In the latter case, you can choose a muted range of colors. To make one yourself, take two colors of satin ribbons and then follow the simple step below.

A small stylish Christmas tree that can be used as a hanging decoration in the car. A thick cord is taken as the basis, onto which ribbons are alternately tied.

For another Christmas tree, beads are also used. Lay the tape in loops, interspersed with beads and do not forget to put the entire structure on the thread.

Experimenting with other materials
Home decor knows no mercy! If you have a little imagination and patience, then the most unexpected masterpieces can be born.
To create such snowmen, you will need several jars (preferably plastic), which you can fill as you wish.
Do not connect banks to each other. Fill the snowmen with treats and stack one on top of the other. Now from such compositions you can help yourself.

Create snowflakes from plastic cans. Cut off the bottoms of a few pieces and paint them with acrylic paints. At the base, make fasteners so that these decorations can be hung above the windowsill or under the ceiling, or hung on a cardboard frame to get a Christmas tree.

From a wooden blank, you can quickly make an interesting decoration in the form of a snowflake by painting the tree with acrylic paints.

Crafts with embroidered elements always look unusual. To make the decorations below, you will need a plastic canvas that can be covered with a felt insert at the back. The scheme is easy to remove from the photo.

To create a ball with buttons, take a foam blank and all the decorative elements. Make a loop out of the string and glue everything else.

Beads and wire are great companions. With the help of them, with your own hands, you can create seemingly simple, but such cute pendants with which you can decorate windows and, in general, the entire space of the apartment. It is easy to make them - put on a piece of wire a sufficient amount of beads of the desired colors and bend into the desired shape.

An original idea for exotic lovers - a winter-style dream catcher.


Christmas tree decoration
Again, you don't need any special materials. As they say, everything that is at hand (well, maybe a little more).
Christmas balls
It turns out that Christmas decorations like a ball can be made from a large number of different components. For example, take a foam base and attach sequins to it with small pins.

Or finally get rid of the annoying discs and split them into many small parts, which are then glued to a transparent plastic base.

A ball of foil and cardboard also looks interesting.

Take a closer look at the New Year's ball of pompoms.

Without textiles, nowhere - it is easy to create a masterpiece from it with the help of simple patterns.


Plastic balls - a huge scope for creative imagination. They can be covered with a thread frame or sprinkled with sparkles or sequins.


I'll show you how to make a Christmas tree with your own hands - there are not many of them for the New Year.
Take the mesh, PVA glue, paper, pins and glowing garlands. Make a paper cone. Soak the mesh in glue and wrap this cone, securing the mesh with pins. Wait until dry, pull out the paper base. Everything, you can light inside the garland

For light bulb penguins, prepare old light bulbs, eyelet tape, acrylic paint, and a pencil to draw the outlines for this.
In general, all you need to do is paint the bulbs as you wish, attach loops and additionally decorate with various sequins, knitted and sewn elements, rhinestones, etc. Ready
The only negative of this idea is the need to get light bulbs somewhere.

Stars, stars
Prepare for the star thick paper, glitter (available in woven), tape for fastening and PVA glue. All you need to do is cut out a star, apply glue to it, attach a ribbon loop and sprinkle with sparkles.

What could be more pleasant on New Year's Eve (except for receiving gifts, of course) than to congratulate your relatives and friends beautifully? To do this, prepare felt, a base stick, glue, sequins, synthetic winterizer and threads with a needle. For wishes - beautiful paper and a pen.
Cut out two stars, from one of which cut off the edge. Sew a star along the edge, without sewing up the cut edge, stuff it. Decorate with sequins. Insert the rolled-up wishes into the hole left. Sew a stick at the bottom, sew up the hole.

Another variation of the star is from tree branches.

Macaroni will also serve as an excellent material.

And thread options.

We take another basis
Felt will help you create the most fabulous decoration. To do this, cut out the animals according to the pattern, which you can take from the photo, and sew along the edge.


If the feathers are covered in sparkles, you will get a cool decoration that is easy to hang anywhere in the apartment with a thread tied to the base.

A few more ideas for your creativity.


Decorations for the New Year's table
Of course, I also did not forget about the table for the New Year. Here are some ideas for you as well.
To do this, prepare a tin can, double-strand braid and braid with roses. Pins, glue and additional decorative embellishments will also come in handy. Wrap the jar with ribbons, fasten. Decorate with a bow.

To create a Christmas tree, you will need several woven or paper napkins. All that is required is to fold the napkins in four and fold them in accordance with the photo.

For decoration-candles, take simple candles and sequins. Sprinkle sequins in a candle, you can melt it a little for this.

For lamps from balls, a well-known technology is used by many. For her, you will need an inflated balloon, PVA glue and threads (preferably thick ones).
Draw a circle on the ball in the tip area (you will need it for the hole). Gradually wrap the ball with threads soaked in glue without closing the hole. When the structure is dry, pop the balloon and remove it.

You can find even more ideas for New Year's crafts in this article.
Food is the main decoration of the festive table. She can become cakes with winter patterns.

If you prepare a New Year's cake in the form of a big gift, then there will definitely be no limit to the joy and surprise of the guests.

Snowmen and cookie ornaments can be both decorations for a spruce tree and a festive table.


Small cakes with the simplest winter pattern - what could be better?

Christmas tree can be delicious too! If it is from macaroons or cookies)


A separate topic is New Year's champagne. You can decorate it indefinitely, but I will show you three cool options: with sweaters, satin ribbon and sequins.
P.S. Subscribe to updates, save interesting material for yourself and visit more often!
Sincerely, Anastasia Skoreva