How to make a wallet out of a box. How to make a paper wallet using the origami technique with your own hands. How to make a wallet out of paper - an unusual option
The art of origami is used to make various crafts. They can be practical or perform only decorative functions. Paper origami “Wallet” can be useful for a child in life. It is suitable for beginners, including preschoolers who are just getting acquainted with the magical world of origami. You can make an envelope for money out of paper in 5 minutes. It is useful for role-playing, board and other types of games.
Children over 5 years old need to play in order to fully develop. role-playing games. An affordable and fun option is to set up a home store and shop there. To do this, you need to make a counter, a cash register, and product mockups. Setting up a home store is a lot of fun.
They do for him:
- counter and cash register made of boxes;
- product models made of plasticine or polymer clay;
- money;
- wallets;
- paper bags.
Many people forget to make wallets or money, which makes the game less realistic. A preschooler should be taught to count money, because this skill will be useful to him in 2-3 years. Make all the devices for the game together with your child, so that it will be more interesting for him to interact with them in the future. The counter can perform double functions - during the game you can put goods on it, and after completing the lesson, you can store all the little things inside it.
Now you can buy any toys, but joint creativity brings families together. Psychologists recommend spending time making crafts every weekend. These can be practical things, panels or other interior decorations. After 7 years, children begin to get carried away Board games. Make a paper wallet for them, since the kit often contains cards that are easy to lose if stored scattered. If there are a lot of little things for games, then use the origami technique to create a separate storage unit for each type.

Girls should learn how to make wallets so they can make elegant clutches for their dolls. Such bags are useful for all types of dolls: paper, Barbie, Monster High, simple baby dolls of different sizes. To get a small clutch, use a candy wrapper as a base. This will allow you to make a handbag of an unusual color.
Scheme for making crafts
Once you have found a practical use for this craft, it is worth considering how to make an origami paper wallet. If you know how to fold simple airplanes, then the diagram of this craft will not seem complicated to you.
Before you start, prepare a rectangle of thick paper intended for printing, scrapbooking, and gift wrapping.
Beautiful wallets are made from textured sheets.
It will help you make an origami wallet from paper. The work diagram is:
- Mark a horizontal fold on the sheet, fold it in half, and unfold it. Repeat the same vertically. Place the sheet with the long side facing you.
- Fold all corners of the rectangle to the fold line.
- You are left with 2 sharp corners on each side of the sheet. Bend them towards the center line.
- Then bend the flaps on each side towards the central vertical line.
- Turn the workpiece over.
- Bend the top and bottom edges of the sheet to the horizontal center line.
- Fold the future wallet in half vertically.
- It will take on the shape of the real thing, all that remains is to pull out one of the corners so that it covers the compartments of the wallet.

If desired, the model can be easily modified - a clasp is made. It will require two thin vinyl records or regular Velcro. Glue one part of the fastener to the valve, and the second to the main part of the model.
For the first craft, give your child a simple sheet from a notebook. After he learns the lesson on folding wallets, change the material and dimensions of the craft. Origami is based on small candy wrappers or sheets cut to the size of money. If you want to make a craft that can easily accommodate Russian banknotes, then you need to make the width of the rectangle equal to twice the length of the banknote. The length of the sheet is equal to 6 times the width of the bill.
Purse: how is it different from an origami wallet?
Another type of wallet is a purse. It is made using a different technique. To make it you need to have:
- a sheet of cardboard or thick paper;
- scissors;
- scotch;
- glue.
The technique for making this craft cannot be called traditional origami, but it is close to it.

Make a wallet according to step-by-step instructions:
- Take a thick sheet of A4 format.
- Fold it in half lengthwise. Iron the fold line well: after you unfold the sheet, it should be clearly visible.
- Unfold the sheet, fold it vertically, and bend it in half. Iron the lines, straighten the workpiece.
- The sheet is lined with marked folds into 8 equal rectangles. Take scissors, use them to make a slit between the two shapes on the left, and between the next ones make a diamond-shaped slit.
- For rectangles 1 and 3, cut the edges and fold them up.
- Cover the vertical cut line with thin tape.
- Fold the right and left edges of the sheet towards the center line.
- Fold the workpiece in half.
- Use the protruding protrusions to secure the edges of the wallet. Secure them with glue so that the money does not spill out of the toy.
The resulting wallet is suitable for storing analogue bank cards, cardboard change and toy money. It is more difficult to make, it is best to make it with younger schoolchildren. The same craft can be made easier by cutting out a wallet: prepare several rectangles from cardboard or thick paper, fold the large one in half, and glue small pockets to it (for cards). Make a flap with Velcro or thin magnets.

How to make money?
For a home “shop” you need to make money. You can get them in different ways:
- purchase ready-made dummies (sold in large packs, used for wedding celebrations);
- draw on a lined sheet of paper and cut;
- create a layout on a computer and print it out;
- scan banknotes and reproduce them.
You should not use real banknotes as a basis: if a child confuses them with real ones and goes to the store, problems will arise with law enforcement agencies. To make counting easier, borrow only existing coin denominations and banknote denominations.
: toys, souvenirs, and useful things for everyday life. One of these things can be called a paper wallet. What can it be useful for? Firstly, for children's games. Secondly, in order to give someone money in it. And thirdly, as a temporary option, in case a regular wallet for some reason becomes unusable. A paper wallet can also help out on the road, when the main one is hidden away from prying eyes.
Let's figure out how to make a wallet out of paper. One of the most simple ways It is considered to create a wallet using the origami technique. For this craft we need a rectangular sheet of paper. Having chosen the necessary paper, you can start making a wallet.
Its scheme is quite simple:
Step one.
We bend our sheet in half crosswise and unfold it.
Step two.
We place the sheet vertically in front of us. We bend the corners from the bottom and top to the middle in the same way as when creating an airplane.
Step three.
Bend the noses at the top and bottom corners.
Step four.
Fold the resulting trapezoids to the center of the sheet.

Step five.
We turn the workpiece over and bend the edges to the center again.
Step six.
Fold the wallet in half.
Step seven.
We got two small pockets, inside each of which there is a triangle.
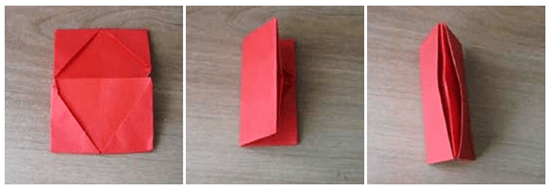
Step eight.
 We pull one of the triangles out. This way our wallet gets a valve for closing.
The wallet is ready to use. Feel free to use it. The strength of the structure depends mainly on the paper chosen. The choice of paper also affects appearance finished product. The size of the wallet is also determined by the size of the sheet. You can decorate the finished wallet at your discretion.
 You can also make a wallet using regular appliqué, or take thicker paper and stitch all the details. If you use your imagination, the scope for creativity is limitless. Some make wallets and purses from cardboard using the scrapbooking technique, others master a variety of Japanese schemes addition. Some people use plastic instead of paper, for example, soft chocolate wrappers, and sew beautiful wallets. Such products are not only beautiful, but also functional. There is no shame in giving them as a main gift or using them instead
The art of origami is one of the ancient arts who came from Japan. These paper folding activities attract people different ages from all over the world. Today we are faced with a task: how to make a paper wallet with your own hands. If you have a free minute, take a look at our master class and 13 diagrams.
It’s interesting to understand the schemes and make different wallets. A fun activity for adults and children, which develops thinking and motor skills, brings calm and peace. Even if not everything works out right away, it doesn’t matter, try again. You can practice origami at any time; this hobby will not require you to spend a lot of money.
If you do origami with a child, he will become diligent, inquisitive, learn to fantasize, and think logically. Mathematics will no longer seem complicated and incomprehensible to him; such activities develop taste and spiritual harmony.
You will need a sheet of A4 paper. Before you make a paper wallet with your own hands, we will find suitable paper or thin cardboard. There is special paper for origami in stores. Ideally, it is better to use it, colored cardboard or thick wrapping paper, just adjust it to the desired size.
An origami wallet is made perfectly from gift bags or boxes of chocolates. To make paper origami for children, you can also use glossy magazines.
So, let's start making a paper wallet for money with two pockets. To do this, take an A4 sheet.

It’s better to practice on a plain white sheet of paper, and then move on to colored paper.

Bend the sheet in half lengthwise. Iron the fold with your hand and then with a ruler. We make a clear line in the middle of the sheet. A lot depends on this, we don’t want our product to be crooked and oblique.

Unfold and turn over with the fold facing the table. That is, our “opened book” should look up.

We bend the right half of the sheet towards the center. Iron it with a ruler. We do the same with the other half of the sheet - we direct it to the center and also iron it with our hand and a ruler.

Fold down the right side (open the right half). Fold the right side ⅓. to the center. Ironing.

We wrap the right side again by ⅓ - 3.5 cm. If you fold the “book” now, you will see the shape of your wallet.

Turned upside down.

We bend the top and bottom by 0.7-1 cm. The folded parts should be the same.

Let's turn the work around. As you can see, we have a double fold of paper at the bottom, and we need to bend small corners on the lower single fold. We make corners on one side and the other.

Fold it with the curved edges inward, as in the photo.

Fold the sheet with the folded corner over and insert the side with the double fold into it. We do the same on the opposite side.

All that remains is to bend our wallet in half.

In the video - folding a paper wallet with your own hands:
The art of origami uses a system of special signs that help in the process of work. Here are the most common of them:


Schemes - how to fold an origami wallet
Now that we know all the basics symbols By folding paper, it will be easier to make an origami paper wallet with your own hands. There are situations in life when you need to give money instead of a gift (for a wedding, for example). Now you know how to make a paper wallet or envelope.


Origami wallet is one of the most popular paper origami. If you don't know how to make an origami wallet, then on this page you will find everything you need to assemble this simple paper figurine.
In the first photo you can see what you will get if you follow the assembly diagram below. The second photo of the origami wallet was taken by one of our site users. He created a kind of wallet that folds in half. If you have photos of origami you have collected, send them to: This address Email protected from spam bots. You must have JavaScript enabled to view it.

Assembly diagram
Below is a diagram of how to assemble an origami wallet from the famous Japanese origami master Fumiaki Shingu. If you strictly follow the instructions, then assembling the origami wallet will not take much time, and the result will be the same as in the picture. After doing what is described in the diagram several times, you will understand how to make an origami wallet quickly and without peeking at the diagram.

Video master class
Assembling an origami wallet may seem like a daunting task for beginners. Therefore, we advise you to enter the query “origami wallet video” on the largest video hosting site on the Internet, YouTube. There you will find many different videos about the origami wallet, which clearly show the steps to assemble the wallet. We hope that after watching the video of the assembly master class, you will have no more questions about how to make an origami wallet.
If you want to make an original paper wallet, watch this video:
And this training video will teach you how to assemble a paper wallet:
Symbolism
A wallet has roughly the same symbolic meaning in many cultures. A wallet means prosperity and wealth. If you have a beautiful wallet with original decoration, then it can still be a symbol of good taste and careful attitude to money.
Does your child often lose their wallets and you don't know what to do about it? Of course, you need to teach your child to be more careful and not trust him with a lot of money. Well, as a way to keep your child’s finances safe, invite him to create an origami wallet for himself. Perhaps a hand-assembled “money safe” will help your child be more attentive to his money.
Origami wallet
It will not be difficult to create such a piggy bank. How to make an origami wallet? You need to take a rectangle with dimensions 200x400 mm. Now you should bend it, first horizontally and then vertically. Now unfold the workpiece. These actions had to be done in order to create constructive lines. We lay the workpiece horizontally and bend the corners of the right and left sides to the center, as shown in the picture. Now the sharp tips that were formed after the previous step should be pulled up to the newly created line. We bend two parts of the workpiece towards the center and turn the paper structure over. Again, pull the sides towards the center and turn the workpiece over. Now you should take out a corner from one pocket and make a cut in the lower part. Place the sharp tip in the hole. The product is ready. If desired, it can be painted or immediately folded from colored paper.
Cardboard wallet

This product is very similar to a paper folder. By the way, it can be used for this purpose as well. But we will assemble an origami wallet from this pattern. It's quite simple. You should take thick paper or cardboard. It could be something textured or textured. For example, velvet paper or paper with images of raised flowers. We print out the above diagram of an origami wallet and transfer it to the selected material. Now you can start making the product. We cut out the workpiece and use a stationery knife to make shallow cuts. You can skip this step, but then the fold lines will be uneven and the product may warp. When the cuts are ready, you can begin folding the wallet. We bend it according to the diagram and make a cut in the front part for the tongue. Such a wallet can be decorated with beads, seed beads or colored paper.
Envelope

The easiest way to make an origami wallet is to assemble it from a pattern. And envelope patterns are best suited for this purpose. In such an interesting wallet you can store not only your “stash” for a rainy day, but also present money for your friends’ birthdays. How to assemble such a universal one that should be used is given above. You should choose the model you like, print it and transfer it to paper. As in the previous version, this wallet can be made not only from ordinary white paper, but also from tinted, velvet or textured paper.
All envelopes are assembled according to the same pattern. First, the side corners are bent towards the center, then the lower part is raised towards the middle, and then the upper corner is closed. To make the assembled wallet durable, you can glue the three lower parts together. Beads, beads, and rhinestones should be used as decoration. You can write a wish on such an envelope. Moreover, this can be done even if the wallet is not made as a gift, but for your own use.