Do-it-yourself sundress pattern for a girl: a master class on creating different models. School uniform patterns
To make a pattern of children's dresses and sundresses, it is not necessary to be able to sew dresses for adults and be a sewing master. Many models of dresses and sundresses are sewn very simply, and it will take no more than 30 minutes to build a pattern. And a dress with a size for little ladies will be special and individual, unlike the one bought in the store.
Easy option

The simplest dress is one-piece, which is sewn from any materials. Suitable for ages 1 to 3 years old. For 3 years, many sew more difficult dresses, but as a light summer option, this style is also suitable for 5 years. Patterns of children's dresses for girls can easily be found in our material.
The basis for the dress can be downloaded for free on the Internet, then adjusted to the desired size and supplemented with details - ties, pockets, an additional skirt, buttons. But it is more interesting to do it yourself, especially since it does not take much time. Learn how to make this outfit below.
- Prepare pattern paper. Find a T-shirt in your daughter's wardrobe that is not small for her;
- Next, lay the T-shirt on the paper and smooth it out so that there are no extra wrinkles. Circle the outline of the shirt, or only the outline of the neck and armholes. Next, the lines need to be expanded to the bottom, and rounded at the bottom. It’s not scary if the pattern turns out to be asymmetrical, since only half of the product is needed for sewing.


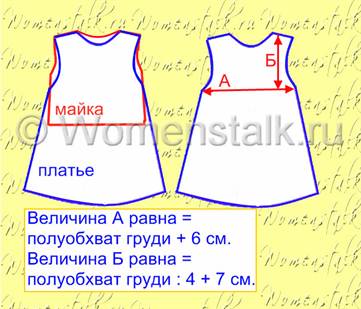

- Choose the length of the dress, choosing by age. Choose the neckline of the dress. Next, measure the circumference of the child's chest, divide it in half, getting a half-girth. Determine the size of A and B. If there is no child nearby, or you are sewing as a gift to someone, you can refer to the tables that indicate the sizes for small children.

- Measure the distances for allowances so that the dress sits freely on the child;
- Divide the pattern in half and cut it, since only one half is useful, you can choose the most successful half if they turn out to be different.
summer model
Summer sundresses come in completely different models: from simple ones with ties to complex patterned multi-layered sundresses. Consider two sundresses. For a sundress, a child under five years old will not need difficult patterns. You can make a simple sundress with straps.


It is even easier to sew a sundress that is tightened with a ribbon. And it looks bright and beautiful, suitable for any age of the child.


For a teenage girl
It’s not much more difficult to sew a sundress for 10 years, but it’s unlikely that everything will be done by eye, so it’s better to take the basic dress pattern as a basis.
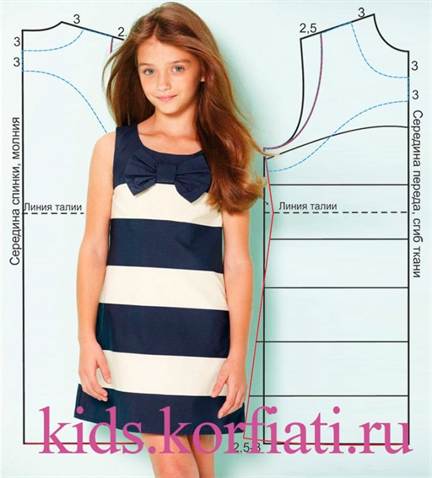
It will be a fitted, sleeveless dress with a large bow in the front.
Front and back. The neckline needs to be deepened by 3-4 cm, a new cutout must be built according to the specified parameters. In order for the dress to emphasize the beauty of the figure, it must be fitted and extended downwards. On the back, on the waistline, retreat 1.5 cm, increase the bottom line by 3 cm. Since the dress has thin straps, the shoulder needs to be reduced by 2.5 cm and a new armhole should be made. Next, with a width of about 3 cm, make the facing of the neck and the facing of the armhole.
Color transition. The dress will be with a color transition, so the color change on the dress should be marked with horizontal lines. You need to do both on the front and on the back pattern.
Cut the pattern and you can start sewing.

The basis of the outfit
In order to sew many dresses for your child, you can make a base pattern, according to which in the future it will be easy to sew any dress. To do this, you need to take measurements:
- Lengths: back to waist, total length, shoulder, sleeve;
- Semi-girths: neck and chest.
Construct a rectangle on graph paper ABCD, AD is the length of the dress, AB and BC are the width=Lift+4cm for the allowance.
Please note that the allowance can be made smaller, then the dress will fit more tightly.
From A, retreat 1/3 * Pog + 6 cm and put G. From G, draw a line to BC, mark G1. From A, retreat Ds and note the longing of T, draw a line from it to BC and put a point T1. Divide GG1 into two equal parts, mark G4 and draw a line from it to DC, designate H and H2. From G4 to the right and left, set aside ½ * the width of the armhole (Shp = ¼ * Pog + 2 cm). Put G2 and G3. From G2 and G3, build straight lines up to AB, put P1 and P. From B and P1, retreat 2 cm, put P2 and P3. Make a segment P2P3. Divide PG2 into two equal sections, and divide P1G3 similarly into three sections.

In modern Russian schools there is no single sample of a school uniform. A mandatory dress standard as a rule for all students has been introduced in the country's educational institutions since 2013.
The style and patterns of school uniforms are developed and adopted by each school independently. Often, uniforms express the characteristics of an educational institution, referring to its history or concept.
Modern school dress code
A common school practice is to replace individual designs of school suits with business-style children's and teens' attire. If the school does not have a uniform dress code, it can be introduced at the classroom level.
Dresses sewn according to Soviet standards, which were once worn by Soviet students, are now worn by schoolgirls only on holidays. In some educational institutions, brown sundresses with white aprons are considered a symbol of farewell to school graduates.

allforfamily.ru
The modern school uniform for girls is a wide variety of styles and combinations of clothing items. A schoolgirl's costume can be based on a certain model of a dress, sundress, trousers or skirt in combination with a blouse, badlon, jumper, jacket, jacket. With some changes, one pattern of a school uniform for girls is used in the manufacture of costumes for the entire size range.
Sundress with two pleats
The sundress consists of a sleeveless bodice with a deep neckline or boat neckline. Complemented by a "semi-sun skirt" or an A-line silhouette. The silhouette of a sundress is most often semi-adjacent, detachable, with a low or high waist. Two opposite folds can be laid on the front skirt part. Due to this, the model sits on the figure freely and does not hinder movement.

wlooks.ru
The cut of the product consists of two parts of the central part of the back, one folded part of the central shelf, four side parts (two for the shelf and two for the back), as well as a pair of skirt parts. You will need six one-piece facings (for the neckline and armholes) from the main fabric and interlining.
The basis for building a sundress is a standard drawing of a shoulder product. The design is complicated by modeling the basic cut.
Drawing algorithm

tvoivykrojki.ru
Before building the selected model of a dress or sundress, a standard drawing-algorithm of the product scheme is drawn.
- Based on the measurement of the height of the chest, draw a horizontal line - the basis of the future armhole.
- From one of the edges of the main rectangle, retreat half the value of the width of the back on the previously obtained line.
- Divide the value of the half-girth of the chest by 4 and add 2 cm. Set aside the resulting value from the received point. Get the outline of the armhole.
- Mark the neckline at the top rectangular corners. Decorate the seams on the shoulders and armhole cutouts.
- After you need to expand the side seams down. The value of the flare depends on the difference between the circumference of the chest and the volume of the abdomen of the child.
- A feature of the patterns of sundresses and dresses for schoolgirls 7 years old and younger is the absence of chest tucks.
- The drawings of all models of student sundresses are basically a rectangle. One of its sides is equal to the measurement of the half-girth of the chest, the other is determined by the length of the product.
Model building
- Draw on the paper the lines of the chest, hips and bottom of the pattern of the upper part of the product. These lines will be combined on the front and back details of the future sundress.
- From the level of the chest, lower the horizontal segment (6-7 cm) down. The resulting line will unite the bodice with the skirt.
- Make the armhole deeper 2 cm from the bottom edge.
- Reduce the length of the shoulder, stepping back 2 cm from each edge.
- Connect the obtained points of the new armhole with a rounded line.
- From the top point of the construction of the back on the fold line, retreat 1 cm. Mark a new point for the beginning of the neck.
- Expand the product along the seam of the shoulder by 2 cm from the top edge of the cutout.
- Step down 3 cm from the bottom edge of the shelf cutout along the fold.
- Increase the neckline at the back by 2 cm along the seam of the shoulder.
- Open the facing of the neckline by drawing a curve parallel to the cutout, stepping back from its edge 3 cm.
- Combine the shoulder facings of the back and shelves.
- Construct a skirt pattern with an inverse pleat, the depth of which is 3 cm.
- To make a pleat on the front of the skirt, step back 6 cm to the right from the bottom extreme point.
- Set aside another 6 cm to the right side along the line along which the skirt will be connected to the bodice.
- Connect the resulting points.
- Leave the back of the skirt unchanged. Or add a fold.
Product processing

baby-modnik.ru
- Use an iron to glue the stitched non-woven parts to the facing fragments of the front and back of the bodice.
- Connect the side part of the front of the bodice with the central front part using a relief seam.
- Pin the facings right sides to the face of the base and turn them inside out.
- Sew the shoulder sections of the product, lay the allowances under the turning parts.
- Unscrew armholes.
- Connect the side seams of the facings and the base. On the left, leave room for future lightning.
- Sew the fastener along the side cuts on the left side.
- Turn the armholes down and attach to the seams.
- Sew skirt pieces.
- Combine the front side of the upper edge of the skirt with the lower edge of the front and back details.

oxami.ru
- For first-graders and primary school students, a model of a cut-off sundress on straps with a skirt of the “sun” type is suitable. Typically, patterns of this style are designed for a height of 122 cm.
- The length of the straps is recommended to be measured directly on the child. This value sometimes includes a spare length, which can be adjusted in a year or two.
- Lay out the bodice and skirt patterns down along the shared thread on the fabric.
- The center of the back, front and skirt fold should be exactly on the fold of the fabric cut.
- Baste a fragment of the bodice to the skirt part.
- Try on the product, controlling it at the waist.
- Sew a zipper into the center of the back, which will last all the way to the beginning of the skirt.
- Sew the straps, turning them right sides to each other. Turn out.
- Sew bodice zones with future straps with stitching.
Sundress with "wing sleeves"

priparade.ru
- A sundress model with cap sleeves can have a straight or pleated skirt.
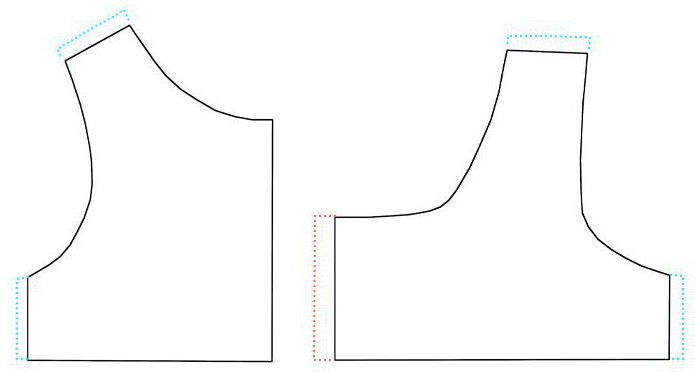
- The dress pattern of a straight silhouette consists of two parts of the bodice, waist fragments and parts of a straight skirt. The front part of the bodice is made up of three strips-tucks and one part with an armhole and a neck. The back of the top consists of two elements.
- Place the patterns on the fabric along the grain thread from the inside out.
- Lay the frontal segments-stripes in the composition of the bodice in the form of tucks and lay a machine seam.
- From the back, from the wrong side, sew in a zipper. Align the center of the zipper with the center seam of the front of the product. Extend the zipper almost to the very bottom of the sundress. You can also finish it at the level of the hips.
- Finish the inside seams with a zigzag stitch.
- White decorative guipure is used as a collar and sleeve edging.
The pattern of the variant of the skirt with large pleats consists of:
- 2 back pieces;
- 1 - center with a fold;
- 2 side fragments before;
- 2 sleeves of the "wing" type;
- 1 front part of the skirt with a fold;
- 2 back skirt pieces;
- 6 one-piece facings on the back and front;
- basic matter;
- non-woven dubbing.
Working process
- With the help of an iron, provide interlining with one-piece facings of the front and back of the future sundress.
- Attach the side part of the front part to the face of the front part. Lay relief seams.
- Connect the cuts on the shoulders.
- Process the oval bottom of the sleeves.
- Sew on "wing sleeves" with a pre-made assembly.
- Make facings for the front and back.
- Place the details of the sleeves between the facing strips and fragments of the bodice.
- Fasten the product in the center below the level of the zipper.
Short sleeve dress

kinderly.ru
Based on the shoulder pattern of the standard configuration, a school dress with a short sleeve is made. The model is slightly tapered at the waist. The detachable skirt as part of such a dress is equipped with several opposite folds and pockets.
School suits are supplied with decorative shirt-fronts made of slats (the shirt-fronts are supplemented with buttons). Products are modeled due to various configurations of collars and cuffs. In addition to the main cut, you will need a separate sleeve pattern.
Working process
- Transfer both configurations to paper.
- Adjust the length of the sleeve to the desired level.
- Mark a new bottom of the sleeve, stepping back 2 cm from the part width line. Cut off the sleeve along the drawn line.
- Stepping back 7-8 cm from the waist cut, draw a horizontal line. Cut the pattern along this line.
- Leave the standard top pattern as part of the dress unchanged.
- Construct a drawing of a skirt in the form of two rectangular parts.
- The width of the skirt construction will be equal to the length of that part of the cut that is sewn to the shelf along with the width of the folds.
- Distribute the folds from the center of the front skirt to the seams located on the sides.
- The pocket entry line (if any) is located in the front of the skirt.
- The back of the pattern for the bottom of the dress is built in a similar way.

missbagira.ru
Modern girlish school uniforms are made from fabrics that tend to hold their shape - soft fabrics for jackets, thin classic suits. For children's (teenage) dresses and sundresses, linen, cotton and mixed materials are suitable.
It is best to create school clothes from a matter consisting of 1/3 synthetic fibers, 2/3 natural fibers. Such fabrics let in a sufficient amount of air, retain heat, do not wrinkle so actively, and are quite durable.
Wool is excluded from this list, as it has caustic properties. Velor, velvet and corduroy are also not suitable because of their ability to attract dust and small debris.
A few decades ago, absolutely all schoolchildren were required to wear the established uniform, which greatly facilitated the life of parents. Buying a dress or at that time was not difficult. All stores had a special section where you could pick up a uniform of absolutely any size, both for boys and girls.
Today, there is no generally accepted style. There was only an agreement on the combination of colors. Light top and dark bottom are classic. And it is this combination that the administration of any school asks parents to adhere to. In addition to the standard combination of a blouse with a skirt or trousers, girls are allowed to wear sundresses over a light blouse. But today it can be quite difficult to find a thing of the right size, especially when it comes to clothes for first graders. Often, babies entering the school path simply do not correspond to the generally accepted size range of the form produced today. And even the smallest models are great.
Therefore, it will not be superfluous to learn how to sew a school one. The patterns of this garment presented in the article will help craftswomen understand the principle of creating a base pattern and modeling various styles.
Perhaps, work on a new outfit for a little schoolgirl should begin with determining the length of the cut of the material and measurements.
Calculation and taking measurements
For pattern and fabric calculation, you should measure the height of the child, chest, waist, hips, back width, height from shoulder to chest, as well as the length from shoulder to waist and the length of the finished product. For any model, whether it's a straight silhouette or a variant with a canvas width of 150 cm, you will need a cut equal to the length of the finished product + 10 cm for the design of the seams and the hem of the bottom. If the width of the material is 110 or 80 cm, its consumption will increase by about 20 cm.
What material should not be taken?
The fabric for a school sundress should be selected based on the following requirements for the fabric:
What is better to sew a sundress from?
The ideal option for both price and quality will be the so-called school fabric, as well as katon, gabardine. But you can use other costume fabrics. From knitted fabrics, diving and jersey can be used. In any case, the patterns of school sundresses discussed in this article are suitable for making a product from any canvas, the only difference will be in the fastener.
In addition to fabric, you will need sewing equipment, matching threads, a 50 cm long zipper or buttons. But, as practice shows, the child will be more comfortable with a zipper.
Building a template
The main pattern of a school sundress for a girl of 7 years old, on the basis of which absolutely all styles are modeled, is built in accordance with the measurements taken from the figure. To develop a drawing, you will need to draw a rectangle on paper or on a construction film. One side of it is half the circumference of the chest, the other is the length of the product. Further construction can be divided into several stages:

Perhaps these are all the tricks of building the main pattern of school sundresses. All of its changes relate to design and modeling. And this topic is worth talking about separately, because by changing the number of cut elements and their shape, you can achieve amazing results.
Modeling
If you change the base a little, then new patterns of school sundresses will come out. For example, in the drawing, relief seams from the shoulder and to the bottom can be marked, the sections of which should be flared to the hem. The six-piece product will look like a bell and is perfect for a small thin girl.

You can also make the top cut-off, and arrange the skirt from a strip of fabric gathered with bow or ordinary folds. The place where both parts are combined can be decorated with a satin ribbon and a bow. In this case, it is best to underestimate the waist by about 7 cm.
Patterns of school sundresses for girls can be improved. For example, it is not difficult to fit it on the back and make a real lady's sheath dress in this way for the baby.
Also interesting options would be models with a tulip skirt and peplum along the waist line.
Armhole and neck options
Sewing a school sundress, the pattern of which is built so easily, is not at all difficult. All the most difficult thing that can lie in wait during assembly is the armhole. They can be made from the main fabric or a selection of lining fabric, duplicating the main fabric of the product to the waist line.

In view of the fact that the patterns of school sundresses for girls are built without complex calculations and drawings, and the processing of parts is not so complicated as it might seem at the beginning of work, you should try your hand and make a school uniform item yourself.
| Size (height) | Bust | Waist | Hip girth | age appropriate | |
| size 122 | 58-62 | 55-58 | 63-67 | 7 years |
Payment for goods Buy |
| size 134 | 64-68 | 58-61 | 69-73 | 9 years |
Payment for goods Buy |
| size 146 | 70-74 | 62-64 | 75-80 | 11 years |
Payment for goods Buy |
| size 152 | 74-76 | 64-65 | 79-83 | 12 years old |
Payment for goods Buy |
| size 158 | 76-82 | 65-66 | 82-84 | 13 years old |
Payment for goods Buy |
| size 164 | 82-86 | 66-67 | 84-85 | 14 years old |
Payment for goods Buy |
| Test payment before buying a pattern * |
Payment for goods Test |
* As a result of payment, a file with a pattern is automatically sent to the email address you specified. If the file has not arrived, then you need to check whether you entered the correct postal address when paying. If the mailing address is correct, but the file has not arrived, you must immediately contact the address [email protected]
**You can offer your payment option in the website feedback
Patterns are given without seam allowances.
Recommendations for choosing fabric: shape-holding jackets, fine suits, linen, cotton or mixed fibres.
A sophisticated model of a sundress for a girl will be a great substitute for a school uniform. A fitted silhouette with soft embossed lines and a neat skirt make the model delicate and feminine. The deep cut of the model will look great in combination with blouses, turtlenecks and thin half-overs. A classic thin belt will gracefully emphasize the waistline. If desired, it can be lowered to the line of the hips and a contrasting color can be used.
Difficulty level is above average.
Cutting from the main fabric:
. the central part of the back - 2 children;
. the central part of the shelf - 1 child. with a fold;
. a barrel of a shelf - 2 children;
. barrel back - 2 children;
. skirt - 2 children;
. one-piece back facing - 2 children.
Non-woven details:
. one-piece facing of the shelf - 1 child. with a fold;
. one-piece facing of the back - 2 det..
When cutting the parts, it is necessary to leave allowances for the seams and cuts - 1.5 cm, for the hem of the bottom - 4 cm. And you also need to make notches on the parts for proper alignment.
Processing of the neck and armholes with one-piece facing:


Stages of work:
1. Iron the interlining to the details of the facing of the shelf and back.
2. Fold the details of the central part of the back with the right sides inward and sew the middle seam. Slices iron and process.
3. Fold the front barrel with the right side to the front side of the central part of the front and make relief seams, aligning the notches.
4. Iron the sections to the middle of the shelf part and process on the overlock.
5. Sew relief seams at the back of the back by folding the side of the back and the central part of the back right sides inward. Iron the seams on the back and process on an overlock.
6. Pin the front facing to the front, the back facing to the back, face to face.
7. Stitch along armholes and neckline. Cut the seam allowances close to the seam and notch in several places on the fillets.
8. Turn the facings to the wrong side and iron the edges.
9. Stitch the shoulder sections on the sundress, iron the allowances and hide them under the facings. Sew the shoulder edges of the facings by hand.
10. The neck of the front and back can be stitched if desired.
11. Turn up again along the armholes of the facing.
12. Stitch the side seams on the facings and on the sundress, while leaving a free area for the zipper on the left side.
13. Along the left side cuts processed into an iron, between the cut marks for the zipper, sew a hidden zipper using the special foot of the sewing machine.
14. Turn the facings along the armholes down again and sew to the seams.
15. Fold the details of the skirt with the right sides inward and stitch along the seam, process the seam allowances.
16. Pin the top section of the skirt with the right side to the front side to the bottom section of the front and back, aligning the seam line. Stitch and process the sections, while ironing them on a sundress.
17. Iron the bottom of the skirt to the wrong side and topstitch or sew by hand with blind stitches, depending on the material or as desired.
Recently, for the line of high school graduates, many girls prefer to wear Soviet-style school uniforms for girls. Parents' nostalgia for the school years of the 70s and 80s was passed on to their children, and the fashion for retro style has firmly entered our modernity. On the other hand, the old Soviet school uniform for girls, thanks to the classic model of a school dress with pleats on the skirt and a contrasting color scheme, black and white or brown and white, looks very impressive. In addition, compared to expensive evening dresses, the USSR school uniform can be bought or sewn at a studio much more profitably, which is also important for many families. In a word, if you need to dress inexpensively and effectively for the last call, then the Soviet-style school uniform is the most suitable option.
If you decide to sew a Soviet-style school dress for graduation on your own, we offer you a pattern of a simple model of this form. When constructing the pattern, measurements of size 36 were used. If you cannot buy or sew a uniform from the times of the USSR, please contact our online studio "Skirts Plus". You can order a school uniform of any sample and model, any color scheme and quality of fabric for tailoring in the studio. Delivery of the order by mail.
Measurements for building a dress pattern
When constructing a pattern of a dress, unlike a pattern of a straight skirt, it is necessary to take many additional measurements. Each measurement has its own abbreviated designation used when constructing a dress pattern drawing. For information on what measurements are needed for a dress, and how to take them, see "How to take measurements for a dress".
Please note that all the terms, designations and calculations of this pattern are taken from the educational literature of the Soviet period. In our work, we do not use such a dress construction (and have not tried it).
I offer a proven and already worked out scheme for constructing a dress pattern in the article "Pattern of the basis of a straight dress". You can also use it for sewing a school dress. And from this article, take the main features and some elements of this drawing.
However, the main advantage of this pattern is that it is original. This is how they used to sew a school dress for "Soviet" schoolgirls.
Building a school dress pattern

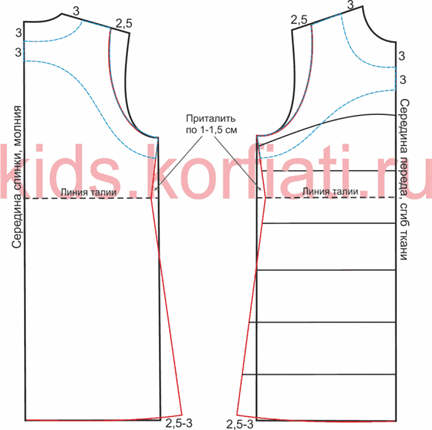
Start building a pattern for a school dress by drawing a rectangle ABSD, the vertical lines of which AD and BC are equal to 76 cm - the length of the dress according to the measurements, and the horizontal lines AB and CD make up the width of the dress and are equal to 43 cm (semicircle of the chest by measurement plus 7 centimeters for all sizes).
Depth of the armhole.
From point A down along the AD line, set aside 18 cm and put a point D (1/2 of the half-girth of the chest according to the measurement plus 6 cm). From point G to the right, draw a horizontal line until it intersects with line BC. Designate the intersection point G1.
Dress waistline.
From point A down along the AD line, set aside 31 cm (the length of the back to the waist) and set the point T. Draw a horizontal line from it to the right until it intersects with the BC line. Mark the point of intersection as T1.
Hip line.
Set aside 15 cm from T down along the AD line and put a point L. Draw a line to the right of it until it intersects with the BC line. Set point L1.
Back width.
From the point G to the right along the line GG1 set aside 16 cm and put a point G2 (half circumference of the chest plus 1 cm). From G2, restore the perpendicular to the intersection with the line AB. Point P.
The width of the armhole of the dress.
Set aside 11 cm from G2 to the right and put a point G3 (1/4 of the half-girth of the circumference of the chest plus 2 cm). Draw a perpendicular line from G3 and mark the intersection with the AB line with point P1.
Lifting the front of the dress.
From point P1, continue the vertical line up 2 cm (for all sizes) and set point P2. From point B, also continue the vertical line by 2 cm and put a point W. Connect points P2 and W.
Side seam line.
Set aside 3 cm from point G2 to the right and put point G4. From point G4 lower the perpendicular to the intersection with the line SD. We denote the intersection point as H. The intersection with the TT1 line is denoted by T2, the intersection with the LL line is denoted by L2.
Auxiliary points of the shoulder line and armhole. Lines PG2 and PG2 are divided into four equal parts.
School uniform dress back pattern

Having finished the auxiliary constructions, proceed to drawing the pattern of the back, and then the front of the dress of the USSR school uniform.
Neckline.
From point A to the right along the line AB, set aside 5.5 cm (1/3 of the semicircle of the neck according to the measure plus 0.5 cm). Set aside 1.5 cm from the extreme point of the segment 5.5 upwards. Connect points A and 1.5 with a concave line.
Shoulder slope.
Set aside 1.5 cm from point P down.
Shoulder line.
Draw the shoulder line through points 1.5 (neck) and 1.5 (shoulder slope) 12 cm long (shoulder length by measurement plus 1 cm for fit for all sizes).
Armhole line.
Divide the angle PG2G3 in half and set aside 3 cm from point G2 along the bisector of the angle. From point G4, continue the line of the side seam upwards by 0.5 cm. .
Side seam.
Set aside 2 cm from the point T2 on the line TT1 to the left and set the point T3. Draw the side seam line through points 0.5, G4, T3 and further from point T3 through point L2 to the intersection with the line SD. From point T3 along the line of the side seam, set aside a distance equal to the distance of TD and set point H1.
Bottom line.
Divide the DN distance in half and connect the division point to the H1 point.
Building a school dress shelf
Neckline.
Set aside 5.5 cm from the W point to the left along the W2 line (1/3 of the half-girth of the neck according to the measurement plus 0.5 cm for all sizes). From the W point down along the HS line, set aside 6 cm (1/3 of the semicircle of the neck according to the measure plus 1 cm). Connect points 5,5 and 6 with a dotted line and divide it in half. Then, from the W point through the division point of the dotted line, set aside 5.5 cm (1/3 of the semicircle of the neck according to the measure plus 0.5 cm = 5.5 cm). We connect points 5.5 and 6 with a concave line.
Dress shoulder line.
Connect point 5.5 (on the line ШП2) with a dotted line to the upper division point of the line PG2 (back). Then, on this line from the point 5.5 to the left, set aside 11 cm (shoulder length according to the measure). Set aside 1 cm from point 11 down. Connect the marked point 11 to point 5.5 (neck).
Armhole line.
Set aside 2 cm from point G3 along the bisector of the angle P1G3G2. Draw the armhole line through points 11 (end of the shoulder line), the middle point of dividing the line P1G3, point 2, touching the GG1 line to point 0.5 (side seam line).
Side seam.
From the point T2 (on the line TT1) set aside 2 cm to the right and put the point T4. Draw the side seam line through points 0.5, G4, T4 and through point L2 until it intersects with the SD line. From point T4 along the line of the side seam, set aside a distance equal to the distance from T3 to H1 (side seam of the back) and set H2.
Waistline shaping.
From point T1 along the line BC, set aside 1.5 cm down and connect the resulting point with point L2.
Formation of the hip line.
From point L5 down along the line BC, set aside 1.5 centimeters (for all sizes) and connect point 1.5 with point L2.
Forming the bottom line.
From point C, continue the line BC down 1.5 cm and connect it to point H2.

To build a drawing of a sleeve pattern for a USSR school uniform, make a rectangle ABSD, the vertical lines of which AD and BC are equal to 50 cm - the length of the sleeve of the dress according to the measurements, and the horizontal lines AB and SD make up the width of the sleeve, equal to 27.3 cm (1/3 of the semicircle of the chest according to the measure plus 1 cm, multiplied by 2).
Eye height.
From point A down along the AD line, set aside 12.5 cm and put a point P (3/4 of the depth of the armhole of the base of the dress). Draw a horizontal line from point P to the right until it intersects line BC. We denote the intersection point as P1.
Auxiliary points of the line of the eye and the bottom of the sleeve.
Divide the line AB into four equal parts. Designate the middle point of the division as O. From the division points of the line AB, lower the perpendiculars to the intersection with the line SD. We denote the intersection points as H, H1, H2.
Sleeve hem.
Connect points P and O, as well as points O and P1 with dotted lines. Mark the points of their intersection with the auxiliary lines O1 and O2. Divide each segment of the dotted line in half and set aside from the division points at right angles to the dotted lines: from PO1 down - 0.5 cm, from O1O up - 2 cm, from OO2 up - 1.5 cm, from O2P1 down - 2 cm. Set aside 1 cm from point 01 up. Draw the line of the sleeves through the points P; 0.5; one; 2; ABOUT; 1.5; O2; 2; P1.
Forming the bottom line.
Set aside 1 cm from points D, H1 and C. Set aside 2 cm from point H2 upwards. Draw a bottom line through points 1; H; one; 2; to point 1.
In the article "Construction of a one-piece sleeve pattern" I propose a simplified version of a straight sleeve pattern, with a minimum number of designations and calculations.
Cutting and sewing a school dress
According to the drawing of the school uniform dress pattern (base), you can sew any style of dress, blouse, skirt, etc., making only the appropriate changes to the pattern. Based on this dress, you can also sew a school uniform dress for older girls with a chest tuck. In this case, the pattern is cut along the waist line.
A skirt for a school uniform is usually made in a circular fold or in folds laid in groups. Sometimes the skirt is cut out with a different number of wedges.
After cutting the skirts, they begin to cut the shelves and back of the school uniform.
The collar of the school uniform is made turn-down or stand-up. With a turn-down collar, the fastener is marked in front, adding 5 cm to the line of the middle of the shelf when cutting to the transition of the fastener and hem. If a stand-up collar is made, then the clasp is made at the back, adding 5 cm to the middle of the back for the clasp and hem.
The chest tuck is sewn along the laid snares or laid in soft folds along the shoulder.
When cutting parts, the following seam allowances are made:
along the neckline 0.5 - 1cm, along the armhole 1.5 cm, along the shoulder 2 cm, along the side seam 2.5 cm, along the waist 4-5cm, along the bottom of the dress 5-6cm, along the side lines of the sleeve 2, along the bottom sleeves 0.5-1 cm. Sleeves are cut without an increase in seams. The high point of the sleeve must be marked, cut with scissors.
After cutting the parts, they begin to sweep the parts. First, the tucks are swept, then the shoulder seams with an appropriate fit of the back by 1 cm and, finally, the side seams, having previously chipped the waist line, back and front with pins.
The sleeve of the school uniform is extended to the bottom, on the cuff. For free passage of the hands on the elbow line along the bottom of the sleeve, the edge (cut) for the cuff 3-4 cm is left unbuilt and notches are made. The distance between them is 3-4cm. Hemmed with a hidden seam by hand. This part of the bottom of the sleeve remains unstitched into the cuff. Then two threads are laid from the notches at the bottom of the sleeve. The laid threads are pulled together along the length of the cuff and distributes the gathers evenly or in groups. After that, the cuff is basted, applying it with the right side to the front side of the sleeve. Attached at a distance of 0.5-1 cm from the cut edge. The cuff is folded 0.5-1 cm and sewn from the inside of the sleeve with a hidden seam per line. The finished sleeve is swept into the armhole.
The turn-down collar for a Soviet-style school uniform is cut double, adding 0.5 cm seam allowances. The bottom line of the collar and cape are sewn 0.5 cm from the cut edge. The seams are straightened on two sides. The corners are cut out so that there is no thickening, then the collar is turned inside out, ironed and basted to the neckline, after chipping the middle of the collar with the middle of the back, and the edges of the collar along the stitching line with the middle of the shelf.