DIY cardboard box diagrams. Decor of newspaper and wrapping paper. #29 Gift box “Petals”
Beautiful and unusual gift wrapping gives a pleasant impression and creates a little intrigue. I immediately want to check what's inside? To prepare a gift, you don’t have to contact the packaging department, but you can do the work yourself. Let's try to figure out how to make a gift box with your own hands.
There are actually a lot of options for such packaging. You can simply make it from cardboard and decorate it with a paper bow or ribbon. The most interesting are the options with scrapbooking elements. Below we will look at both the first and second types of packaging.
Simple gift box
You need to prepare decorative thick paper, scissors, ribbon, pencil. Below is a master class with which you can make a box like this.

Let's start with the lid. Draw and cut out a square with a side of 21.5 cm. Draw two diagonals.

Bend one of the corners of the square so that the vertex coincides with the intersection of the diagonals.

Then make a quarter diagonal fold and unfold the corner.

Now perform similar actions with each corner.

Make two cuts in opposite corners, as shown in the illustration.

Fold the corners without cutting along the folds already made.


Fold the sides inward.


Then bend the loose ends and tuck them in.

The lid is ready.

Cut a 21×21 cm square from cardboard of a single color and do all the same manipulations as with the lid.

By changing the size of the square and the color of the paper, you can easily make beautiful boxes in the right quantity in a short period of time.
The packaging is decorated with ribbons or decorative bows. Here are some photos.


Let's make a voluminous bow for our box.

Cut 9 strips from colored paper, the length ratio is clearly visible in the picture. Glue each one in the shape of a figure eight. It turned out 4 sizes of parts.

Now you need to connect the elements, placing them on top of each other, following the principle: from larger to smaller. Once the glue has dried a little, attach the bow to the box.

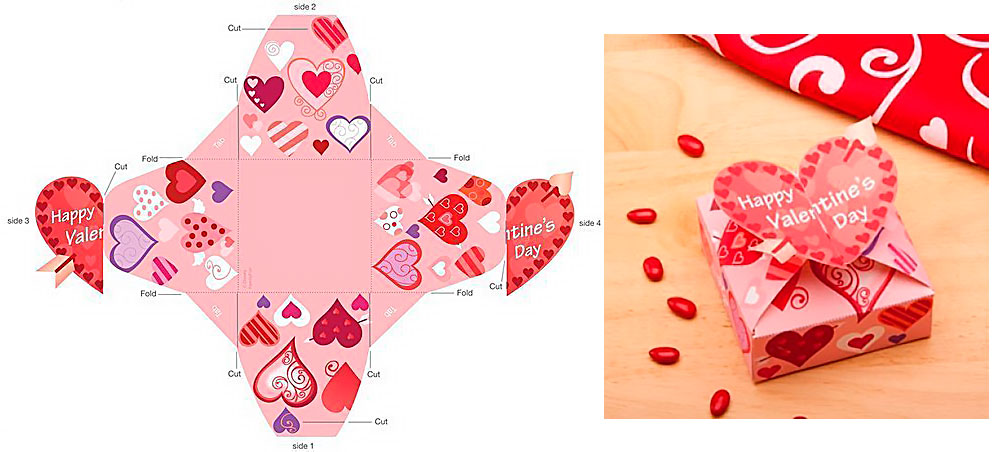
Gift box with heart
Let's make a wedding gift box with charming hearts.

For crafts take:
- double-sided cardboard 25×25 cm;
- scissors;
- glue;
- stationery knife;
- plastic for lamination 12×12 cm;
- glued strips with beads, beads or rhinestones;
- artificial flowers;
- leaves (they can be cut from lace and glued to non-woven fabric to give them density);
- scheme.


Cut out the templates and follow the indicated lines with a blunt knife to easily make neat folds in the right places.

Transfer the heart template to the lid piece and cut it out with a stationery knife.

Make folds along the lines and fold the box, fix it with glue.

Carefully close the window with film from the wrong side.

Decorate the lid with flowers, stripes and beads.


Make the bottom in a similar way. Complete the composition with a ribbon.
Creative ideas
Coffee scented box? This is exactly the version of the packaging box that we suggest you make:

To do this unusual design, you need to print the text in calligraphic font. Lightly wet the sheet with water and sprinkle evenly big amount instant coffee, grind gently. It is better to take coffee in powder form rather than granules.
Then cut the paper into several pieces of irregular shape and paste over any suitable ready-made box.
Video on the topic of the article
The video shows master classes on making original packaging.
For a gift to make an impression, it must be presented skillfully. A beautiful box made with love plays an important role in this.
A universal selection of gift ideas for any occasion and occasion. Surprise your friends and loved ones! ;)
How to make a gift box with your own hands
Gift packaging can be very diverse. But there is one rule - the cardboard or paper from which you want to make a box must be required quality. Classic in this sense children's cardboard Not all fit.
Where can I get such cardboard or paper? First of all, in specialized stores for creativity or even scrapbooking separately. It’s good if there is such a store in the city, you say, but what if you don’t have one at hand or the prices are sky-high?
These leaves will be enough for you to make small souvenir boxes (for jewelry, sweets, toys, etc.). Your family will appreciate it
And now I suggest you start with the actual detailed photo master classes, which will include a diagram for creating each individual box.
Master classes on creating boxes from cardboard and paper
Small boxes
First of all, I want to give you 5 designs with very cute patterns that will make this wonderful packaging:

The first one has red roses. If you want to impress your lover, then she is definitely for you.
Principles of working with templates:
- Print the layout you like on thick paper.
- Cut out the future box along the contour and cut in those places where there are straight lines (focus on the light scans - the location of the lines is the same everywhere).
- Fold the box along the dotted lines and glue it so that the parts with semicircular ends lie between the other two and the round ends point up.
- That's it, all that remains is to bend the lid properly.


And again roses, but more delicate.

And now there are two options for Birthdays - candies with balls and lollipops.


Large rectangular
This is perfect for large gifts (for example, wall clocks). You will need specialized binding cardboard to make the box really convenient. By the way, binding cardboard can also be purchased in specialized stores or on Ali.
The incision sites are marked in orange. The lid can be made the same way, but with slightly larger dimensions (2-3 mm).

For a man
If the gift is intended for a man, then I suggest choosing one of the following options.
Simple shapes are on trend - this is proven by the following 4 templates for creating strict, classic boxes. For these you will again need thick cardboard.


If the gift is intended for a loved one, then there should be more than enough romance ^^ There are butterflies, hearts, and all kinds of declarations of love. They can be made from thick cardboard or thick paper.


Heart
Heart boxes are very popular because you can use them to express your feelings. Or admit them


Cake
Are you getting ready for a party where everyone will need to be given a little surprise? Or maybe a wedding is planned? In both cases, cardboard pieces of cake will come to the rescue.
A beautiful and clear diagram is suitable for both the bottom and the lid.

Paper boxes
Boxes don't always need to be dense - sometimes it's enough just to create beautiful picture. Then I suggest you use this convenient scheme of 6 different packages:

If you are going to a child’s party (or maybe you want to please your child), then make him a cute box in the shape of an animal.

Give such a boot to happy parents. Follow the traditions: pink for girls, blue for boys.

Boxes for the New Year
The mood can be created not only with the help of gifts) Just look at these 8 lovely boxes, each of which can also be a great New Year's decoration
This is especially necessary if for some reason there is no New Year's tree. The main thing in this packaging is to trim the edges beautifully and neatly.

Snowflake
Of course, this box itself is wonderful, but the silver paint on the tips of the snowflakes can add some zest.
Tip: Give something in this package to a girl who loves Frozen.

Bag
For giving a gift - one of the simplest options.

Box of sweets
For all lovers of beautiful New Year's favors and quick handmade items! Take a plastic cup with a smooth surface, cut the edge and cut the edge.
Fold the cut pieces inward so that they cling to each other. Place some goodies inside and cover the top with something cute.

Another option for candy packaging is a donut. It is a little more labor-intensive, but more effective.
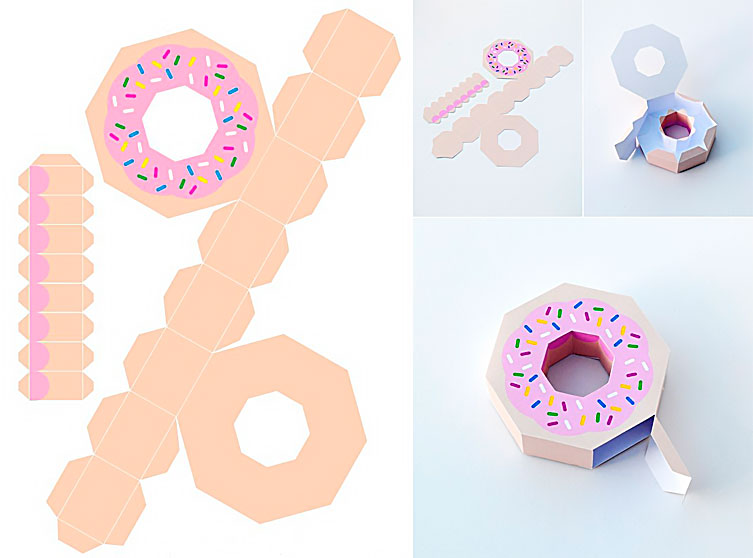
And, of course, the candy itself.

A slightly more modest pyramid from which you can build a geometric Christmas tree. 
A few more boxes
Finally, there are 3 more boxes for you that did not fit into the previous groups.


How to decorate a box with your own hands
The design of the box can be very diverse - from simple shapes in the form of birds and hearts to intricate flowers and bows. I will write more about box decor in the future - don’t miss it.
In the meantime, subscribe and comment - see you soon!
Sincerely, Anastasia Skoracheva
Content
“If you want to do it well, do it yourself” is a well-known phrase that different situations confirms its truth. So, if you want to decorate a gift beautifully and interestingly, then it is not necessary to contact specially trained people and spend money on their services. Let's better create a gift box with our own hands from cardboard, let's do it well and with high quality.
From cardboard you can make a box with a valve lid, with a removable lid, gift bag, a small chest for a memorable souvenir and other products.
Scheme
In order to make high-quality and beautiful box you will need special templates to use to cut the workpiece. We offer several design options so you can choose the one you like. Note that among these schemes you will also find products that do not require glue when working with them. The design itself is designed in such a way that the box is assembled and secured by itself.
This DIY cardboard gift box design is suitable for a product made of thin cardboard. The template needs to be enlarged to the size you need, transferred to cardboard and cut out.

The dotted lines show you where to fold the cardboard. Use an old pen or nail file to pre-mark thin grooves so the cardboard will bend better and more beautifully. Cardboard is quite easy to work with once you already know how it will behave in a given situation.


To hold the parts together, you can use PVA glue, hot glue, double-sided tape, or any other material that will support thick cardboard.
Manufacturing process
First, let's look at the materials and tools:
- cardboard (thick corrugated and thin colored);
- PVA glue or glue gun;
- double sided tape;
- scissors;
- stationery knife;
- ruler;
- a pen that no longer writes or a nail file;
- all kinds of decor - beads, ribbons, lace fabric, twine, quilling paper, napkins for decoupage and so on.
What's next? Choose a template suitable for your gift, transfer it to cardboard, carefully cut it out using scissors or a sharp stationery knife, and connect the parts. Now all that remains is to design the box. Use the birthday boy’s favorite colors, remember his hobbies, passions, and use this knowledge in the design of the box. We offer you to look at several interesting options:

Laconic design is often the most stylish and original. Try not to overload the gift box with too much decor. Or at least choose decor in the same style or in the same color scheme.
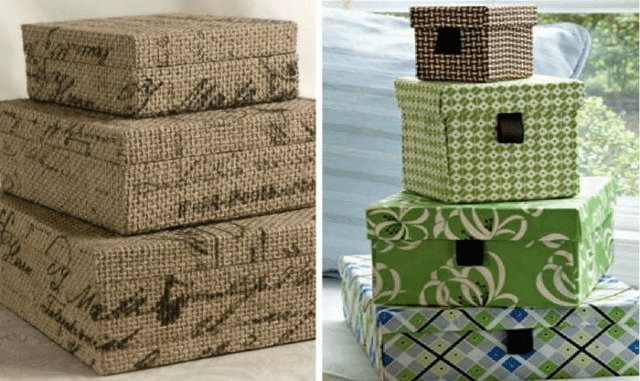
The main material for the box can be cardboard, but the top can be decorated with burlap, wallpaper, gift paper and other materials. To make the box truly perfect, don’t forget to decorate the inside as well.
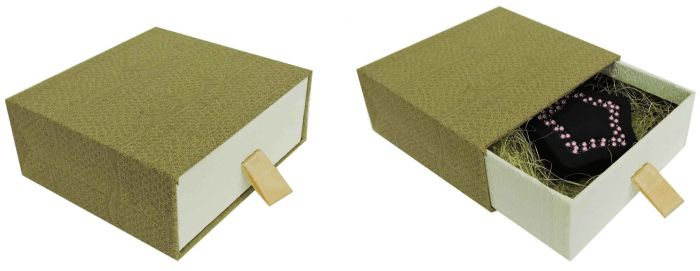
At the bottom of the box you can put a sheet of foil, a soft pad, satin fabric, decorative hay or any other material.
Large gift box
To create a large gift box, you can use a ready-made box from a small TV, food processor or any other medium-sized appliance. What else will you need:
- beautiful wrapping paper;
- satin ribbons to match the paper;
- glue gun;
- scotch;
- stationery knife;
- thin plain cardboard;
- decorative elements (if you want).
Making a gift box from cardboard with your own hands, especially a larger one, will not be difficult for you, but you will spend almost 4 times less money on it than if you buy ready-made packaging.
First you need to lay out the finished box so that you have a clean sheet of cardboard. Next, you need to draw a diagram taking into account the dimensions of your gift.

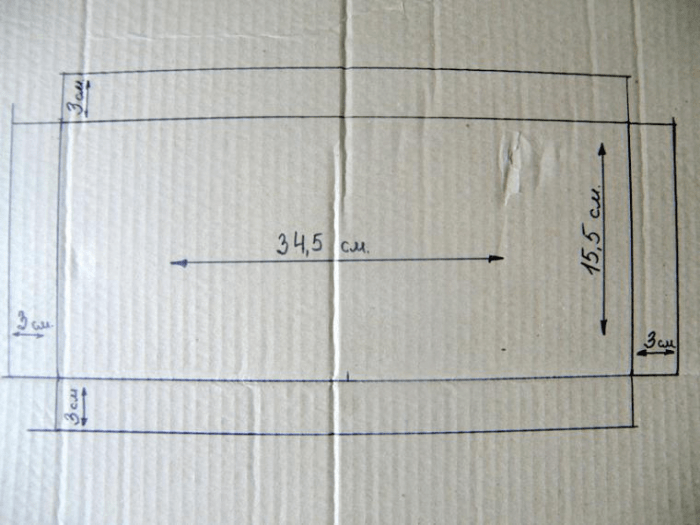
Next, using a stationery knife, you need to cut out all the parts. You will also need a bottom for the box, which will also need to be cut out. For the sides of the bottom, use thin cardboard, which will not reduce the internal space of the box.
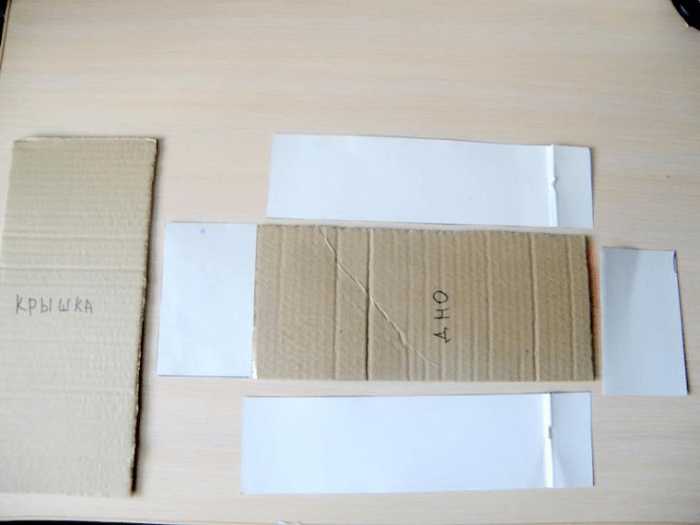
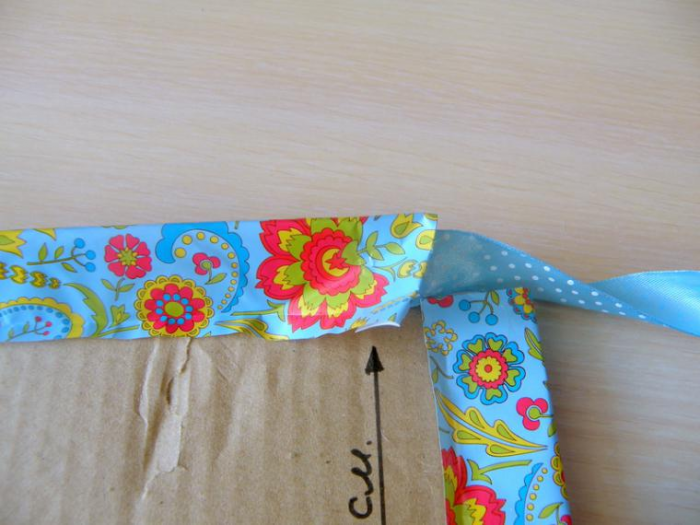
Now all the parts need to be laid out on a sheet of your wrapping paper. Leave a few centimeters everywhere so that you can carefully arrange the box and completely cover the cardboard.
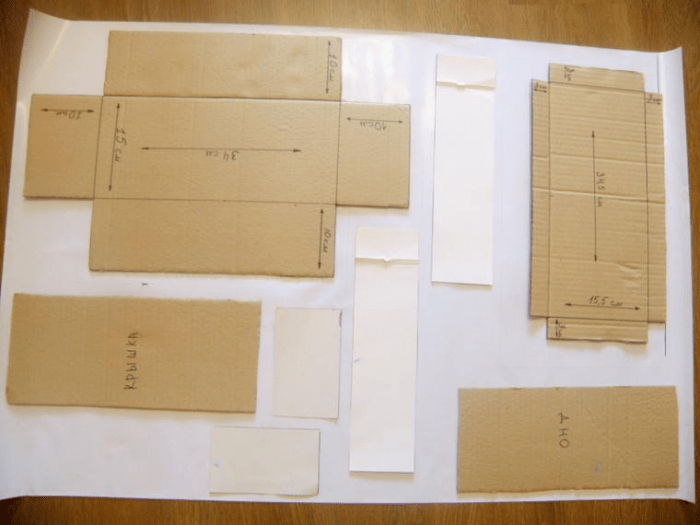
Trace all the parts, and then carefully use glue to connect the cardboard to the wrapping paper. Be careful not to use too much glue so that it stays on the piece.

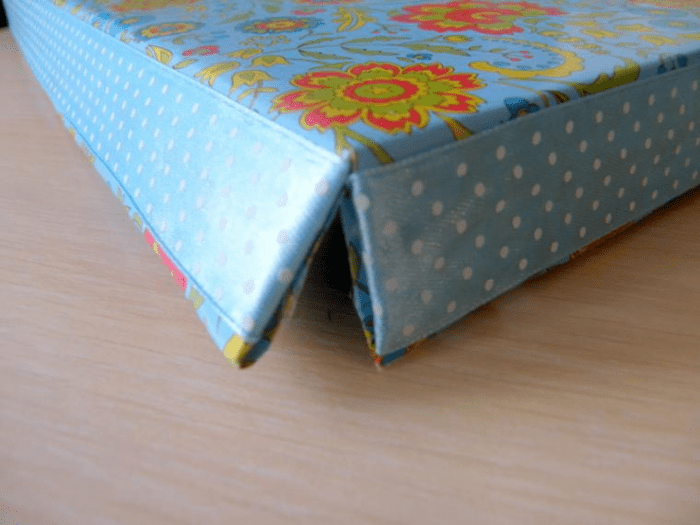
Now, using a glue gun, you need to connect the sides of the bottom and all other parts of the box.

Now take satin ribbon, carefully hide its edge under the wrapping paper of the lid, as shown in the photo:

From the same tape make beautiful bow, which will decorate the finished product.

Don’t forget to decorate the inside of the gift box with your own hands from cardboard.
You can attach special ribbons inside to firmly secure the gift. This will be needed if you send it.
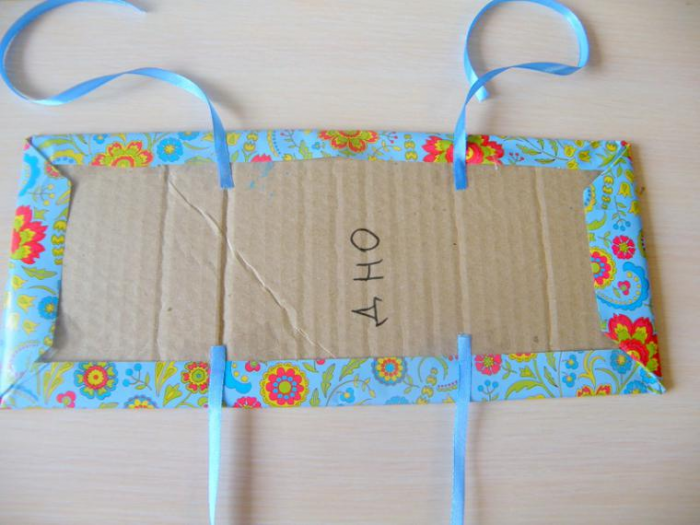
The inside of the box should also be decorated using wrapping paper, then it will turn out neat and complete.


Who would have believed that such beauty could be made with your own hands at home using improvised materials?
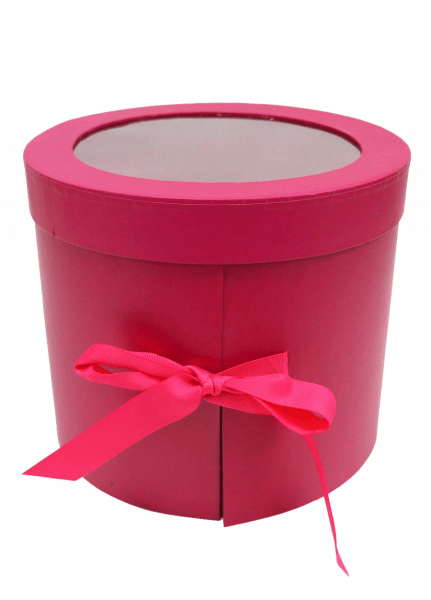
Round box
If the gift is intended for a lady, and you want to present it in an original way, then your choice is a round cardboard box.
For it you will need not too thick cardboard, from which you need to cut out two circles and two rectangles.

Do not come up with complex schemes and do not make unnecessary movements - for a small gift like this simple option creating a round box will be enough. But think carefully about the design:
You can use the quilling technique, decorative fabric flowers, beads, appliques, fresh flowers, postage stamps and other decor.
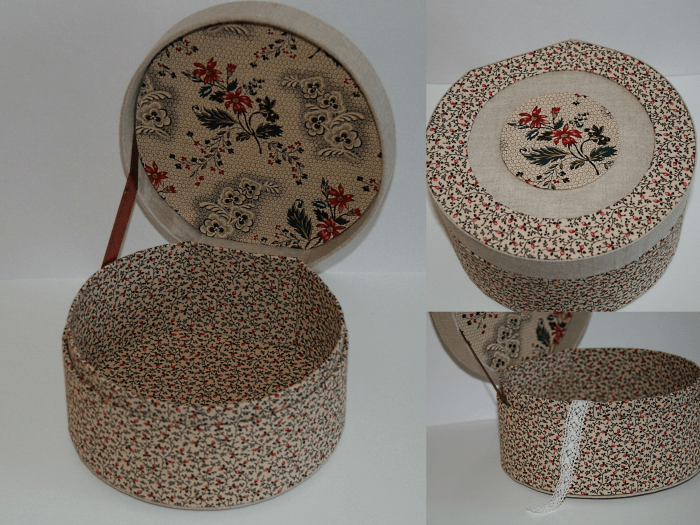
As a highlight, you can use thick, colorless cellophane to make a transparent lid for the box.
Try to start any craft in good mood, in a place prepared for this purpose. It is advisable that the room is ventilated, because you will be working with glue. There should be plenty of light in the room so you don't have to strain your eyes. All these nuances are very important, because the quality of the product depends on it.
A master class on creating a cardboard box with your own hands will help you consolidate the material that was outlined above:
Today I will tell you how to make a square cardboard box with your own hands according to the correct pattern. It can be decorated with any decor or suitable cardboard with a ready-made design.
We will need:
Cardboard 38x25.5 cm;
ruler;
scissors with a sharp end;
pencil;
organza ribbon;
white, pink corrugated paper;
half beads;
sisal;
glue gun;
awl or toothpick;
ruler.
First you need to draw a layout of the box on the back of the cardboard. It consists of six squares of the same size. We also draw the sides, with the help of which the walls of the box will be fastened, of the same height. You need to make small cuts on each edge. When gluing, they will prevent the cardboard from being deformed. Only the protrusion from the very first square on the left will be 1.5 cm wide and its corners will be left even for now.


In order for all the walls to be perfectly even, we draw very carefully along the lines under the ruler with scissors. This is how we formed the fold points.

Now let's process the corners of the protrusion of the very first square. We make them rounded and make small cuts on each side. With this part the lid of the box will be closed.

We bend all sides of the box, forming a right angle. It should look like this.

Let's start assembling the box. This is done very simply. We place the cardboard blank with the lid closer to us and begin to roll the cardboard towards ourselves from the other side. We glue the internal allowances to the walls, forming a right angle.


We get this cardboard box in the shape of a cube.

All that remains is to decorate. We tie the side walls with an organza ribbon, the ends of which are tied with a bow.

Cut out 5 rectangles, each 6x5 cm, from white paper.

We form petals from each, making one edge sharp and the other rounded.

Gently stretch the rounded edge until waves form, then use an awl or toothpick to curl the edges of the petals back.

Glue the petals onto the cardboard in a circle, forming a flower.

We form a small circle from sisal and glue it in the center. There we paste a ball of pink paper, which can be formed using your fingers. Additionally, we decorate the box with beads.

So we made a simple one in which you can put a gift for a loved one.


We all love gifts. Sometimes you want to give gifts made with your own hands. Or we need to make packaging for a purchased gift, and such packaging that it reflects our feelings. Most often, the gift is packaged in a box. So let's look at what boxes you can make. Consider rectangular and square boxes.
The simplest box
This box is without any special tricks. Without cover. Here is her diagram:

I must say, boxes can be made using the same pattern different sizes. Therefore, the diagram indicated in centimeters can be enlarged. If you have a diagram, you can use it to make both a small and a large box. Depending on what size box you need. Looking at the diagram, we see that we must first draw a scaled view of the box to the required size.
If you need a dense box, then it’s better to make it made of cardboard. It will be stronger. You can even choose cardboard with colors. You can take white cardboard. The diagram shows the creation square box. Instead of a square one, you can make a rectangular one. To do this, you need to make changes to the proportions of length and width, to the proportions of the sides.
After careful drawing, carefully cut out the outer side of the drawing along the contour. Then we bend along the folds. We glue the edges for gluing. Consistently. Please note that the top of the box has folds on all sides. This is to ensure that the top is aesthetically pleasing and comfortable. We bend these bends. We glue it. All. The box is ready.
Boxes with finished lid
Here's the most simple circuit box like this:

If you need a small box, then it is better to make it from paper with a density of 80 or 120. If you need a larger container for the gift, then you need to choose a denser material. When drawing, pay attention to the proportions. If you need a square at the bottom and top, and a rectangle on the sides of the box, make the proportions as in this diagram. Drew it. Cut it out. Bent. Glued together.
If you need a box with a ready-made lid in the form of a cube, then this diagram will do:

A minimum of material is needed here. Everything is simple and functional. Drew it. Cut it out. Bent. Glued together. You can paste additional pictures on the box for design.
There is a sketch of a rectangular box, already with tricks.

Here the edges for gluing are beautifully beveled, and the outer sides and top with lid have eyes for fastening. Such containers for gifts can also be modified at your discretion. The same circuit can have many variations within its implementation.
Another diagram of a rectangular gift box:

Creating such a craft is a little more complicated than the previous ones. There are additional side slots. This increases the strength of the container. The lid has additional wings - sides, which are inserted inside the box. The wings are made with roundness, aesthetically pleasing. Naturally, the proportions of the box in width, height, and length can be changed. Do what you need to do.
Boxes with top and inserts
If we want to make a rectangular box with a top and inserts, then this one is best suited:

This box is good because, thanks to the additional wings on the sides (put inside during assembly), it becomes stronger when gluing. And the lid with side wings and a front lock with a side overlap enhances the effect of the strength of the box (in the diagram, the lid with the front lock is drawn on the right side).
There is also a box with a top and inserts along the bottom of the box. Everyone has seen these boxes. Here's the diagram:

Let us immediately indicate that everything that is at the bottom of the diagram relates to the assembly of the bottom of the box. All the curly lines along which the cut must be made were made for a reason. The four halves of the four sides of the bottom, connecting in the desired configuration, form a tight adhesion of the bottom without any glue. The glue is applied to the box in only one place.
This place is indicated on the very left edge of the diagram - a side strip for gluing. You don't need any more glue for this box. The upper side wings are needed to provide rigidity to the lid that is lowered from above. And the lid itself has an additional valve that fits inside the box.
Boxes with separate lid
The easiest way to create such a box is shown in this diagram:

The sides that are wider are slightly larger. So that they can be folded at the top and glued inside too, for rigidity and aesthetics. The lid for such a box is easy to make. Take the main size 3 millimeters larger. The rest: the width of the sidewalls is at your discretion. Glue the inserts on the sides. Dry the finished products.
Another way to make a box with a separate lid. More aesthetic. Moreover, the box is not only beautiful. It also gains strength. Here is her drawing:

It’s convenient to make such a box because it’s easy to maintain the proportions, no matter what size you stick to. It is easy to draw using a square as a basis. The side wings are also easy to make at any scale, making the cut angle to the middle of the side of the virtual outer square. By folding such already cut material, you will get a product where the wings for gluing converge at the top on both sides. This gives the product not only aesthetics, but also strength. The sketch shows how to create a product both cubic and rectangular.
The diagram does not show how to create a lid for such a box. Yes, you don’t need to draw it. And so it is clear. To create the lid you need to apply the same scheme. True, draw a square 2 - 3 mm larger.
Since the sidewalls of the lid will be significantly less base, then the wings for gluing need to be simply beveled at a certain angle in order to connect the sidewalls. When creating a lid, it is not necessary to make the wings for gluing all the way to the middle, towards each other. It is enough to make the wings for gluing simply at an angle.
Also, for those who want to learn how to make boxes, I have two links to videos where you can see how it’s done: