Beautiful handmade box packaging. Box in the form of a prism. How to wrap a box with gift paper
It is often said that beautiful packaging is already half the gift. And it really is. Modern materials, tools and work techniques allow you to create real masterpieces. Read on for DIY gifts. This type of creativity can be not only useful for you, but also very interesting and exciting. See ideas, choose your favorite samples. Create your own exclusive.
We make ideas and options
Create beautiful packaging can be done in two different ways:
- Decorate the finished cardboard base.
- Build a product from scratch.
In the first case, you will need to find a blank of the right size and shape if you want to get something unusual. This method of working is quite simple as you don't have to think about how to create a solid, neat construction with right angles and a suitable lid. Here you immediately begin to engage in creativity - decorate the surface of the box. However, in this case, you are limited to the form that you can find. Usually it is a cube or a parallelepiped.
The second way of working makes it possible to create absolutely any design: standard or unusual in the form of a pyramid, cone, heart, Christmas tree, etc.

However, here the work will be somewhat more difficult. Before you start decorating, you will have to glue the structure yourself. The template can be downloaded and printed to scale.

If you understand what you are doing and have at least minimal experience in drawing and design skills, it is easy to create a diagram yourself with a pencil and a ruler.

Materials and tools
How to make gift boxes - choose for yourself. In any of these methods, the set of accessories for work is approximately the same. So, you will need the following:
- cardboard, thick paper or finished box;
- ruler;
- pencil;
- scissors or stationery knife;
- glue or thermal gun;
- packaging, decorative, design, corrugated paper to create a decor or pasting a workpiece;
- the cloth;
- satin or paper ribbons;
- decorative tape;
- any embellishment materials for making appliqué elements, such as hearts or snowflakes, beads, bows, stickers, etc.).
As you can see, nothing unusual and expensive is required. The main thing is to create or find a ready-made base, and you can decorate it in any way, focusing on the tools at hand or the theme of the gift (New Year's, anniversary).

How to make from an existing workpiece
If you decide not to complicate your life and have prepared a cardboard blank of the desired shape and size, proceed immediately to the decoration process. Work like this:
- Measure the box and draw on decorative paper or fabric a diagram of the detail that you will glue the base with.
- Don't forget the gluing allowances. They are necessary so that at the joints, for example, on the ribs, as well as on the upper edges of the box, the base material is not visible.
- Cut out the blank from and carefully glue the surface.
- Do the same with the lid, if available.
- Glue any suitable decor on top, such as paper flowers, lace, snowflakes, hearts.
- Make an imitation of tying with ribbons using decorative tape.
- Decorate the package with a spectacular bow.
In a word, let your imagination run wild, but remember: everything is good in moderation. Do not turn the surface of the product into a colorful carpet. It should remain stylish and harmonious.
How to make packaging from scratch
So, you have learned how to make a gift box with your own hands from an existing blank. The second option is to make the product from a regular sheet of cardboard. Work like this:

Now you know how to make paper gift boxes. In fact, you can work in different sequences: according to the plan described above, or decorate the product before gluing, while it is still laid out on a plane. Choose the method that is more convenient for you. Try both.

Ideas for unusual decor
If you have already decided how to make a gift box, but have not chosen the decoration option, you can use one more interesting technique- decoupage. It is also called napkin, as napkins with thematic images, such as New Year's or romantic ones, are glued to the prepared surface. Everything is varnished on top. Although the instructions are presented in a very abbreviated form, the whole process is actually quite simple. And most importantly, in this way you can get gift boxes, which themselves will resemble a souvenir - a box or an old chest.

So, you have learned how to make from existing packaging or completely from scratch. Choose your favorite ways to create designs and decorating ideas. Make original "clothes" for presents for any holiday.
DIY boxes
What is the packaging without the box? Of course, a gift can be packed in a bag or bag embroidered with rhinestones and beads, but making a box is easier (especially if you are just starting to master the skill of an applied decorator) and faster (this is important in a situation when you suddenly received a call and were told that you, it turns out, waiting at a party where everyone has already gathered, and decency simply oblige to present something small and nice to a half-familiar mistress of the house). You can buy a box in a store, but it's expensive - sometimes more than the gift itself is worth. You can use a box from under something - for example, a small one from under charger for mobile phone or a large one from under sandals. But it is only our parents who tend to keep all the boxes in the pantry, and young people do not have such a habit. So it does not hurt to learn how to make boxes with your own hands. By the way, it makes sense to put them on for the future - at the same time you will practice.
simple box
Having learned how to make the simplest base box, you can make more complex options without much difficulty.

We take a sheet of cardboard of the right size and draw a rectangle or square on it (depending on the volume and shape of the gift itself). We mark and draw length lines from each side of the drawing to the center of the box - this is the depth. On one side of each "sidewall" we draw protrusions of 2 cm, cut them off near the bottom of the box at an angle of 45 degrees, cut out the entire workpiece completely, bend along each line and glue it to the adjacent "sidewall".
The lid should be 2-3 mm larger than the box itself. To keep the lid, you also need to make ledges. Before gluing the cover, fasten it with paper clips and check if it fits.
"Grandma's Chest"
The manufacture of this package begins with the same blank as for a simple box, with "sides" and protrusions for fastening. Raw material- the thickest cardboard that you can only find in an office supply store.

To determine the size of the pattern, place your gift in the center of the sheet (glued, if the gift is large, from two halves) and step back from each edge by about 8 cm - then you can definitely be sure that the gift will fit.
From one of the large sides we draw a rectangle equal in size to the bottom of the box - also with protrusions for fastening, and so that the sides of the lid go inside the “chest”.
We draw on the "sides" of the box (located across the width) a semicircle, the length of which should be equal to the width of the lid. We make the second semicircle along the length of the lid. We glue the workpiece.
The final step is coloring. You can, for example, glue a pre-painted "barn lock".
Again we draw a square with "sides", that is, the walls of the "house".

At the same time, we draw a “roof” - triangles (preferably with protrusions for fastening).
In the "sides" we mark the door and windows, cut them out, select rectangles of cellophane or polyethylene that are symmetrical to the openings. A window frame is cut out from a separate sheet of cardboard - we will fasten it, like “glass”, on the back of the sheet.
The door can be drawn either so that it opens and closes, cut through from three sides.
We color the "house" at our discretion. We fix the "chimney". It remains to glue the "house", put a gift into it and fasten the fragments of the roof together.
At the final stage, you can make small holes for a bow or ribbon.
We draw a square. We retreat from its sides and draw five more equal squares.

We add them around the perimeter of the base, attaching the last one to one of the previous ones.
Do not forget to make allowances for gluing fragments.
Having cut out the blank, paint it or paste over it with bright paper.
We glue the fragments, put the gift in the box and fasten the top.

triangular box
We draw a pattern - a triangle twice as large as the box we need. We divide all sides in half and draw straight lines along their middles - these are the fold lines of the box.

We put the gift in the center of the inner triangle and glue the box. To do without allowances for fastening, you can pierce small holes around the edges for decorative tape.


Box-"handbag"
From plain or colored cardboard, you can cut out and glue a handbag as shown in the figure.

cone-shaped box
The packaging box can also be cone-shaped. The starting material is cardboard or thick paper. It is not necessary to go to the stationery store for cardboard, especially if there is not much time before the party. Juice packaging, a kefir tetrapack will be used, in extreme cases - a cover from an old wall calendar.

envelope
Such an envelope can be made for both a flat gift and a postcard.

box-case
Such an “intimate” tiny case also implies a very “thin” gift, intended exclusively for close person. From two contrasting sheets of cardboard, you can glue a sliding box-case in two parts.

Box with a clasp
Such a box is good for a mother, girlfriend or daughter, as it looks at home and emphasizes the closeness in a relationship.

Starting materials - dense beautiful paper or colored scraps of whatman paper.

It is clear that only a small box will look cute and hold firmly. Consequently, the gift is also meant to be "chamber" - either tiny, but valuable, or completely playful, like candy with a note.
Box-"asterisk"
Option one
This package is suitable for baby gift, for example, for small things like elastic bands and hairpins.


Option two
In such a package, it is good to present a modest "household" gift.

Boxes for watches and money
Pretty "substrates" for watches or chains can be made very simply. And the money invested in a man-made envelope will not seem like such a “mundane” gift.


We put the pattern on cardboard or velvet paper. We cut it out, fold the box and decorate with various applications.

Cup box
Cardboard cup with delicate flower top is suitable for any gift.

1. We make a pattern according to the scheme and fold the workpiece.
2. Carefully lay the allowances.
3. We fix the folds at the bottom with adhesive tape.

chest
According to the manufacturing technique, such a chest is not much different from a simple box. At the top, it can be decorated with any “lock”, depending on the purpose of the gift and the occasion.


"Locomotive" from chests
To build such a package, at first glance, is difficult. However, in fact, it consists of the number of simple cardboard chests you need.

Box-"leaves"
This box is equipped with a double-sided latch.

Box-"T-shirt"
Such packaging is suitable for a flat object, such as a book or a disk.

Box-"machine"
And in this box a toy car will look great. Or... diamond earrings.


Box-"giraffe", "elephant", "tortoise"
Children's gift boxes can be made in the shape of a variety of animals.

Box with application
An ordinary flat box can turn into a funny animal - just stick an application on top and bottom of it. If you make a bottom pattern in the form of a “sun” with a “fringe” for attaching the case, the box will turn out to be round.

We start making packaging with a paper tube. Glue the cone. Having cut out two small ovals with ears, we glue them together. We put a blank-head on the cone-body, stick a bow on the neck, draw a tail and paws.

When the gift is packed into the box, seal it from the bottom with a thick cardboard circle.

"Frog"
A small paper cone will serve as the frog's head. We glue the eyes to the workpiece, draw the mouth, and then glue the body from the cylinder with the bottom closed. It remains to glue the head and paws to it and color the “frog”.


"Muzzle"
Making a funny face with multi-colored pigtails is very simple. Source materials - several fragments of multi-colored paper, preferably one that does not tear (for example, cigarette paper).
We wrap the gift box in paper, fastening the seams - then they will be hidden under the pigtails. Weave from paper different colors a long pigtail - such that it is enough to wrap the box around the perimeter. We tie lush bows to its ends. You can tie the pigtails with a thread, and fluff the tails. It is more interesting if the ponytails with bows fall on the corners of the box. We draw the face itself with felt-tip pens.

"Candies"
Such "sweets" are ideal for "distributing elephants" at school or kindergarten at the birthday of a beloved child. They can also be used during wedding celebration: guests who give gifts will be pleased to receive a gift in return, albeit the most modest.
"Candy" universal
The starting material is a rectangular sheet of drawing paper, rolled into a tube and fastened with a stapler or tape. The rectangle is selected taking into account the dimensions of the gift.

Along the perimeter of the tube at both ends we glue small rectangles of thin wrapping paper and pick them up in a "quill" using a decorative ribbon. Before gluing the blanks, we decorate them with shells, dry flowers, stickers, appliqués, etc.
"Candies" for fruits
You can pack everything - not necessarily a valuable gift for a special occasion. A handful of cherries or a few apricots brought to the hospital by an ill colleague will make a completely different impression if you work a little on their design.

1. We fold a “boat” out of thin, preferably bright tissue paper.
2. We place the fruit in its “nose” so that the paper fits it like a scarf.
3. We twist the ends of the paper left free. We connect the ends.

For fruits or, for example, for a larger bunch of grapes, an oblong sheet of paper is suitable.
1 Lay the offering in the middle of the sheet so that there are free ends.
2 We collect them in brushes and bandage them.

"Sweetie"
Such packaging is suitable, for example, for jewelry, a small toy, a tie, etc. It is better to get rid of the factory packaging and turn the gift into a “candy”.

Our task is to bend the paper so that the resulting envelope resembles a candy wrapper.
1. We twist a tie (or any other soft gift) with a tube - this way it will be easier to pack it.
2. We put it in the center of gift paper.
3. We bend the ends so that we get triangles, like a candy wrapper.
4. We bend and bring the ends of the package together, fixing them with adhesive tape.
5. Bandage the junction of the edges of the package decorative tape or cord.
Preparing for a solemn event, a person always carefully thinks over his image, style, demeanor and, of course, a gift. It happens that the turn comes to the last when there is practically no time left for its purchase and packaging. In this case, the invitee begins to rush about in search of a present, and when he is found, he puzzles over how to present it. If there is no time to go to specialized gift wrapping workshops or run to the nearest market to buy packaging, improvised materials and imagination will come to the rescue.
Learn how to make a box out of cardboard, and perhaps these methods will save you in an emergency. Also, these accessories can be used not only for gift wrapping, but also for storing various household trifles. There are several methods for making cardboard containers.
Material selection
Before you make a box out of cardboard, you need to decide on the material itself. You can take an already colored sheet or decorate it later. If you intend to store heavy objects, then you need to take a dense material.
The decoration of the made box can be paper applications, drawings, various stickers or fabric. It all depends on who and for what reason it is made.

How to make a rectangular box
Perhaps one of the most simple options packaging is a rectangular container. To make it, you will need a sheet of cardboard, a pencil, a ruler, sharp scissors and hard glue.
Lay the sheet in front of you and decide on the size of the bottom. Draw with a pencil and a ruler its borders. After the preliminary drawing is made, it is necessary to sketch the sides of the box. To do this, from each bottom border, draw a pair of perpendicular lines to the side. Remember that their length should be the same. On two of the future walls, draw a couple more segments parallel to the bottom border. It is with the help of these parts that the sides of the box will be fastened together.
Carefully cut the workpiece with scissors and bend evenly along all the drawn lines. After that, you can start assembling. Apply glue to the additional pieces coming from the walls and fix them by making a corner of the box. Let the glue dry and you can start decorating the container.

How to make a box (round container scheme)
A round container looks more original, but it is also somewhat more difficult to make it. You will need a sheet of cardboard, a pencil, a ruler, scissors and glue, as well as an ordinary school compass.
Lay the material in front of you and draw the required size of the bottom with a compass. Carefully cut the workpiece with scissors so that the borders are perfectly even. After that, you need to make the walls of the box. To do this, using mathematical formulas or a simple measurement, calculate the circumference.
Draw the resulting length on cardboard with a pencil and make a rectangle out of it. The width of the sketch you create should be one centimeter more than you need. Cut out the workpiece and, using scissors at the border, make small cuts with a depth of one centimeter. Next, you need to bend the created cuts and apply glue to them. After that, carefully place the bottom of the box on the glue and press firmly. Let the adhesive dry and start decorating.

triangular variant
There is a way to make a box without glue. In this case, it can be replaced with ordinary or double-sided tape. You will need cardboard, a ruler, scissors and a pencil.
Draw a triangular sketch on the selected material in such a way that all its sides are equal. After that, from each side, draw lines for future walls. Since you can make a box without glue, there is no need to draw additional segments, which usually attach one side to the other. Cut out a neatly created blank and bend along all available lines.
After that, bring the sides together so that an angle forms. Carefully stick a piece of tape on it. Do the same with all three sides. Next, you can start decorating the product.

Cubic packing
How to make a square box out of cardboard? There is nothing easier!
cook necessary tools- ruler, pencil, glue and scissors. Draw a square on the cardboard, then from each side - another square. Do the same for each side. As a result, you will get five identical squares, one of which is in the center and borders the rest. On two sides, create small segments that will be attached to adjacent walls. Cut out the workpiece and carefully glue the sides, after bending them along all lines.
Follow the same steps and create the same box, but the sides of the squares should be half a centimeter larger. Cut and glue it. Your box now has a lid. When closed, such a container looks like a cube.
simple box
We will tell you about how to make a box out of cardboard without any materials at hand. All you need is a sheet of thin cardboard and your own skilled hands.

Fold the sheet in such a way that you get two folds that will divide the base of the future gizmo into three parts. After that, bend each extreme part in half inward. Bend the corners on the received elements. As a result, you will get four identical corners on each side.
Straighten the resulting part, equaling its center. You will get a container that does not have corners. You need to make them yourself. To do this, gently press the sides of the box with your fingers. Then you can proceed to decorate the created packaging, but remember that thin cardboard is not able to withstand heavy objects.

Before you do beautiful box, decide on its decor. Prepare the necessary decorations in advance. Think over everything to the smallest detail. Only after that you can start creating a form, drawing a picture or gluing applications.
If necessary, a suitable lid can be made for each box in the same way (remember that it should always be slightly larger than the main part of the product).
Select the cardboard material according to the purpose of the packaging. Make masterpieces with your own hands and delight your friends and relatives with them. Give them storage boxes and various gifts wrapped in them.
Good luck in this interesting work!
Almost no holiday is complete without gifts. And one of the most popular options is chocolate, sweets and other sweets. You can present such a gift in its original packaging or pack it directly in the store, but it is much more interesting to make the packaging yourself. A candy box is a great solution for those who want to give something original and unusual. It is not at all difficult to make it with your own hands, and in this material you will find several interesting ideas for the design of such a box.
How to make a DIY square candy box
It's classic universal option packaging, for which you will need square pieces of paper, a ruler and scissors. One of the two sheets should be slightly smaller than the other, for example, 30x30 and 29x29 cm.
The box execution scheme is shown in this photo:

We bend the square diagonally, unfold and bend along the other diagonal. We unfold again. The diagonal must be drawn. We bend the corners to the center, then we bend the same corners to the opposite and to the near fold lines. The resulting center square will become the bottom of the box.
On the sides of the drawn diagonal we cut the paper to the central square. We fold along the folds the incised edges for the walls of the box. We bend the sharp ends inward. We cover the bent tips with the remaining not bent tongues and wrap them inward. The lid is ready.
We fold the second part in the same way as the first. It will turn out a little smaller to fit the size of the lid. For this option, it is better not to use cardboard, thick paper will be best kept without glue. We tie the filled box with a ribbon or braid.
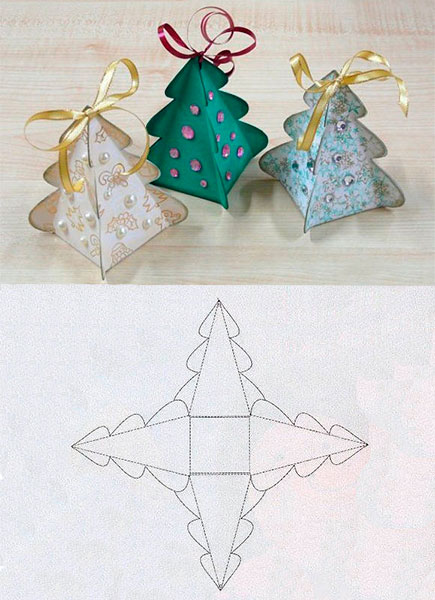
We make a version of the box in the form of a prism with our own hands
It's very simple and original version boxes that can be made in just a few minutes. To work, you will need a square sheet of thick paper of a suitable size, a ruler, scissors, a pencil, ribbon and a hole punch.
We draw the sheet in half and diagonally, bend the corners to the center. Then we bend from the center to the deflections of the central square, set aside and draw arcs, focusing on the diagram:

We cut out the extra corners with scissors, on the rounded "petals" we make holes with a hole punch. We thread the braid into the holes, bend the edges and tie with a bow. The box is ready!
Such original "appetizing" boxes are perfect for sweet gifts. If desired, you can make a whole paper cake from the pieces.
To work, you will need decorative paper of delicate colors, a clerical knife and scissors, Moment glue, a pencil, a ruler, ribbons, small flowers or berries for decoration (they can be made independently from polymer clay).
From thick paper with the selected pattern, you need to cut out the scan according to the template, which is presented below.

Before folding the workpiece, slightly push the fold lines with front side. You can do this with a non-writing pen or any thin sharp object.
We turn the box, apply glue and connect the surfaces. Glue a ribbon in the middle of the side surface, the ends of which are fixed on the inside of the lid. We decorate the "cake" with flowers, berries and leaves to your taste.
We make another model of a box for sweets in the form of a voluminous envelope
For this box, colored cardboard with an interesting pattern or thick paper is suitable. In addition, you will need PVA glue and a “moment”, scissors, a hole punch, a pencil and a ruler, rhinestones and a satin ribbon.
We draw the cardboard from the inside according to the scheme presented below. The numbers indicate the dimensions or aspect ratio of the box.

We cut out the blank from cardboard along the marked lines. The upper edge of the part that will lie on the “T-shirt” can be cut with curly scissors.
We turn the workpiece along the lines, punch holes for the ribbon with a hole punch. We glue the box together in stages using transparent instant glue. We carefully fold the side walls with an “accordion”, pull the ribbon through and tie a bow.
We put small dots of glue on the front surface of the box (in our case, according to the drawing, in the center of each star), glue the rhinestones.

The original box for sweets is ready! You can fill the gift with sweets.
Felt is one of the versatile and affordable materials that is also suitable for packing candies if, for one reason or another, you do not want to do it. paper packaging. Their advantages are that the box can not be thrown away after the holiday, but used as an original box for storing small things.

To work, you will need colored felt, a sewing needle and thread, glue, scissors and a ruler.
We draw a square canvas of felt into 9 small squares and cut out the corner ones. We fold and sew the box over the edge. Do not worry that the seams will be visible. They look quite stylish, you can even pick up contrasting threads. We decorate the finished box with applications to our liking.
Video on the topic of the article
For those who want to disassemble the manufacture of boxes for sweet gifts more clearly and learn new creative ideas, we have prepared a selection of video master classes:
Gift wrapping can be very diverse. But there is one rule - the cardboard or paper from which you want to make a box must be the right quality. In this sense, classic children's cardboard not all fit.
Where can I get such cardboard or paper? First of all, in specialized stores for creativity or even scrapbooking separately. Well, if there is such a store in the city, you say, but what if there is no such store at hand or the prices are exorbitant?
Such leaves will be enough for you to make small souvenir boxes (for jewelry, sweets, toys, etc.). Your family will appreciate
And now I suggest that you proceed to the actual detailed photo master classes, in which there will also be a scheme for creating each individual box.
Master classes on creating cardboard and paper boxes
small boxes
First of all, I want to give you 5 unwrapped patterns with very cute patterns that will make such a wonderful package:

On the first of them - red roses. If you want to impress your lover, then this is for you.
Principles of working with templates:

Large rectangular
This is perfect for large-sized gifts (for example, wall clocks). For you, you will need specialized binding cardboard to make the box really convenient. By the way, binding cardboard can also be purchased at specialized stores or on Ali.
Incision sites are marked in orange. The lid can also be made, but with slightly larger dimensions (2-3 mm).

For a man
If the present is intended for a man, then I suggest choosing one of the following options.
Simple shapes are on trend - this is proved by the following 4 templates for creating strict classic boxes. For them, you again need thick cardboard.


If the gift is intended for a lover, then there should be more than enough romance ^^ There are butterflies, and hearts, and all kinds of declarations of love. They can be made from thick cardboard or thick paper.


A heart
Heart boxes are very popular, because with the help of them you can express your feelings. Or confess them


Cake
Getting ready for a big party where everyone needs a little surprise? Or maybe a wedding is planned? In both cases, cardboard pieces of cake will come to the rescue.
A beautiful and understandable scheme is suitable for both the bottom and the lid.

Paper boxes
Boxes do not always need to be tight - sometimes it is enough just to create beautiful picture. Then I suggest you use this convenient scheme of 6 different packages:

If you are going to a holiday with a child (or maybe you want to please yours), then make him a cute box in the form of an animal.

Boxes for the New Year
The mood can be created not only with the help of gifts) Just look at these 8 lovely boxes, each of which can also be a great Christmas decoration
Especially needed if for some reason there is no Christmas tree. The main thing in this package is to trim the edges nicely and neatly.
Snowflake
Of course, this box itself is wonderful, but the silver paint on the tips of the snowflake can add a twist.
Tip: Give something in this package to a girl who loves Frozen.

sachet
Giving a gift is one of the easiest options.

Box with sweets
For all lovers of beautiful New Year's favors and quick handmade! Take a plastic cup with a smooth surface, cut off the edge and cut the edge.
Bend the cut pieces inward so that they cling to each other. Put the goodies inside and seal the top with something cute.


