Children's crafts for the new year. A piggy bank of original DIY Christmas crafts for home decoration and gifts. Felt Christmas tree toy
The New Year is approaching with its indescribable atmosphere of all-encompassing kindness, which shines through the eyes of passers-by, and the kids at this time are especially joyful and happy. Of course, on the eve of the holidays, almost every person thinks about gifts for relatives and friends, about decorating his house or apartment.
New Year's crafts 2017, made by hand perfectly fit into the role of both a pleasant and stylish home decoration for the New Year and Christmas holidays.
Such crafts are not too costly in material terms, they will not take much time to make, unless you have to “sweat” a little with some, but the feelings and emotions that they will give to your friends, relatives, relatives, colleagues are worth it, rest assured.
Excellent hand-made gifts can serve you well for many years, causing a genuine smile every time your eyes catch on this thing lovingly made by your caring hands.
DIY crafts for the New Year from buttons
With the help of multi-colored buttons, you can create interesting crafts for the New Year holidays.
Christmas tree made of buttons
To make a Christmas tree from buttons, you will need:
- cardboard or thick paper;
- buttons;
- tailor's pins;
- mounting foam (in the absence of foam, soft paper or cloth can be used);
- scissors;
- glue;
- decorations and decor.
Step 1. Roll a cone out of cardboard and glue the edges. Excess at the base must be cut off.
Step 2 Mounting foam is ideal for filling the cavity of the cone, but if it is not possible to use mounting foam, you can get by with ordinary pieces of soft paper or cloth that need to be pushed into the cone (this is done so that the pins “sit” firmly and do not pop out).

Step 3 Now it's time for the buttons and pins. In random order, pin the buttons with pins to the cone so that there is no empty space left. It is best to start from the bottom, gradually moving towards the top of the Christmas tree. Buttons will look more beautiful not only in different colors, but also in different sizes. Buttons will hold on tighter if, pinning them with pins, point the point of the needles slightly down at an angle.
Step 4 When the buttons completely cover the cone, you can start decorating the Christmas tree. To do this, you need to attach all kinds of beads, decorative snowflakes, etc. using a glue gun or the same pins. At the top it will be good to arrange an asterisk or a ribbon bow.
Christmas ball of buttons

In the same way, you can make a toy for the Christmas tree. Only instead of a cone, the pins will need to be pinned to a foam ball, to which you will first pin a loop of thin tape. This decoration looks amazing, and in the year of the Rooster it becomes especially relevant, since the owner of 2017 simply loves everything colorful and catchy.
From buttons, by stringing them on a thread, you can build funny snowmen, Christmas trees, and you can also get beautiful licorice sticks, Christmas wreaths, snowflakes and much, much more.
Crafts from cones
Turning on your imagination and armed with the gifts of nature, you can make very cute crafts from cones that can be used as Christmas tree decorations, New Year's decor or a souvenir gift for the holidays.
If you paint a beautiful cone in some color, cover it with glue in some places and sprinkle sparkles on top, you will get an original decoration for the Christmas tree, to which all that remains is to attach a loop.
A beaded or green-colored cone can be “planted” in a pot, and an amazing little Christmas tree will appear in front of you, on top of which you can attach a small star or other small decor.
Big Christmas tree made of cones

Such a Christmas tree is most suitable for the New Year, because it is created from natural materials, and by decorating it with rhinestones, sparkles and all kinds of small decorations, the beauty of cones will create an amazing atmosphere of festive New Year's magic around her.
To make a Christmas tree from cones, you will need:
- bumps (as many as possible);
- scissors;
- cone and circle made of brown or green cardboard;
- glue gun;
- various decor and decorations.
Step 1. To begin with, the bumps need to be cleaned of debris and rinsed. Then dry them and spray paint each bump (this is purely optional).
Step 2 Glue the cardboard circle to the cone for greater structural stability.
Step 3 Gently glue the buds with a glue gun, starting at the base and working your way to the top. It's best to start with the biggest buds and work your way up to the smaller buds. It is important to try not to leave gaps.
Step 4 Christmas tree made of cones is ready! It remains only to decorate it to your taste.
Cone Party Balloon

A similar ball can be hung on a chandelier or directly under the ceiling. Covered with sequins, beads or even in "pure form", a ball of cones will give a New Year's mood to both you and your guests.
To make a ball of cones you will need:
- balloon;
- PVA glue;
- toilet paper;
- glue gun;
- brown paint;
- bumps (a lot);
- ribbon;
- decorations.
Step 1. Of course, a ready-made ball for creating crafts can be bought in specialized stores, but making the base with your own hands is much more pleasant and less costly financially. So, inflate a balloon and wrap it with toilet paper, which was previously soaked in a mixture of water and PVA glue (one part of glue goes to two parts of water). After the entire ball is covered with paper, you need to leave it to dry for 24 hours.

Step 2 When the ball is dry, paint it with brown paint (this is necessary so that the color of the toilet paper does not show through between the bumps).
Step 3 It's time to glue the bumps onto the ball, trying not to leave gaps.
Step 4 The eyelet can be made from a beautiful satin wide ribbon.
DIY candy crafts

Every hostess wants to surprise and please her dear guests with something unusual. Candy Christmas trees are the best gift for a sweet tooth! And if you attach sweets on, you get a solid present for the New Year.
Colleagues, relatives and friends will appreciate your attention to them, having received a “sweet” Christmas tree as a gift for their favorite winter holiday. It would not be superfluous to find out in advance which sweets the person you are giving prefers to eat.
To make candy crafts you will need:
- candies;
- base (cone made of cardboard or polystyrene, a bottle of champagne);
- glue gun;
- ribbons, tinsel, Christmas tree beads, a variety of decor.
Step 1. Glue candies onto the base with a glue gun, starting from the bottom.
Step 2 When the bottle or cone is "strewn" with sweets of your choice, the Christmas tree can be decorated with New Year's tinsel, Christmas tree beads and other suitable decorations.
A “sweet” Christmas tree can even be made from marmalade, marshmallows, Turkish delight, etc. Only for fastening sweets without a wrapper to the base, you need to take not glue, but toothpicks or skewers. The bottle can no longer be used here; a cone made of foam or other material washed with soap and water is best suited.
On the threshold of the long-awaited New Year holidays, which are eagerly awaited not only by children, but also by adults. After all, the New Year is a new hope, new plans, new life. To create a magical atmosphere in the house, we always prepare decorations in advance. Someone buys them in stores, but in this article we will tell you how to make interesting crafts for the New Year with your own hands.
The patron of the upcoming 2017 will be the Fire Rooster. It is his image that should be present in every home so that the whole year is successful and happy.
You can make a cockerel in different ways. In this case, the main thing is to show imagination. We will present several workshops on making do-it-yourself symbol of the New Year 2017:
Rooster toy
The product will look like a soft toy. To create it, you will need a pattern, cotton wool, two identical buttons and any dense fabric. It is not necessary to buy it, you can use an old sheet or shirt.

The only thing you can buy is two small pieces of red and orange felt to make a beak and comb out of them. You can also use any decorative elements for the cockerel. In the photo below, the master used straw to make a bow.

The uniqueness of this toy is that it is easy and quick to make. In a short period of time, you will be able to sew dozens of such cockerels to give them as gifts to all your friends for the New Year 2017.
If you make small-sized soft cockerels, then they can become decorations for the New Year tree. It will only be necessary to sew ropes to them, for which they will cling to Christmas tree branches.

You can not make cockerels voluminous. Just cut them out of felt, decorate them with rhinestones, beads, feathers, ribbons and other decorative elements, attach ropes to them to hang them on the Christmas tree.

Rooster made of buttons and old beads
- Outline the rooster on decorative paper.
- Use quick-drying glue to attach buttons and beads to the image, alternating them in colors and sizes.
- The resulting product can be framed and hung on the wall in the hallway or in the kitchen

Painting "Rooster" in quilling technique
The quilling technique is very popular among needlewomen, because it can be used to make exquisite products using only special paper, a toothpick and glue. To make a picture with a cockerel, you will need the same material and whatman paper, which will become the basis for future crafts.
The work will be very painstaking, so you need to be patient:
- First you need to cut the quilling paper into strips 5 mm wide and 25 mm long.
- Then wrap each strip around a toothpick. Glue the ends to the finished paper spirals. All spirals need to be slightly lowered and squeezed into the shape you need.

- Glue all the curls on a pre-prepared outline of a rooster on a drawing paper.
- In addition to the rooster, according to the same scheme, you can make other elements of the picture - snowflakes, Christmas trees, snowmen, and so on.
As a result, you should get such a beautiful product:

The techniques we have listed are the most practical options for crafting a New Year's symbol that will last for a long time. You can use many other ways to make cockerels, for example, from disposable tableware or plastic bags, but they are unlikely to retain their original beauty for a long time due to their impracticality.
Craft "Christmas Tree" for the New Year with your own hands
Despite the fact that a live or artificial Christmas tree is decorated in every house for the holiday anyway, we still make small ones. original crafts for the New Year with your own hands in the form of a forest green beauty, so that the festive mood is felt everywhere.
Of the many ways to create Christmas trees, we have chosen some of the most interesting:
Christmas tree made of bright pictures

- To make such a beauty, you will need old magazines, newspapers or a children's book.
- Of these, using a shaped hole punch, you need to make as many round elements as possible - these can be flowers, ordinary circles.
- Each of the resulting circles must be twisted a little by wrapping them around a regular pencil.
- They will need to be glued in neat rows to a pre-prepared paper cone, starting from the bottom.
Christmas tree made of felt

From the minimum amount of material, you can make just such a Christmas tree. You will need:
- felt fabric in two colors
- thick cardboard
- quick dry adhesive
- thin Christmas rain
- First, we make a cone from cardboard, which will be the basis of the future Christmas tree.
- Then we cut out circles of different diameters from felt, cut a hole in the center of each through which these circles will be threaded onto a cone.
- When all the felt parts are threaded, you can proceed to decorate the product - glue the Christmas tree rain and other New Year's tinsel in a spiral to the product, which you do not mind.
Christmas tree made of floristic mesh and garlands

- To make such a Christmas tree, you must first make a paper cone and wrap it with a plastic bag.
- Then it is necessary to cut patches of the same size from the floristic mesh, moisten them in PVA and alternately glue them onto the cone in several layers.
- When all the layers are glued, the top of the mesh must be smeared with PVA again and left to dry.
- After the mesh dries, it must be removed from the cone. We won't need it anymore. Instead, you need to attach a garland inside the Christmas tree using decorative wire.
- If desired, you can also attach any decorations from the outside of the resulting Christmas tree.
DIY paper crafts for the New Year
Paper is a universal material for needlework, but short-lived products can be made from it, although they are quite original. In this article, we decided to tell you how to make paper out of paper. easy DIY crafts for the New Year. We will talk about two designs of Christmas decorations.
Crafts from paper tubes

To make such a Christmas tree decoration, you will need scrapbooking paper and a ring from an old chain through which a decorative thread will be threaded.
What will be the algorithm of our actions:
- We cut out a circle of any diameter from any cardboard and mark the center on it (the size depends on your desire, to make the same toy as in the photo above, you need to cut a circle with a diameter of 5 cm);
- From one sheet for scrapbooking we cut out squares with a side of 3 cm, and from the second squares with a side of 2.5 cm;
- Expand all the squares so that they look like diamonds, then begin to bend the left and right ends of the square towards the middle as if you were swaddling a baby;
- Glue the resulting elements with quick-drying glue;
- Clockwise to the center, start gluing the twisted elements to the pre-prepared cardboard so that each tube fits snugly against each other;
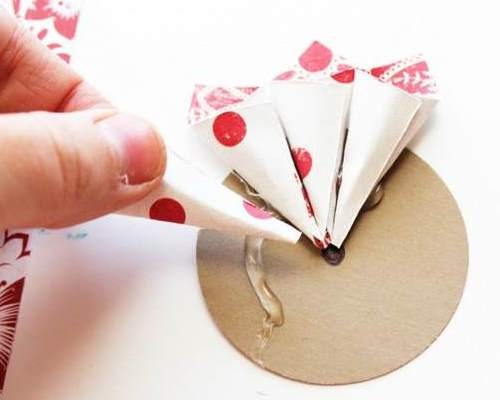
- You will need to make several layers of these tubes so that in appearance the future product begins to remind you of a flower;
- If desired, attach an old brooch or pendant with stones to the middle of the toy, and glue rhinestones along the edges of the tubes.
Craft from paper squares and foam

The main material for creating such a beautiful paper cone is decorative paper and a foam ball. What to do with them:
- Cut the paper into strips 2.5 cm wide;
- Each strip again needs to be cut into squares with a side of 2.5 cm;
- From each resulting square, you need to make such an arrow, as shown in the photo;

- When all the elements are prepared, they can be glued to the foam ball in layers from the bottom up;
- To the top of the cone, you can attach paper leaves and braid, for which the resulting cone can be attached to the Christmas tree.
From above, each of the proposed toys can be covered with sparkles, sprinkled with New Year's tinsel, so that they look festive and elegant.
Crafts from cones for the New Year
Crafts from cones with their own hands for the new year look very original and natural on the Christmas tree. From this beautiful natural material, you can come up with a huge number of different toys and table decorations. After all, the cones are amenable to staining and gluing. As examples, we will present you with several options for cone products for the New Year:
- By painting the cone green and sprinkling with white or silver sparkles, you can make a mini-Christmas tree that will look beautiful both as a New Year's toy and as a figurine on the fireplace.

- The cone can be used as a body for a toy bird or deer. You will only need to figure out what to make their heads and limbs from. It can be a sponge, cotton wool, wool - any material and decorative elements.

- Cones can be used to make beautiful Christmas door wreaths. Moreover, they do not even need to be subjected to any processing. Through them, you only need to pass a wire, with which the cone will hold firmly on the wreath.

Crafts from the test for the New Year
To creation salt dough crafts for the New Year children can also be involved. As a rule, children really like to sculpt different figures from it, especially if they are dedicated to the celebration of the long-awaited winter holiday.
The most important thing here is to knead the dough correctly. It is very simple: you will need salt, flour, starch and water. All these components are mixed with each other in equal quantities. If you already know in advance what color your products should be, you can immediately add dyes to the dough. If not, then leave it colorless.

- To give contours to future crafts, you can use special confectionery molds - Christmas trees, snowflakes, gnomes or snowmen.
- Cut out the characters, then lay them out on a baking sheet and dry in the oven.
- When the products are dry, take them out and decorate - paint, glue all kinds of decorative elements to them.
Here are some examples of designs for New Year's products made from dough:


Crafts from sweets for the New Year
Candy is the most festive material. In childhood, each of us tied a rope to them to decorate the New Year's beautiful Christmas tree with sweets. Today, sweets are used in a more original way. With their help, you can create not only interesting crafts for the new year but also to make sweet gifts for your loved ones.
For example, if you are going to visit godfathers or neighbors, then you can make a beautiful Christmas tree from a bottle of champagne and loose sweets.

How to do it:
- Lubricate the bottle with a festive drink with glue, and attach New Year's tinsel to it.
- Then glue the sweets in a circle in exactly the same way. You can use both the same sweets and different ones.
- Decorate the resulting Christmas tree with bows, beads and that's it - this is the chic New Year's gift ready.
If you go to a house where there will be children, then you can also make New Year's sweet gifts for them. Buy different chocolates and cane-shaped lollipops. From these sweets you can make a sleigh:

- Glue chocolates to candy canes with a glue gun
- Put the rest of the sweets on pyramid-shaped chocolates and wrap them with a beautiful ribbon
- To complement a sweet gift, you can tie a toy deer to the sleigh
You can also make New Year's clocks from sweets. To make them you will need:
- cookie metal box
- candies
- New Year's tinsel

- First you need to decorate the cookie box with corrugated paper
- On the one hand, make a dial from old beads
- Glue all the decorations and details of the product on the glue gun
- Then, around the circumference of the box, glue the sweets so that they fit snugly against each other.
- From above they can be wrapped with decorative tape.
When the main part is ready, you just have to complete the decoration of the dial. This is where your imagination comes in handy.
Crafts from disks for the New Year
Everyone in the house, for sure, has old CDs that just take up space on the shelf in the closet. So that they do not simply gather dust, use them to create beautiful crafts for the New Year with your own hands.
We suggest you make New Year's toys and panel pendants from CDs. With their help, you can decorate the Christmas tree and the walls in the rooms of your house.
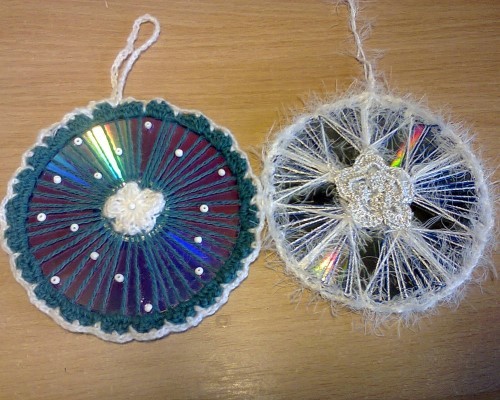
To create Christmas decorations, you do not need to show special talents. Even kids can do this job. You will only need to draw a beautiful winter drawing for them on the disk and give out decorative elements - paints, beads, beads, buttons. Children themselves will show their imagination and complete the decoration of CDs.
Panel pendants according to the manufacturing technique are a little more complicated:
- The discs will first need to be coated with acrylic paint.
- Then thread the braid through the hole and fasten it tightly.
- The next step is gluing a drawing to the disk using the decoupage technique, which we will need to color and give it volume with the help of salt, semolina and other improvised means, for example, toothpaste, from which snowy mountains can be made.

Crafts from beads for the New Year
Beading is a real art, to master at least the basics of which is not given to everyone. But what if you really want to make from this material beautiful crafts for the new year There is an exit. We have selected several ideas for creating Christmas beaded decorations that even a child can make.
Christmas ball from beads
- Take a long thin wire and randomly string beads on it.
- Having coped with this task, inflate a small ordinary balloon.
- Now this ball must be carefully wrapped with prepared wire.
- When the whole ball is decorated, pierce it so that you have such an original Christmas decoration in your hands, as shown in the photo below.

Christmas tree made of beads
- Make a tight cone out of cardboard and set it aside.
- After that, string green beads very tightly on the wire, alternating it with red.
- You just have to wrap the paper cone in a spiral with the resulting garland, and then take it out so that only the original Christmas tree remains, which can be used as a toy.

Snowflake from beads
- First, fasten three wires of the same length together to make an asterisk.
- Then, on each ray of the star, simply string the beads so that you get a beautiful snowflake, which is shown in the photo.

Knitted crafts for the New Year
knitted ideas original crafts for the new year great amount. Of course, to create at least one of them, you need to undergo special training or train yourself for a long time, relying on video tutorials from the Internet. For those who know how to knit Christmas decorations with talent, we have selected several patterns that can be useful for needlewomen while preparing home decor before the New Year holidays.
Knitted snowflakes

Knitted Christmas balls


Volumetric crafts for the New Year
In this section, we will show you how to make volumetric unusual crafts for the new year from improvised materials.
The first version of Christmas decorations - Christmas decorations from walnuts. To make them, you need:
- First, peel the nuts from the inside so that only the shell remains.
- Cut a satin ribbon 25 cm long, fold it in half, string a bead on it. Insert the ends of the ribbon between the two parts of the shell, and only then glue them together.
- Color the nuts in the color you want, decorate and varnish.

The second option is wine cork Christmas decorations. To make them you need:
- Paint the corks in different colors
- Think of the shape of the future toy
- Fasten the corks together in the desired shape with wire
- On top of the resulting decoration, attach a ribbon in the form of a bow with a regular decorative pin

The third option for Christmas tree decorations is the simplest - burnt out light bulbs. You just need to color them beautifully - give them the look of penguins, snowmen or Santa Clauses:

Crafts in kindergarten for the New Year
All of the above homemade Christmas decorations can fall into this category. However, we want to highlight here children's crafts for the New Year with their own hands. As an example, we give original options for needlework, which you can offer to make your children on the eve of New Year's parties in kindergartens.
Magic snow globe
- On a regular round cardboard, glue cotton wool to imitate snow.
- A plasticine snowman and a Christmas tree are attached to it. On top of this craft, you will need to install a small glass jar, the inner surfaces of which must be smeared with glue and sprinkled with sparkles to give the impression of falling snowflakes.
- We attach the glass jar to the base of the craft using a glue gun. It turns out such an original product:

Modular paper crafts
- In the same way, we first prepare the base. In this case, it will be a cardboard candy box.
- We glue it so that both parts touch each other at a right angle.
- Lubricate their inner surfaces with glue and glue cotton wool to them, which will again imitate snow blockages.
- From paper we make different animals - bunnies, cubs, and then we attach them to a horizontally located base.
Here you can also place a plasticine Christmas tree and other home-made products. For clarity, here is an example:

Video: DIY crafts for the New Year 2017
In this video, the needlewoman clearly demonstrates how you can decorate Christmas balls in an original way or make unusual elements of New Year's decor with your own hands.
Sometimes, in order for a holiday to become special, it is not enough to have traditional attributes. Yes, without a Christmas tree and a capital salad in the new year - nowhere, but it's time to bring fresh ideas into the traditional celebration. Do-it-yourself New Year's crafts for the new 2017 Year of the Rooster will help us with the implementation of this idea.
Many of us carefully keep real rarities from our childhood in the form of Christmas decorations that are now rare, others every year buy something new, trendy from the latest collection of some designer brand in modern shopping centers ... All this, of course, is good, but if add a couple of hand-made crafts to the festive decor, it will immediately become clear - in this house they love and wait for the new year.
Idea first. colorful balls
Do you want to completely transform an annoying set of Christmas balls, but don't want to buy new ones? Then the next craft will be to your liking. To implement this idea, we offer a fairly simple master class:
- take the balls and wrap them in bright patches of fabric,
- tie with satin ribbon, braid,
- add spruce twigs or an artificial flower to the knot.
Such Christmas balls, decorated in a single color scheme in consonant with each other graphic solutions, will be an excellent decoration for the Christmas tree. And if desired, the craft can play with all the colors of the rainbow (it is better to choose a palette loved by the Rooster - fiery, from bright red to pastel yellow). The balls can simply be put into a vase or put on a bookshelf, or they can be entrusted with the role of cards for guests, providing each decoration with a sign with the name of the invitee.
The second idea. Christmas installation in a frame
An object for inspiration to help create DIY Christmas crafts for the new 2017 year of the rooster can be the most common photo frame. Paint the frame in red - the traditional color of the winter holidays and place (hang, lean against the wall, books) in a conspicuous place. The craft will look organic with the same balls or snowflakes. Any, dear to the heart, New Year's decorations will do. It does not matter whether there will be many toys or just one - an advantageous frame will give any content a great sound. Do not forget about the bow, which can crown the top of the frame, sit on the side, or acquire a democratic look of the tape, for which the crafts are fixed on the wall. 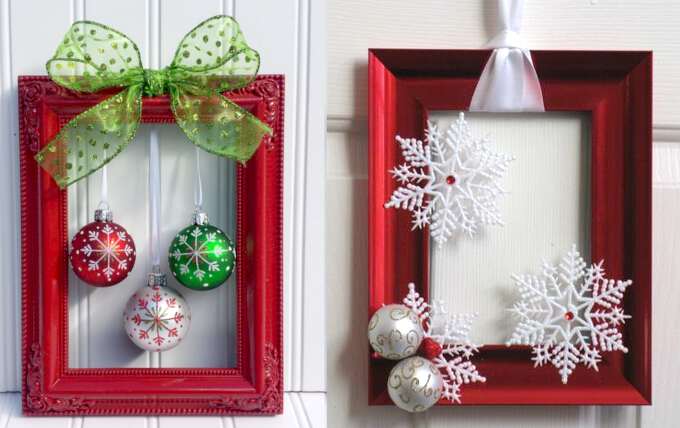
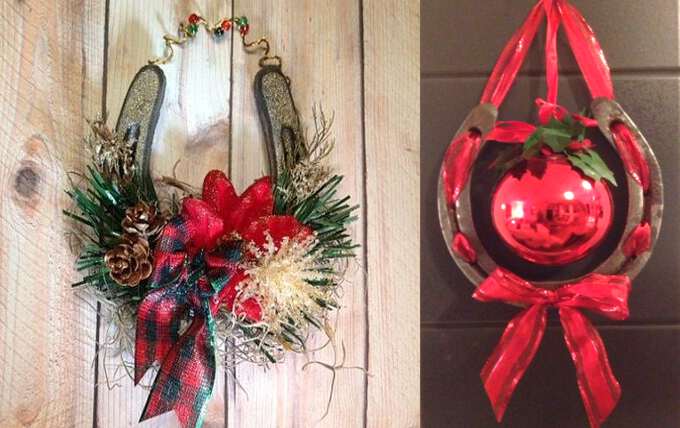
Idea three. With new happiness!
And how do you do crafts for the new year 2017 with a horseshoe? This accessory can be purchased at a specialized gift shop, or you can use the one inherited from your grandmother. The effect in both cases will be amazing. A master class on turning an ordinary horseshoe into a bright New Year's souvenir can be voiced in 2 versions.
Option one:
- Having placed the horseshoe with its “horns” up (this is the only way it will work to attract good luck and happiness), decorate its base with tinsel, spruce branches, cones, ribbons, in a word, with what you have at hand.
- Attach wire, ribbon, braid to the horseshoe horns, as shown in the photo, to fix an impromptu Christmas wreath on a wall or door.
Option two:
Idea four. Hello Dedushka Moroz!
Such a Santa Claus, as you see in the photo, you definitely have never met. The original master class on turning the most ordinary object into a favorite of adults and children is simple and brilliant at the same time.
Deciding to decorate your house with funny symbols of the new year, just follow these instructions:
- we take a regular paint brush, paint the handle red and draw a few snowflakes on its surface,
- cut out a rectangular strip from fluffy material and attach it to the handle. This will be Santa's hat. On the side we glue a contrasting star or snowflake,
- glue the eyes and nose, as it is done in the photo. Black buttons can be used as an eye, and a round piece, which can be purchased at art stores, will serve as a spout.
- we thread a rough twine into the hole on the handle and place the resulting craft where we like.
Funny Santa Claus can also be made from a round brush. The face can be made from pink paper or fabric by placing eyes and a round nose there, on which we boldly place wire glasses. We make the cap more elegant - for the fur trim we choose the fur more fluffy, and we turn the cap from red thick cardboard. Such New Year's crafts will look great on the Christmas tree or become the center of a decorative composition. 
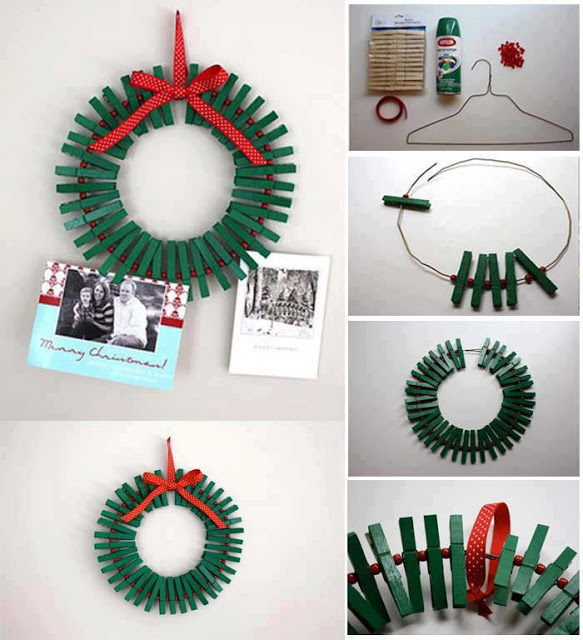
Fifth idea. Christmas wreath photo holder
A master class on creating a creative wreath, which can simultaneously serve as a fixative for memorable photos or greeting cards, consists of the following steps:
Idea six. funny snowmen
Making a whole family of funny snowmen and decorating your house with them is a great way to create a festive mood. Craft using our master class is made as easy as shelling pears. So:

Idea seven. DIY New Year's beauty
Surprise your guests with an unusual version of seating cards by making a small creative Christmas tree. The craft is easy to make - we adopt our master class and proceed:
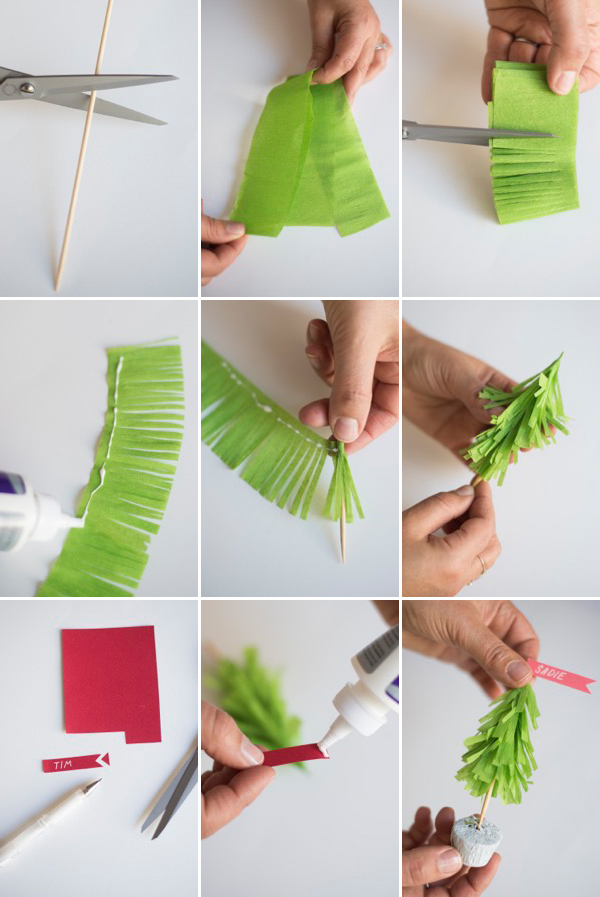
Idea eight. For fans of minimalism
Try to "grow" a whole forest of Christmas trees from paper cones. An unusual craft requires thick paper, beads, braid, scissors and glue. Having rolled a cone from paper of the desired color (not necessarily green, it all depends on your vision and preferences), decorate its top with a golden star - the main attribute of the new year is ready with your own hands! And if you want to create something special, decorate the Christmas tree with rhinestones, snowflakes, placing a transparent ribbon on top. At the base, the craft is decorated with a braid of beads - it will be very beautiful! Arrange such decorations around the apartment, decorate a table, a mantelpiece or a dressing table with them, and you will immediately feel that the New Year is just around the corner. 
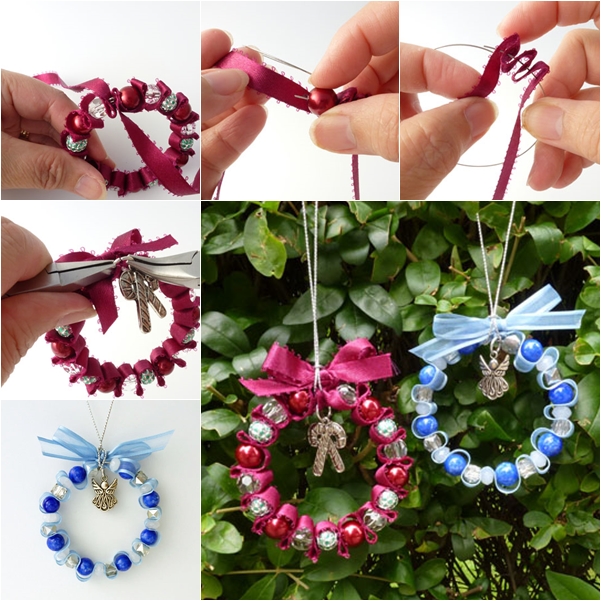
Idea nine. Charming wreaths
A very delicate and interesting Christmas wreath will be a wonderful element of New Year's decor. Making such decorations is quite easy, you need a minimum of materials and time. Prepare a thin wire, satin ribbons of the desired color and matching beads, a strong thread for hanging and get to work, based on the following master class:
- form a ring out of the wire and start stringing a ribbon on it,
- alternate one fold of tape with a bead to the end of the wire,
- when the wreath is ready, hang a decorative figurine on top and tie a bow,
- fix the thread on which you will hang the wreath.
And finally. The owner of the coming year, the Fire Rooster, has great respect for handmade, so what prevents us from conquering the proud bird with our creative abilities? Using the photos presented in the review with original ideas for New Year's crafts, you will succeed in this, surprising the rooster with your own hands for 2017 with New Year's crafts for 2017, not only the eastern ruler of the year, but also all your loved ones.
The New Year is such a bright and long-awaited holiday that you want to prepare for it in advance. Moreover, there are things that you just need to take care of the day before. For example, gifts, home decor and handmade Christmas decorations, which take a lot of time to create, especially if you need a lot of them. If you decide to prepare original New Year's crafts with your own hands, then start right now - time is running forward without looking back, 2017 will come very soon.
DIY New Year's interior
The whole charm of this holiday is that on New Year's Eve you can afford something that would seem strange on ordinary days. This applies in particular to interior design. If the abundance of bright colors, glitter and tinsel on weekdays is considered bad manners, then on the eve of the holiday - this is exactly what you need to create a fabulous atmosphere.
And do not forget about the garlands - a mandatory attribute of the New Year. They can be made from anything.

Garlands can be made from anything.
back to contentsOriginal chair covers
Of course, not everyone is able and affordable to completely change the situation on the occasion of any important event, but this is not necessary. It is enough to confine ourselves to textiles, a few themed accessories that you can easily do with your own hands, having at least some skills in needlework.
Even an inexperienced seamstress can sew such funny chair covers in the form of Santa Claus hats for the Year of the Rooster. To do this, cut out two red rectangles according to the width of the back of the chair, cut off the top third of the fabric at an angle, sew together and decorate with white piping and a pompom.

Chair covers will immediately create a festive atmosphere

A way to hide diverse furniture
back to contentsAn unexpected decision for the table
When it comes to decorating a table, the first thing that comes to mind is beautiful tablecloths, napkins, dishes. If you decorate the table in the way suggested in the photo, then your household and guests will definitely be delighted.

Gaiters will make the table silent when moving
This decor has another indisputable plus - a piece of furniture in New Year's shoes can be easily and silently moved without even lifting it and without risking damage to the flooring. And in order to create unusual beauty, you just need to purchase leggings of a suitable color in the store and sew the simplest shoes from colored felt.
back to contentsChristmas wreath - mood from the threshold
To let each guest feel the spirit of the New Year holidays from the very beginning, hang a Christmas wreath on the front door. To make a wreath of pine or spruce cones you will need:
- base for a wreath (sold at any needlework store);
- glue gun;
- ribbon to hang decor.
If you do not have the opportunity to buy a ready-made base, you can create it from thick cardboard and foam rubber. If you want to make your wreath look a little "snowy", paint the buds with spray paint. You need to glue the cones close to each other so that the base is not visible. The finished wreath can be hung on a wide contrasting ribbon.

If you have accumulated a lot of wine corks, feel free to start making decorations. Using a glue gun, you need to thickly glue the corks onto the base for the wreath, placing them randomly in several layers. You can decorate the New Year crafts 2017 at your discretion.

Outrageous cork wreath
back to contentsGarlands from improvised materials
A garland can be made from anything. The most New Year's material for creativity is pine cones. For manufacturing you will need:
- cones of different sizes;
- long strong rope;
- screw pins for making jewelry (it is a ring with a leg and thread).
Cones can be painted or varnished, but it is better to leave them in their natural form. Screw a pin into each cone. Put the first cone on the rope, secure with a knot. Continue stringing and pinning cones at 20cm spacings until you have the desired length of garland.

Unobtrusive garland made of natural materials
If you are friends with a needle and thread, sewing a simple sock bag is not difficult. Patchwork-style socks embellished with snowflakes, lace and frills are great for New Year's decor. If you arrange all the socks in different ways, the garland will look colorful and cute.

Colorful pointed socks

Red and white - classic
Many people remember the chain garland since the days of kindergarten. Only then they made it from colored paper and glued it with PVA glue. The pretentiousness of such an unpretentious garland will be added by all kinds of ribbons of different colors, textures, with a pattern or plain. Prepare material:
- ribbons (satin, silk, rep, braid);
- glue gun.
Cut all ribbons into strips 10 cm long. Connect each link of the chain to the previous one and fix with a drop of hot glue.

A bright chain can decorate a room or a Christmas tree
back to contentsHow beautiful to decorate a candlestick for the New Year
Burning candles are an essential attribute of the New Year holidays. No wonder they say that you can look at how the fire burns endlessly. Making candlesticks from cones for the New Year 2017 is very simple. You will need:
- knife or secateurs;
- sequins;
- PVA glue;
First you need to remove the top of the cone with secateurs or a sharp knife. Then grease each remaining scale with glue and sprinkle with sparkles, and when the glue dries, brush off excess sparkles with a brush. The candlestick is ready, it remains to place a candle in it and do not forget about fire safety.

So simple but very cute
Cinnamon is the most Christmas spice. It can not only be added to pastries, but also used for New Year's decor. Take a glass glass or any jar. Glue its surface with cinnamon sticks using a glue gun. Make sure the chopsticks are higher than the glass. The final touch is a ribbon or rope for decoration.

Aromatic spice cinnamon
Those who know how to knit can show their talent in making candle decorations. Simple knitted "muffles" with braid patterns will make the most ordinary New Year's candle. You can combine several plain candles or decorate knitting with Scandinavian winter patterns - deer and snowflakes.

Clothes for a candle - what could be more comfortable
back to contentsSnow globe - New Year's fairy tale in a jar
Making a glass ball with snow is very easy. For the classic version you will need:
- a jar with a lid;
- glue gun;
- glycerol;
- artificial snow (chopped tinsel, polystyrene foam, stars, sparkles);
- new year decor.
The lid is decorated first. All Christmas trees, houses, Santa Clauses, deer and everything that the soul desires are installed on it. All this is fixed with hot glue. Then you need to pour glycerin diluted with water in a ratio of 1: 1 into the jar. Lubricate the threads of the cap with glue and tighten tightly. The snow globe is ready.

Snow covered Christmas tree - traditional design

Blue spruce - a fresh solution
A snow globe from a wine glass is made according to the same principle, but instead of a lid, a circle of thick cardboard is used. It must be glued to the edge of the glass with a glue gun. Make the cardboard bottom a little larger in diameter than the glass itself. The protruding edges can be decorated with sparkles.

Snow-covered composition in a glass looks elegant
back to contentsFestive menu - surprise guests with the design of dishes
When compiling a festive menu for guests, remember the main thing - ordinary salads and potatoes managed to become boring for everyone in a year. And even if you cannot afford red, black and overseas eggplant caviar on the table, believe me - there is always a way out of the situation! It is enough to decorate the same familiar dishes beautifully and unusually - and they will already taste different.
How do you like this serving of the simplest creamy dessert "Bird's Milk" prepared for the Year of the Rooster? Agree, in glasses with colorful cookies instead of a lid, it looks amazing and causes an incredible appetite!

Neither children nor adults will refuse such a dessert.
And here is an interesting option for another decoration for the sweet table. It is enough to bake shortbread cookies of different sizes and fold them in the shape of a Christmas tree, gluing them together with whipped protein glaze that imitates snow.

Herringbone made of shortbread cookies will undoubtedly decorate the table
New Year is just one of the few holidays, an integral attribute of which is champagne. Raising glasses with a sparkling drink to the chimes has already become an unchanging tradition. So give this ritual a little glamor and brilliance! To do this, it is enough to dress boring bottles in a brilliant outfit: coat them with glue and sprinkle liberally with multi-colored sparkles or beads.

Sparkling sparkling champagne in New Year's costume
The most ordinary muffins with the help of a pastry syringe and strawberries are easy to turn into a mini-Christmas tree. Moreover, they do not even have to be baked - store-bought cupcakes without icing are quite suitable. Place a strawberry on top of each and decorate with green buttercream or protein cream using the star-shaped syringe nozzle.

Surprise cupcakes will delight guests
back to contentsGet in the holiday spirit with the little things
To make the holiday really a success, you should not lose sight of even the smallest details when preparing. Sometimes they are able to set a joyful tone much more effectively than something global. Lovely decorative little things in the atmosphere, small souvenirs for all guests are a guarantee that everyone will have a good mood. Here are some ideas for crafts for the New Year 2017.
back to contentsHelpers of Santa Claus - fabulous elves
Cute fairy elves made of felt and spruce cones can become a multifunctional decoration. If you attach a loop to the hat, they will turn into a Christmas tree decoration, and if you attach a cardboard rectangle with the name of the guest to your hands, you will get funny landing cards that will perfectly fit into the decoration of the festive table.

Fairy elves - a multifunctional decoration
To make such funny little men, just a few cones and large wooden beads, a couple of bells or beads for a hat and a few sheets of multi-colored felt are enough.
back to contentsSweet souvenirs from candies and wine corks
If you expect a lot of guests in the New Year, take care of small souvenirs for them, because on this magical night it is especially pleasant to receive surprises, albeit small ones. Beautifully decorated delicious sweets in this case is just what you need.

An original gift will delight guests
To create these cute Santa Clauses pictured, you will need wine corks, some white acrylic yarn, red and black acrylic paint, brushes, white beads, small pom poms, and glue.
The lower half of the cork should be painted with red paint, and on the upper part, draw eyes and glue a bead nose. Using glue, glue a cone-shaped candy on the top of the cork, and make a beard and an edge on the candy cap from the threads.
back to contentsForest beauty - use an alternative
Recently, more and more people, for various reasons, refuse to install a natural Christmas tree, replacing it with artificial counterparts. But don't be banal - replace the Christmas tree with a more creative alternative! For example, why not turn an ordinary hanger into a Christmas tree, as in the photo?

From the hanger - to the Christmas tree - New Year's metamorphoses
Here are some examples of how you can make New Year's crafts with your own hands. In most cases, you won't even have to spend extra money.

Christmas tree made of sweets on a paper cone
back to contentsChristmas tree-lamp from a cone
In order for such a miracle to appear in the house, it is enough to find in the bins a piece of paper, a decorative net from a hopelessly withered bouquet, glue, threads, various beads, ribbons and small toys. A sheet of paper should be rolled into a cone, glued well and decorated as your heart desires.
If you first make curly holes in the paper, and put an LED garland inside the cone, you get a beautiful lamp that you won’t want to part with even after the New Year holidays are over.
To get another, more openwork version of the Christmas tree, you need to wrap multi-colored threads soaked in glue on the cone, and when they dry, remove the workpiece.

Two in one - decor item and lamp
back to contentsOriginal patchwork Christmas tree
The next version of the New Year's tree is a good way to use the shreds or scraps of beautiful paper that have accumulated in the needlework box. A Christmas tree made from them does not require additional decoration.
To create this colorful miracle, you need to make a cone base and glue it with paper or fabric patchwork branches cut with curly scissors. You should start gluing the details from the bottom, and the very top can be crowned with some kind of decorative bead. In order for the “branches” to curl up beautifully, it is recommended to slightly twist them with a pencil before gluing them.

Christmas tree made of shreds will please with its colorfulness
back to contentsChristmas toys - make an exclusive from improvised materials
The main symbol of the New Year is the Christmas tree. DIY Christmas tree decorations add coziness and make the holiday even more family-friendly. Christmas decorations are made from everything that comes to hand. Even an old light bulb can become a cute penguin or a snowman if you paint it with paints. The plinth can be decorated with felt or woolen threads, imitating your character's hat.

Cute penguin in a blue hat
Each member of the family will be pleased to see a personalized Christmas tree ball on the New Year's tree. To create such a New Year's craft for the New Year 2017, it is enough to buy transparent white glass balls, print a small photo of each household on the printer and place it inside the toy, additionally decorating with beads and ribbons.

Name balloons will please everyone
If a baby has appeared in your house, you can use a plaster cast of his tiny arm or leg to decorate the Christmas tree. The cast can be made independently from building gypsum, adding PVA to it for plasticity. Even easier is to buy a ready-made kit for making prints. The memory will last a lifetime. Elements of children's clothing, such as mittens or felt boots, also look very cute on the Christmas tree. They do not need to be decorated in any way, just hang them on the Christmas tree.

In a few years, you won't believe that his palm was so small.

Lovely wool mittens
For those who know how to knit, it will not be difficult to build such cute dolls from wooden beads and leftover yarn. Well, those who do not own knitting needles can donate an old knitted sweater in this case.

Dolls will look wonderful on the Christmas tree
At the heart of the Christmas balls in the next photo is a foam ball. It can be pasted over with beautiful beads, rhinestones, decorated with soutache cord or covered with an unusual fabric to end up with exquisite glamorous jewelry.

Glamorous toys for a secular holiday
Most of all, the New Year brings joy to children. During the New Year holidays, let the children participate in decorating the house and making DIY Christmas crafts for the Christmas tree. Such cute hedgehogs and New Year's elves are made from ordinary cones and colored felt. The head of the elves can be made from ping-pong balls.

Forest dwellers - hedgehogs

Sleeping elves - Santa's helpers
Felt toys are very popular lately. They are easy to sew and quite safe for kids. The edges of the felt do not crumble, which makes this material available for use. And if you put sachets of herbs inside the jewelry, they will also fill the house with a pleasant aroma.

Safe and cute felt crafts for the New Year 2017
back to contentsGift wrapping - everything unusual is nice
back to contentsPacking Christmas surprises
Separately, it is worth mentioning the gift wrapping. Of course, now in stores there is such a service for customers that, if necessary, they will not only pack your New Year's gift, but also deliver it home. This is beautiful, but not as pleasant as receiving a present, knowing that the giver spent time not only on choosing it, but also on hand-made decoration. This can tell a lot to the recipient.
The packaging of New Year's gifts, due to the specifics of the holiday, allows you to give free rein to your imagination. Here are some examples for inspiration that are easy to replicate with your own hands.
To create a deer-shaped wrapper, you will need craft paper, colored cardboard and glue. You will have to tinker a little with cutting out the details, but the result is worth it.

Such a wrapper will certainly be opened carefully
Jewelry or small jewelry can be presented to a lady in such an unusual way - by hiding a surprise in a pre-peeled nut. And to make the effect of the gift stronger, watch the fairy tale “Three Nuts for Cinderella” together on the eve of the holiday, because what girl does not want to feel like a princess.

An ideal gift solution for romantic girls
You can give guests candies by placing them in beautiful pyramid boxes resembling a Christmas tree. It is very easy to find a template for such a box, the main thing is to choose a beautiful designer cardboard.

Boxes can be made in one evening
back to contentsUseful little thing - a label for a gift
So that your gift does not get lost among the rest and gets to the right addressee, it is advisable to hang a note label on it with the name of the person to whom the present is intended. It would seem a trifle, but the label can also be issued in the New Year's style.
The white cardboard label, decorated with cross-stitch embroidery, looks concise and stylish. Draw a picture on the cardboard with a simple pencil, and then pierce holes with a needle or awl. This will make sewing easier. You just have to thread the thread through the holes.

Simple and beautiful
A small sprig of juniper or mistletoe can be rolled up to form a Christmas wreath. This label looks fresh and natural. You can attach the branch with a glue gun.

Evergreens for gift decoration
Paper snowflakes are taught to cut out in early childhood. They can be used to decorate gifts for the Year of the Rooster. Use bright, solid color wrapping paper. So the snow-white snowflake will look more spectacular.

A small snowflake looks cute
back to contentsHomemade postcard - made with soul
A great addition to a New Year's gift is a postcard. A handmade postcard is an exclusive thing. Having several types of colored paper with a pattern, a red ribbon, scissors and a white sheet, you can make a fun card with three Christmas trees.
Draw a triangle on the base and cut out three such triangles for each Christmas tree. Combine different colors. Fold each triangle in half and glue together as shown. Complete the design with red ribbon bows and a congratulatory inscription.

New Year's cards with 3D figures can also be made by hand. Draw and cut out a half circle from colored paper. Fold it like an accordion. Repeat the operations, but the diameter of the semicircle should increase with each tier. Glue the edges of the accordions in increasing order to the postcard.

Herringbone 3D from plain paper
Cut out a triangle from green paper, from gold paper - a star. Applying hot glue to the buttons, fasten them to the herringbone triangle in random order. Decorate the composition with a golden star.

Buttons - an unusual material for a postcard
back to contentsMaster class on creating New Year's crafts "House for a cockerel"
This step-by-step New Year's crafts master class for the year of the Rooster will help you make several toys or gifts at once in one evening. The plot with the symbol of the year is taken as the basis, but if you want to diversify the Christmas tree, choose napkins with different pictures.
back to contentsPreparation of materials for work
To create a house of wooden ice cream sticks, you will need the following materials and tools:
- ice cream sticks long straight 2 pcs.,
- standard sticks - 6 pcs.,
- curly sticks - 5 pcs.,
- larch cones - 2 pcs.,
- pistachio shells - 5 pcs.,
- napkins, white twine, brocade ribbon, colorful sequins,
- white acrylic paint, water-based varnish,
- PVA glue, universal transparent glue "Dragon",
- brushes, sponge for dishes, scissors.

Step by step description and photo
On six standard sticks folded together horizontally, glue long sticks vertically with transparent universal glue "Dragon", stepping back from the edge of 1 cm.

Glue curly sticks, finally forming a house.

Cut off part of the sponge. Apply white acrylic paint to wooden sticks and larch cones, lightly brushing with a sponge. Paint over the middle of the house and the pistachio shell completely.

Color the details
After the paint has dried, glue a loop of white twine to the back of the roof.

From the top layer of decoupage napkins, carefully tear off the pair of birds you like. Put a picture with a rooster and a chicken in the middle of the house, drop a little PVA glue and quickly spread it with a brush with movements directed to the edge of the picture. Cover the shell with a layer of PVA glue and roll in small sparkles or simply paint with colored acrylic paint.

After the glue has completely dried, cover the house with a layer of water-based varnish.

Protect the motif with varnish
While the varnish dries, tie two larch cones and tie a bow from a brocade ribbon. Cut off the excess tape with scissors.

Tie the cones to the twine loop on the back of the Christmas craft. Attach a brocade bow on top of the universal glue.

Attach the decorated eggs from the shell of pistachios with universal glue to the bottom of the house.

After the glue has completely dried, the ice cream stick house is ready.

New Year's crafts for the year of the Rooster

DIY Christmas toy

New Year's house for the Rooster on the Christmas tree
You can continue the list of crafts for the New Year 2017 indefinitely. Here is only a small fraction of what you can create with your own hands for the holiday. The main task of this collection is to inspire you to be creative and awaken your indefatigable imagination so that something invented by you will be on the list of the best New Year's handmade ideas next year.
Very soon the most long-awaited and favorite holiday will come - the New Year. The most far-sighted people buy gifts for their relatives and friends in advance, and the most creative people make them with their own hands. As cute New Year's gifts, various crafts, and New Year's toys, and various decorations, and postcards can act - yes, whatever your heart desires! In this article, we will once again consider the options for making New Year's crafts, and also recall the coolest New Year's articles that have already been posted on our website.
New Year's crafts from improvised materials
In fact, there is nothing nicer than receiving a handmade gift. Such gifts speak of special attention from the donors, they contain a piece of human warmth. With your own hands, you can make not only gifts, but also decorations for the home and that will create a magical New Year's mood. Today we will tell you about the most interesting ideas for New Year's crafts.
Christmas tree made of buttons
A real New Year's interior is unthinkable without a Christmas tree. We propose to make a creative Christmas tree from improvised materials, which will decorate your home.

Each housewife has a box with a variety of buttons that will be an excellent material for a future Christmas tree.

You will need:
- Cardboard, preferably green;
- Buttons of different diameters;
- Glue;
- Scissors.
Description of work:
We twist the cone from thick cardboard and glue the edges - this is the basis for our Christmas tree. Then, in a chaotic manner, we glue the buttons on the cone. It all depends on your imagination. If you want to get a cheerful Christmas tree - use multi-colored buttons; if you want to make a stylish little thing - stick buttons in two primary colors, for example, red and white, blue and white, and others. The Christmas tree can additionally be decorated with snowflakes, beads, etc.

Attention: You can stuff the cone with a soft cloth or cotton wool, and attach the buttons with pins. Such a tree will be more stable.
Buttons can also be used to make an original Christmas tree decoration. Only instead of a cone, you will need a foam ball (sold in the departments for creativity), on which buttons are glued. Such a ball can be hung on a ribbon. It can decorate not only the Christmas tree, but also, for example, a window opening.


Other options for New Year's crafts from buttons -
New Year crafts from beads with your own hands
Homemade Christmas tree decorations made from beads will be a great gift for loved ones. To make such a toy, it is not necessary to have experience in beadwork or beadwork. Even a novice needlewoman can make simple, but very beautiful crafts from beads.

Crafts from beads for the year of the Rooster
A beaded cockerel can become a wonderful New Year's souvenir. To make you will need:
- Beads of green, light green, red, blue, light blue, yellow;
- About 2 meters of brass wire;
- Scissors.
To make a cockerel, you need to master the technique of parallel stringing and the “toward” technique. You need to start with the head, then we make the body, not forgetting to leave the wire for future paws and each feather. If you do everything right, you will have a funny cockerel that can become a keychain.

Christmas crafts from old light bulbs
Old, worn-out light bulbs can acquire a new, no less bright life. Having shown imagination, you can make magnificent Christmas tree decorations by painting bulbs in the form of funny snowmen or other fairy-tale characters, as well as making applications using glue and sequins, beads and other decorative elements.


Crafts from cones
A variety of crafts made from cones will become a real New Year's decoration, because cones are a natural material that is directly related to a living Christmas tree or pine.

Do-it-yourself Christmas tree from cones
To make a decorative Christmas tree from cones, you will need:
- Thick green or brown cardboard;
- Cones (preferably pine);
- Glue gun;
- Decorations;
- Spray paint in gold or silver.

We make a cone from thick cardboard, glue the edges. This Christmas tree will turn out to be heavy, so for stability it is better to glue a circle of cardboard to the base of the cone. Then glue the bumps onto the cone with a glue gun. You need to start from the bottom and glue the bumps, leaving no gaps between them. At the bottom it is necessary to stick large cones, and closer to the top - smaller ones. So the craft will look harmonious.
Now the most pleasant moment - decoration. If desired, you can paint the Christmas tree in gold, silver or any other color using spray paint. When the paint is dry, glue on the decorations. It can be multi-colored beads, sequins, bows, small bells and more. You can dissolve the string of beads, and glue each bead separately on the Christmas tree. It all depends on your imagination!

By the same principle, you can make a ball of cones.
You will need:
- Styrofoam ball;
- Glue gun;
- cones;
- Spray paint;
- Decorations.
Making this decoration is quite simple. Stick the cones on the foam ball as closely as possible. Then you can paint the workpiece with spray paint, or you can leave it in its natural form.
An interesting idea is to “powder” the ball with artificial snow from a can. Such a product can also be decorated to your liking with various decorations.
If you tie a ribbon to the ball, it will become a wonderful decoration for the ceiling (you can hang several of these balls). And if you put the ball on a stick and fix it in a flower pot, you will get a wonderful Christmas tree.

Christmas wreath of cones
From spruce and pine cones, you can build a wonderful New Year's wreath.
For this you will need:
- Ready-made base for a wreath (sold in stores) or thick cardboard;
- Cones (spruce or pine);
- Glue gun;
- Satin ribbon of any color;
- Spray paint;
- Decorations.

For a wreath, we take a ready-made base or cut out a suitable blank in the form of a wreath from thick cardboard. Then glue the cones on the base. We paint the wreath with gold or silver paint (if desired). We twist our product with a ribbon of a contrasting color, decorate it with beads, rhinestones, bells, etc. An interesting idea: decorate a wreath with small artificial apples, tangerines, etc. (sold in specialized stores). Such a wreath will look truly homely and cozy.


Other options for crafts from cones:


DIY Christmas crafts: patterns and patterns
In order for your children not to get bored in anticipation of the holiday, take care of making simple crafts with them. Literally every child will cope with the manufacture of a snowman from old socks. For this you will need:
- White socks:
- 2-3 buttons;
- Pins with black and yellow (or red) heads;
- Fabric for a scarf (or colored sock);
- Glue.

Cut the sock into two pieces. We tie the upper part with a thread and turn it inside out. We fill this bag with rice, tie it with a thread, stuff it with more rice and form a head. From black pins we make the eyes of a snowman, from a yellow or red pin - a nose. From a piece of fabric or a colored sock we make a hat and a scarf, sew on buttons. The cute snowman is ready.

Children's paper Christmas tree crafts
Even the smallest children will cope with the creation of a paper Christmas tree from their hands. You will need:
- Colored paper and colored cardboard;
- Scissors;
- Glue;
- Pencil;
- Sample.
We cut out a triangular base for the Christmas tree, stick it on a colored sheet of cardboard. Then we circle the child’s pen on a sheet of green paper, cut out the blank. There should be several such details. Glue the "palms" on the base from the bottom up. "Fingers" should remain free. When the base is all covered with "palms", the Christmas tree is ready. It remains to glue the star to the top and, if desired, decorate the craft.
Crafts for the New Year from felt
Felt is an ideal material for crafts, as it is very malleable, easily glued, and when cut, its edges do not crumble and do not require additional processing. The material is perfect for creating toys with small details. There is a huge selection of felt in various colors and densities in needlework stores.


New Year's crafts from salty text
Children love to sculpt. Invite them to make Christmas crafts from salt dough. You will need:
- 2 cups of flour;
- 1 glass of salt;
- 250 g of water.
Knead the dough from the indicated ingredients. During cooking, you can add vegetable oil, then the dough will not stick to your hands. Now you can sculpt toys. Here, children's imagination is not limited. You can use cookie cutters to make Christmas trees and stars. If you make holes in them with a stick, you will get beautiful decorations for the Christmas tree. The blanks should be dried in the oven, and then decorated as you wish.

The easiest option for children is to color the toys with colored felt-tip pens. Various beads, ribbons, sparkles will also be used - everything that is at hand. As a result, you will get exclusive decorations for the Christmas tree, and the process of creating toys will delight you and your children.


DIY Christmas toy Cockerel
The upcoming 2017 will be the year of the Fire Rooster. Therefore, it's time to start making a pretty symbol of the year. It will be a pleasant surprise for your loved ones. Even a novice craftswoman will be able to tie a heating pad on a teapot in the form of a funny cockerel. This is the case when the gift will be both pleasant and practical thing. For a heating pad you need to purchase:
- Yarn of red, blue, cream and yellow shades;
- Hook number 3.

First we knit the body. We take a red thread in two additions and knit a chain of 65 air loops, connect into a ring. Then we knit 18 rows with a single crochet, from the 18th to the 42nd row we begin to decrease two loops. We tighten the bottom of the product with a thread.
Scallop making. We knit three tubes from a yellow thread, one of which is slightly larger than the other two. To do this, we collect a ring of five air loops and knit 7 columns without a crochet, in each subsequent row we double the number of loops. The next 5 rows are single crochets. Then we decrease one loop in 7 rows. All three parts need to be connected together and knitted next to a single crochet.
Then we knit the beak. We take a blue thread and from the ring (3 ch) we knit 4 single crochet, then 9 single crochet, adding one loop in each row.
To make the legs of a cockerel, we take a cream thread and knit tubes of three air loops with single crochets. In the second row, double each loop and knit 22 rows. Also tie the second leg.
Connect the blanks together - and you get a funny cockerel-warmer. If desired, the cockerel's body can be decorated with flowers.


