Unusual crafts for the new year. Original crafts for the new year with your own hands. Crafts from beads for the year of the Rooster
On the threshold of the long-awaited New Year holidays, which are eagerly awaited not only by children, but also by adults. After all, the New Year is a new hope, new plans, new life. To create a magical atmosphere in the house, we always prepare decorations in advance. Someone buys them in stores, but in this article we will tell you how to make interesting crafts for the New Year with your own hands.
The patron of the upcoming 2017 will be the Fire Rooster. It is his image that should be present in every home so that the whole year is successful and happy.
You can make a cockerel in different ways. In this case, the main thing is to show imagination. We will present several workshops on making do-it-yourself symbol of the New Year 2017:
Rooster toy
The product will look like a soft toy. To create it, you will need a pattern, cotton wool, two identical buttons and any dense fabric. It is not necessary to buy it, you can use an old sheet or shirt.

The only thing you can buy is two small pieces of red and orange felt to make a beak and comb out of them. You can also use any decorative elements for the cockerel. In the photo below, the master used straw to make a bow.

The uniqueness of this toy is that it is easy and quick to make. In a short period of time, you will be able to sew dozens of such cockerels to give them as gifts to all your friends for the New Year 2017.
If you make small-sized soft cockerels, then they can become decorations for the New Year tree. It will only be necessary to sew ropes to them, for which they will cling to Christmas tree branches.

You can not make cockerels voluminous. Just cut them out of felt, decorate them with rhinestones, beads, feathers, ribbons and other decorative elements, attach ropes to them to hang them on the Christmas tree.

Rooster made of buttons and old beads
- Outline the rooster on decorative paper.
- Use quick-drying glue to attach buttons and beads to the image, alternating them in colors and sizes.
- The resulting product can be framed and hung on the wall in the hallway or in the kitchen

Painting "Rooster" in quilling technique
The quilling technique is very popular among needlewomen, because it can be used to make exquisite products using only special paper, a toothpick and glue. To make a picture with a cockerel, you will need the same material and whatman paper, which will become the basis for future crafts.
The work will be very painstaking, so you need to be patient:
- First you need to cut the quilling paper into strips 5 mm wide and 25 mm long.
- Then wrap each strip around a toothpick. Glue the ends to the finished paper spirals. All spirals need to be slightly lowered and squeezed into the shape you need.

- Glue all the curls on a pre-prepared outline of a rooster on a drawing paper.
- In addition to the rooster, according to the same scheme, you can make other elements of the picture - snowflakes, Christmas trees, snowmen, and so on.
As a result, you should get such a beautiful product:

The techniques we have listed are the most practical options for crafting a New Year's symbol that will last for a long time. You can use many other ways to make cockerels, for example, from disposable tableware or plastic bags, but they are unlikely to retain their original beauty for a long time due to their impracticality.
Craft "Christmas Tree" for the New Year with your own hands
Despite the fact that a live or artificial Christmas tree is decorated in every house for the holiday anyway, we still make small ones. original crafts for the New Year with your own hands in the form of a forest green beauty, so that the festive mood is felt everywhere.
Of the many ways to create Christmas trees, we have chosen some of the most interesting:
Christmas tree made of bright pictures

- To make such a beauty, you will need old magazines, newspapers or a children's book.
- Of these, using a shaped hole punch, you need to make as many round elements as possible - these can be flowers, ordinary circles.
- Each of the resulting circles must be twisted a little by wrapping them around a regular pencil.
- They will need to be glued in neat rows to a pre-prepared paper cone, starting from the bottom.
Christmas tree made of felt

From the minimum amount of material, you can make just such a Christmas tree. You will need:
- felt fabric in two colors
- thick cardboard
- quick dry adhesive
- thin Christmas rain
- First, we make a cone from cardboard, which will be the basis of the future Christmas tree.
- Then we cut out circles of different diameters from felt, cut a hole in the center of each through which these circles will be threaded onto a cone.
- When all the felt parts are threaded, you can proceed to decorate the product - glue the Christmas tree rain and other New Year's tinsel in a spiral to the product, which you do not mind.
Christmas tree made of floristic mesh and garlands

- To make such a Christmas tree, you must first make a paper cone and wrap it with a plastic bag.
- Then it is necessary to cut flaps of the same size from the floristic mesh, moisten them in PVA and alternately glue them onto the cone in several layers.
- When all the layers are glued, the top of the mesh must be smeared with PVA again and left to dry.
- After the mesh dries, it must be removed from the cone. We won't need it anymore. Instead, you need to attach a garland inside the Christmas tree using decorative wire.
- If desired, you can also attach any decorations from the outside of the resulting Christmas tree.
DIY paper crafts for the New Year
Paper is a universal material for needlework, but short-lived products can be made from it, although they are quite original. In this article, we decided to tell you how to make paper out of paper. easy DIY crafts for the New Year. We will talk about two designs of Christmas decorations.
Crafts from paper tubes

To make such a Christmas tree decoration, you will need scrapbooking paper and a ring from an old chain through which a decorative thread will be threaded.
What will be the algorithm of our actions:
- We cut out a circle of any diameter from any cardboard and mark the center on it (the size depends on your desire, to make the same toy as in the photo above, you need to cut a circle with a diameter of 5 cm);
- From one sheet for scrapbooking we cut out squares with a side of 3 cm, and from the second squares with a side of 2.5 cm;
- Expand all the squares so that they look like diamonds, then begin to bend the left and right ends of the square towards the middle as if you were swaddling a baby;
- Glue the resulting elements with quick-drying glue;
- Clockwise to the center, start gluing the twisted elements to the pre-prepared cardboard so that each tube fits snugly against each other;
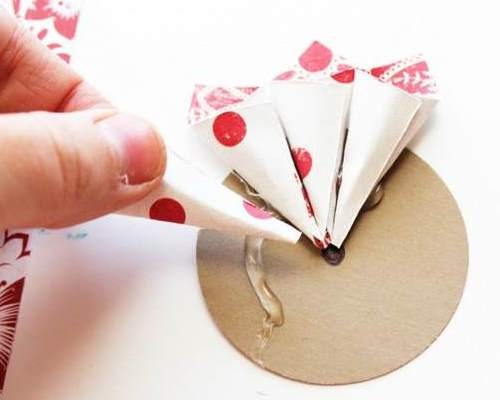
- You will need to make several layers of these tubes so that in appearance the future product begins to remind you of a flower;
- If desired, attach an old brooch or pendant with stones to the middle of the toy, and glue rhinestones along the edges of the tubes.
Craft from paper squares and foam

The main material for creating such a beautiful paper cone is decorative paper and a foam ball. What to do with them:
- Cut the paper into strips 2.5 cm wide;
- Each strip again needs to be cut into squares with a side of 2.5 cm;
- From each resulting square, you need to make such an arrow, as shown in the photo;

- When all the elements are prepared, they can be glued to the foam ball in layers from the bottom up;
- To the top of the cone, you can attach paper leaves and braid, for which the resulting cone can be attached to the Christmas tree.
From above, each of the proposed toys can be covered with sparkles, sprinkled with New Year's tinsel, so that they look festive and elegant.
Crafts from cones for the New Year
Crafts from cones with their own hands for the new year look very original and natural on the Christmas tree. From this beautiful natural material, you can come up with a huge number of different toys and table decorations. After all, the cones are amenable to staining and gluing. As examples, we will present you with several options for cone products for the New Year:
- By painting the cone green and sprinkling with white or silver sparkles, you can make a mini-Christmas tree that will look beautiful as a New Year's toy, as well as a figurine on the fireplace.

- The cone can be used as a body for a toy bird or deer. You will only need to figure out what to make their heads and limbs from. It can be a sponge, cotton wool, wool - any material and decorative elements.

- Cones can be used to make beautiful Christmas door wreaths. Moreover, they do not even need to be subjected to any processing. Through them, you only need to pass a wire, with which the cone will hold firmly on the wreath.

Crafts from the test for the New Year
To creation salt dough crafts for the New Year children can also be involved. As a rule, children really like to sculpt different figures from it, especially if they are dedicated to the celebration of the long-awaited winter holiday.
The most important thing here is to knead the dough correctly. It is very simple: you will need salt, flour, starch and water. All these components are mixed with each other in equal quantities. If you already know in advance what color your products should be, you can immediately add dyes to the dough. If not, then leave it colorless.

- To give contours to future crafts, you can use special confectionery molds - Christmas trees, snowflakes, gnomes or snowmen.
- Cut out the characters, then lay them out on a baking sheet and dry in the oven.
- When the products are dry, take them out and decorate - paint, glue all kinds of decorative elements to them.
Here are some examples of designs for New Year's products made from dough:


Crafts from sweets for the New Year
Candy is the most festive material. In childhood, each of us tied a rope to them to decorate the New Year's beautiful Christmas tree with sweets. Today, sweets are used in a more original way. With their help, you can create not only interesting crafts for the new year but also to make sweet gifts for your loved ones.
For example, if you are going to visit godfathers or neighbors, then you can make a beautiful Christmas tree from a bottle of champagne and loose sweets.

How to do it:
- Lubricate the bottle with a festive drink with glue, and attach New Year's tinsel to it.
- Then glue the sweets in a circle in exactly the same way. You can use both the same sweets and different ones.
- Decorate the resulting Christmas tree with bows, beads and that's it - this is the chic New Year's gift ready.
If you go to a house where there will be children, then you can also make New Year's sweet gifts for them. Buy different chocolates and cane-shaped lollipops. From these sweets you can make a sleigh:

- Glue chocolates to candy canes with a glue gun
- Put the rest of the sweets on pyramid-shaped chocolates and wrap them with a beautiful ribbon
- To complement a sweet gift, you can tie a toy deer to the sleigh
You can also make New Year's clocks from sweets. To make them you will need:
- cookie metal box
- candies
- New Year's tinsel

- First you need to decorate the cookie box with corrugated paper
- On the one hand, make a dial from old beads
- Glue all the decorations and details of the product on the glue gun
- Then, around the circumference of the box, glue the sweets so that they fit snugly against each other.
- From above they can be wrapped with decorative tape.
When the main part is ready, you just have to complete the decoration of the dial. This is where your imagination comes in handy.
Crafts from disks for the New Year
Everyone in the house, for sure, has old CDs that just take up space on the shelf in the closet. So that they do not simply gather dust, use them to create beautiful crafts for the New Year with your own hands.
We suggest you make New Year's toys and panel pendants from CDs. With their help, you can decorate the Christmas tree and the walls in the rooms of your house.
To create Christmas decorations, you do not need to show special talents. Even kids can do this job. You will only need to draw a beautiful winter drawing for them on the disk and give out decorative elements - paints, beads, beads, buttons. Children themselves will show their imagination and complete the decoration of CDs.
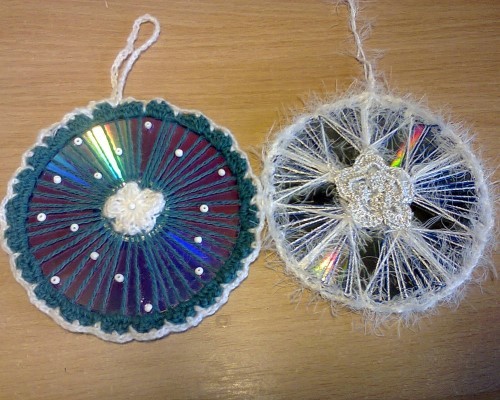
Panel pendants according to the manufacturing technique are a little more complicated:
- The discs will first need to be coated with acrylic paint.
- Then thread the braid through the hole and fasten it tightly.
- The next step is gluing a drawing to the disk using the decoupage technique, which we will need to color and give it volume with the help of salt, semolina and other improvised means, for example, toothpaste, from which snowy mountains can be made.

Crafts from beads for the New Year
Beading is a real art, to master at least the basics of which is not given to everyone. But what if you really want to make from this material beautiful crafts for the new year There is an exit. We have selected several ideas for creating Christmas beaded decorations that even a child can make.
Christmas ball from beads
- Take a long thin wire and randomly string beads on it.
- Having coped with this task, inflate a small ordinary balloon.
- Now this ball must be carefully wrapped with prepared wire.
- When the whole ball is decorated, pierce it so that you have such an original Christmas decoration in your hands, as shown in the photo below.

Christmas tree made of beads
- Make a tight cone out of cardboard and set it aside.
- After that, string green beads very tightly on the wire, alternating it with red.
- You just have to wrap the paper cone in a spiral with the resulting garland, and then take it out so that only the original Christmas tree remains, which can be used as a toy.

Snowflake from beads
- First, fasten three wires of the same length together to make an asterisk.
- Then, on each ray of the star, simply string the beads so that you get a beautiful snowflake, which is shown in the photo.

Knitted crafts for the New Year
knitted ideas original crafts for the new year great amount. Of course, to create at least one of them, you need to undergo special training or train yourself for a long time, relying on video tutorials from the Internet. For those who know how to knit Christmas decorations with talent, we have selected several patterns that can be useful for needlewomen while preparing home decor before the New Year holidays.
Knitted snowflakes

Knitted Christmas balls


Volumetric crafts for the New Year
In this section, we will show you how to make volumetric unusual crafts for the new year from improvised materials.
The first version of Christmas decorations - Christmas decorations from walnuts. To make them, you need:
- First, peel the nuts from the inside so that only the shell remains.
- Cut a satin ribbon 25 cm long, fold it in half, string a bead on it. Insert the ends of the ribbon between the two parts of the shell, and only then glue them together.
- Color the nuts in the color you want, decorate and varnish.

The second option is wine cork Christmas decorations. To make them you need:
- Paint the corks in different colors
- Think of the shape of the future toy
- Fasten the corks together in the desired shape with wire
- On top of the resulting decoration, attach a ribbon in the form of a bow with a regular decorative pin

The third option for Christmas tree decorations is the simplest - burnt out light bulbs. You just need to color them beautifully - give them the look of penguins, snowmen or Santa Clauses:

Crafts in kindergarten for the New Year
All of the above homemade Christmas decorations can fall into this category. However, we want to highlight here children's crafts for the New Year with their own hands. As an example, we give original options for needlework, which you can offer to make your children on the eve of New Year's parties in kindergartens.
Magic snow globe
- On a regular round cardboard, glue cotton wool to imitate snow.
- A plasticine snowman and a Christmas tree are attached to it. On top of this craft, you will need to install a small glass jar, the inner surfaces of which must be smeared with glue and sprinkled with sparkles to give the impression of falling snowflakes.
- We attach the glass jar to the base of the craft using a glue gun. It turns out such an original product:

Modular paper crafts
- In the same way, we first prepare the base. In this case, it will be a cardboard candy box.
- We glue it so that both parts touch each other at right angles.
- Lubricate their inner surfaces with glue and glue cotton wool to them, which will again imitate snow blockages.
- From paper we make different animals - bunnies, cubs, and then we attach them to a horizontally located base.
Here you can also place a plasticine Christmas tree and other home-made products. For clarity, here is an example:

Video: DIY crafts for the New Year 2017
In this video, the needlewoman clearly demonstrates how you can decorate Christmas balls in an original way or make unusual elements of New Year's decor with your own hands.
The last days of December are full of troubles. Each hostess is trying with all her might to create a fabulous atmosphere in her home. But in order to make your home even more beautiful on New Year's days, it is not necessary to buy bulky and a bunch of Chinese decorations. It is enough to arm yourself with scissors, glue, a sheet of cardboard and a pack of colored paper. From these materials you can make very unusual and cute crafts that will be a wonderful decoration for your home or office. Some products can be used as, while others can be used on their own. A few hours spent on making paper decorations are worth the joyful smiles of your loved ones!
paper christmas tree
Original Christmas tree with lacing around the edgesThe Christmas tree is the main decoration of the New Year's interior. creates a solemn mood and pleases us all the winter holidays. Well, a decorative paper tree that will decorate your windowsill can be stored until next year. To make this craft, prepare:
- 8 Christmas trees cut out of thick paper or cardboard
- cutter
- scissors
- hole puncher
- Double-sided tape
- white thread or thin cord
- white sequins
- white acrylic spray
- ruler
- cardboard sheet

Since there are no Christmas trees without stars on top, make the top first. Draw the outlines of the figure on the cardboard. Then, using a ruler and cutter, carefully cut out the star. From eight paper blanks, assemble a Christmas tree. Attach it with double sided tape. The edges of the product should be symmetrical, so it is better to fasten the corners with glue.
 Examples of the design of cardboard Christmas trees
 Punch holes along the edges of the craft with a hole punch and paint your product with white spray paint. Make the trunk of the tree 5 cm wide. Then pull a white woolen thread or cord through the holes made earlier. To "stitch" it was more convenient, take a needle with a large eye. Spray the star with white paint and attach it to the top with glue. Decorate the entire piece with glitter. To do this, you can use a golden rain, Christmas decorations or multi-colored paper glued to the sides of the Christmas tree.
House for sweets
 Such houses will be an excellent package for New Year's cookies.
 You can decorate your home with this craft, hang it on a Christmas tree, or use it as a package for sweets. To make it you will need:
- house template ()
- scissors
- stationery knife
- ruler
- double tape

 Creating a sweep of a cardboard house
 First, print out the house template. You can also draw a similar sketch of your choice. Then cut out the template. For particularly delicate items, use a clerical knife. Bend the blank along the dotted lines using a ruler or a postcard fold tool.
 Step-by-step instructions for making crafts
 Glue the house together using double-sided tape. Decorate and decorate the product at your discretion. Fill the craft with your favorite sweets and you can please the children with it! Well, if you print the templates of houses on colored paper, you will have a motley New Year's town.
Christmas lantern
 Cardboard lantern is ideal for children's creativity
 Lanterns will create a fabulous atmosphere in the house. They can be made from colored paper in just a few minutes! Cut ribbons of the same length and width (dimensions depend on the size of the future product). To make one flashlight, prepare about 15 strips of paper. Then put them in a pile and use an awl to make holes at both ends of the blanks.
 Step by step instructions for making a paper strip lantern
 Thread on one side. Tape its end to the strip. Then pass this thread through the second hole. Stretch it so that the paper is bent into an arc. Secure the thread with a knot. It should be large and not slip through the holes. At the final stage, straighten the strips so that a ball forms. Here is our flashlight! Several products of different colors and sizes, suspended side by side, look very beautiful.
Volumetric snowflake
 The 3D snowflake looks spectacular and is not difficult to create.
 Traditionally, most families use it as a New Year's decor. They are made mainly of paper and decorate the whole house with “snowfall”: a Christmas tree, walls, windows. There are many techniques for making this craft. For example, you can make a spectacular three-dimensional snowflake. To do this, you need to stock up:
- paper (white, color and wrapping)
- scissors
- glue
- stapler
 Step-by-step instructions for creating a three-dimensional snowflake
 Cut out six square pieces. Fold each square diagonally and cut inside with scissors. Open the square and place it on the table in front of you. Roll the first row of strips into a roller and fasten its edges with a stapler or glue. Then turn the snowflake to the other side and similarly connect the two strips of paper that are closer to the center. Turn the product over each time and fasten the remaining strips.
In the same way, fold the remaining five blanks. Connect the three parts of the snowflake with a stapler in the middle. Fasten the remaining three parts in the same way. Now glue these two halves together. To keep the shape, it remains to connect the snowflake where each of the six parts is in contact with the next. Decoration can be made from paper of any color.
christmas angel

The magical spirit of Christmas will always be present in a house decorated with angel figurines. They can be created with:
- colored paper
- PVA glue
- scissors
First, make a patterned snowflake. To do this, prepare a sheet of white paper measuring 20 by 20 cm. Fold it in half, then in half again and fold the two opposite corners together. Cut out with sharp scissors. Instead of paper, you can use openwork napkins. Glue half of the snowflake onto colored paper and cut out a semicircle from it.

Thoroughly coat its edges with glue and connect into a cone. Cut out wings from paper and attach to the back of the product. Draw the face of the future angel: eyes, nose, mouth. Hair can be made from cotton. Attach a hanger to the toy so that the Christmas angel can decorate your Christmas tree.
paper star

Origami technique can be used to create Christmas decorations. From paper squares folded in a special order, you can easily make a star for the New Year's table. Stock up on colored paper and patience.
- Fold the paper square in half.
- Bend the right corner of the resulting triangle up.
- Then bend it half down, and then up again.
- Unfold and smooth the top corner.
- Fold the top corner back as shown.
- Also fold back the left corner.
- Make eight of these elements. Enclose their wide part in a small square.
- Flip over to the other side and fold the small square piece over the large square of the other piece.
Cardboard snowman

What's Christmas without a snowman? However, it does not have to be made of snow. Instead, you can take cardboard or thick paper. Such a craft is suitable for home decoration and gift wrapping, or can be used as a Christmas tree decoration. To make a snowman you will need:
- cardboard
- colored paper
- scissors
- black tissue paper

Glue a cylinder from white cardboard. On one side, make incisions in the form of cloves and bend them inward. Cut out a circle of the appropriate diameter and stick it on the cylinder. This will be its bottom. On the other side, attach a cover of the same size. Paint the top edges of the cylinder and the brim of the hat black. Cut out black eyes and buttons from colored paper, and a nose from red paper. Make snowman arms out of tissue paper strips.
New Year holidays are the happiest time for every person. These days should be remembered for a long time. It is worth noting that by this day it is customary to make any crafts. In this article, we have collected for you the most interesting crafts that you can make with your own hands for the New Year 2017. We hope that you will like our ideas.
What crafts to do for the New Year with your own hands
In this article, you can find some craft ideas. And they are all made in the New Year theme. Let's just say that you can use a wide variety of materials to create them.
Some interesting crafts for the New Year using the quilling technique.
Rooster.
2017 is the year of the Rooster. And, of course, this bird is made by many people of different ages. You can make beautiful cockerels if you use the quilling technique. But the following is worth noting, in order for you to get something interesting, you need to show your perseverance and a little imagination.

If you really want to make a bright rooster using this technique, then check out the quilling pattern. In addition, you can use other schemes. In any case, if you do everything right, then you will get interesting and most beautiful cockerels.


Snowflakes in quilling technique.
The most familiar decoration of the New Year holiday is snowflakes. We sculpt snowflakes or create garlands from them. But, you see, it's all so banal. We suggest you make several of these snowflakes using the quilling technique, which you can hang on a Christmas tree or give to friends as a souvenir. In order to make a snowflake, prepare:
- special paper for quilling;
- scissors, ruler, clerical knife, PVA glue, toothpick.
Working process:
- First, we cut the quilling paper into strips that are 25-27 mm long and 3-5 mm wide.
- Now we take a toothpick, cut off the sharp tip on one side and use a clerical knife to make a small incision of 1 cm.
- We now insert a strip of paper into this hole and slowly twist it into a spiral. It is important to keep the paper curled. Don't rush into this.
- We remove the finished spiral from the toothpick and put it on a flat surface. It needs to loosen up a bit.
- After that, a little glue is applied to the end of the strip and the spiral sticks together.
- In order for you to get one snowflake, you need to make several such curls. Moreover, they can have completely different shapes and sizes.
- The resulting curls must be folded into a snowflake and carefully glued with glue.
- Look at what snowflakes can be varied.


Herringbone.
The quilling Christmas tree can perfectly decorate the New Year's table. In addition, this product will be a wonderful gift for your loved one. To make a Christmas tree prepare:
- quilling paper;
- scissors, ruler-pattern;
- PVA glue, toothpick, tweezers.

Working process:
A quilling tool can replace a simple toothpick.
- So, for work you will need green quilling paper. You must cut it into several strips. Their width should be 3mm. It is also worth cutting brown paper into strips. The brown stripes should be 7mm wide.
- We wind strips of brown paper on a simple marker. As a result, you should get ordinary curls. Lubricate the ends of the strips with glue and glue.
- Next, we make blanks from green paper. In this case, we wind the paper onto a toothpick and insert a size 16 ruler into the workpiece. Let the curl unwind. And in order to pull out the workpiece, you need to insert a toothpick into the center, slightly move it and remove it.
- At the next stage, we glue the end of the spiral with PVA glue. Your curl should take the form of a droplet. Therefore, you must move it. You must make 10 such droplets. At the same time, wrap each curl with a strip of white. You will use these curls to create the first row of the Christmas tree.
- Curls for the second row are made in the same way as for the first row. However, in this case, the whorls are inserted into circle 15.
- On your arms you have 2 rows of curls. You must glue them as shown in the photo.
- For the third row of the Christmas tree, we insert curls into a circle at number 14. Glue the finished curls.
- For the fourth row, curls are inserted into circle 13. We use the same size for rows 5 and 6. You must carefully glue all the blanks to each other. Glue another drop to the top. Use beads to decorate the Christmas tree.
As you can see, using the quilling technique, you can create a huge number of interesting crafts for the new year. However, this technique should not be stopped.
Other interesting crafts
Cute cockerel made of felt.
Many people like inconspicuous trinkets. And the next craft is also a very cute trinket that can be a wonderful gift. Try to make it yourself.
- First, cut out 2 pieces of felt that will be in the shape of a heart. Fill the middle with cotton wool, and sew the edges.
- From bright felt, cut out individual elements of the cockerel. Use a bright color material for this. Sew them to the cockerel.
- As you can see, making such a cockerel is very simple. In addition, it will take you a little time to do this activity.

New Year's toy made of puff pastry.
You can make this craft with your child. So, knead the dough. To do this, take a glass of flour and salt. Also take half a glass of water.
In the work, it is also worth using blue gouache, sparkles and glue.
Working process:
- First, knead the dough and add blue gouache to it.
- Roll up 7 peas from the dough and make a flower out of them. Take a toothpick and make holes in them.
- Now we will roll up a flagellum from the dough. We attach the second one to it.
- Let's make 5 more rays.
- Let the snowflake dry. And then on both sides we cover it with paint.
- Now it is worth applying glue to the surface of the snowflake and sprinkle the product with sparkles.

Beautiful and unusual ball for the new year.
This beauty is very easy to make. To do this, prepare:
- thread and balloon
- glue, skewers, tape,
- gold and brown paint
- small basket.
Working process:
- First, the balloon must be inflated and wrapped with threads.
- If the threads are dry, then pierce the ball.
- Now we wrap the skewers with braid and paint with brown paint.
- The thread ball itself is painted with golden paint.
- Next, glue the skewers to the basket and fix them on the ball.

Luxurious Christmas tree made of cones.
The next master class will allow you to make an interesting New Year's craft, which will become the main attribute of the holiday. To create it you will need:
- a lot of bumps, glue gun;
- plywood circle, luminous garland, legs;
- spray paint green and silver.
Working process:
- Our Christmas tree will have a height of 1 meter and 40 cm. Therefore, cut out a circle from plywood that will have a diameter of 70 cm. And in order to make a pendant in the same circle, cut another circle with a diameter of 30 cm.
- Attach the legs to this base.
- Now start gluing the cones. In addition, each row should be offset to the center. It is worth gluing cones until a finished cone is obtained.
- Next, turn your Christmas tree over and carefully place the garland between the rows of cones.
- Paint the tree green. Lightly spray the ends of the tree with silver paint.

That's all your wonderful Christmas tree is ready.
Finally
Here you could see the most unusual crafts that are easy to make for the New Year 2017. As you can see, everything is simple here. You should only carefully study the detailed description of the creation of crafts. You will also have to work hard and then you will get incredibly beautiful crafts.
Craft ideas for the New Year 2017 to school differ from the options offered to preschool children in complexity, materials and tools. Among the most interesting are applications on cardboard, a do-it-yourself Christmas tree, kits for creativity with gypsum, eggshell crafts.
In today's article, both simple and complex crafts for children are selected, which can be used as homework for labor lessons at school or serve as a bright decoration in a home interior.
How to make crafts for the New Year 2017 to school?
The photo below shows step-by-step instructions for various crafts that are designed for children of different ages. They can be done with parents and independently, depending on the child's skills in creativity.
Crafts from plasticine for the New Year 2017
Christmas tree made of plasticine
To make a Christmas tree from plasticine, you need to roll out green plasticine in a cone shape, and use nail scissors to separate the branches. Step by step work is shown below in the photo:

Symbol of 2017 - Rooster (cockerel)
The Rooster will become the patron of the coming year, so you can make a small copy of it from plasticine as a craft for school. The combined colors can be different, the main thing is that in the end you get a similar version of the cockerel, as in the photo below.

Boot with gifts
Who doesn't love gifts? Everyone loves them! Therefore, the craft "boots with gifts" will be a real find for children on the eve of the New Year. See photos with step-by-step instructions below:
Santa Claus is associated in every child with the New Year holidays, gifts and magic. Therefore, he will only be happy to mold him from plasticine.
Other plasticine crafts, step by step in the photo:
window decorations
You can decorate windows with the help of stencils offered in. They can be scaled up and printed. And then, paint the gaps with glass paint or toothpaste.
Salt dough crafts for the New Year 2017
Salt dough crafts for children's creativity are the best fit! From them you can mold all kinds of figures of animals, fairy-tale characters, reproduce landscapes and paintings. However, parents will have to help the child prepare the dough.
Photo step by step crafts from salt dough:
Applications and figures made of cardboard and colored paper in the photo:

Craft for the New Year 2017 to school, photo:

Do-it-yourself crafts for the new year are a great occasion to bring the whole family together. In addition, handmade toys will bring even more warmth and positive into the house. Well, we will tell you simple and original ideas for crafts!
Original idea for decorating a candle
This is perhaps the most a simple and quick DIY craft for 2017. So, we take the usual candle itself. Lubricate it with glue and sprinkle with coconut flakes. That's all! New Year's snow-covered candle is ready! It remains only to set the table and call the guests.

Original popcorn wreath
If you want to get the title of the most creative hostess, then this craft idea for new year you will definitely like it. To do this, you need a large bag of popcorn, a needle, thread, a plastic plate and scissors. The plate will serve as the basis for the future wreath, just cut out the bottom of it. Thread the popcorn onto a thread and wrap it in several layers.

Decorate the wreath with a red ribbon. And the original New Year's decor is ready!

DIY Christmas candlesticks
Candlesticks from improvised means, such as oranges or apples, will help you decorate the table for a romantic New Year's Eve dinner with a loved one in an original and quick way. It is very simple to make them, and most importantly from simple and affordable materials. And do not forget to choose exactly red apples, because - red.


DIY Christmas tree toys made of fabric or felt
The simplest and popular way- add some soft New Year crafts made by yourself. First, think of the shape of the future toy. Cut out a sample from paper or cardboard, attach it to the fabric and trace around the contour. Cut out the toy, but do not forget to leave allowances for the seams. Fold the pieces right side together and stitch, just remember to leave a small opening so that the craft can then be turned inside out.

The extra edges of the toy can be cut off and, if necessary, notches can be made in the places of future bends. Turn the toy inside out, fill it with padding polyester or a special filler. The remaining opening is sewn with a hidden seam. And you can safely proceed to decorate the Christmas tree!


