DIY lamp – what could be simpler? Lamp made of threads in the shape of a heart DIY heart lamp
On the occasion of Valentine's Day, it is customary to give cute souvenirs as a sign of tender feelings for loved ones and loved ones. If the gift is made with your own hands, it will be especially appreciated.
We invite you to make a night light that will symbolize your loving heart. detailed instructions on how to make a lamp with your own hands in our article.
To work we will need:
- pink or red acrylic paint in a spray can;
- jute rope or decorative tape, braid;
- masking tape;
- small glass jar;
- sharp stationery knife;
- a short battery-powered LED garland suitable for the size of the jar;
Step 1: draw the outline of the heart

Apply several strips of masking tape to the outer wall of the jar. We draw a heart with a marker and carefully cut it along the contour with a stationery knife. Remove the excess ribbon around the heart.
Step 2: paint the jar

Cover the entire surface of the jar with spray paint. Let the paint dry. Carefully separate the tape from the jar. The heart-window remained untouched by paint.
Step 3: decorate the lamp

We decorate the neck of the jar with jute rope or any other suitable braid. Place a garland inside the jar. Instead of a garland, you can use a round one
If we learn how to independently make blanks in the form of a heart, ball, hemisphere and other shapes, then we will be able to make original decor for the interior and a DIY gift.
2.
Let's study a master class on creating these blanks, which will later be useful to us for our creativity :)
And for this we only need corrugated cardboard, from which we cut different sizes hearts. Considering that our heart should be voluminous and round, the size of the heart template in the very center will be the largest, and then with each subsequent template it should become smaller evenly in both directions, which means: 1 central heart and two blanks each every step to decrease.
3.
4.Look at what you should end up with.

5.After you have collected the heart, it’s time to fix it. To be on the safe side, I would put a little glue on each layer so that it doesn’t drip when you cover it with transparent tape. Although then cling film could also be suitable, which would then be easier to pierce with skewers for decoration.

6.After you have covered the heart with film or tape, you need to cover it with another film like this.
For example, I once bought a bag wrapped in such material. But I think this is not important :). Any elastic fabric that can be stretched may well suit us.
By the way, pharmacies sell elastic gauze. I think this is just it :)

7. In this completely uncomplicated way we can make ourselves any shape for decorative crafts :)

8. Attached is a template for cutting.

Using this blank, you can always develop your ideas on it. You can decorate with coffee beans, pebbles, shells, buttons, mosaics, moss, combine decorative material, use as a basis for artificial flower bouquets, candy bouquets,
Look what beautiful topiaries can be made this way!!!
These works are borrowed from the Internet :)


And it is quite possible to make not only a heart shape, but also a hemisphere and even, if you try, a circle.
1.
2.
On the eve of every holiday, we begin to think about gifts for our loved ones. For those who want to make something completely unusual - a wonderful lamp made of threads in the shape of a heart. Such a night light can become an original gift for a mother, a friend by March 8, or for a significant other on Valentine's Day. A similar heart-shaped lamp will help create a romantic atmosphere anywhere, even in a hostel in the center of Moscow.
To make a lamp from threads in the shape of a heart you will need:
A pair of spools of red or pink thread;
About 100 ml. PVA glue;
Thermal gun/glue “moment”;
Thick, long needle;
Heart-shaped balloon (you can use a round balloon);
Board square shape(dimensions 20x20), at least 1.5 cm thick (you can use other materials, for example, a photo frame + hard cardboard);
Colored napkin (can be decorated with other materials if desired);
Reel from toilet paper;
Decor as desired: artificial flowers, beads, seed beads, etc.;
Christmas tree garland;
Scissors, pencil, drill.
Heart shaped thread lamp step by step:
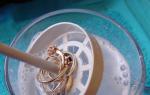
First, make a lampshade for the future lamp by inflating a heart-shaped balloon to the desired size (the size of the finished lampshade will depend on it). Take a container with PVA glue and heat it from below with a needle and a couple of threads threaded into it. Pull the needle through the jar, take it out from the back, and remove the thread from the needle. Be sure to pierce the jar at the bottom, because... the thread must be constantly wetted with glue, and during operation the amount of glue will periodically decrease.

So, tie the tip of the thread behind the “tail” of the ball and begin winding the ball. The thread must be constantly wetted with glue. At first, the thread will try to slip off the ball, so act carefully and slowly. Pull the thread tightly diagonally, lengthwise, crosswise. After 10 minutes of winding, it will become easier for you to do this, since the threads will cling to those already wound.
It is much easier to wrap a round ball, since the “heart” needs to be wrapped around the “ears”. Look where you have voids and direct the thread there. Continue winding until both spools run out of thread. If you run out of glue early, just add it from another container. Hang the wrapped ball by the tail to dry. After the threads are almost dry, pierce the ball and remove it.
Make a stand. Here a board was used, in which a hole was drilled with a diameter sufficient to “pass” the Christmas tree garland. Instead of a board, you can choose a thick photo frame by replacing the glass with thick cardboard (photo 4).
Cut a “ring” from a toilet paper reel and glue it over the hole, using plenty of glue to fill it. Reinforce the outside with a strip of paper, one edge grabbing the “ring” and the other going onto the surface of the board. Decorate the board - you can cover it with a napkin (PVA) and lightly tint it golden acrylic paint(photo 5-6). On the other side of the board you need to make a groove for wiring from the Christmas tree garland (photo 7).

When the threads are dry, heat the ball, which should easily come off the threads. So don't wait for it to dry completely. If the rubber still does not come off, insert any stick through the threads and press it onto the ball. If the threads become wrinkled, they need to be straightened from the inside using the same stick. Using tweezers, remove the remaining ball (photo 8).
Then, in the place where the “tail” of the ball was, you need to cut a hole in the shape of a lotus (photo 9). The hole should have a diameter equal to the “ring”, and fit tightly onto it (photo 10). Place the ball on the ring, fill it with glue, and press. Make sure that the lamp is level and not tilted (photo 11).

Decorate the “heart” at your discretion (dried flowers were used here). At the bottom of the stand, insert it through the hole into the “heart” Christmas garland. Leave the wire outside, run it along the groove and attach it with glue or tape.

Turn on the finished heart-shaped thread lamp and admire the result!
Creating a heart-shaped lamp with your own hands is a responsible job that requires compliance with some nuances and features, but the result will definitely please you or your significant other, to whom you would like to give such a product.Lamp in the shape of a heart - original and attractive
With the onset of holidays, such as Valentine's Day, men should prepare gifts for their loved ones. This gift will please every female representative, so try to do it right. Undoubtedly, a wonderful perfume will conquer a woman's heart.
When creating a gift with your own hands, you need to use polystyrene foam tiles, adhesive tape and a pencil for the lamp. Perhaps a list necessary materials and tools looks ridiculous, but this is really the entire set that is needed to create this product.
Let's start work
You need to cut out a circle from polystyrene, the diameter of which should be 33 cm. In the center you need to draw a heart, along the perimeter of which squares should be placed, they should be located approximately two centimeters from each other.
This stage of work must be performed carefully and competently. Using a sharp scalpel, you need to cut out the holes in the squares that you marked. The size of the holes will depend on the sockets and bulbs located on your garland.
All the light bulbs now need to be inserted around the perimeter of the heart. Speaking of loose wires, they must be glued to the back wall of the lamp using tape.
You need to use those remnants that will definitely remain from the polystyrene to create a box - a support.
When purchasing garlands, do not forget to purchase those garlands whose bulbs will be red, because modern garlands have big amount light bulbs, so you definitely need to take this into account.
Thus, the heart-shaped lamp is ready, which means that now you can wait for the long-awaited holiday and present the product to your soulmate. In any case, she will be satisfied, because it is no worse than those products that are sold in stores today.
Such a product can be hung on the wall, and it will constantly remind you of your loved one.
- One of the brightest and most desirable holidays is approaching - New Year, so many people are already starting to buy certain gifts for family and friends. But some needlewomen and needlewomen want
- The long-awaited and joyful holiday For many people, this is, of course, the New Year. And many people begin to buy various gifts for each other, so that, in this way, it will be favorable
- The long-awaited holiday of children and adults - New Year - is coming soon, so I want to create a special atmosphere in the house that will lead to relaxation and comfort, so that your children and you can
- Among the wide selection of bracelets and other accessories, you really want to choose something unusual and interesting for yourself, but as always, this is not possible. Therefore, if you started to think about creating
- A very unusual and original lamp can literally be “brought from the forest.” First, you need to remove the soft part of the mushroom. Then drill a hole for the chuck at an angle (see figure).