How to make a New Year's paper snowflake. How to make a Christmas snowflake with your own hands. Necessary materials for a large do-it-yourself paper snowflake
Remember how in childhood we folded paper sheets into triangles and randomly cut out all sorts of corners and circles on them, and when we unfolded the sheet, we got an unusual snowflake?
Soon New Year, and the soul, just like in childhood, asks to decorate your home and office, but also with magical openwork decorations.
Only if earlier we invented everything ourselves, now there are a lot of all kinds of templates and stencils, by circling which and cutting out the necessary parts, you can create stunningly beautiful and rather unusual creations with your own hands no worse than frost draws on the windows.
Agree that now you want to create a pre-holiday mood? What is the cheapest and easiest way to do this? Of course, cut homemade decorations!
Simple and beautiful paper snowflakes will decorate the interior at the right time.
There is nothing easier than folding a regular paper square and looking at beautiful schemes create triangular bases. Or translate unusual curls from stencils, cutting them out, we get unpredictable jewelry options in expanded form.

Finished products can be used both separately and formed from them, for example, snowfall.

And if a flat openwork snowflake seems too simple to you, then you can connect your imagination and make voluminous decorations.
Do-it-yourself voluminous paper snowflakes
Volumetric decorations look more impressive than ordinary ones, and they are also created in a matter of minutes. The only thing is that you will have to tinker a bit with gluing the protruding parts, but it's worth it!

And if an ordinary snowflake is most often attached then somewhere on the surface, then a three-dimensional (volumetric) one can be made of any size. And hang it, both in the form of a Christmas toy, or an additional decor for a chandelier or a doorway, and as an independent hanging decoration in the middle of the room.

Volumetric jewelry can be made in several techniques. The most common are: three-dimensional designs from stripes, origami, cutting stencils and gluing them.
The volume is created either by cutting and connecting the elements of a flat snowflake into protruding elements, or by gluing the constituent volumetric parts into a single structure.

To create them, in addition to sheets of paper, scissors and imagination, you will need a stapler, thread, glue, clothespins, paper clips and a ruler with a pencil.
Most often, voluminous snowflakes are made from snow-white paper, but no one forbids using colored or shiny paper sheets!

And also the finished product can be covered with sparkles. Or weave flowing rain and tinsel into it.
Simple patterns for making voluminous jewelry
There is no more intuitive way to needlework than to make your own snowflake according to the scheme. The scheme, instead of words, gives a visual representation of how to do step by step with your own hands what you will be proud of, and what will please the eyes of others.
So let's get started:
Scheme for the manufacture of volumetric "Turntables".

Scheme for making a three-dimensional snowflake "Flower".

Scheme for making a three-dimensional origami-style snowflake.

As you can see, everything is made quite easily and simply.
Beautiful and voluminous 3D do-it-yourself paper snowflakes
3D snowflakes are a kind of three-dimensional products that, although they look intricate, are actually modeled in just a few simple steps.
Don't believe? Let's try to make 3 variants of 3D snowflakes together.
But what if, for starters, we try to make snowflakes from individual strips?

We take a strip and glue its ends to make a drop-loop.

We glue 5 drops together to make a kind of twig. For better gluing, you can clamp the “trunk” of the branch with a clothespin.

It is necessary to make 8 such branches.

To fasten the branches, you need to make a core. To do this, you can wrap a strip of paper on a regular bottle of varnish and glue it.

Glue the branches to the core and - voila! We have a big snowflake!
The following snowflake can also be made from stripes, but a little more geometric:

We fold the strips crosswise and for better gluing, you can temporarily fasten them with paper clips.

We bend the extreme strips with a spiral and glue their tips together.

We add more on top of the previous stripes, and glue them in the same way as the previous stripes.

Now glue the spiral petals to the main guide strips. And to be sure, for the time of drying the glue, we fix them with paper clips.

We remove the paper clips - our snowflake is ready!

But you can make such interesting snowflakes without using separate strips, but just by cutting separately folded sheets of paper:

We draw straight lines on the square along which we will cut the snowflakes

We cut along the drawn lines, leaving a slightly uncut edge on one tip.

We fold the core and glue it

We turn the next stripes in the other direction and also glue

The resulting "icicles" must be glued together

And now the voluminous snowflakes can't wait to be hung on a string.
Indeed, it turns out very beautifully, doesn't it?
Snowflake templates for cutting
But if you do not have much time, then for simplicity and convenience, you can use ready-made stencils. To do this, sheets of paper are usually folded in four and templates are transferred onto them, along the lines of which unnecessary details are cut out. As soon as we unfold the sheet after cutting it out, we will already have a snowflake ready!
We suggest you use the following stencils:
Option number 1

Option number 2

Option number 3

Option number 4

Option number 5

How to glue voluminous snowflakes
Since snowflakes are usually made from plain or colored paper, any stationery glue for paper products will do.

However, it is worth remembering that the glue stick, if it dries out a little, will weakly glue paper parts together and may not hold the glued components of bulk products.

Silicate glue is well suited for gluing, but it has one drawback - it dries for a very long time and some types of paper get wet through it.

The best option would be PVA glue, which, firstly, dries much faster than silicate glue, and secondly, it has a higher viscosity than glue stick, and thirdly, it glues paper products almost tightly.

Therefore, if you have a choice, you should still use PVA glue to glue bulk snowflakes.
Beautiful snowflakes on the windows with templates for cutting
Do you remember how in kindergarten teachers helped us cut out snowflakes, and then glued them on the windows? Immediately it seemed that it was snowing outside the window.
But after all, in addition to simple lace products scattered around the window, you can create whole compositions from them!
For example, lay them out in the form of such a cute snowman, which will certainly bring a smile to everyone passing by:

Or you can depict a snow blizzard:

And such a window design option can fully replace any curtains!

In other words, turn on your imagination and create whatever comes to mind!
Stencils for cutting paper snowflakes
And to speed up the process of creating the same type of snowflakes, you can use stencils.
According to them, you can either translate the drawing, and literally cut out gorgeous snowflakes in just a few minutes. Or, according to the example given, draw the necessary lines by hand and get openwork fluffy beauties.
Although stencils limit the flight of fantasy a little, you can still learn from them how to make more “chiseled” shapes for cutting.
Stencil #1

Stencil #2

Stencil #3 
Stencil #4 
Stencil #5 
It is also worth saying that in recent years it has become very popular to cut out all kinds of shapes from paper using a special very thin scalpel for paper. This direction in needlework has not bypassed snowflakes!
But for this creation option, we need stencils that need to be printed, and then applied to a sheet of paper and cut out with a blade with neat, precise movements.
Shall we risk making a few of these decorations?

Almost a masterpiece with portraits of movie characters, isn't it?
And such snowflakes will be appreciated by fans of Star Wars:

Such options will be able to cut even the most inexperienced needlewomen:

You can even include elements of national ornament: 
As they say, the eyes are afraid, but the hands are doing! You should definitely try something new!
Snowflake templates for printing from A4 paper
Templates will help in cases where you need to cut out many identical snowflakes.
They can be printed out, cut out in the form of such a corner template and then applied to folded paper blanks in order to outline complex details and cut them out.
To make a template of a suitable size, you can either transfer it from the monitor screen by applying a sheet and carefully tracing the outline. Or by copying to a Word file, and stretching it on the page to the desired size.
Below we offer you several templates that can be printed on a printer and immediately used to cut out snowflakes on A4 sheets folded into triangles.
Template #1 
Template #2 
Template #3 
Template #4 
Template #5

Good luck in your work! Let this winter please you not only with snow, but also with home-made stunning snowflakes that you will make yourself and, quite possibly, with your household!
Happy New Year!
Good afternoon, today I am uploading the largest article on most different ways
make a snowflake with your own hands. You will see snowflakes made today in different techniques from those cut out of paper to those molded from liquid caramel. You will see beautiful craft snowflakes - woven from beads, molded from dough. Will many interesting MASTER CLASSES on snowflakes(glue, bead, paper). You will definitely find here an idea for your homemade snow art. Making snowflakes with your own hands is easy and pleasant at home - feasible ideas for snowflake crafts with kids and smart ideas for adult creativity.
So let's see what we're going to do today.
- Cooking snowflakes (from dough, from caramel, from corn balls)
- Snowflakes from recycled material ( toilet paper, from threads and glue)
- Snowflakes in a twist quilling technique(with elegant decor
- Snowflakes made of plastic bottoms of bottles and children's thermo-mosaic)
- Snowflakes from natural material (from ice, wood)
- Snowflakes from felt, crochet and wicker from beads.
That is, there will be a lot of interesting things. So...let's get started.
PAPER SNOWFLAKES for interior decor.
how to do it yourself.
Let's start with paper ideas to create snowflake crafts. And it's not just cut out of thin paper ... now I'll show you 3D snowflakes, in the technique of origami, in the technique of twisting-quilling and cardboard rolled snowflakes.
FLAT SNOWFLAKES FROM PAPER.
(openwork beauties and crafts from them).
Snowflakes can be ordinary FLAT ... when made of paper roll-triangle... a pattern is cut out on it ... a triangular fold is unfolded and an openwork snowflake and paper are obtained, in which the circular symmetry of the pattern.

Lots of ideas and carving patterns of openwork paper snowflakes I will describe in a separate article (so as not to clutter up this page). And then there will be a link to it.
Because paper snowflakes can be made NOT ONLY using the OPENWORK CUTTING technique. And you will see for yourself now.
As you can see in the photo above, paper snowflakes can not only be glued to windows (as in childhood), they can be used to decorate gift packages, postcards, trees by the porch, ribbons hanging from the curtain rod.
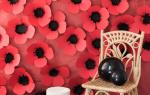
And from paper snowflakes you can do Christmas wreaths on the wall. A wreath of simply white snowflakes looks very gentle and beautiful ... and it’s very good if paired with white color choose another color (red or blue).

It is these delicate snowflakes that I teach to cut in a special article.
Others can be made from paper snowflakes silhouette wall hangings- for example christmas tree silhouette. And also with light hand From an unknown author, I learned the idea of how to create snow-white figurines of ballerinas in a paper snowflake skirt. Dancer silhouette also cut out of white paper ... and make a larger central hole on the snowflake - so that it fits.

And you can also add such a Christmas wreath of paper snowflakes LED Christmas garland.
The photo below shows that this requires a wire frame - but this is optional. You can simply cut out a ring of their cardboard, wrap this ring with a garland - and then with tape (with double-sided Velcro) glue the carthorn ring openwork snowflakes from thin paper.

And snowflakes are cut out of thicker cardboard or felt. and hang them on trees. Naturally, you don’t need to fold the cardboard into a triangular wrapper - we just transfer the outlines of a thin paper snowflake onto the cardboard, circle it with a pencil and cut it out. And then you can decorate a paper snowflake with a pattern.
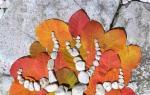
SNOWFLAKE WITH GLUE PATTERN- to make the pattern convex-contour, you can simply take a jar of PVC glue, which has a thin nose and squeeze the pattern onto the plane of the snowflake (as in the left photo below).
SNOWFLAKE WITH A PATTERN FROM COTTON STICKS. You just need to take cotton buds and cut off the cotton tops from them (slightly smooth them with the same glue) and attach in the form of a pattern on a cardboard cut (as in the right photo below).

VOLUME 3D- SNOWFLAKES from paper.
(multilayer, fan and origami crafts)
And here are some more ideas for layered snowflakes . The principle of the craft is simple- cut out snowflakes from thin paper different size. We translate their contours onto thick cardboard - cut out the silhouettes of cardboard snowflakes.
We take a piece of foam (the one that insulates the cracks on the windows is suitable, you always have the remnants of such material at home) and cut a few small pieces. These plump little squares foam we use as spacer between cardboard layers snowflakes.

And you can in our paper snow creativity add some ORIGAMI principles. I.e cut paper modules - bend them in such a way that you get FIGURED RAYS and lay out the rays in the form of a snowflake on a round base (attaching them to the base with glue).
Or collect cardboard 3D- a snowflake of two stars cut out on thick cardboard. Each star has vertical incision - between the legs. And cardboard stars put on each other this incision (see the photo of the snowflake above) is very easy to do with your own hands.

Schemes and master classes for creating these snowflakes (pictured above) - in the article
Also you can do snowflake crafts like a paper fan. They just look complicated, but are made very simply. I even found a tutorial. Very simple.

Below I give a scheme for assembling such a voluminous paper snowflake. You can see for yourself what simple steps this has master class on assembling a fan paper snowflake. A simple craft that is easy to make at home with the kids.
Moreover, the edges of such a snowflake accordion can be pre-curly(as in the photo below).
You see, when we were drawing our accordion model, we came up with make some of the teeth on the paper harmonica higher than the rest- in the form of a three-leaf peak.

Such a FAN SNOWFLAKE can be made from MUSIC PAPER ... and additionally decorate with Christmas tree branches, pieces of shiny tulle rags and pictures cut out from a postcard. Like in the photo below. It turns out whole piece of art with your own hands - you can stick it on gift bag. Or hang it from a loop on a Christmas tree.

Snowflake from ROLLS of toilet paper
THREE CRAFTS with your own hands.
And you can also make a beautiful snowflake from toilet paper rolls. Here's how to do it yourself. toilet paper roll squeeze a little and cut it into rings. Each crushed ring lay symmetrically in a circle in the shape of a snowflake.

Such a paper snowflake can be painted red and sprinkle with glitter for nails.
And pay attention to the photo below, that inside the rays-rolls there are more a few smaller paper rolls.

Toilet paper rings can be cut very thin and tie them up bundle in a circle(stretch the thread and pull it into a bun). It will turn out such an air miracle as in the photo below. Paint everything with white paint and sprinkle with silver sparkles.

And even if you don't have toilet paper rolls, you can make a snowflake. from ordinary white sheets office paper (cut into strips and twist them into rings different sizes ... And then from these rings collect rays of snowflakes... and then collect and glue all the rays together - and you get a paper snowflake as in the photo.
Paper snowflakes - using the QWILLING technique.
(photo of the best options)
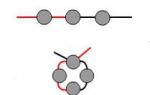
You can also make paper snowflakes with your own hands - IN THE QUILLING TECHNIQUE. For this you need from thin strips of paper wind the FIGURED flagella.

It's easy. I just wrap the strip around a toothpick (or a special pin for quilling), and then remove the twist (weaken it to the size we need, smooth it with my hands, giving it the desired shape ... and fix the tip of the twist with glue).
Make a lot of twist modules different forms and collect them them quilling snowflake. You can practice at home with your children to make such a paper snowflake craft. Children will be happy to twist the modules and fold the snowflake pattern.

Such a paper snowflake-craft using the Quilling technique can be made from colored paper. This is even more beautiful. Air lines and clear color spots. And opportunity decorate the anchor points of the pattern bright rhinestones. Here we get such multi-colored snowflakes crafts.

A snowflake made of red and white paper looks beautiful. If you plan to meet and decide to dress up the Christmas tree in white-red colors, then such paper snowflakes will help you save on the purchase of Christmas decorations. They can be made in one color scheme but different in shape and size.

Snowflake caramel craft.
Take candy canes white (milk) and red (for example, barberries). We put them in different saucepans, pour water on the bottom (so that the caramel does not burn) - and put on fire. Our task melt caramel until liquid. When the caramel becomes liquid, we will make snowflakes out of it. We take a sheet of foil for baking(smooth, not crumpled) - put it on the board. And on this metal sheet we draw snowflakes with liquid caramel - pour in a thick stream(it is more convenient to pour from a hot gravy boat with a spout). We cool and get caramel-glass snowflakes - such crafts can be hung on ribbons by the window and let them play, the rays of the winter sun sparkle.

And you can also just string pieces of marmalade on the wire and also get an interesting snowflake. Or glue a snowflake out of corn balls. Kids will love this Christmas craft. It is more interesting and tastier than paper crafts.

Do-it-yourself snowflakes - from pasta and glue.
And the children will also like these New Year's pasta crafts ... When we take pasta of different shapes, we put them in a snowflake pattern on paper - and then neatly one after another glue them with barrels. This pasta snowflake can be painted with gold paint
Also, pasta can be glued to round pieces made of cardboard or canvas paper so that they have a solid base for gluing.


How to make a snowflake craft FROM THE DOUGH.
And here is a master class on how to make a snowflake out of dough. We make dough for cookies and squeeze out a symmetrical circular pattern with ordinary molds.

You can cut a snowflake salt dough. Squeeze out with foam. And if there is no such snowflake mold, then you can do it in an artisanal way - put it on the dough cardboard figurine snowflakes and circle it with a knife along the contour.

SNOWFLAKES FROM PLASTIC.
(beautiful DIY crafts)
I found several examples of New Year's crafts made of plastic with the image of snowflakes. Let's take a look at them now - for sure you will choose a method for yourself.
Model 1 - snowflakes from the bottoms of a plastic bottle.
We take plastic bottle from under mineral water- it is just made of bluish plastic - that is, it has a beautiful snowy tint. What we need.
Cut off the bottom with scissors or a file. On it we draw the outlines of a fluffy snowflake with white or blue paint. And we drill a hole - through which we pass the ribbon-hanger. A good craft to work with the children is that you saw bottles (a regular knife works well), and the children draw a snowflake pattern.

Snowflakes with their own hands from transparent plates.
And you can thick transparent plastic sheet cut out neat stars and decorate them in the center with a snowflake pattern. You can take plastic from old packing boxes with transparent display side. Another sheet of plastic can serve transparent kitchen table mat. Or a thick clerical folder is also suitable for business. We get a beautiful New Year's craft with our own hands.

Snowflakes made from caps.
Even plastic bottle caps can serve a common purpose. New Year's decor apartments. They can be glued to a piece of cardboard or plywood, and then cut along the contour. Or attach the lids to each other with glue from a glue gun.

Snowflakes-crafts from thermo-mosaic.
And you can also take an ordinary children's thermo-constructor - with such bubbly - you string them on pins, making a pattern, and then bake them in a microwave or oven - and you get a whole craft thing. In our case, we lay out the snowflake pattern and get the author's patterned beauty made of plastic, made with our skillful hands.

Snowflakes from GLUE and THREADS
Three easy crafts for kids.
And in this chapter of our article, I have collected THREE IDEAS on how to make a snowflake WITH GLUE, where it is the glue itself that will be the main material snowflakes. Let's take a look at these methods - they are all simple and easy to do with your own hands in normal home conditions.
MASTER CLASS No. 1 - a snowflake from a GLUE GUN.
The method is simple on a sheet of polyethylene with a glue gun we apply a pattern of a snowflake. Let dry and cover with glitter.


MASTER CLASS No. 1 - a snowflake made of glue on a thread frame.
Very beautiful snowflakes translucent and delicate. Now you will learn step by step how to make such a craft with your own hands.

STEP 1 Draw a snowflake on a piece of paper - the pattern of a snowflake can be anything - but with one obligatory condition - the drawing must be FRAME - so that there are closed cells (for which, you will now understand).

We cover the sheet with the pattern with a thick film (or simply put this sheet inside a plastic office file).
STEP 2. And now, according to this pattern, we lay a thick thread (from any suitable yarn for knitting). To make the thread easy to fit into the shape, it needs to be moistened - but not in water, but in PVA GLUE. Wet thread will easily take the shape we need. And it will harden-harden in it due to the drying of the glue.
STEP 3. Now (without even waiting for our thread frame to dry) we will fill the snowflake cells with glue. Directly from a tube pour inside- do this puddle, the sides of which are thread.

And so that the filling of the glue was not white, but colored - it can be mixed with paint. We take a drop of gouache on the brush and knead it in our glue puddle, right in the snowflake cell.
We do this - with each cell - leaving empty cells between them. And we carefully place our sheet dry out of the reach of children. Let it lie there for a couple of days - so that everything dries well.
When the snowflake dries, it will be already easy to separate from polyethylene and hang it by a string on a window or on a Christmas tree. But better on the window - as the light will beautifully penetrate through the blue glue cells of the rays of the craft snowflake.

And here's another one good way make a snowflake out of glue and thread with your own hands.
MASTER CLASS No. 3 - a snowflake made of sewing threads and glue.
We need a sheet of polyethylene - glue and white bobbin threads.
On a sheet of paper - make a round puddle of glue- the size of the puddle should match the size of the silhouette of the future snowflake. That is, first we cut out our cardboard snowflake template and then we make a puddle of glue, which is commensurate with this snowflake silhouette.
Further, on this puddle of glue, we RANDOMLY LAY the thread - we put it and put it, as it fits - in several layers - in different directions. And dry the whole puddle. And then when everything is dry - we take this round thread adhesive plate... we apply a snowflake stencil template to it - and cut it out along the contour. We get a beautiful elegant snowflake craft made by ourselves.

DIY snowflakes
From NATURAL MATERIAL.
You can make a snowflake from the material that nature gave us. It can be knots from chopped tree branches.
You can make a snowflake from the remnants of lumber brought from the country.

You can make snowflakes from straw and thread - as shown in the photo below. If you look at the photo, you can see how to do it all
Better yet, I’ll draw and write you step by step how to make one such snowflake. And it will become more clear.

Also you can do snowflakes-crafts from ICE. Take a few glasses and freeze ice in them (pour water and put them in the cold. Take the ice out of the glasses and draw a snowflake on each with paints and melt a hole with a hot carnation. Work is best done in a cold room on the street - so that the ice does not melt. And then they can beautifully hang windows along the eaves - from the opposite side of the street, or on a tree near the gate ... or under a canopy over the porch.Let them hang and tinkle in the wind.

How to make snowflakes out of felt.
I have . Very large, and there are many ideas of what decorations can be made for the Christmas tree from bright felt.
And of course you can cut snowflakes out of it. Made from thick felt just cut out the contours and the snowflake will keep its shape. From thin felt the snowflake must be glued to the base-base.

But PETAL snowflakes - they are made very easily with your own hands. Now you will learn how...

Round piece of felt cut DIAGONALLY in a circle- like pizza in pieces - we get something like flower petals. Each petal loading sharpening along the edge(any pattern - a scar or pipette).
And then at the very root, each petal is SEALED-CONNECTED - that is, we press the blades of the petal against each other and sew them together with threads. Getting a Petal Snowflake from felt - we decorate it with oval beads or long glass beads.
And here is a model of a snowflake, which at first was flat - and then it was made three-dimensional by carving and bending. And decorated with large rhinestones and a small textile decorative flower.

From felt snowflakes, you can make beautiful Christmas craft wreaths.

SNOWFLAKES made of beads.
MASTER CLASSES of weaving and SCHEMES.
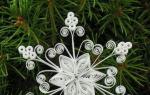
Well, finally, the turn came to snowflakes from beads. Very pretty things. And most importantly, they are created very quickly - it takes a beginner 30 minutes to create such a snowflake. I checked myself - last week I wove just such a BLUE SNOWFLAKE - weaved without a pattern from this photo(made of gold and white beads with bronze glass beads - it turned out gorgeous). For the first time in my life. And everything got. Weaving not on a fishing line, but on wire- large snowflakes should be woven exactly like this - with wire - so that the rays keep exactly to the sides.

The alternations of large long beads and small granular beads look beautiful - in ONE COLOR. Especially beautiful are homemade snowflakes made of beads and beads, made in a snowy dazzling white color.

Beads look nice their clear crystals. It turns out a crystal icy snowflake - just like a real one, made with your own hands.

And here is a MASTER CLASS on weaving snowflakes from beads. In the detailed photo instructions, we see each step of the lesson on assembling a snowflake from blue beads. And it immediately becomes clear that making such a snowflake with your own hands is quite simple and easy. Try it and everything will work out. Only six large beads are needed - the rest are ordinary beads.
And here's another master class of weaving a figured snowflake from beads of different colors. The red arrows show the movement of the beads through the beads - either through passages through the previous row, or new layers of bead rows and stitches through the first tier of the pattern.

And here are some more diagrams ... Rows are shown at the FIRST SNOWFLAKER different colors- to understand the sequence of weaving. And IN THE SECOND, you have to look closely and figure out for yourself what follows what.

And here are examples of snowflakes in which the START OF WEAVING IS THE SAME - that is, you see that the central part of three snowflakes is the same. We start weaving according to one pattern for all, and only then add different patterned rays, as you like.

Here are examples of snowflakes in the assembly of which more are involved and long tubes of glass beads. The pattern of weaving such a snowflake-star is understandable even from a photograph. But if not, write in the comments, I will draw a step-by-step picture and post it here.

Such beaded snowflakes can become designer earrings.

Or wicker snowflakes can be a decor for Christmas ball. Also, as you can see, original and beautiful.

Here are some DIY ideas. I poured a SEA OF SNOWFLAKES for you today - whole drifts of snowy ideas. Choose any for your home New Year's joy.
Happy crafts.
Happy New Year.
Happiness to your Home and Family.
Olga Klishevskaya, especially for the site ""
If you like our site, you can support the enthusiasm of those who work for you.
Happy New Year to the author of this article, Olga Klishevskaya.
And, probably, the most popular of them is a paper snowflake.
There are many ways to make a paper snowflake, from very simple to very intricate and original.
In this article, you will learn how to make beautiful snowflakes, and how to create various Christmas crafts from these snowflakes.
But first, it’s worth recalling how a simple beautiful snowflake is made, from which we will build on in the future.
Scheme of a beautiful paper snowflake
You are offered detailed instructions for creating a standard snowflake.
If some steps are not clear to you, you can find a video instruction below.
1. Prepare a sheet of A4 paper and cut a square out of it. To do this, you need to bend the corner of the paper, pull it to the opposite edge and bend it. Then we cut off the extra piece and get a square.
Here's how it's done:


2. The triangle that you have turned out needs to be bent in half and put with the top up.


3. Take the left edge of the triangle and drag it a little further than the middle.
After that, overlap the right edge.
* You can start to bend the right edge first, and then the left.
* The main thing is that the edges do not protrude from each other.


4. Turn the workpiece over and cut the lower part along the level of the strip that you got (see picture).


5. It remains to draw a pattern you cut along the contour. Here are some examples:


Video instruction:
Another option:
Beautiful voluminous paper snowflake

You will need:
Paper (white or color)
Ruler
Pencil
Scissors
1. Cut out a square from paper - bend the corner of the sheet, pull it to the opposite edge, bend and cut off the excess bottom. You will need two identical squares.

2. Bend the resulting triangle in half again.

3. Cut the petals from the first and second blanks.


4. Open the workpiece.

5. Glue the middle petals to the middle.

6. Repeat the same with the second piece.

7. Glue the blanks together.

Such snowflakes can decorate a wall or windows.
Cut out beautiful snowflakes from paper
Snowflake garland


Hanging structure made of snowflakes
You will need:
Thread for knitting
Snowflakes (in this example, these are ready-made snowflakes from felt, but you can make your own snowflakes from paper or cut them out of felt using a printed and cut-out template).
* Glue one end of the thread to the snowflake, and the other to the hoop. Repeat this step with other snowflakes, varying the length of the thread.


Here is another option:

Schemes of beautiful snowflakes from paper bags

Prepare several paper bags of the same size. You can use 2 colors for the best effect.
You will also need a glue stick.
1. Apply glue to the bottom of the bag and glue another bag to it. Repeat the same with multiple packages.
2. Cut out the desired simple pattern on the top of the glued bags.
3. Unfold the bags and glue the first and last to make a snowflake.
Video instruction:
How to cut beautiful snowflakes in the form of snowmen


How to make a beautiful snowflake out of scrap paper

You will need:
Scissors
Hole puncher
A little foam or foam rubber.
From the previous paragraphs, you already know how to cut snowflakes. So here we go straight to the next step.
1. First, make two snowflakes of the same size but different colors. In this example, the diameter of each snowflake is 7.5 cm.
* It is better to align one snowflake, and leave the second as is.

2. Prepare foam or foam rubber and cut out a small circle. In this example, its diameter is 10 mm. Make a hole inside the mug with a stapler. You will have small circle after using the stapler, save it.

3. Glue the Styrofoam circle to the center of the even snowflake, and the small remaining piece to the center of the unsmoothed snowflake.

4. Apply glue to the opposite side of the unsmoothed snowflake and glue it to the even snowflake. Press a little on the snowflake so that it "falls" a little into the foam ring.
* Make some of these snowflakes to decorate your house and Christmas tree.


Snowflake medallions are simple and beautiful

You will need:
White paper
Scissors
stapler
Pencil.
1. Take a sheet of A4 paper and cut it in half lengthwise.

2. Start folding each half of the paper into an accordion shape. You can fold it in half first, then in half again, and so on, to get an even accordion.

3. Secure the accordion in the middle with a stapler or thread.
4. Draw a simple pattern on the side of the accordion and cut along the outline (see image).

5. Unfold your blank and glue its ends to make a beautiful snowflake.

Here are some more pictures:


Beautiful do-it-yourself snowflakes from old newspapers

You will need:
Scissors
Acrylic paint.
1. Unfold the newspaper and place it on a table or other work surface.
In this lesson, I present the most interesting, beautiful and original patterns on how to cut snowflakes out of paper with your own hands with patterns and unique patterns. step by step photos. On the eve of the New Year holidays, everyone wants that the house was extraordinarily beautiful, cozy and fabulous. good option decorating the house before the New Year holidays will be window decoration with paper snowflakes, unusual drawings, festive motifs that will bring pre-holiday mood and a New Year's fairy tale to the usual room decor.
The easiest thing you can do with your own hands is to cut and attach paper snowflakes in different places. Everyone remembers how, as a child, they cut them out before the holidays in kindergarten or at home. Today, having become parents, you can spend time with your child with benefit and pleasure, cutting out beautiful snow-white snowflakes with your own hands from paper. Kids are always happy to take part in such events.
Paper snowflakes made with your own hands and with joint efforts with children are not only a way to decorate your home, but also bring the New Year spirit, a sense of celebration and family coziness and unity into it.
Teaching a child to cut a snowflake yourself is not at all difficult. For this you need to prepare essential tool and paper. As a basis, you can take napkins, colored paper or just a white sheet from the album.
The thickness of the sheet does not really matter. But you need to know that the most delicate and airy snowflakes are obtained from thin sheets. And too thick paper will be difficult to cut.
You will also need a pencil and sharp scissors. After the pattern for the future snowflake is selected, the paper is folded, as shown in the photo. If you have a sheet of A4 paper, then cut off the excess to get a square.

Fold diagonally.

The more additions you make, the more interesting and openwork the snowflake will turn out.


The size of the future decoration depends on how large sizes sheet is initially selected. In this case, only the desire to have a large or small snowflake influences the choice.

When the drawing is applied to paper, we proceed to cutting. This process requires special care and accuracy. In no case should you cut off the edges of the paper at the folds, as the snowflake may simply fall apart.

Children really like this process. After all, in the end you will get beauty with your own hands, which is so nice to decorate a Christmas tree, windows or walls in a room.
It should be noted that, it would seem, such a simple activity as cutting snowflakes out of paper with your own hands is a great opportunity to develop a child’s imagination, a sense of beauty and artistic taste.
Ready-made snowflake templates for download


It so happened that a snowflake has become an attribute of any new year holiday. Often on New Year's parties The first role for girls is a snowflake. We can safely say that a snowflake is the main attribute of the celebration of the New Year.
Paper quilling snowflake
Quilling snowflakes look elegant, especially if they are complemented with sparkling rhinestones and small foil elements or in the form of small patches. It is not necessary to buy special paper to create New Year's snowflakes, you can cut ordinary office sheets into thin strips, and use a toothpick instead of a split stick. You can wind the strips according to a simple technique, pressing the paper to the stick with two fingers, scrolling in your hands.

What to prepare for snowflake modeling:
- a sheet of office white paper;
- scissors;
- any glue with a brush or a special thin nose;
- stick or toothpick;
- a snowflake created with a hole punch or a blue patch;
- blue half beads.
How to model a quilling snowflake
Take either special paper or cut the sheet into strips of the same width. Use scissors or a stationery knife, a ruler and a special thick rug. It will take a lot of strips to create individual parts.

Roll each strip individually onto a stick. Paper easily remembers a forced bend, but in order for the parts not to unwind, to take a certain shape, it is necessary to glue the ends together.

For the center, prepare 1 large round. Make also droplets to fill the body of the snowflake. Only 12 pieces. Make sure they are the same size.

Stick 6 drops around the circumference, adding a drop of glue to the side wall.

If there are sufficiently large gaps between the details of the first layer, you can fill them with small rolls. Twist 6 small circles.

Glue small circles into the gaps of the first layer.

Stick the second layer of droplets. Spread glue on small parts and press down the droplets with the back (wide) part.

The paper quilling snowflake model is assembled. Now you have to decorate it with blue decor. Glue a snowflake and a half-bead in the center. Add 6 blue crystals to each ray.
Blue sparkle will add a festive touch. New Year's craft is ready. It can be hung on a green branch or on a window.

In this master class, I propose to make an unusual paper snowflake card on a stand. She will be an excellent gift for mom or grandmother, and she will have no equal at the school exhibition. And by doing this craft, the child will learn how to fold paper, carefully cut it out and use glue. And of course, fantasize! After all, the creation of snowflakes is a real art!

Materials needed for the postcard:
- colored paper delicate shades;
- cardboard for the base or stand;
- glue;
- scissors;
- sequins for decoration.

Consider snowflakes with children, tell how snow is formed, what types of snowflakes are and how they differ. Usually snowflakes are six-pointed, but we will have an eight-pointed snowflake, since it is made in the origami technique. In order to make one snowflake, you need to fold a sheet of colored paper in half and cut out two identical squares.

Now fold each square in half in different directions. You should get two folds that divide the sheet into four squares. Make marks on the back with a pencil. They are in the middle of the side of the small square.

Carefully cut the paper to the marks.


Such blanks are obtained. For one snowflake, you need two things.

Using glue, attach the corners to the rays.

Now you need to put the workpieces on top of each other with an offset. It turns out such a snowflake!

It's time to decorate the snowflake. To do this, you can take rhinestones, beads or sequins. They need to be glued so as to close the joints of the corners.

It remains to make the base - stand. To do this, you need to fold a wide strip of cardboard inward so that you get three equal parts. Then round off the corners with scissors.

Inside the base, you can write a congratulation. It remains to glue the snowflake on the edge of the workpiece. We placed a small snowflake cut out of foil in the center.

These snowflakes are obtained in half an hour - bright, airy, sparkling! And most importantly, they keep the warmth of children's hands.
How to do simple snowflake from paper step by step video lesson
Blue origami mosaic paper snowflake
The origami mosaic technique allows you to create beautiful relief paintings from paper. They look unusual and very attractive. Those who have not yet mastered this needlework technique and are only going to try it should immediately tune in to painstaking work that requires maximum concentration and perseverance. Even the simplest image in an origami mosaic will take a lot of time, because you need not only to choose a clear scheme, but also to make a lot of miniature square blanks.
In this master class, I will show you how to make a three-dimensional blue paper snowflake using the origami mosaic technique.

To create such a New Year's panel you will need different materials and tools:
- scissors;
- black lead pencil (simple);
- wide tape;
- ruler;
- 2 sheets of white cardboard;
- 6 sheets of white paper;
- 2 sheets of blue double-sided colored paper;
- tube of PVA glue.
First, on white and blue paper, you need to draw squares 3x3 cm in size.

Now cut the blanks into individual elements.

And proceed to the formation of squares, from which a panel in the form of a blue snowflake on a white background will be assembled.
How to make a paper square using the origami mosaic technique?
Take one square.

Gently fold it in half.

Fold this blank in half again to end up with a square half the size of the original.

Unfold all sides to their original position.

Now bend each corner of the square towards its center.

It turns out here is such a preparation.

Flip it over to the wrong side.

And again, begin to bend the corners of the square to the center.


The result should be a very small square measuring 1.5x1.5 cm.

In total, you need to make 136 blue squares and 225 white ones. This number was calculated according to the scheme, which is attached below.

Now take a simple pencil, a school ruler and draw a grid of squares with sides equal to 1.5 cm on two sheets of white cardboard.

Using tape, glue two sheets together and cut out a square, each side of which holds exactly 19 squares.


Now we move on to pasting the base with small squares. First, mark the center of the craft and glue a white square on it.

Now apply a drop of PVA glue to each shaded cell and fill them with blue blanks. Glue the center stripes.

Then place the squares diagonally.

Form a pattern according to the scheme.

The blue paper snowflake mosaic is almost ready!

It remains only to glue on empty cells white squares.

When the work is completed, you will receive an original panel in the form of a blue snowflake on a white background. She looks like this! See how the texture of the craft is unusually visible, volume and relief are created.

In this technique, you can make many other snowflakes that will differ in image scheme or color.

This panel looks great on the wall and creates a festive atmosphere. Also, it can be used as original postcard for one of my friends.
How to make a paper 3-D snowflake with your own hands
Modern technology has also reached such a seemingly simple task as creating a snowflake. As the name implies, 3-D snowflakes are a more complex, but very effective technique, due to which the made decor is distinguished by a special elegance of lines and rather unusual shapes.
What may be needed to make a snowflake with a 3D effect?
Prepare a square sheet of paper of the desired color, a pencil and a ruler, scissors or a sharp paper knife, glue. The work of making 3-D snowflakes is very painstaking and requires a lot of patience.
The first step is to draw a sheet of paper into squares. We need 6 identical squares. Then such a scheme is applied. It can be printed. 
Fold the square in half diagonally, transfer the diagram as shown in the figure. Fold in half again.

The next step is cutting parallel lines. The incisions must be made in such a way that they are directed towards each other, but do not converge to the end.


We connect and glue the corners of the first small square.


Then turn over and glue the corners of the next square.

And so on in order, until all the corners are glued together.

To make the snowflake voluminous, you need to very carefully glue the corners of all the squares. As a result, six snowflakes are obtained, which, gluing together, form a three-dimensional 3-D figure.

We connect the corners of all the blanks to each other.


In order for the figure to keep its shape and not fall apart, you need to additionally glue the sides of the snowflake.

That's all, our 3-D paper snowflake is ready!

Coming up with various patterns, painting the figure with paints and even decorating with beads, you can not only create a very beautiful Christmas decoration but also to help develop the child's imagination and sense of style.
Snowflakes - paper kirigami instructions
Snowflakes - kirigami is a fairly simple way to quickly and without special efforts make a lot beautiful jewelry. The highlight of this type of snowflake is the selection of paper. For snowflakes - kirigami you need bright colored paper.

It can be colored on one side only, but you can choose paper with rich colors on both sides. We take an A4 sheet and fold it as shown in the photo.

Cut out a square, fold in half diagonally.

We fold two more times.


Then we print and transfer just such a scheme to the finished workpiece.


The next step is to cut patterns on the workpiece using nail scissors.


Carefully cut out the snowflake and unfold it.


Bend the resulting corners, as in the photo.


A snowflake can be decorated with stasas, beads, Christmas tinsel, and then it will become the central decoration of your New Year's home.
2 more do-it-yourself kirigami snowflake options:


The light, airy figure of a ballerina is very beautiful. If you combine two types of a beautiful snowflake and a ballerina figurine together, the effect can exceed all expectations.
It takes a lot of time to make this type of jewelry. But the work of cutting it out is quite simple, even a child can handle it. Not single figures look very impressive, but a whole garland of graceful ballerinas.
What you need to prepare for work:
- dancing ballerina figure template;
- thin White paper for a ballerina's tutu. Paper multilayer napkins are very well suited;
- thin white cardboard;
- scissors.

Choose a ballerina figurine template. On the Internet you can find a large number of options. Simply copy the selected template into a text document, format and print. But it is much more interesting to draw a sketch yourself. Transfer the template to cardboard and cut it out.
It is very important that the cardboard is white on both sides, since the snowflake is voluminous and is clearly visible from any side. The size of the figurine is optional. There are no restrictions in this matter.
Watch the video - how to make a snowflake ballerina with your own hands
A very beautiful pack is obtained from a white multilayer napkin. We make a snowflake in the usual way. We put the pattern you like on paper and cut it out with sharp scissors.
The only caveat to consider is that the paper snowflake should have a fairly large central hole. In this case, she will easily and simply sit on a cardboard figure of a ballerina.
Paper heart with a snowflake in the form of a handbag
In this master class, we will make such a heart with a snowflake. It can be used as a bag for little gift or just like Christmas tree toy with your own hands.

First you need to print this diagram.


We transfer the scheme to paper and cut it out.


The result is two identical blanks.


To fasten together, we make cuts - on one side from the top to half of the snowflake, on the other - from the bottom to half of the snowflake.

We collect the finished volumetric snowflake, threading each other.

Attach the handle.


Do-it-yourself voluminous paper heart-shaped snowflake is ready!

Master class - beautiful voluminous snowflake video
No need to think that all home decorations can only be purchased in a store, while spending a fairly impressive amount of money. It would be much better, having united with the whole family, to make a variety of decorations for the house and the Christmas tree on their own. For such an activity, you can allocate a certain day, for example, when it is planned to install a New Year's beautiful spruce.
Do not deprive yourself of the pleasure of making decorations for the New Year holiday with your own hands. A variety of methods for making snowflakes allows everyone to choose the most suitable one for themselves. And it doesn't have to be spending a lot of money. It will take a minimum of costs, imagination, patience, accuracy and a great desire to do something beautiful with your own hands.
How to make a fluffy snowflake
Welcome all! Today is November 12, and there is still no snow in our city. What's the weather like for you? We're all looking forward to it winter fun and snow-white attire of nature. I really want to go outside and feel how slowly and gracefully snowflakes fall on you.
As a matter of fact, we will talk about them, about these white cut-out beauties! Probably, these fluffies are an indispensable attribute of decorating houses, streets, school and kindergarten premises in the winter. There are different ways to make this craft. The main difference is the material from which it is made and the cutting methods. We will talk about how to make paper snowflakes using different patterns and cutting patterns.
Do not forget that such blanks can be used as crafts for the upcoming New Year. Ideas of interesting and beautiful things that you can do with your own hands, you can get ready for the holidays in advance.
You know, I want to advise you to introduce such a tradition in your family: to get together on cold evenings and create with the children, making and cutting out these simple designs, and then sticking them on the windows. And let passers-by envy your beauty!!
The easiest way to make a snowflake is to fold the sheet 5 times. We fold the first four times in half, and the fifth diagonally. From the resulting workpiece, cut out any patterns and unfold. Our New Year's beauty is ready!!

But this is a very simple and not very interesting way. To complicate it, you can perform a tetrahedral version:

Or pentagonal:

Here is another simple and easy way cuts of our product:

And to make it even clearer to you, let's now take a step-by-step look at the manufacturing process:
- We will make snowflakes from square paper. If you have a standard A4 sheet, then bring it to the desired shape. Now fold it so that you get a triangle. We cut off the excess part and get a perfect square.
- We add the square diagonally, we get a triangle.

- Fold the triangle to the far corners, getting another smaller triangle.
- We have a preparation. Apply any pattern on it and carefully cut it out.
- You just have to straighten the finished product, so as not to hook it and tear it.
On a note!! This is the easiest way to make a snowflake. Here the result depends on the selected pattern. The more complex the pattern, the more unusual and interesting the result will be.

Beautiful do-it-yourself snowflakes (we make from paper)
I would also like to note that the more complex the decoration pattern, the more difficult it will be for you to cut it out, so calculate your strength.
For you, one more photo instruction for making New Year's crafts:

- Make a diagonal fold. If you do not have a square sheet, then do not forget to cut off the excess part. Next, fold the workpiece diagonally again.
- The widest part of the triangle, that is, its base, is divided into 3 equal segments. We bend one corner so that the edge ends at the level of the mark. It will be below the base, but strictly below the mark. Now fold the second part and cut off the uneven ends.
- Draw or cut out a snowflake right away.
I think, in general, you already have an idea of how to carry out these simple designs and there should no longer be any difficulties in their manufacture. For you, there is another video story on our topic, and we move on to more complex options.
Volumetric snowflake. Cutting templates
To make a three-dimensional structure, you need to master the techniques of kirigami and quilling. Let's take a closer look at these two methods.
- Kirigami paper snowflake

We will need: bright colored paper (the reverse side should be white or colored); scissors; pencil with ruler.
Manufacturing process:
1. Cut out a square from colored paper of any size.

2. Fold it four times to make the part a quarter.

3. We make a diagonal fold.

4. Cut off the beveled corner from above.

5. Cut out symmetrical triangles at the outer side of the figure.

6. With scissors from bottom to top, we make two cuts on both sides of the sharp corner, as well as one more cut on the right or left.

7. Unfold the paper and gently smooth it out.

8. Now arbitrarily bend the formed corners up or down.

9. Having folded all the corners, iron the craft with an iron.

10. When you place the product, then rotate it as you wish, front or wrong side to yourself.

When you are familiar with this technique, I offer you templates of more original types:
- like this for example

- or such

- maybe you will like this option

- Snowflake in quilling technique
And this is a very painstaking work, but the result is the envy of everyone. Although, if you figure it out, everything is done very simply.

- We take a regular sheet of paper and draw the same lines using a ruler with a pencil. Cut the sheet into strips.
- Take an awl and attach the edge of the paper strip to its end. Now we wind the strip on the tool.
- We glue the end of the strip to the resulting coil and remove the roll from the awl. Make another such coil, but lightly squeeze it with your fingers on one side. Make five more of these droplet coils.

- Take the first blank and glue six "droplets" to it.
- Again we roll six coils and squeeze with our fingers on both sides. Glue new details between the snowflake petals.
- Take three strips and bend them in half, then cut them. You should have six short strips. Of these, twist six coils. Glue a new coil to each end of the part.
- From long strips we make six more coils, only slightly larger than the first. To do this, do not tighten the paper too much. Glue them on top between small rolls.
- You need to make six more large coils and bend their sides with your fingers so that you get a square. We glue them with the top to large coils.
- We take a pencil and wind a paper strip around it, glue the end of the strip and remove the coil. We glue this part to one of the tops of the snowflake and thread a ribbon or rope into the ring.
Here is a diagram of how you can still glue the parts:

- And you can also make such a three-dimensional 3D figure.
We will need: paper, scissors and a clerical knife; Scotch; glue; stapler.
Cooking process:
1. Make six identical squares out of paper.

2. Bend each square diagonally and make 3 cuts to the middle on both sides. The cuts should not touch, leave 0.5-1 cm between them.

3. Unfold the sheet and lay it so that the uncut edges are vertical. From the inside, you need to twist the two nearest edges into a tube. Glue with glue or tape.

4. Expand the workpiece and connect the next two strips. Again, turn the part over and connect the 3rd row of strips. Glue the last strips too, turning the workpiece upside down.

5. We do the same with six squares. Then fasten them in three elements, deployed in one direction. Then we fix both parts into a three-dimensional figure.

6. If necessary, fix the sides of the product with a stapler or glue.

And another master class on making winter beauties:
How to make a snowflake from a toilet paper roll?
It turns out that in order to make such crafts, it is not necessary to use plain paper, you can also take toilet paper rolls. And the work process is very simple, you need to take only one roll, PVA glue and paints, you can use acrylic, or gouache. For decor, take glitter, sequins or confetti.

Now just cut the toilet paper roll into equal parts, flatten it and glue it. Top with your choice of material.
Here are a couple more design ideas for roll structures:
- use small and large pieces

- From above you can take different elements of decoration

- Or you can just cover it with gold paint

Schemes of paper snowflakes for the New Year
Now that you are familiar with different techniques making this type of jewelry, I want to offer you schemes and ready-made templates. Take, save, cut and create! May the holiday always reign in your house.
- scheme 1;

- scheme 2;

- scheme 3;

- scheme 4;

- scheme 5;

- scheme 6;

- template for kirigami technique.

At the end of today's topic, I want to say that the main thing in this matter is to try, fantasize and have good mood. And if you get bored, make snowflakes from beads or just tie it, or maybe you can make it from pasta ?!