A paper spinning top is a simple DIY craft for kids. Top made of paper - a simple craft for children with their own hands Yula from paper
An origami paper spinning top is a cool toy that is easy to make with mom. You can experiment with sizes and color combinations.
What you need to make a spinning top:
- 2 squares of colored (can be colored office) paper;
- ruler and pencil - make marks;
- toothpick - a top will spin on it;
- I also recommend having a narrow and short strip of paper and PVA glue, a thick needle on hand.
How to make a paper top:

- Squares are better to take bright, beautifully combined with each other colors. The spinning top will be 3 times smaller than the squares taken. From squares with sides of 21 cm, I got toys with a side of 7 cm.
- On two opposite sides of the squares, make two marks that will divide these sides into 3 equal parts. In my case, this is a mark 7 and 14 cm from the edge.
- We make a fold first along the first two marks, then along the second. In my case, I got a rectangle 21 x 7 cm.
- We combine the upper left corner with the bottom side of the rectangle, and the lower right corner with the top. Smooth out the folds.

- We impose one figure on another with a cross. The folds should be face up.
- Now we turn off the corners in sequence: first from right to left ...
- … top down…
- … from left to right…

- ... and from bottom to top. When you turn off the last corner, place it in the pocket that has formed on the right side. And send it.
- Insert a toothpick into the center of the top. It is rather difficult to pierce thick paper with a toothpick, so it is better to make the initial puncture with a thick needle and only then insert the stick.
- During play, the hole may expand and no longer hold the toothpick. Therefore, I recommend sticking a narrow strip of paper with several turns at the base of the toothpick and dripping PVA on top to stick it to the origami figure.
- We put a toothpick on the bottom and let the PVA dry.

Shared the master class
Kononenko Anastasia
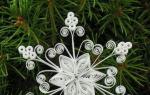
Nothing will decorate a Christmas tree like toys made with love with your own hands. They exude warmth and comfort, even if such a toy is made of paper. And how to make such a Christmas tree toy - a spinning top, we will tell and show you in our master class.
To make a toy, we need: 2 sheets of A4 paper of different colors and a little more colored paper, thread, needle, 2 beads, scissors.
Master class on making toys for a Christmas tree out of paper
We cut sheets of colored paper across into 9 identical strips each. From another sheet, cut out 2 circles with a diameter of about 2 cm.

We thread the needle, string a bead on the thread and thread the second end of the thread into the eye of the needle

Fold paper strips in half, bright side out. Now we string in turn: a circle, strips of colored paper one after another.

When all the strips are put on the thread from one end, you can make a knot to secure the thread and the paper does not roll along it. Now let's move on to the other side of the stripes. We put them on the thread in the same order: first the first (top) and so on.

Then again a circle and a bead. Now we straighten the strips of paper so that we get a top.

We bring the thread up and tie it in such a way that the toy can be hung on the Christmas tree.

Our paper Christmas tree toy is ready!
Paper tops are a simple craft and a very effective toy for children and adults. It consists of a circle cut out of cardboard and a toothpick base. When moving, the top is located vertically, but as soon as it stops spinning, it immediately falls. This property of the top underlies various gyroscopic instruments: compass, stabilizer, which are used on ships and aircraft. With the help of tops, you can get various optical effects. We will tell you more about this below. Children from 3-4 years old can play spinning tops. This is not only interesting, but also useful for the development of the fingers and speech centers of the baby.
The spinning top is a universal toy. You can play it together with your baby and with a fairly large group of children. We will talk about games with tops below.
How to make tops out of paper.
For this simple craft, you will need some cardboard and a toothpick.
It is better to immediately make a lot of tops with different patterns.  Mark circles on cardboard, for this you can use any round object. But it is best to take a simple compass - then you will immediately have the centers of the tops.
Cut out the circles.  Pierce the centers with a sharp object.
  Insert a toothpick in the center of the circle. If necessary, you can use plasticine or a piece of eraser to fix the toothpick in the center.
  The most interesting, in our opinion, in spinning tops is the mixing of colors. If the top is stationary, then we see one picture. When the top moves, the colors of the picture are mixed, and we see just a color.
We make tops out of paper.
You can cut out circles of the desired size from any magazines and glue them to the front side of the cardboard or simply put the cut out circles on top of the top. You will get interchangeable drawings - you can experiment with color mixing. 

 It will be interesting for children to draw their drawings on circles - any will do - it will still be interesting.
Games with tops for mixing colors.
1. The circle can be divided into an even number of sectors and painted through one in two different colors.  Yellow + blue = green
Yellow + red = orange
Blue + red = purple
Red + purple = magenta
Red + black = brown
Black + white = gray
2. If the circle is divided into seven sectors and each is painted in a circle in the colors of the rainbow, then when the top is rotated, it will turn out (ideally) white (gray) color. After all, white is the sum total of all colors.
 A little secret: make the sectors the same size and do not draw lines between them in black.
3. Here are some colored tops. You can print these pictures or draw them yourself, observing the colors.  As you rotate the top, you will see a color gradient.
4. Squares and triangles drawn on paper turn into circles when the top moves.  5. Spiral drawings on tops look bewitching, especially when slowing down.
  6. If you rotate such black and white tops, you will get colored rings. Try spinning the top in different directions and experiment with lighting.

 A few more examples of spinning tops with black and white drawings.
 And here are a few more drawings for tops.


Games with tops for 2 - 6 children.
1. Each child launches a spinning top. Whoever spins the top the longest wins.
2. You need to run as many spinning tops as possible. This game can be played by two teams. The one with the most spinning tops at the same time wins. Spinning tops can be counted for a certain moment, for example, for the cessation of music. Or the team that launched the most tops in one minute wins.
3. Players on one field (sheet of paper) launch their tops in turn. If a launched top touches a top already standing on the field, then the player takes both tops for himself. If the top did not touch other people's tops, then his top remains on the field.
4. Each player has his own top and field (sheet of paper). The winner is the one whose top does not go beyond the edge of the field.