Crafts from natural material in Tat yaz. Do-it-yourself autumn crafts for kindergarten and school from natural materials. Bunches of grapes from acorns - master class
Children's crafts from natural materials: 25 ideas and step-by-step workshops for preschool and primary school children.

Children's crafts from natural materials
In this article, you will find more than 25 ideas for making crafts with children from natural materials (leaves, branches, seeds, chestnuts, acorns, vegetables, and others) using different techniques. All master classes from this article have been prepared for you by readers of the Native Path, participants in the competition.
Craft 1: Maple Leaf Roses
This craft was sent to our competition by Anna Baranova and her daughter Lera and teacher Lera from kindergarten MBDOU No. 3 "Ryabinka" (junior group) in the city of Inza, Ulyanovsk region. And also Khabibullina Liliya Rustyamovna (MADOU "Kindergarten No. 174 of the combined type" of the Moscow district of Kazan) and Davletberdina Malik (5 years old).

Material for manufacturing:
- maple leaves of bright colors (orange, yellow, red),
- branches with viburnum berries,
- harsh threads to form a bouquet of roses,
- golden hairspray to strengthen and strengthen the bouquet (optional),
- a few strong branches to strengthen the bouquet of roses.
How to make a bouquet of roses from maple leaves:
Preparation for making crafts: We collect suitable leaves of various colors. We need large enough, not too dry and whole leaves. Too small, dry, diseased, torn leaves are not suitable for making a bouquet. For the manufacture of one flower, it is better to choose leaves of the same color.
Step 1. Take one maple leaf, hold it with the petiole towards you and fold it in half with the right side out. Then we twist it into a tight roll - a tube. This will be the "core of the rose", that is, the middle of the flower.
Step 2. Now, around this "core" of the flower, we begin to lay the "petals". We take another maple leaf, hold it also - with the petiole towards us - and put the prepared core-tube on it closer to the petiole in the middle of the leaf. The front side of the leaf should be inside the future flower. The sheet is very carefully bent outward in half. The edge of the inflection of the "petal" is located above the "core" by a centimeter and a half. Smooth out the fold of the sheet.
And now we bend this protruding edge of the sheet outward again, but the fold is no longer smoothed out. We try not to compress the fold and keep it elastic.
Step 3. We take the next maple leaf and make the second petal on the other side of our middle - the tubes. Continue on until you get a rose flower. Each time you need to take a maple leaf a little larger than the previous one.
Step 4. Having decorated the flower, wrap the base tightly with threads. A strong thin twig can be tightly tied to the base to give the flower strength.
Step 5. Having collected a bouquet of several roses and decorated it with viburnum sprigs, you must again tightly wrap all the branches with threads, collecting them in a bouquet.
How many flowers will be in your bouquet - you decide. We evenly arrange the prepared leaves in a circle, placing them under the buds in the hand. Then we fix the now ready-made bouquet at its base with the same threads.
Here is our autumn bouquet of maple leaf roses and ready!

Step 6. To give strength, beauty and shine, you can sprinkle the finished roses with golden hairspray. But this is optional.
Another version of the design of such a bouquet of maple leaves was made by the family of Kasanova Margarita (5 years old), Kazan, MADOU "Kindergarten No. 174 of a combined type" of the Moscow region of Kazan. Teacher – Kalmykova Olga Dmitrievna

Craft 2: corn
This craft was sent to our competition "Autumn Workshop" by the educator Rim Elena Anatolyevna (GBOU of the city of Moscow "School No. 166" Structural unit No. 7). And Yulia Terekhina (5 years old), a pupil of Elena Anatolyevna, completed the cornbread.

How to make the craft "Corn:
Step 1. Prepare corn cobs (large, medium and small), cardboard base for crafts, hot glue, fern leaves, fir cones, acorns, leaves, nuts, cereals (barley), decorations for corn (bows, hats, beads, eyes etc.)
Step 2. Form characters from corn on the cob.
Step 3. Arrange Cornflowers on a cardboard base and decorate the surface with waste material. The craft is ready! Good luck!
Craft 3: autumn forest.
This craft was sent to our competition by Kazakova Anna Yurievna. And Anna's four-year-old son Maxim performed it in drawing classes under the guidance of a teacher Alexandra Vladimirovna (club "Happy Childhood", drawing circle for children "Kalyaka-Malyaka", Yoshkar-Ola).

You will need:
- landscape sheet of format A 4,
- autumn leaves,
- watercolor paints,
tassel.
Step by step description:
Step 1. We bring autumn leaves from a walk.
Step 2. Color the white space of the album sheet as a background. Next, on a sheet of paper, draw vertical lines - the trunks of autumn trees.
Craft 4: Old Man Lesovichok
This craft was sent by the teacher Fedorova Tatyana Vladimirovna from the city of Birsk (Bashkortostan), MADOU Kindergarten No. 8 "Alyonushka". It was made by a child from the group of Tatyana Vladimirovna (senior group) with the help of a teacher.
DIY material: larch needles and cones, plasticine. All parts of the woodsman made of natural materials are fastened together with plasticine.

Craft 5: Application "Hedgehog"
This hedgehog was made and sent to our autumn competition of children's art by Sofia (5 years old) and her mother Anna Shikhareva.
Material for making crafts- pine needles, felt, pine cone, cardboard and PVA glue.

If you prefer not an application, but a voluminous hedgehog, then it can be easily made with children from a piece of plasticine, dried chestnut skin and cut cotton swabs. But this is really a prickly hedgehog, so be careful. Such a hedgehog was made by Yulia Romanovna Ruzaeva and her daughter (2 years 8 months) from St. Petersburg. And you will find another craft by Yulia and her daughter “Giraffe from chestnuts and acorns” in the master class in the article

Craft 6. Hedgehog from piaflora and natural materials
And here is another hedgehog in a different manufacturing technology. It was made and sent to us by Mironets Anna Vladimirovna (mother) and her son Maxim (4 years 9 months) from the Komi Republic, Syktyvkar.
We need to make crafts:- piaflor, - dried leaves of mountain ash, gooseberry, shadberry, - dried flowers, - hairspray.
Description of the craft:
Step 1. Take half of the piaflora brick and cut out the body of a hedgehog from it (it will resemble a droplet in shape). Sharp corners must be smoothed out with your hands. Piaflor does not need to be soaked.
Step 2. Divide the dried rowan leaves into separate leaf plates, which are then inserted into the piaflor (in the body of the hedgehog).
Step 3 Hedgehog ears can be made from dried gooseberry leaves. And we will make paws from dried leaves of irgi.
Step 4 Fold the leaf cuttings several times. We make eyes and a nose out of them.
Step 6. Fix our craft with hairspray. Here's a hedgehog you get.

Craft 7. Caterpillar and chestnut hedgehog
This craft was made and sent to us at our "Autumn workshop for children's crafts" by children of 4 years old together with their teacher Tegaeva Olga Nikolaevna (Moscow region, Sergiev Posad district, Shemetovo village, Novy microdistrict, MGBOU d / s No. 75 "Fairy Tale")

To make crafts you will need:
chestnuts,
- moss,
- branch cut
- acorn hat
- tree leaf,
- plasticine.
How to make a caterpillar and a hedgehog from chestnuts:
- We dry the chestnuts to make it easier to separate the prickly peel from the nut.
- While the chestnut nuts are not completely dry, we pierce them with an awl on both sides and insert matches without heads into the resulting holes (glue the matches on glue for reliability).
- We form a caterpillar. To do this, we select the nuts by size, starting from the largest to the smallest.
- We glue an acorn hat on the head of the caterpillar.
- We make caterpillar eyes from plasticine and attach them.
- Glue the caterpillar on the stump.
- Now we make a hedgehog from plasticine, and we make its prickly back from chestnut peel.
- On the spines of the hedgehog we put a maple leaf ironed through sheets of white paper.
- Lay out the moss.
Here is such a hedgehog - a caterpillar friend - you will succeed.

Craft 8. A basket of cones
This craft was made by Polina Durnova (9 years old, Samara, school 118, 4B class), Maxim Durnov (2 years old) with her mother Durnova Svetlana from Samara, Krasnaya Glinka village. At first, Svetlana and her children tried to make a basket of cones according to the description on the Internet using a glue gun, but ... a day later the resulting basket lost its shape and “went” in different directions. Therefore, Svetlana came up with her own technology for making a basket of cones.
How to make a basket of cones:
Step 1. Go to the forest, collect a lot of cones.
Helpful Hints:
- If you want to make a strong basket that will serve you for a long time, then you need to take into account such a possible fact: closed cones open in a warm room. And this is undesirable if by this time you have already woven a basket. Therefore, it is recommended to cover the cones with a liquid solution of wood glue.
- The most durable connection of the cones in the basket is the connection with brown wire (in the color of the cones, so that it is less noticeable). To do this, we wrap the first cone with wire, then we continue to wind the cones around the wire in a circle, wrapping each of them. We do this until we get a circle of the desired size. So we make 2 - 3 rings. And then we connect them into a frame. Connect the cones to the basket using a glue gun. But further in the next steps you need to fix this design.
Step 2 Using a thin wire, fasten three rings, then connect them into a single basket design and screw the handle on top. Cones for the handle are also wrapped with thin wire and then wired to the thick base of the handle or thick wire.
Step 3. Put a cardboard circle at the bottom of the resulting structure. Put rowan branches with berries and spruce cones in a basket. It will turn out a beautiful autumn composition.

Craft 9: Autumn Ship
Autumn is the time of multi-colored ships made of leaves, which set off on a voyage known only to them through the endless airspace. The main thing is that the wind is favorable. It's time to make your autumn ship.

This ship was made and sent to our autumn workshop of children's crafts Matveeva Svetlana Nikolaevna (Liski, Voronezh region) together with her son (the child's age is 3 years 8 months).
To make crafts - a ship from natural materials, you will need:
- plastic food tray
- a few leaves that can be found on the street (it is better that at least three leaves of them are large - we use them for a sail),
- a stick for a sail with a length of 20 to 30 centimeters,
- a few thin sticks for making pens,
- plasticine of different colors,
- colored paper
- glue stick,
- a few cones ate,
- parachute seeds of maple or ash-shaped maple (optional, optional)
How to make a craft - a boat from natural materials:
Step 1. Making the torso and head of the sailors. The body of the sailors will be cones. From pieces of plasticine we sculpt eyes, a mouth and noses, which we attach them to the cones so that we get the faces of the sailors.
Step 2. We make peakless caps for sailors - cones.
For this:
- Using caps of various diameters, we draw circles on colored paper - the future caps of our sailors (choose the diameter of the circle of a suitable size).
- Cut out circles.
- From paper of a different color, we cut out several thin strips based on one circle, two strips each (the length is arbitrary, but it should be borne in mind that these will be peakless ribbons, so do not overdo it with the length).
- Glue two stripes to each peakless mug close to each other.
- In the center of each capless circle, glue a piece of plasticine the size of one or two beans.
- We fasten these caps to the tops of our cones - sailors have caps.
Step 3. We make the arms and legs of the sailors.
- Determine where your sailors will have their hands and glue a couple of pieces of plasticine there, to which you attach small thin sticks - these will be the sailors' hands.
- The legs are made of plasticine. The shape of the legs should resemble flippers so that the bump stands and does not fall in our ship. To make legs, we sculpt “sausages” from pieces of plasticine the size of a walnut - small but thick, and then we flatten them and attach them to the bottom of our cones.
The sailors are ready.
Step 4. Making the sails. With a large stick we make holes in several large leaves, and stretch the latter through this stick to make several sails on one mast. The joints of the leaves with each other can be glued a little with plasticine, then the leaves will not slide down on top of each other and fall down.
At the top of the mast we placed a basket of ash maple helicopters. To do this, we simply stuck around a piece of plasticine with these helicopters, dividing them into single seed plates, and then this piece of plasticine was glued to the top of the mast. However, such a “basket” is not necessary if you have seeds - there are no “helicopters”.
Step 5. Attach the mast to the base of the ship.
To attach the mast to the ship from a plastic tray, we glue a piece of plasticine a little smaller than a walnut to the tray approximately in its middle (do not spare the plasticine, we need the mast to hold tight). We insert our mast into it. For better mast attachment, you can stretch the plasticine a little along the trunk of our mast.
In the tray-ship, place our sailors in empty places, slightly pressing their flippers-legs to the bottom so that they stick and hold firmly on the deck. Along the sides of the ship, you can glue leaves of different trees and / or flowers on pieces of plasticine, but this is not necessary - see for yourself how you like it best. It is also optional to make a dragon head on the bow of your ship.
The nose of the ship can be anything, but we made a plasticine dinosaur head and attached it to the nose of our ship.
The autumn ship is ready and can go to any fairy tale that you want to compose with your child!
Craft 10. Picture for the fairy tale by V. Suteev "Under the mushroom" from natural materials
This craft for staging Suteev’s fairy tale “Under the Mushroom” was made together with the teacher by four-year-old children: Mochalova Katerina, Kuchieva Adel, Krupennikov Kolya, Sbudyshev Vlad, Akhtemenchuk Anatoly and Mukhantseva Yana. Teacher - Denisova Svetlana Alexandrovna. Children go to kindergarten MADOU d / s No. 2 "Karamelka" ShchMR MO in the city of Shchelkovo, Moscow Region.

Preparatory stage: watching the cartoon "Fungus-Teremok", reading the fairy tale by V. Suteev “Under the mushroom”.
Materials for making crafts based on a fairy tale from natural materials:
- pine cones, spruce
- plasticine
- wire
- mushroom toy
- basis for crafts
- maple, rowan leaves
- corrugated paper
- scissors
- PVA glue
- pine branch
- matches
- Cork
Step-by-step instructions for making crafts:
Step 1. We prepare the base.
We paste over the A4 size box with green corrugated paper. On this paper we glue maple leaves, ironed in advance through sheets of white paper.
Step 2 We make trees - scenery.
We take a piece of plasticine, roll up the ball and crush it until we get a round cake. On this cake with a branch up, we insert a mountain ash leaf, ironed in advance through a sheet of paper. You can also insert into the "cake" and a pine branch. Such trees adorn our base.
Step 3 We attach a large mushroom.
In the middle of the base we attach the finished mushroom - either on plasticine or on glue.
Step 4. D we eat the main characters of the fairy tale (ant, butterfly, sparrow, hare, fox).
All heroes are made of cones and plasticine.
How to mold fairy-tale characters from cones and plasticine:
Ant:
We take a fir cone. The narrow tip of the cone is pulled out with brown plasticine. Eyes made of black plasticine are attached to the "head" of the ant. Paws can be made of wire, attaching them evenly throughout the cone with plasticine. We make the antennae of the ant from 2 matches without heads.

Sparrow:
the toy is created from a pine cone, eyes - from two small corks, paws - from three matches (attached to plasticine). The beak and tail are made using plasticine: attach the plasticine to the cone and pull it into the desired shape.
Butterfly:
A butterfly can be created from a fir cone by attaching two multi-colored circles of corrugated paper to it using wire. To do this, a hole is pierced in the paper (from the edge of the circle closest to the bump), a wire is threaded into the resulting hole and the wing is attached to the component of the bump. The same action must be done from the other end. The head of a butterfly can be made of plasticine by attaching it to the toy's body from the narrow side of the cone.
Hare: the toy consists of a fir cone and blue plasticine. Paws, ears and head are molded from plasticine. We also make eyes from platinum of a different color.
Fox: Fox is easy to make. We need a fir cone and orange plasticine. The muzzle of the fox is molded from an orange plasticine sausage, stretched out in the shape of a fox's nose. A black nose is attached to the muzzle.
Step 5 We make a composition according to a fairy tale.
Let's put the heroes under the mushroom. Attach the butterfly in the corner to the base of the composition.
We wish you creative fantasies and imagination, and then you will get your own fairy tale!
Craft 11. Caterpillar from apples

This craft was made by Danila Ankushev together with his parents from the Strekhninsky kindergarten (the older group "Friendly Family"). And the teacher Elena Yaroslavtseva sent the craft to us for the autumn workshop.
How to make a caterpillar: the body of the caterpillar is made up of apples. We make legs from earplugs (sold in a pharmacy). To fasten the parts, wooden toothpicks are used. Decorates the craft with a shell from a grape snail.
Another option for making caterpillars from apples was sent to us from the city of Kungur in the Perm Territory (MADOU "Kindergarten No. 6"). This caterpillar was made by Kulyashova Arina, 6 years old. Teachers: Zueva Tatyana Vladimirovna, Karaguzheva Rufina Viktorovna.
How else can you make a caterpillar out of apples: option 2.
This caterpillar is made from apples. Apples are fastened together with toothpicks. The legs are carved from carrots. They also hold on to toothpicks and walk on autumn leaves glued to the landscape sheet. The fashionista dressed up in chokeberry beads. The berries are collected on a string. The eyes are made of red rowan and are also held on by toothpicks. The caterpillar put on a beautiful flower instead of a hat, hooked it on itself with a toothpick and went to the fair.
Here is such a cheerful caterpillar made from natural materials by Arina.

Craft 12. A cheerful family of acorns
This and the following three crafts made from natural materials were made with children by Alexandra Albertovna Naumkina together with her son Vanya (4 years old) and daughter Masha (1 year 3 months), Barnaul, Altai Territory. Here is what Alexandra writes:
You will need to make crafts:
- a piece of a branch or tree bark,
- acorns
- black marker
- glue gun or Moment glue.
How to make a fun family from natural materials:
Step 1. Draw faces.
She showed her son how to draw a face on the stomach. Gave him permanent marker and acorns and left him. Here are such bizarre faces turned out.
Step 2. We glue the hats to our little men.
We glued the hats on Moment glue.
Step 3. We attach the family.
But with gluing to the bark, I had to tinker. I smeared the bark with Moment glue. Substitute something rectangular at the back to hold the craft while gluing, place the acorns on the bark and leave them to stick.
Please note: only an adult can work with Moment glue without the presence of children in a well-ventilated area, because. he is toxic. Instead of glue, you can use a safe glue gun, an adult also works with it.
Everything! The happy family is ready.

Craft 13. Interior craft "Autumn branch"
We got a beautiful interior craft. My son made it himself. The main thing is that it is done very simply.
Step 1. We found more interesting branches in the forest and brought them home.
Step 2 Dried the leaves in the books between the pages.
Step 4. Then we decided to complete our composition and make owls out of plasticine and place them on the autumn branches.
To do this, we took cones, maple seeds ("helicopters") for wings and plasticine.
I made the first owl, the second was made by my son.
Attached them to the branches on plasticine, they hold well.
Such a beautiful composition now decorates our house! And, most importantly, this craft is very easy to make.


Another option for making an autumn branch was sent to us by Natalya Oshueva (Balashikha) and her son Vanya Oshuev (3 years 8 months).
Autumn branch on the wall: the second version of the mobile
Natalia writes: “I first laminated the leaves. With my son, we cut them out, made holes and threaded the ropes. The branch was found on the street. They hung leaves on it. The result was a branch with fallen leaves.

Craft 14: Hedgehogs from cones and salt dough
Alexandra Naumkina shared with us her experience of making hedgehogs with her son.
Step 1. We kneaded the salty dough together with our son. He loves to bake so much that he kneads all the dough himself, and I only tell him what to take and in what proportion.
Salt dough recipe (proportions): wheat flour - 2 cups, fine salt - 1 cup, water - 3/4 cups. The finished dough should not crumble and stick to your hands.
Step 2. Blinded two hedgehogs together: mother and baby. Here I have already given the final shape. We stuck the cones and put the oven in the oven.
Step 3. The next day (after the hedgehogs have cooled down), we painted them with gouache paint. But if you need hedgehogs for a more durable period, then it is better to use acrylic paints. They molded the nose from plasticine and glued the eyes.
We just studied with my son, so the son was so carried away by modeling mushrooms from plasticine that he stuck many different mushrooms for hedgehogs himself.

Craft 15: Autumn Leaf Mobile
for the development of speech breathing in children
This handicraft from natural materials was also made by Naumkina Alexandra Albertovna for her children - Vanya (4 years old) and Masha (1 year 3 months). This family lives in the city of Barnaul, Altai Territory.
Alexandra writes:
“Our craft was born, one might say, spontaneously.
Step 1. As a basis for the mobile, I cut out the rim of a cardboard disposable plate.
Step 2. I tied a string of yellow yarn on the resulting rim at about the same distance. From the same yarn I made a pendant for which our craft will hold.

Craft 16. Application from seeds "Hedgehog"
This application from natural materials was made by Khaliullin Artur (6 years old) from MADOU "Kindergarten No. 174 of the combined type" of the Moscow region of Kazan. Teacher: Khaliullina Rafida Raisovna.
You will need:
- paper,
- pencil,
- PVA glue,
- seeds,
- colored pencils (felt-tip pens),
- leaves for decorating
- spruce branches.
Craft progress:
Step 1. We draw a hedgehog with thorns on paper. If the child is already old enough, then he can draw a hedgehog himself.
Step 2. We apply PVA glue on the back of the hedgehog with a thick layer. Then spread the seeds on a layer of glue. We make sure that the sharp tips of the seeds are directed in one direction.
Step 3. We color the muzzle and paws of the hedgehog with colored pencils.
Step 4. We decorate the background with leaves of mountain ash, birch; cones, spruce branches.

Craft 17. Application from wheat "Lion Cub"
"Wheat lion cub" is a children's craft - an appliqué made of fleece and wheat. It is very simple to make this craft. First, glue spikelets of wheat on colored cardboard, and then on top of it - the muzzle of a lion cub. Glue on the glue "Liquid nails".

This craft was made by a child of 5 years old, and Irina Babarinova from Sergiev Posad (GBOU "School No. 166 SP No. 7", Moscow) sent us to our competition of children's crafts.
Craft 18. Lady - cabbage and Forest fairy tale

These crafts made from natural materials were made by children from Bataysk.
The work is made from a head of cabbage. Eyes, nose, mouth are made from purchased blanks for soft toys. The head is decorated with a wreath of rowan and leaves. The stand can be any, it is decorated with material and decorated with leaves.
The forest fairy tale is made of natural materials. The little fairy is made of autumn flowers. Firebird - from a cone and seeds of an ash-tree. The work is decorated with natural materials collected by children.
Crafts from natural materials 19. Autumn meadow
This craft was sent to us by the teacher Samigullina Lilia Rustyamovna from Kazan. And I made this craft with the help of adults Izmailov Rodion (3 years old), a pupil of the MADOU "Kindergarten No. 174 of the combined type" of the Moscow district of Kazan.
Required material: Box, scissors, PVA glue, plasticine, natural materials (cones, dry leaves, acorns, chestnut peel), toothpicks.

How to make an autumn meadow with children:
Step 1. For the base of the craft, we will prepare a box. Let's cut off one side of the box so that the autumn glade is visible.
Step 2. We attach dry leaves inside the box, decorate it with various natural materials (cones, toys, pebbles).
Step 3. We make fairy-tale characters from chestnuts. We make crafts from fruits that have just fallen from a tree while they are soft (this applies to crafts from chestnuts, acorns and cones).
The main method by which we will fasten the details of crafts is plasticine and toothpicks. For this:
- first, carefully pierce the chestnuts with an awl,
- insert toothpicks into the resulting holes and fix the joints with glue.
In the photo, the bear is made of chestnuts and plasticine, the little man is made of chestnuts and acorns, the hedgehog is made of chestnut peel and plasticine, the owl is made of chestnut.
The eyes of the birds are made of acorn caps, and the bird's beaks, paws and wings are made of plasticine.
Spiders can also be made from chestnuts. Small holes are made in the chestnut with an awl in the places where the paws will be attached. The paws of the spiders are made from toothpicks that are inserted into the holes in the chestnuts and fixed with glue.

Craft 20. Autumn forest

This craft was made and sent to our autumn workshop for children's crafts Stephanie (3 years old) with her mother Yulia Anatolyevna Fefelova (Barnaul, Altai Territory).
For crafts "Autumn Forest" we need the following materials:
- Herring jar (or any container of suitable shape and depth)
- Foam rubber
- Rubber glue or glue gun
- Gouache or acrylic paints and a brush
- colored paper
- Plasticine
- tree branch
- dried leaves
- Maple planes
- Pine cones
- fir cones
- Pine needles (needles)
- Stones (pebbles) of oval shape of different sizes
- piece of cardboard
- dried flowers
- rowan berries
How to make crafts "Autumn Forest" from natural materials:
Step 1. We make the basis for our craft:
- paint the foam rubber with yellow gouache,
- after drying, we make a hole in the middle and insert a branch into it,
- fix it with glue to the jar,
- Glue the end of the can with yellow paper.
Step 2. We make owls: we attach eyebrows, eyes and a beak to spruce cones from plasticine. With the help of plasticine we attach the wings of maple "airplanes".
Step 3. We make hedgehogs: we sculpt a muzzle, mushrooms from plasticine. With the help of plasticine we fasten the needles. We attach a muzzle, mushrooms and rowan berries to the hedgehog.
Step 4. Making a bunny and ladybugs:
- paint the stones with gouache (gray for a bunny, red for ladybugs).
- we glue ears from cardboard to the bunny, make eyes, nose, antennae from plasticine or draw with a felt-tip pen.
- we also complete the manufacture of ladybugs with plasticine parts or draw with a black felt-tip pen.
You can cover crafts with varnish.
The photo shows fragments of the autumn forest and its inhabitants, made from natural materials.

Step 5 We attach dried leaves to our tree on plasticine. We stick dried flowers into plasticine. Leaves, animals, dried flowers are attached to foam rubber with glue.
Autumn forest is ready!
Craft 21. Autumn sun from natural materials
The idea of this craft was shared with us by Maria Schukina, mother of two children (Vova - 4 years and 8 months and Anyuta - 1 year and 3 months), St. Petersburg. Maria writes: “This is my favorite autumn craft, and I have been nurturing this idea for a long time. We did it with great pleasure :). Everything was invented by ourselves.”

What you need to make an autumn sun from natural materials:
- PVA glue,
- a lot of autumn leaves from different trees and shrubs (we even collected rose hips),
- rowan berries,
- dog-rose fruit,
- acorns
- watercolor paints,
- thread and needle
- any natural material.
How to make the sun from natural materials with children:
Step 1 Draw a large circle on A3 paper and glue it with maple leaves. We collected leaflets in advance, and for some time they were kept in our journal. Thus, they became very even and easily stuck to the paper.
Step 2 Then we connect the fantasy and also stick any leaves and natural materials according to your taste in a circle. The circle becomes larger.
Step 3 Draw the face of the sun: eyes, nose and mouth.
The mood of the autumn sun can be anything - cheerful or sad, surprised or delighted - whoever feels the autumn mood, discuss this with the children when making crafts.
Step 4 We sew rowan earrings to the sun (you can sew rose hips, any flowers). I used the largest needle and simply sewed the mountain ash to the Whatman paper as to ordinary fabric. At the same time, on the reverse side of the drawing paper, I fixed the thread with adhesive tape. You can also sew on many other decorations.
Step 5 In the upper corners of the drawing paper, glue the acorns with PVA glue, after cutting them in half lengthwise. I hope you enjoy our autumn sun from improvised natural materials :).
Craft 22. Application from the shell. Autumn Walk

This creative work was done by Kuznetsova Nastya, 6 years old. And Maria Sharygina (Vologda) sent it to us at the autumn workshop of children's crafts.
How to make a craft:
- First, draw a pencil drawing on paper.
- Then we glue small pieces of egg shells onto the silhouettes of the crown and trunks of trees. We are waiting for the glue to dry.
- Shake off excess shells.
— We paint the work with gouache.

Craft 23. Hut at the edge of the forest
This children's craft made from natural materials was made by Anastasia Viktorovna Dergunova and her nephew Alexander (6 years old) from Saransk, Republic of Mordovia.
How to make a craft:
Step 1. Leaves of various shapes (birch, rowan, maple, etc.) are painted with paints of different colors and attached to a clean sheet of paper so that prints remain on it. Paint the sun.
Step 2. While the prints of the leaves are dry, we will break the required diameter of the sticks from a small twig for the hut. Lubricate the paper in the place where the hut will be in the future with glue and lay out the hut from the sticks, in the middle of which we place a birch leaf as a window.
Step 3. We attach the leaves and the rowan bush in the clearing with a stapler.
Step 4. Glue the bottom of the clearing with glue and lay out the path from the watermelon seeds.
Step 5. Cut out the solar circle and rays from birch leaves, then glue them on the already dried sun. From black and blue threads we lay out a cloud in the sky in the upper part of the craft.

Craft 24. Autumn park for dolls made from natural materials
This craft was invented and made by Brusyantseva Valeria, she is 9 years old, Orenburg.
Necessary materials:
- cardboard box,
- light colored paper
- colored pencils and markers
- glue stick, PVA, double-sided tape and colored tape,
- plasticine, beans,
- leaves, tree branches with leaves, mountain ash,
- stones,
- matchboxes.
How to make a craft:
- From a cardboard box, we cut out the base of the park of any configuration, leaving a high wall for the screen and a low wall for the fence.
- We glue all the edges of the base with light paper. We outline with a pencil where the benches and paths will be.
- Making the screen. We cut out a rectangular sheet of white paper that is suitable in size, draw any picture on it and glue it to the screen.
— Design of the place of installation of benches. We cut out rectangular sheets of white paper that are suitable in size, color them (for example, you can color them in the form of colored tiles). Glue to the base in the intended places.
- Making paths. We apply plasticine to the tracks outlined on the basis and attach the beans to it.
- Making trees. We attach branches of trees with leaves to plasticine, forming a park.
— We decorate the stone ruins of the castle. We fasten the stones with plasticine.
- We make a lawn. We attach leaves and mountain ash to the remaining free places of the base on PVA.
- We make two benches from matchboxes and colored tape.

Everything is ready! The doll can walk along the paths of the park, admire the picture on the screen or the ruins of a stone castle, and arrange photo shoots.
Craft 25. Panel: Autumn puddle

This panel was invented and made by Maria Vostrikova (grade 4 B, MBOU secondary school No. 118, Samara), teacher - Belyanskaya Vera Evgenievna.
Materials used:
- poplar twig,
- leaves,
- dried grass
- cellophane,
- masking tape
- threads
- glue moment,
- green marker.
The sequence of execution of the panel "Autumn puddle":
- Make a ring out of a twig, fix it with masking tape.
- Place the autumn leaves inside the plastic bag so that the leaves are fixed. To obtain the effect of a frozen puddle, the composition must be ironed with a warm iron through a sheet of paper.
- Trim the composition to fit the ring.
- Using a hot nail, make holes along the edge of the composition.
- Pulling the thread through the holes, fasten it with a ring of twig into one.
- Paint the masking tape with a green felt-tip pen and glue the grass on the twig.
Children's crafts from natural materials "on the go"
It is not necessary to make a complex children's craft. Many crafts from natural material can be made on the go, without preparation. They can be used as quickly created attributes for children's games. Oshueva Natalya Mikhailovna (Balashikha) shared her ideas with us. Here are some very simple crafts she did with her son Vanya at the age of a child of 3 years 8 months and with her daughter Masha (1 year 4 months).
wreath of leaves
We collect a lot of leaves on a walk, string them on a wire. We connect the ends of the wire and get an autumn wreath of leaves. We hang the wreath by a rope. We also decorate the rope with leaves.

leaf crown
The crown is very easy to make.
Step 1. A blank was made from paper - a “hoop” according to the size of the child’s head, about 5 cm wide.
Step 2. We glued double-sided tape on top, and then my daughter glued leaves on it.
autumn trees
Natalia writes: “To quickly make autumn trees, we used toilet paper rolls and corrugated paper cut into strips. The children pushed the paper inside the roll as they could. In the end, it turned out well for us, bright and autumnal.
You can also place autumn branches and autumn leaves collected on a walk in a roll.
Pumpkins from cones
In this craft, we used fluffy wire. They took a bump, wrapped it with orange fluffy wire. Further, leaves of green fluffy wire were attached to it. To make green spring leaves, we first wound the wire around a pencil, then removed it from the pencil and got green spirals.

Hedgehog
For crafting a hedgehog, we used an eaten sunflower.
- The muzzle and body were cut out of foam. This is best done in advance by adults.
- From above, the muzzle was covered with plasticine.
- “Needles” - a sunflower was glued to the foam with glue using a hot gun.
- Decorated a meadow for a hedgehog with autumn leaves and cones.

"Speech development from 0 to 7 years: what is important to know and what to do. Cheat sheet for parents"
Click on or on the course cover below for free subscription
... Everything interesting that can only be found in the park, in the forest and in the country is suitable for creating crafts.
I note that many of them can be used in interior design (which is wonderfully demonstrated in articles and).
And although “seasonal” decor items are mainly obtained from natural materials, it is not at all a fact that then they will gather dust around idle. These can be quite functional things that you, until today, may even have planned to buy in a store. But isn’t something that is created by one’s own hands more expensive and more valuable than a purchased one? It seems to me, at times more valuable and more expensive. From things made with a soul, some kind of good energy emanates. Shall we start?
Insanely beautiful craft that everyone will pay attention to! Leaves look like this:

In my opinion, they lose little to real roses. Just not as fragrant. For the bouquet, choose large and bright maple leaves. Of course, when they dry, the colors will not be the same. But still…
Roses from leaves: step by step photo instruction
Flowers from leaves are very easy to make!
Roses from maple leaves. Photo: icreativeideas.com
- First, bend the top tip of the sheet.
- Then we twist the sheet, be sure to tuck the top edge: this way the flower will be more voluminous. We hold it from below so that the "bud" does not fall apart.
- Naturally, for a large flower you will need more than one leaf. To keep the flower even, before taking a new leaf, secure the edge of the old one. Well, for example, a stapler or glue. But it is best to wrap the base with thread.
- Important: choose fresh enough leaves, they are softer. But dry ones will break and crumble. Ready flowers can be collected in a bouquet.

You can use not only maple leaves. Photo: icreativeideas.com
Advice: if you take the leaves of trees, keep in mind that they dry out pretty quickly, lose their color and shrink. I remember once I collected a whole mountain of multi-colored maple leaves in the forest and pasted over all the walls and ceiling in the room with them. And it wasn't glued tightly. It turned out amazing! The room was like an autumn hurricane, which collected all the most beautiful leaves from the ground. There are simply no words.

The next day I left, and when I returned in the evening, all the leaves faded, withered, and some fell off, even the adhesive tape did not help. Is there a solution? Yes, I have. Leaves for crafts prepare in three ways:
- Dry in a book. The traditional way is very good, but the color will not be preserved. So, a bright red leaf will turn brown-burgundy, or even brown. You can also dry it with an iron, but always through a sheet of paper.
- Dip in melted wax or paraffin. It's simple: we melt the wax in some container and, without waiting for it to boil, we lower the leaves into it, as if dipping them on both sides. Take out and let dry. With this method, the color of the leaves will change slightly, but in general it will remain the same bright.
- "Marine" in glycerin. Mix 1 part glycerin and 2 parts water. Put the leaves in the solution and leave them for a few days. In this case, they not only do not lose color, but also acquire shine. Crafts from such leaves look better than from ordinary dried ones.
Children especially love it. Beads are the easiest to make: take a needle, thread a thread and string berries. It turns out bright beads, like real ones! By the way, this is a good way to dry the berries: both beautiful and useful in winter.

You can use, fruits, and others. Advice: alternate berries, then in winter it will be possible to brew assorted tea.
Interesting and stylish beads are obtained from acorns:

Interesting beads are obtained from acorns. Photo: 1tv.ru
Do you want the same? Watch the video tutorial from designer Olga Nikishicheva:
Candlesticks and candles made from natural materials
Very original candlesticks and candles are obtained from natural materials. Look, for example, at these:
Floating candles made from acorn caps. Photo: lostandfawned.com
In my opinion, very interesting candles, similar to mushroom caps. Of course, they will not burn for a long time, but they will be able to create an atmosphere at the right time. Making them is easy:
- It is necessary to collect acorns and separate hats from them.
- Then cut the wicks of the desired size and melt the paraffin (you can wax or any other composition for candles).
- Then just put the wicks and fill them with liquid paraffin. When the paraffin hardens, you will get very original candles.

Candlestick decorated with autumn leaves. Photo: decorwind.ru
Warm and mysterious in autumn:

Candlesticks from jars with autumn leaves. Photo: polyvore.com
Or elegant and "tasty":

Pumpkin candlestick. Photo: lilacsndreams.com
Or will do instead. It is very easy to make such a candlestick.
Master class: apple candle


4. We decorate the candlestick with beautiful twigs. Light a candle and enjoy the result!

And here is another interesting version of the autumn candle decor:

Autumn candlesticks with dried flowers. Photo: pixel.brit.co
You need to take an elegant glass goblet, put a candle in it and fill the space between the walls and the candle with dried flowers, leaves, twigs, cones, nuts or berries. Try not to let natural materials come into contact with fire, otherwise the whole decoration will burn. Especially if these are spruce branches, as in the photo above.
Look at the photos, study simple step-by-step master classes, get ideas and the muse will definitely visit you! And do not forget to collect during walks everything that comes under your feet - interesting pebbles, twigs, flowers, berries, nuts and other natural material. Take a separate box for these treasures - they will definitely come in handy, you'll see.
Golden autumn is the best time for long walks and creativity. Enjoy nature, be inspired to create stunning masterpieces with your own hands.
The most beautiful autumn crafts from vegetables and fruits with your own hands
With the advent of autumn, kindergartens and elementary schools often organize exhibitions of crafts made from natural materials. Recently, a special niche has been occupied by crafts made from fruits and vegetables. They turn out very bright and quite interesting.
Most often, parents learn about such creative exhibitions the day before. And you have to quickly collect your thoughts, the necessary materials and create something beautiful in haste.
I want to offer you a few master classes of simple vegetable crafts. You do not have to run around the neighbors in search of the necessary material. Also, the creative process will not take too much time, and you will even have time for a night's sleep.
mushroom meadow
A simple craft that will require the following materials:
- Cardboard sheet or box lid
- Leaves or greens for grass
- Carrot
- An Apple
- Potato
- toothpicks
In the lid from under the box we will make a clearing for which you can collect fallen leaves on the way home from the garden or school.
Let's make mushrooms. Legs are pieces of carrots, hats are halves of potatoes or apples.
We fasten all the details together with toothpicks. The mushrooms themselves are installed in a clearing with pieces of plasticine.

You can also make bugs out of plasticine and put them on mushrooms.
piglets
For this craft, prepare the following materials:
- Potato
- Plasticine
- plastic plate
- Paper napkin (or corrugated paper)

From a plate and a napkin we make the basis on which our “pigs” will sit.
For piglets, we make triangle ears, patches, eyes, tails from plasticine.
Very simple and fast. You don’t even have to suffer - your baby will blind all the necessary components with pleasure.
funny little men
But what kind of cute can be made from potatoes. You will need:
- Potato
- Pumpkin or large zucchini
- felt-tip pens
- White paper
We cut the pumpkin in half, make a "boat" for funny little men.
For funny faces from white paper, cut out circles-eyes, draw pupils on them, glue them to potatoes.
With felt-tip pens we finish everything else - noses, mouths.
Kids will love this unusual drawing on vegetables, so be sure to involve them in making crafts.
Potatoes are a great vegetable that is easy to work with and a variety of fantasies are born easily. For example, here are such simple cockerel and dog. or a cute ant that can be made in just 10 minutes. Just first go to the yard "to hunt" for sticks.
Or cut out such candlesticks from large potatoes:
Caterpillars made of apples and grapes are beautiful and bright.
Caterpillar
For such a beauty, we need:
- Apples
- grape berries
- Carrot
- Toothpicks, skewers
- In the apple, which will be the muzzle, we cut out the “eye sockets”, into which we insert grape eyes with the help of toothpicks. For the mouth, we also make a small horizontal incision, insert a “smile” into it.
- We string grapes on skewers - we make “horns”.
- We connect the apples together - this will be the "torso", to which we attach the "head".
- Cut the carrot into slices. We make our caterpillar "legs".
- You can seat such a beauty in an impromptu clearing. Which can be easily made from a plastic plate and leaves. A little imagination, additional materials and such caterpillars are obtained from apples.

On the theme of animals, you can fantasize a lot. Hedgehogs are especially popular. They can be made from any material - potatoes, pears, apples.
Hedgehog
To create a cute forest dweller, we need:
- vegetable marrow
- An Apple
- rowan berries
- Twigs, leaves
- Toothpicks, plasticine

From leaves and twigs we will make a clearing in the lid from under the box.
The hedgehog itself is made from zucchini. We sculpt the eyes and nose from plasticine, pin with toothpicks. After that, you can make "thorns".
Everything is simple here - insert toothpicks into the zucchini and you're done!
We put a small apple on the back of the hedgehog, decorate with rowan berries. If you have dried mushrooms, they can also come in handy.
In fact, creating a masterpiece from the gifts of the garden is very simple. Lay out the vegetables that you have in the refrigerator in front of you and, together with your child, think about what they look like or who they can turn into. Children are known to have a rich imagination, so in a couple of minutes you will have enough brilliant ideas.
Autumn paper crafts for kindergarten
Paper is an excellent material for creativity. Therefore, if you were unable to collect a herbarium or natural materials, do not be discouraged. Plain colored paper, cardboard, glue, scissors - everything you need to create an application on the theme "Autumn".

The first application that I want to offer you, I call
Wood
For its manufacture you will need:
- Sheet (A 4) of light blue or blue cardboard
- Colored paper - red, yellow, green, orange, brown
- Glue, scissors

Cut out a rectangle from brown paper - this will be the trunk of the tree. We also cut out two green rectangles - this will be the grass.
Cut out rectangles from red, yellow, orange paper, glue them in the form of rings.
After that, we glue the prepared elements on cardboard in the form of an autumn tree.
A few more variations on the theme of autumn trees:

Another of autumn's associations is harvesting. Therefore, consider another interesting application idea called
Harvest
A variety of fruits can be stored with you all year round. All you need for this:
- colored paper
- Scissors
Help the child - draw these simple details for 3D fruits. Cut them out together and stick them on pieces of cardboard - you get cute postcards.
And you can put fruit in a “jar” - and a compote will come out that will amuse your baby, and he will want to “roll up” more than one such jar!
Umbrella
It often rains in autumn. In order not to get wet, let's make a bright voluminous umbrella out of colored paper and cardboard. For this craft we will need:
- Sheet A 4 green cardboard
- Squares (8 * 8 cm) - 5 pieces of different colors
- Rectangles (2 * 10 - 15 cm) - 1 white and 2 pieces blue
- Cocktail tube
- Scissors
- Double-sided tape
- simple pencil

Using adhesive tape, glue the tube to a sheet of cardboard at a distance of 2 - 3 cm from the bottom edge.

We make an umbrella from multi-colored squares. To do this, each leaf is twisted in the shape of a cone, fastened with glue.

Then we glue the blanks together.
Then glue the umbrella to the cardboard.

We fold the rectangles of white and blue paper with an accordion. On the fold, draw a half of the "raindrop" and cut it out.

Let's make the droplets voluminous. Take three drops - 2 blue, 1 white, glue them together.
To do this, take a blue droplet, fold it in half, grease one of the halves with glue, glue a white droplet. Similarly, glue the second blue droplet to the white one.

We glue the finished droplets on a sheet of cardboard above the umbrella. A simple, beautiful autumn application is ready!
Joint creativity with children charges with positive emotions and brings you closer to the baby. Do not miss the opportunity to fill the rainy autumn days with warmth. Your child will remember such family evenings for a lifetime. So, having received a task in the garden to do some kind of craft, do not rush to do it yourself, because it’s faster, more accurate ... Be sure to involve your baby!
Original works from cones, acorns and chestnuts
Another craft material that parents often meet is cones, acorns, chestnuts. From simple stick figures to complex compositions, the fantasy world is rich and varied. Crafts made from natural materials become especially relevant in autumn, when the gifts of nature can be easily collected during a walk.

Let's make chestnuts
"Merry Caterpillar"
For this we need:
- chestnuts
- Plasticine
We roll out multi-colored circles from plasticine, with the help of which we connect the chestnuts - this will be the body of the caterpillar.

From plasticine we make "eyes" and a smile 
From two plasticine "sausages", for example, green and orange, we make "horns" for the caterpillar.
A simple craft is ready! Arrange for her a clearing of dry leaves and other natural material and you can take it to the exhibition.
Autumn flowers from cones
Another simple master class for joint creativity with children.
- cones
- Acrylic paints or gouache
- Large wide brush
- Green colored paper
- Scissors
For "flowers" it is best to collect open cones. Clean them from dirt, rinse if necessary, dry well. After such a preparatory procedure, you can begin to be creative.
The first step is to paint the cones and let them dry well.
We cut the paper into rectangles 5 * 15 cm. We make “leaves”, which we twist into a ring. Fold the top outward.
Place a cone in the center of the leaf.
Make some of these autumn flowers, place them on a stand "flower bed". A simple, bright, original craft is ready!
Vase of acorns
Let's look at a simple acorn craft that can be made in one evening, leaving the most difficult work to your child.
We will need:
- Bank (any size)
- Plasticine
- acorns
For this craft, it is not necessary to take a new plasticine. Leftovers from an old box will do just fine. Since we will just need to stick around the jar on all sides with plasticine mass.
If your acorns have lost their hats, it doesn't matter! Glue them on.
As a result, the entire bank must be sealed. If you get large gaps between the acorns, fill them with hats. The neck of the jar can also be glued with hats.
Place a bouquet of autumn leaves or any composition of autumn gifts in a vase.
It is not necessary to use one thing in compositions from natural materials. Naturally, you can safely combine everything you can find in one craft. Do not be afraid - fantasize!
The main thing here is to start, to take the first step. And then you will be unstoppable! You yourself will not notice how ideas begin to be born in your head. And when you are engaged in such creativity with a child, then a sea of positive emotions is provided. Little geniuses are sure to surprise you - they are capable of more than you think. Therefore, never do instead of a child - do with him!
Crafts from a pumpkin
Pumpkin is an excellent material for bright, beautiful crafts. Working with this vegetable is a pleasure! For example, taking a small pumpkin and modeling mass, you can make a cute "vampire". An old hat, paints, any material at hand - and the fabulous Scarecrow from Oz is ready.
Dry leaves, rowan berries, matches, a little plasticine, shells that were collected in the summer by the sea - and here we have a teremok.
Or you can carve a whole flying saucer with garlic heads of alien creatures.
I really like pumpkin vases. They are made quite simply. Everything that you can find in the garden or park goes into business. The result is just fabulous!
Let's make a colorful autumn bouquet in a pumpkin together. It can not only be sent to the exhibition, but also presented as an original gift to your favorite teacher or educator on Teacher's Day, which is celebrated on the first Sunday of October. 
For crafts you will need the following materials:
- small pumpkin
- floral sponge
- Scissors
- Glass of water
- Any autumn flowers
Cut off the top of the pumpkin and clean it well from the pulp.
Cut off the floral sponge, place inside the pumpkin. Let's pour water.
We cut the stems of flowers, we collect a bouquet.
Do not forget to gently moisten the floral sponge, and such a bouquet will delight you with its beauty for a long time. If you create a similar composition from dry leaves and twigs, then to fix them, place ordinary foam or modeling mass in the pumpkin. For a stronger structure, you can additionally lubricate the tips of the branches with glue. Enjoy your creative moments!
Autumn crafts in kindergarten from leaves
I start collecting and drying leaves, herbs, flowers with my children in the summer. By autumn, we have a rather impressive collection, which gradually turns into original applications.
All you need for such applications is cardboard base, PVA glue or glue stick, scissors and, of course, a herbarium. Children really like to take part in the creation of leaf paintings that literally come to life on a piece of paper.
The youngest children can draw, for example, the contour of a hedgehog or a butterfly and let it be sealed with leaves. The older the child, the more complex compositions you can offer him.
Let's make an original voluminous owl out of leaves for kindergarten.
owl
We will need the following materials:
- Colorful leaves
- rowan berries
- File (for documents) format A 4
- Ribbons 30 cm long - 2 pieces
- Colored cardboard - yellow and brown
- Double-sided tape
- Scissors
- Cut out the paws and eyes of an owl from cardboard.
- Cut off the white stripe from the file. We do this carefully, the file should remain intact.
- Open the file like a bag and fill it with leaves and berries.
- Inside the file (in the upper corners) we put triangles-ears, we tie them with ribbons.
- We tuck the bottom of the file, seal it with tape.
- Using adhesive tape, glue the eyes, beak and paws.
Charming owl is ready!
It's so easy to revive autumn leaves and create a little miracle with your child.
Beautiful autumn crafts for kindergarten and school
When you have enough time left, real miracles can be created from natural materials. In schools and kindergartens, with the advent of cold weather, they are often asked to make bird feeders, which are then hung out in the yard.
feeder
Let's make an original craft together. For this we need:
- 5 liter plastic bottle
- Broom
- Leg-split
- Scissors and stationery knife
- Acrylic paints
- Scotch
- We cut the bottle into 3 parts.
- The upper part is completely painted over with acrylic paint. At the bottom, you need to color the bottom and grab a few centimeters from the bottom. Then we apply glue and wrap the bottom with twine, leaving about 2 - 3 centimeters free from the top.
- After the glued twine dries well, cut out a window with scissors and put on the roof of the feeder house.
- We fix the roof with tape.
- We disassemble the broom, decorate our house.
- We wrap the handle with twine - for it we will hang the feeder on the tree.
A beautiful bird feeder is ready!
Autumn panel
For the manufacture we need the following materials:
- Dry leaves, grass
- rowan berries
- rose hip
- wooden sticks
- glue gun
- Rope
Making such a juicy autumn bouquet is quite simple.
- To begin with, we will make two square frames of wooden sticks, which we will tightly tie together.
- Connect the frames together.
- We take several branches, tie them together, and then attach them to the base.
- On the other side and in the center we tie dry grass.
- From above, with the help of a rope, we attach rowan branches.
- Under the rowan berries we place a sprig of fir and fix it.
- Using a glue gun, we decorate the panels with leaves in random order, starting with the largest.
The more various elements you use to make such a panel, the more beautiful and interesting it will be. So today go in search of autumn treasures and you can easily create your own masterpiece!
Autumn crafts in kindergarten fake from the natural material of the autumn forest (video)
See a detailed step-by-step master class on creating wonderful hedgehogs in a clearing. To repeat such a composition, you will need: plasticine, seeds, a sheet of thick cardboard, a plastic bottle, leaves, autumn berries and everything that you can find on a walk with your baby. Also, grab a great mood and get creative! A great family evening is guaranteed.
I hope this modest selection of simple master classes was useful to you and was able to inspire you to create your own unique and vibrant autumn masterpieces.
Nature is a natural habitat that is not created by man. Wildlife includes plants, fungi, animals and humans. Inanimate nature includes the sun, stars, water and stones. As you understand, the choice of crafts on a natural theme is quite large. Natural phenomena such as rain, snow, rainbows, volcanic eruption, storms and even earthquakes also fit into this category. In this article we will look at: how to make crafts on the theme of nature with your own hands.
You will need: nylon sock, sawdust, lawn grass seeds, flagella from nylon stocking, moisture-resistant glue moment, scissors, eyes for crafts, a tablespoon, hair ties.

Master Class


You will need: colored cardboard, scissors, glue stick, cotton wool, stapler.
Master Class

Mushroom from cereals

You will need: A4 color cardboard, mushroom-boletus template, simple pencil, scissors, brush, PVA glue, red lentils, corn grits, semolina, green split peas.

Master Class

We present to your attention a selection of crafts of charming inhabitants of nature. After all, it is thanks to them that nature brings life.

You will need: plasticine, toothpick, stack.

Master Class

Plasticine crow is ready!
funny octopus

You will need: chenille wire of two colors, 2 rubber bands, foam ball, pencil, scissors, button eyes, glue.
Master Class

A funny octopus made of fluffy wire is ready! I recommend watching the video tutorial!

You will need: plastic bottle, cones, paints, black wire, glue gun or superglue, scissors.
Master Class

A hedgehog from a plastic bottle and cones is ready! I recommend watching the video tutorial!
jumping frog

You will need: square sheet of green paper, black felt-tip pen.
Master Class
- Fold the base of the water bomb in this way: fold the sheet along one diagonal, then along the other. Fold the sheet in half with the wrong side out, then lay it out.

- Make a pyramid.
- Fold the sides towards the center.
- Form the paws in this way: turn each side from the center outward, dividing the resulting angle in half.

- Repeat this process to create another foot.
- Turn the frog upside down.

- Bend the bottom corners to the top corner, first on one side then on the other.
- Bend the right corner of the resulting square to the center.

- Fold the left corner in the same way.
- Form the eyes in this way: bend the lower corners on the muzzle in half, then lift the eyes up.

- Make a zipper fold at the bottom of the frog next to the legs. The jumping function depends on the size of the folds. The frog can jump forward, up and even do somersaults.

- To make the frog jump in a sliding motion, press the tail-fold.
- Draw eyes with a black felt-tip pen.
One of the most popular decorations of wildlife are flowers. They can be made from natural and artificial materials. Their main advantage is that they will be a wonderful gift for almost any occasion.

You will need: cones, brushwood, acrylic paint of different colors, brush, green colored paper, scissors, glue gun, vase.
Master Class

original roses

You will need: red colored paper, a simple pencil, scissors, a round object.
Master Class
- Trace a round object on colored paper.
- Draw a spiral in the circle.
- Cut out the circle.
- Cut the spiral in such a way that you get a "spring"
- Twist the rosette, in the same way make the desired number of roses.
Original colored paper roses are ready! I recommend watching the video tutorial!
creative flower
You will need: double-sided colored paper, glue gun, stick or skewer as a stem, button.
Master Class

A creative flower made of colored paper is ready!
Unusual cacti
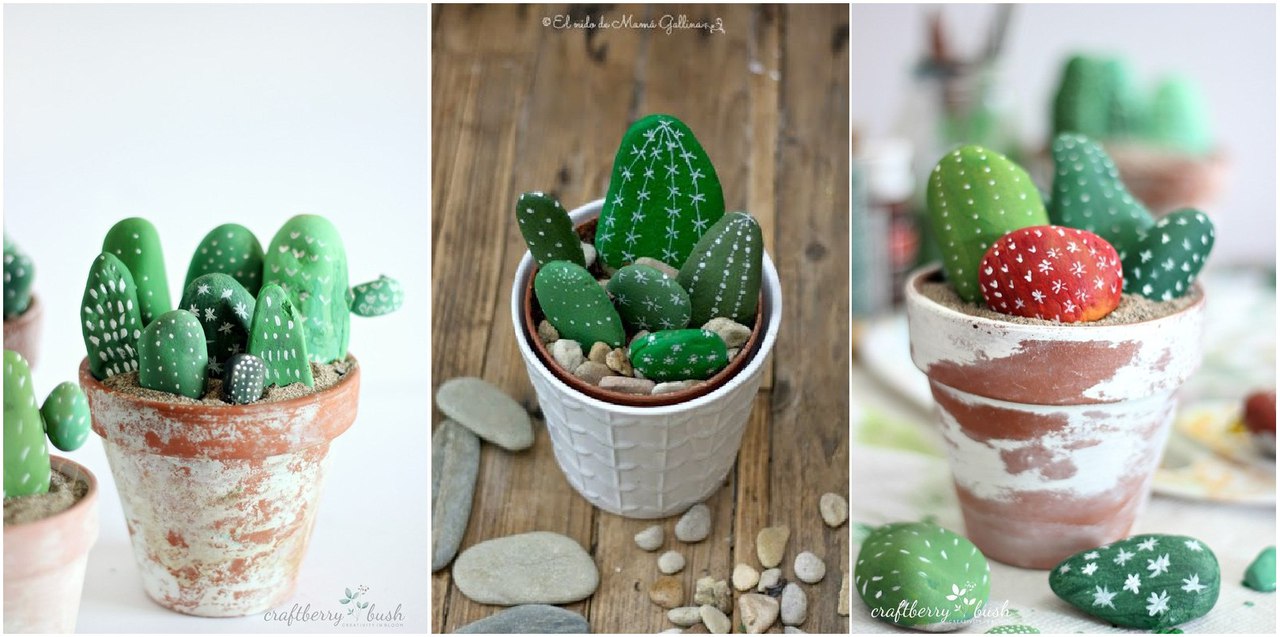
You will need: clay pot, sand, smooth stones (pebbles) medium and small, green acrylic paint in different shades, corrector (stroke).
Master Class

What is a holiday without flowers? And these flowers do not even need to be watered!
Do you want to be able to make crafts from natural materials with your own hands? My accumulated experience allows us to assert that everyone is capable of mastering such an occupation. A few visual master classes will help prove this.
Master class number 1: creating a vase from autumn leaves
If you need a composition on the theme of autumn from natural material, then it is best to take fallen leaves for this. You can make a lot of interesting things out of them, for example, a vase. Such a craft will not only become an original decoration of a room interior in an autumn style, but can also be used to store small items.
Tools and materials
To implement your plan, you will need:
- fallen maple leaves. Choose the most complete copies;
- PVA glue with a brush;
- Balloon.

Work progress

The instructions for making a vase are as follows:
| A photo | Description |
 |
|
 |
Delete roots from leaves. |
 |
Let's start gluing leaves to the prepared half of the ball. |
 |
|
 |
|
Just do not forget that the natural material of the made vase remains quite fragile even despite the abundance of hardened glue. Therefore, do not put too many heavy objects into it, otherwise the edges may break off.
Master class number 2: weaving a basket of cones
Trees can provide many natural materials that most of the time we don't pay attention to. So, in addition to the leaves described above, you can successfully use more cones, for example, to create a basket:
| A photo | Description |
 |
Collecting enough beads. The more there are, the larger the basket can be. |
 |
We wrap the first bump with wire. |
 |
We wind up second to her. |
 |
We connect full circle. |
 |
|
It is better to use insulated wire so that in the future it cannot damage the hand or the contents of the basket with sharp edges.
Cones also make excellent houses and animals that can decorate shelves in the living room or a Christmas tree.

Master class number 3: collage design
It is not difficult to make such compositions from natural material with your own hands, like collages. They look fresh and original.
Tools and materials
In this case, the following props should be at hand:
- bending branches in a dry state;
- Black and colored threads;
- Dried leaves, flowers, berries.
Work progress
| A photo | Description |
 |
|
 |
|
 |
Paste between the threads of the web, cooked leaves, flowers and berries in order to decorate the product. |
To create crafts, use only dry natural materials. Otherwise, they will begin to dry already as part of the structure, which will violate its geometry.
Master class number 4: watch making
Even watches can be made from natural materials. Here's how it's done:
Tools and materials
Such original crafts made from natural material need impressive props. This:
- birch bark;
- Wooden sticks. At the same time, it is better that they are of different lengths;
- Branch cuts with unequal diameters;
- Clockwork;
- Acrylic paints;
- fibreboard(Fibreboard);
- Threads;
- Stationery knife;
- glue gun.
Work progress
| A photo | Description |
 |
Cut out snowflakes from birch bark using a paper cutter. |
 |
We process saw cut with sandpaper. |
 |
|
 |
|
 |
Then glue and shorter beams. As a result, they will make a whole halo around the clock. |
 |
|
The result is not only an original and beautiful thing, but also very useful.


