Winter crafts in the style of quilling. Outline on the topic: Plan - summary of the lesson on the topic “Making a postcard using the Quilling technique. Tips for beginner quilling masters
It will be the perfect solution for any occasion. Next, a master class will be presented that will help everyone make a simple and very original postcard with their own hands.
To complete the work, you will need to prepare a list of materials presented below. Some materials can be replaced at your own discretion, and in the same way, you can take an idea from this work and make your own unique postcard, which will be an exclusive product.
List of materials for making a postcard:
- A sheet of paper for pastels or cardboard in dark purple color A4;
- White cardboard or thick paper;
- Design paper purple with a pattern;
- Foam tape double-sided;
- Quilling paper - yellow, pale purple, white;
- Rhinestones white and purple of different sizes;
- Comb tool;
- Quilling tool, scissors, glue, tweezers.
We cut out a 12x17 cm part from white cardboard, glue squares of foam tape on the reverse side.

We attach white cardboard to the base.

We take design paper. It is desirable that it is also dense enough, since a three-dimensional flower will be attached to it.

The dimensions of purple design paper are 10x15 cm. We also glue it on the reverse side with double-sided foam tape and fasten it on top of a white rectangle on the base.


We take 20 cm yellow quilling paper and use the “scallop” tool to begin to form the part. We fasten the end of the strip of paper to the scallop.

Next, we make loops, each time increasing the size of the element being executed.


At the point of contact of the paper loops, they should be lubricated with a little glue so that the element does not fall apart, but holds securely.
It turns out such a detail. They will need to make 16 pieces.

From white paper 20 cm white, we perform the same eight elements.

We connect two yellow and one white parts together with glue so that the white is in the middle.

Now we take a pale purple strip of paper 20 cm long and wrap these three parts with it.

We cut the edge and fasten it with glue. The first petal is ready.

We carry out such 8 petals for our flower.

We take yellow paper for quilling and form a tight roll. The length of the strip should be about 100 cm depending on the weight of the paper. The roll diameter should be about 2.5 mm.

Now the finished roll is gently pressed inward so that a three-dimensional detail is obtained.

From the inside, the part must be well lubricated with glue so that it retains its shape.

We fasten the flower petals together with glue at the points of contact. In the center we fix the middle of the flower, which should dry completely.

The flower is voluminous.

We smear the finished flower on the reverse side with glue, after which we fix it on the basis of the postcard at the top right.

From purple and white paper for quilling, we perform the following detail, making the loops alternately: a small purple loop, a little more white loop, an even larger purple loop. At the base, the ends of the part are fastened with glue.
We smear the part with glue, glue it to the base.

Next, take a strip of purple paper 20 cm long, bend in half. We fix the edges of the strip with glue, then we begin to wind it with a tool. Lubricate the resulting part with a small layer of glue, fix it on the base.
What is quilling, what is needed for this skill and the technique of hand crafts. Not complicated quilling patterns, 29 photos and videos on creating shapes.
Quilling originated in the 14th century, now it is experiencing another birth. Many are attracted by the fact that such beauty can be created with your own hands from paper strips.
Quilling for beginners - what you need to prepare
For those who have never been engaged in such creativity, it is better to start with simple crafts. It can be:
- postcards;
- snowflakes;
- flowers;
- panel;
- images.

They will tell you how to make crafts using the quilling technique for beginners. Below are the main figures that are used to create real works of fine art. First you need to prepare everything you need for this type of creativity.

If you have the opportunity to buy a quilling kit, get it. The basic kit includes:
- strips of colored paper;
- a template with a coordinate grid applied to it, radii, guides;
- a device with a forked metal tip, with which paper tapes are twisted;
- glue;
- small scissors;
- tweezers.
If you do not have the opportunity to buy a ready-made set, this should not stop those who want to create. In quilling tools for twisting the ribbon, you can turn:
- manicure scissors with straight ends;
- awl;
- kernel;
- gypsy needle;
- toothpick.
Cut off the sharp part of the toothpick, and split the resulting top with a clerical knife. You will insert the edge of the paper tape into this hole and twist it.
When using nail scissors, paper strips are placed between two blades. Further, the tape is wrapped around this tool and a spiral of the desired size is obtained.
When using an awl and a gypsy needle, the edge of the strip is superimposed on the metal part, held with two fingers of the free hand and twisted. They also work with a rod, but in this case the core of the workpiece may turn out to be larger than necessary, then any of the four tools listed above are used.
Strips of quilling paper can also be replaced. To do this, cut them out of white or colored double-sided paper.
Quilling patterns

A detailed description of the manufacture of various elements of this needlework will help you create real masterpieces over time.
The main elements of quilling are:
- tight and loose spiral;
- curl;
- drop and curved drop;
- semicircle;
- eye;
- arrow;
- sheet;
- heart;
- triangle;
- crescent;
- square;
- foot;
- horns.
You need to hold the paper tape with your left hand, and the tool with your right. If your strip is double-sided, then its wrong side should look towards the rod. Rotate the tool clockwise, and with the fingers of your left hand, hold the spiral beginning to form from above and below so that the curls are even and at the same level.
When the tape is over, put a little glue on its free end and attach it to the spiral so that it does not unwind and the workpiece looks neat. So you made one of the main figures of quilling. Many others are based on this element. Those who are better with the left hand need to carry out this process in a mirror image.
The next element is called a "free spiral", make it from the figure you just received. To do this, remove the spiral from the needle, let it unwind a little. You can do it differently - do not let go of the fingers of your left hand, but slightly rotate them in the center of this quilling element, and the spiral will weaken.
To make a “curl”, you do not need to glue the free end of the twisted tape to the spiral. To make a “drop”, it is necessary to squeeze the “free spiral” on one side with your fingers for a few seconds. A “curved drop” will turn out if you bend the corner of the “drop”.
The element called "eye" is also easy to make. To do this, the “free spiral” needs to be slightly pulled to the sides and clamped from two opposite sides, then released. The “leaf” figure will turn out if the corners of the “eye” are bent, one to the right, the second to the left. To make a "semicircle", take a free spiral, press it so that the top side becomes rounded and the bottom is even.

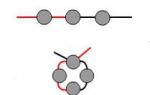
It clearly shows how elements are made using the photo quilling technique. Looking at it, you will understand how to create an "arrow". To do this, press with your fingers on 3 sides of the spiral to make a triangle, now press two of its corners to each other, leave the third one as it was.
To make a quilling greeting card, you can decorate it with an element called "horns". To do this, you need to take a long paper tape, bend it in half, wind the right side in the form of a spiral clockwise, and the left side counterclockwise.
The “heart” shape is made in the same way, only the right half of the tape is wound counterclockwise, and the left half is wound clockwise. The junction of these two elements must be clamped with your fingers to get the corner of the heart.
The "crescent" is made from the "eye", its 2 opposite corners are bent in the form of the letter "C". A "triangle" will turn out when the "free spiral" is compressed in three places, and to make a "square" this must be done from 4 sides.
For the “foot”, you need to make a “triangle” figure, and then bend its two opposite sides with your finger to the center.
How flowers are made using quilling technique
Now that you know how to make the basic elements for this type of creativity, you can start the fun process and create original postcards. If you want to decorate them with such colors, then make a “drop” shape from the “free spiral”. To make the petals multi-colored, use quilling paper of different colors. The middle of the flower will come out of the "free spiral" figure.

Drop glue on a postcard or cardboard, attach a “free spiral” here. Also, with the help of glue, fix a few petals around it. The stem is glued in the same way. For it, take a strip of green paper. The middle leaf, as you can see, is made from the "drop" shape, and the upper and lower leaves are made from the "eye" elements. After the glue dries, the work is completed.
You can make other postcards using the quilling technique. For beginners, another simple option is offered.

As you can see, the center of the flowers is a "free spiral". The petals are made from the same element, but in a different shade. Decorate the card with a "heart" element, as well as an "eye" figure. A beautiful creation will be appreciated by the one to whom you present such a gift.
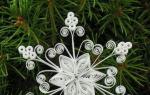
How snowflakes are made using quilling technique

For the New Year, you can make a snowflake. For her you will need:
- quilling paper;
- stencil;
- tailor's pins;
- glue gun or PVA;
- quilling tool.
To remove the spiral from the stencil, pick it up in the center with a toothpick and remove it by pressing the workpiece with your finger. Let it unwind a little, glue the tip. You have a "free spiral". Place all 5 blanks in the center of the template, it will be easy to align them with it.
If beginners make a snowflake using the quilling technique, then it is better to attach the elements to the template with a pin, and then glue them together. Then the details will be arranged as needed.
As you can see in the photo, 10 “eye” details are located around the five “free spiral” elements. Make them and glue them together and with the central parts of the snowflake.

The next 5 parts of the "free spiral" are made from solid strips, so they will turn out to be 2 times larger than similar snowflakes glued in the center. A stencil will also help to achieve their evenness. Use a hole with a diameter of 2 cm. After gluing the tip to the spiral, let it unwind and attach each such blank to the previous row of parts.
So that the "free spiral" in the snowflake does not unwind, direct the center of the spiral to its edge, press it. You can apply a little glue here so that the middle of the workpiece has shifted to the edge.
As you can see, the “tight spiral” completes the production of the attribute of winter and the New Year. You need 5 of these elements made using a stencil. Glue them in place. If you will be hanging a snowflake, run a strong thread through the center of one "tight spiral" and bring it out through the middle of another. Tie it in a bow and hang it on the Christmas tree or on the wall.
The video clearly shows how to make quilling snowflakes:
You read how to make flowers, a snowflake using the quilling technique, got acquainted with the main elements that are used to create works of such creativity. A lot of new and interesting things await you ahead, you will learn how to make a lake, paintings, animals using the quilling technique. You will also learn how to make candy bowls, which are almost as strong as glass ones, but, unlike them, will not break.
Other quilling video tutorials (for beginners):
Other photos of quilling works:
has a rich history. This hobby was enjoyed by both nuns and queens, nobles and commoners.
At present, in the wake of people's passion for hand-made, quilling - master classes have become incredibly popular, it should be noted that there are European and Eastern schools of paper filigree, and the products that come out from under the hands of quilling masters are simply amazing - they are so refined and elegant.
Do you want to know more about quilling technique? Our site will offer you a description of the manufacture of the most interesting ones that can be created using paper rolling, and this is precisely the essence.
If you decide to master quilling for beginners flower quilling
quilling pattern,
quilling photo
quilling patterns
If you decide to master quilling for beginners, then first you need to purchase all the necessary materials and tools. However, for the manufacture of the simplest flower quilling of the materials you only need special paper (for training it can be replaced with cut plain paper), but as for the tools, here you should understand in more detail.
The most important tool that will allow you to make quilling pattern, is a plastic or metal stick that has a forked end. However, you can replace this tool with a ballpoint pen refill by making a slot at the end. Adherents of the Eastern school use a thin awl when twisting paper strips. Also, a thin knitting needle or a toothpick is suitable for creating pictures.
In order to form parts of equal diameter, a ruler with round holes of different diameters is often used - paper spirals are folded into them and there they unfold to the required size.
Paper parts are closed and open - on quilling photo that's noticeable. A fairly thick PVA glue is used to secure the closed parts of the parts. It is very good if the bottle with glue has a thin nozzle - this will allow you to control its amount. By the way, you can use double-sided tape to fix the parts.
As for the basic shape for details, this is a “spiral”. With the help of multi-colored spirals, you can design quilling postcards, but it’s still better to master all the other forms, including the “eye”, “drop”, “tulip”, “square”, “leaf”, “arrow”, “curl” and many other. Of course, the list of forms can be called conditional, because nothing prevents you from coming up with your own.
Of course, for work you will need quilling patterns- you can find them on our website, the diagrams will tell you exactly how many parts you need to do and in what sequence to fix them.
Will tell you how to make unique and panels, postcards, caskets. With the help of paper rolling, you can decorate photo frames, wallets, furniture and create other amazing crafts, for example, flower quilling. When creating your unique works, show all your imagination, as well as intuition, and as a result you will get real masterpieces that cannot leave others indifferent.
If you are looking for an interesting hobby or try quilling! This simple at first glance needlework will make your imagination play, and for children it will be a useful activity for developing motor skills. Don't believe? See for yourself!
What is it?
Interesting! The name comes from the English quill, which means "bird feather". If you choose a Russian analogue, you can call this technique paper rolling or more elegantly - the art of paper filigree.
The essence of quilling is to create flat or voluminous paintings and crafts using specially twisted strips of thick paper. Lines and hanks are organically intertwined, creating the outlines of flowers and animals, drawing landscapes and portraits.
They do quilling, relying on their own imagination or on quilling patterns. Previously, a pen was used to twist the ribbons, which was reflected in the name of the art. Now needles and toothpicks are used for these purposes, and the choice of paper has become much wider. And the most important advantage of this art lies in the fact that it is available to almost everyone - the main thing is to understand its basics.
A bit of history
Information! If the East is considered the birthplace of origami, then the situation with quilling is more complicated. A number of sources date the origin of this type of needlework to the 1st-2nd century. The choice of time is not accidental - in 105, paper was invented in China.
According to another version, Catholic nuns were the first to engage in paper rolling in the 14th-15th centuries. The creation of do-it-yourself medallions and postcards from quilling attracted secular ladies. Commoners could not afford paper for a long time, so this technique was the prerogative of wealthy citizens. Paper rolling has taken a particularly significant place among the applied arts of Korea.
Whatever it was, but the quilling technique was enriched by the traditions of different countries and times. And unlike the first products made in it, it has come down to us intact.
Product types
Of course, the differences between Western and Eastern quilling crafts are as noticeable as the difference in the mentality of people from different countries. Thus, European samples are simple, clear, and do not require a long time to be performed. In the East, masters painstakingly work on each curl and create massive, often voluminous paintings, figurines and jewelry.
Idea! Depending on the preferences of the person to whom you want to present quilling for a birthday or other occasion, you can choose the style of execution. If the recipient is fond of Japanese culture, voluminous and, consisting of many intricate details, sakura will be just to his liking. Lover modern you can please with a concise and uncomplicated, but at the same time thoughtful postcard.
On a note! With the help of quilling, not only pictures are created, but also figurines, vases, snowflakes, jewelry boxes, decorative cups and saucers and even chess.
Idea! Very bright look made in the technique of quilling butterflies. You can make several pieces of different colors and place them on the leaves of indoor flowers.
Set of tools
Quilling is good because you do not need a special office or super-complex professional tools. The set of funds comes down to a small list:
- Strips of paper of different widths (3, 4, 6 and 10 mm);
Advice! Save on paper whenever possible. Not only the final result, but also the process of the work itself will depend on the quality of this material. After all, special paper is easier to bend and less damaged.
- A device for twisting ribbons. It can be a needle, a toothpick, or a needle stuck into a wooden stick with a large but bitten eye. A special machine can be found among other needlework products.
- Tweezers. To prevent your fingers from sticking to the parts and cardboard when gluing, you need to use tweezers with flat ends.
- Scissors. Sharp and thin will work best.
- Glue with a brush. White PVA glue is perfect, which is easy to find in any stationery store. If there is no brush in it, use a toothpick to lubricate the parts - this will avoid marks on the paper.
- The foundation. Cardboard is great for canvas. In addition, you can choose the desired tone, in harmony with the image.
Advice! To create a fringe, you can resort to using a special device that cuts it without any extra effort. By finding such a tool, you can save a lot of time. Also useful stencil with different circles.
In addition, ready-made paper rolling kits can be found in stores specializing in quilling and.
Ideas for beginners
How to make quilling? If you do not often do needlework, do not worry, as it is not difficult to comprehend this art from its very basics. After all, even simple crafts look beautiful if done carefully.
On a note! Quilling for children is a fun and useful activity that promotes the development of fine motor skills and imagination. It’s even better if you work together on the craft. Having carried away, the child will be able to express himself, which does not always happen in school.
Before, you need to master the technique of creating parts. Perhaps the easiest way to make petals for flowers. To do this, you need to take a strip of paper, twist it into a tube, and then flatten it on one side. Having made several of these parts, you can lay out a flower that will decorate any postcard.
From similar parts, you can create a more complex craft. For example, a heart with candy. For this, in addition to the tools already listed, you will need the following materials:
- Candy. It is desirable that the delicacy be round, but its packaging protrudes from both sides beyond the contents.
- Thick white cardboard base.
- Colored (red or pink) paper.
- Transparent narrow tape.
- Step 1. Creating a cardboard base. We draw a heart with a central axis of 7 cm, a width of 8 cm. Draw a circle inside. A stencil is useful for this, you can also use a compass. From the top line of the circle, you need to retreat a centimeter down and put a point, draw a semicircle through it. Cut out the resulting oval.
- Step 2. Next is the preparation of the tubes, as described above. By the way, you can not compress them. Then you get closed, round spirals. Or, on the contrary, you can close the skein from two sides, getting something that looks like an eye.
Advice! Use one or both options at your discretion.