New Year's toys made of paper. How to make a toy out of paper Make instructions for making it out of paper
Despite the fact that nowadays you can buy almost any toy in stores, parents are left with the question of how to make a toy out of paper themselves? This is explained by several reasons. Firstly, for any child, a product made by the parents’ hands is always more interesting and beloved. Secondly, you can involve the child himself in this process, which will not only be exciting for him, but will also allow him to show his imagination and logical thinking, develop attentiveness, perseverance and accuracy. In addition, working with small parts will improve fine motor skills and coordination of movements. Tips from an online bed linen store
Toy ideas for girls and boys
You can make a wide variety of paper toys with your own hands. For example, the most common pastime among girls is playing with dolls, which is why the doll itself can be made of thick paper or cardboard. You should draw, decorate and cut out the toy yourself; you can also use a template that is easy to find on the Internet or buy in a store. Such an original product will give the little lady a lot of positive emotions, as it will be fun and interesting to play with her. The doll can be dressed up in various paper clothes, made into a beautiful house for it and filled with all kinds of interior items.
It is also important to come up with paper toys for children for boys. These can be multi-colored boats, cars or airplanes, or white items that the child will try to decorate to his own taste.
Rice. 1 – Scheme of how to make a paper toy
To prepare such a miracle, you need to draw a sketch on paper, cut out the necessary parts and glue them together, and there is also the option of finding a ready-made template or instructions for folding sheets on the Internet.
Paper toys for little ones
No less original products that little ones will love are paper cubes. To make them, you only need a few sheets of paper, scissors and glue. First of all, you need to draw a cube pattern on a white or colored sheet, the size of which depends on your preferences. Creating a pattern begins with the image of one square, then you should draw three more squares, which touch each other with their side edges, and also draw one more on top and bottom of the third square. You need to complete the sketch by drawing the side trapezoids with which the cube will be connected.

Rice. 2 – Pattern for a paper toy
After this, the pattern is cut out, transferred to thick paper, the contours are outlined, the blank is cut out and glued with ordinary glue. To obtain a more interesting look, the cubes can be supplemented with various applications and original details.

Rice. 3 – Fun children's toys made from paper
It is necessary to understand that certain rules for creating paper toys no, that’s why there is no answer to the question of how to properly make a paper toy with your own hands. The positive outcome of such a process depends only on the imagination and efforts of the author.
Cat crafts are not inferior in popularity to their living counterparts. You can find almost anything in the shape of a kitten or with its image: pillows, clothes, cups, toys and so on. We bring to your attention several master classes on the topic “How to make a (paper origami) cat.” Using them you can make your own paper kitten.
Required tools and materials
To make an origami cat, you will need:
- paper that can be folded (regular landscape sheet, colored paper, corrugated carbon paper, special paper for origami, and so on);
- scissors (needed to give the sheet a square shape);
- markers, paints, pencils or pens (needed to draw a face);
- any decor: beads, beads, ribbons and bows, sparkles and so on.
How to make cats out of paper?
The instructions are quite simple, and the order of work depends on how you make the cat. This can be done in two ways:
- The craft is made from two sheets of paper: one makes up the muzzle, the other makes up the body.
- The craft is made from one sheet of paper.
Making a cat's face (first option)
Master class “How to make a cat out of paper”: making a face using the first method:
- Place a square sheet of paper in front of you (Illustration 1).
- Fold the top right and bottom left corners together. The result will be a triangle (Figure 2).
- Fold the left corner of the triangle down so that its tip is flush with the bottom, but not touching it (as in Illustration 3).
- Fold the right corner in the same way as the left (Illustration 4).
- Fold the middle corner up slightly, as in illustration 5.
- Turn the figure over.
- Draw the eyes, nose, mouth and antennae (Illustration 6). You can also add eyebrows.
The cat's face is ready!
The second way to make a muzzle
Master class on how to make a cat out of paper (photo instructions for making a face):

- Place a square sheet of paper in front of you.
- Fold it in half to form a triangle (Illustration 1).
- We unfold the sheet. The fold line should be horizontal in front of you.
- We bend the upper corner towards the middle of the sheet (Illustration 2).
- Fold the sheet in half again, as in illustration 3.
- We conditionally divide the resulting figure, as in illustration 4.
- Fold the left and right corners to the center along the lines from the sixth point (Illustration 5).
- Fold the left and right sides up, as in illustration 6. That is, the fold line should not be straight, but at an angle and located in the center of the length.
- You've got ears.
- Fold the top corner of the figure down, as in illustration 7.
- Turn the figure over.
- Bend the bottom corner slightly upward (Illustration 8).
- Fold down the tip of the folded corner from the previous point, as in Illustration 9.
- Draw eyes, antennae, nose and mouth. Or glue them from paper.
The muzzle is ready!
Cat's body
Master class on how to make a cat out of paper (instructions for creating the body):

- Take a square sheet of paper and fold it in half to form a triangle (Illustration 1).
- Unfold the piece of paper.
- Fold the right one and left side to the fold line, as in illustration 2.
- Fold the resulting figure in half vertically (Illustration 3).
- Place the resulting figure horizontally in front of you.
- Bend the sharp corner down, as in illustration 4.
- Fold the corner again (Illustration 5).
- Open the corner (Illustration 6).
- Hold the main part of the figure with your left hand, and straighten the corner with your right.
- Fold the straightened corner along the extreme fold line, as in illustration 7.
- Fold the corner up in the same way as in illustration 8. You have a cat's tail.
- Fold the ponytail in half vertically (Illustration 9). To do this, turn the left side over to the right.
The body for the cat is ready!
Now connect the body and muzzle together. If you use the muzzle from the first option, then you need to glue it, and if from the second, then simply stick it on the body.
A whole cat from one sheet of paper
Master class on how to make an origami cat out of paper:

- Take a rectangular piece of paper with an aspect ratio of 1 to 3 and lay it horizontally.
- Fold the paper in half (Illustration 1).
- Make each side smaller by folding them in half, as in illustration 2.
- Unfold the last folds and turn the sheet upside down.
- Fold the lower left corner up (Illustration 3). You've got something like a pointer.
- Fold back the corner of the pointer (Illustration 3).
- Go over all the folds.
- Open the sheet of paper completely.
- Fold the sheet of paper as shown in illustration 4.
- The left and right vertices are the ears of the future cat (illustration 5).
- Now do everything as in illustration 6. In it, a green triangle is used to indicate the lines along which you want to make the chin.
- Squeeze the bottom of your chin. Fold the top of the head as shown in illustration 7. If you do everything correctly, then at this stage your muzzle will already be formed and the ears will be slightly bent.
- Fold the remaining part of the sheet in half (Illustration 8). As a result, you will get a ponytail.
- On both sides of the previous fold, make two more diagonal ones. Fold the paper as shown in illustration 9 . You will get paws.
- Raise your body perpendicular to the tail.
- Fold the sides of the tail in the same way as in illustration 10.
- Curl the ponytail using a pencil or scissors (just carefully).
Twitch toys have been known since ancient times. These mechanical figures of people or animals, whose arms, legs or paws twitch funny thanks to a simple hinge mechanism, have always been especially loved by children.
Initially, twitchers were made of wood; in Rus' they were called “dancers.” Subsequently, the manufacturing technology was greatly simplified through the use of paper and cardboard. With the advent of color printing, twitch patterns drawn by artists began to be published in magazines, which made it possible to make colorful toys for everyone.
Well, the Internet has made the possibilities for creating a variety of twitches almost limitless. :) I invite you to use ready-made templates to make a mechanical toy from cardboard in the shape of the famous fairy tale hero- Puss in Boots. And at the end of the master class, another version of the twitch awaits you - the Monkey.
Master class: cardboard twitch toy “Puss in Boots”
Materials and tools:
— sheets of A4 size office paper (for printing templates);
— packaging micro-corrugated cardboard (1.5 mm thick) or cardboard for children's creativity;
- a sheet of thick white A4 paper;
- standard (stationery) knife;
- scissors;
- awl;
— paracord (4 mm in diameter) or other fasteners;
- nylon thread, narrow ribbon;
- glue stick;
— glue “Moment Crystal”;
- double sided tape.
So, we start by preparing the cardboard parts for the base of the twitch toy.
We print on office paper outline templates. We cut them out with small allowances.
We glue pieces of double-sided tape on the wrong side and glue the templates to the wrong side of the cardboard.

In this case, micro-corrugated cardboard with a thickness of 1.5 mm is used. But I want it right away to draw your attention: the contours of the parts here are quite curly, with small elements, so cutting out of micro-corrugated cardboard can be a little difficult if you’re not used to it. And here you can go two ways:
1. neglect small elements and smooth out the contours when cutting;
2. use thin cardboard (for example, cardboard for children's creativity; for greater rigidity, you can make it in 2 layers); In this case, the toy will also be quite functional; below you will see an example of such a design of the twitch.
Next, use a regular stationery knife to cut out the parts of the base. Immediately make holes for fastening. I used a punch with a diameter of 4 mm. If a punch is not available, you can cut holes with a knife or awl.
The diameter of the holes may differ from the original depending on what fasteners you use.

On thick white paper (on the front side) we print out the colored puss in boots templates. Cut it out.

Alternatively, you can color the cat with pencils or felt-tip pens together with your child. A special set of templates is provided for this.
Using a glue stick, glue the colored parts onto cardboard bases(on front side cardboard).

We fold our paws in pairs (on top of each other). And with an awl we pierce small through holes on the upper edges, as shown in the photo. These holes will be used to control the paws.

To attach the paws, white paracord with a diameter of 4 mm is used here. Cut 4 small pieces (the length is such that you can tie 2 knots).
We tie a tight knot at one end and melt the tip with a lighter. We pass the cord through the holes of the body and paws.

The paws should be located under the body.

This is just one of many mounting options. For movable fastening, you can use, for example, brads, buttons, wire, etc. - whatever you like best. The main thing is to make sure that the limbs of the twitching toy rotate freely in the same plane!
Let's proceed to the most important stage - creating the paw control mechanism. In fact, everything here is extremely simple. It is necessary to tie the paws in pairs with nylon thread through small holes. When the thread is taut, the limbs should be in a downward position.

Now we tie a long thread (can be folded in half) or a thin cord to the horizontal threads, both the top and the bottom, as shown in the photo.
We tie knots on the paracord from the wrong side of the toy. We check whether the paws rotate freely enough. We melt the ends of the cord.

Cut out 2 circles with a diameter of 2.5 cm from cardboard. If you use micro-corrugated cardboard, make a slot in the middle on the wrong side of one circle and place the end of the thread there.

Glue both circles with Moment Crystal glue.

Alternatively, instead of cardboard circles, you can attach a large bead - for convenience and beauty.
Glue a cardboard circle with a diameter of 3.5 cm to the head from the wrong side onto a loop of narrow ribbon. 
The cardboard twitch toy is ready!

This is such a cheerful and lively cat in boots. The kids will be delighted! :)

A set of templates (contour, color and for coloring) for making the Puss in Boots twitch toy can be purchased at the Kartonkino store:
I already mentioned above that similar toys can be made from thin cardboard for children's creativity. These charming monkeys, created by, are made in just this way.
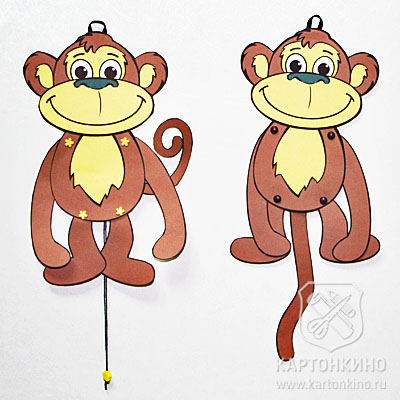
Note that the monkey on the right uses a tail, not a string, to control its paws. Or rather, there is a lace there too, it’s just glued between the halves of the tail. Very interesting option, agree.
And this is what the inside of the monkey looks like. Everything here is quite traditional.

The paws are attached here using brads. It looks very good, and the attachment process itself is simpler than with paracord. Don’t forget that when using brads, the holes need to be made smaller; just pierce them with an awl.
It is worth noting that the tail on the side was not the best solution - it interferes with the movement of the paw. But there is a choice: if you want, do it with a tail on the side, if you want, do it from below, or without a tail at all (not completely, of course, without a tail, it’s kind of in the background and just didn’t come into view).
Templates for the twitching toy “Monkey” can be downloaded here:
By the way, Anya Shidenko has many other interesting templates for making various products for children, as well as holiday accessories. You will find them by going to.
Well, now you know a simple and working way to make a twitch toy out of cardboard with your own hands. By analogy, you can even draw your own favorite character - some hero folk tale or a cartoon.
Or use ready-made templates. I have already shown you two versions of the toy. And you will find another one - Kitty - in the 9th issue of the electronic magazine "Masterklassnitsa".

We wish you pleasant creativity, fun and useful games with children!
Yours Inna Pyshkina and the Kartonkino team.
Tamara Nikolaevna Lazarchuk
Hello again, dear colleagues. I continue to introduce you to my master classes on making paper toys. After all paper- the most accessible and popular material for children's creativity. In progress making paper crafts Children develop artistic abilities, creative imagination, imagination, and thinking. Today I invite you to watch master class on making a cat. The toy is easy to make and children preschool age can easily cope with such work.
Target: make a cat using paper modeling technique.
Tasks:
Strengthen the ability to work with paper, scissors;
Development of fine motor skills, constructive skills and abilities, creativity and imagination;
Form a friendly attitude towards each other, a desire to help;
Cultivate perseverance, accuracy, and respect for work.
Step-by-step instruction.
Attach the saucer to the sheet paper. Trace with a pencil and cut out two circles. Inside one, draw another circle.

In a clean circle, make two V-shaped cuts for the ears. Draw a muzzle under them.

The second circle must be folded in half and cut. Each half needs to be folded in half again. Then we draw the paws and tail, as shown in the photo.

Bend the ears and glue the head cats.

Cut out a rectangle measuring 21 by 14 cm. Then roll it into a cylinder and glue it together.
We attach the head, tail and paws to the body. We glue the tail from the back so that it can be seen from the front. That's all the cat is ready.

Publications on the topic:
 Municipal autonomous preschool educational institution kindergarten No. 12 municipality Slavyansky district Master class.
As the great Coco Chanel said: “Things self made- this is luxury. It is not necessary for everyone to have them. Anyone who wants to have them does so.
Master class with step by step photos"Making Cloves"
Good afternoon, dear guests of my page. I suggest you watch another one of my masters - a class on making toys from paper. This toy.
April 1 is April Fool's Day. Despite the fact that this holiday is not on calendars, it is actively celebrated in various countries peace. On this day.
We made these wonderful swans together with the kids, having only paper, gouache scissors and glue on hand. Swans can also be white.
Dear colleagues! I would like to congratulate you on the past holidays and present to your attention a master class on manufacturing.