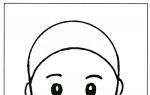
Crocheted funny tooth. Knitted toy - Gnome Mouse Tooth Let's start decorating the face
From "Land of the Masters"
further words of the author


Dear needlewomen, I suggest you tie such a cute tooth together with a toothbrush and a tube of paste. Such a toy will help your child learn to care for their teeth and bring pleasure and joy.
I will be very happy if you get such a tooth.
This is my author's work and idea, and therefore if you knit such a Zubik according to my author's MK and place your photos on the Internet, please be sure to indicate my name as the author of the idea and the MK for which you knitted. Thanks for understanding.
Happy knitting!!!
The toy is quite large (30 cm), but you can take a thinner thread and a smaller hook, and the Tooth will also be smaller.
Acrylic yarn.
Yarn consumption: white-200 gr, a little orange (for a skirt and flower), yellow (for the middle of the flower), red and pink (for paste and brush), blue (for the muzzle).
Hook number 4.5.
Upper part of the tooth (4 identical parts):
Knit ch 3 close in a ring.
3. Knit a row doubling through 1 column.
4. Knit a row doubling through 1 column.
5, Knit a row doubling through 1 column.
6. Knit a row without changes.
7. Double every 3rd column.
8. Knit a row without changes.
9. Knit a row without changes.
10. Double every 5th column.
11. Knit a row without changes.
12. Knit a row without changes.

So 4 identical parts are ready.

8
Now you need to sew together all 4 parts (as in the photo).
Stitching takes place with the same thread as knitting.

9.
10.
11.
We begin to knit from the top of the tooth to the body of the tooth.
Tooth body:
1. We reduce 8 columns - along the edges of the tooth - 4 pcs. and between the details of the top of the tooth - 4 pcs.
2. Knit a row without changes.
3. Reduce every 6th column.
4. 5. 6. 7. 8. Knit the rows without changes.
9. Reduce every 5th column.
10. 11. 12. 13. 14. Knit rows without changes.
15. Reduce every 5th column.
16. 17. 18. 19. 20. Knit the rows without changes.

12
Here's what happened.

13.
14.
Next, we knit a circle and stripes for the bottom of the tooth:
A circle:
Knit ch 3 close in a ring.
1. Double the amount of st.b.s. (6 pcs)
2. Double the amount of st.b.s. (12 pcs.)
3. Double every 2nd column (through one).
4. Double every 2nd column (through one).
Stripes (4 pcs.):
1. Link 10 ch.
Knit an additional 4 rows.

15
We sew the stripes to the circle - in the same way as in the photo.

16.
We sew the other sides of the stripes to the body of the tooth (as in the photo). We try to sew so that the holes for future legs are approximately the same.
We fix all sides except one (in the photo one side is not fixed - where the needle is), so that it would be convenient to fill the tooth.

We fill the tooth with a synthetic winterizer and give it a shape. Then we sew the remaining unsewn edge of the strip (as in the photo).
34.
35.
36
We begin to knit the legs (straight from the torso).
Legs (4 pcs.):
1. We knit 30 stbn around the hole (this amount should be self-pulling).
If you have 29 columns in one leg and 31 in the other - it's not scary - you just need to add or subtract 1 or 2 tbsp. so that all 4 legs are the same for further knitting.
7. Reduce every 6th column.
13. Reduce every 6th column.
14. 15. 16. Knit rows without changes.
Fill the legs (as in the following photos).
17. Reduce every 2nd column (through 1) (to the very end).
.
37.
38.
39
Here's what happened.

40
Here is the body and our tooth is ready.
.
41
Eyes:
Protein:
Knit ch 3 close in a ring.
1. Double the amount of st.b.s. (6 pcs)
2. Double the amount of st.b.s. (12 pcs.)
4. Knit without changes with a semi-column of blue.
Blue pupil:
Knit ch 3 close in a ring.
1. Double the amount of st.b.s. (6 pcs)
2. Double the amount of st.b.s. (12 pcs.)
3. Double every 2nd column (through 1)
Black pupil:
Knit ch 3 close in a ring.
1. Double the amount of st.b.s. (6 pcs)
2. Double the amount of st.b.s. (12 pcs.)
Blue and black pupils are knitted with a thinner thread and hook No. 3.
Nose:
Knit ch 3 close in a ring.
1. Double the amount of st.b.s. (6 pcs)
2. Double the amount of st.b.s. (12 pcs.)
3. Double every 2nd column (through 1).
4. Double every 2nd column (through 1).
.
42.
Sew the pupils of the eyes on the whites, collect the nose with a needle and thread along the edges, tighten, fill and sew to the tooth (eyes and nose).
Then embroider the eyelashes and mouth with the same threads (blue).

43
Handles (2 pcs.):
1. Link 20 ch. close in a ring.
2. 3. 4. 5. 6. Knit the rows without changes.
7. Reduce 3 columns - evenly.
8. 9. 10. 11. 12. Knit rows without changes.
13. Reduce every 4th column.
14. 15. 16. 17. 18. Knit the rows without changes.
19. Reduce every 4th column.
20. 21. 22. 23. Knit rows without changes.
24. Reduce 1 column.
Palms (2 pcs.):
Knit ch 3 close in a ring.
1. Double the amount of st.b.s. (6 pcs)
2. Double every 2nd column.
4. Reduce every 2nd column.
Then stuff.
5. Reduce each column to the end.
Fingers (8 pcs.):
1. Link 3 ch. close in a ring.
2. Double 2 columns (5 tbsp).
3. 4. 5. Knit a row without changes.
The fingers are knitted with a thinner thread and hook No. 3.
.
44. Sew palms to hands, fingers to palms. Fingers do not need to be stuffed.
Then fill the handles, give them a shape (bend them in the right place and fix the shape with threads - sew) and sew to the tooth 
45
Brush:
3. Double the amount of st.b.s. (12 pcs.)
Then knit the rows without changes to the desired length, take a wooden stick, wrap it with a padding polyester (if it is too thin), put it in a connected "case" and then reduce the columns to the very end.
Then tie 2 rectangles - red and pink, the size of a brush head.
I got it like this:
Scored 8 v.p. and then knitted 8 rows.
see the following photos.
Then you need to sew a red rectangle to the edge of the brush for 3 sides, then fill the resulting pocket with padding polyester and sew the 4th side to the brush. Sew a pink rectangle up (to red).

46.
47.
48.
49.
50
We begin to attach the pile (threads) to the brush according to this principle: Every 2 threads must be hooked onto the loops of the head in the same way as you usually attach the kittyki to the scarf.
In the middle of the brush I made pink stripe and white around the edges.
And you can make it to your liking.
.
51.
We knit a pink stripe and sheathe the pile of the brush around it (as in the photo).

Tube of paste:
1. Link 37 ch. and close in a circle.
2. 3. 4. Knit rows without changes.
5. Reduce every 6th column.
6. 7. 8. 9. 10. 11. Knit the rows without changes.
12. Reduce every 6th column.
13. 14. 15. 16. 17. 18. Knit rows without changes.
19. Reduce 2 columns.
20. 21. 22. 23. 24. 25. Knit the rows without changes.
26. Reduce 2 columns.
27. 28. 29. 30. 31. 32. 33. 34. 35. 36. 37. Knit a row without changes.
38. Reduce 2 columns.
39. - 49. Knit a row without changes.
50. Go to pink color. Reduce 2 columns.
Then sew up the tube at the bottom and stuff it.
51. Reduce every 3rd column.
52. Reduce every 2nd column - to the end.
Tube cap:
1. Link 3 ch. close in a ring.
2. Double the amount of st.b.s. (6 pcs)
3. Knit a row without changes.
4. Knit a row without changes.
5. Add 1 column.
6. Add 1 column.
7. Knit a row without changes.
Fill the cap and sew it to the tube.
You can also tie a red stripe, sew it to the tube and embroider the name of the paste / the name of the child or something else on it (I embroidered the word Zubik in English). You can also decorate the tube in a different way - to your liking. Artwork by Maria Lebedeva. Connected by my MK.

If you knit such a Zubik according to my author's MK and place your photos on the Internet, please be sure to indicate my name as the author of the idea and the MK for which you knitted. Thanks for understanding.


Dear needlewomen, I suggest you tie such a cute tooth together with a toothbrush and a tube of paste. Such a toy will help your child learn to care for their teeth and bring pleasure and joy.
I will be very happy if you get such a tooth.
If you have any questions about MK, write them in the comments and I will definitely answer.
This is my author's work and idea, and therefore if you knit such a Zubik according to my author's MK and place your photos on the Internet, please be sure to indicate my name as the author of the idea and the MK for which you knitted. Thanks for understanding.
Happy knitting!!!


The toy is quite large (30 cm), but you can take a thinner thread and a smaller hook, and the Tooth will also be smaller.
Acrylic yarn.
Yarn consumption: white-200 gr, a little orange (for a skirt and flower), yellow (for the middle of the flower), red and pink (for paste and brush), blue (for the muzzle).
Hook number 4.5.
1. Upper part of the tooth (4 identical parts):
4. Knit a row doubling every 2 columns, but not one.
5, Knit a row doubling every 2 columns, but not one.
6. Knit a row without changes.
7. Double every 3rd column.
8. Knit a row without changes.
9. Knit a row without changes.
10. Double every 5th column.
11. Knit a row without changes.
12. Knit a row without changes.
So 4 identical parts are ready. 
2. Now you need to sew together all 4 parts (as in the photo).
Stitching takes place with the same thread as knitting.


3. We begin to knit the torso of the tooth from the top of the tooth.
Tooth body:
1. We reduce 8 columns - along the edges of the tooth - 4 pcs. and between the details of the top of the tooth - 4 pcs.
2. Knit a row without changes.
3. Reduce every 6th column.
4. 5. 6. 7. 8. Knit the rows without changes.
9. Reduce every 5th column.
10. 11. 12. 13. 14. Knit rows without changes.
15. Reduce every 5th column.
16. 17. 18. 19. 20. Knit the rows without changes.

Here's what happened.


4. Next, we knit a circle and stripes for the bottom of the tooth:
A circle:
Knit ch 3 close in a ring.
1. Double the amount of st.b.s. (6 pcs)
2. Double the amount of st.b.s. (12 pcs.)
3. Double every 2nd column (through one).
4. Double every 2nd column (through one).
Stripes (4 pcs.):
1. Link 10 ch.
Knit an additional 4 rows.

5. Sew the stripes to the circle - in the same way as in the photo.

6. Sew the other sides of the stripes to the body of the tooth (as in the photo). We try to sew so that the holes for future legs are approximately the same.
We fix all sides except one (in the photo one side is not fixed - where the needle is), so that it would be convenient to fill the tooth.

7. We fill the tooth with synthetic winterizer and give it a shape. Then we sew the remaining unsewn edge of the strip (as in the photo).


8. We begin to knit legs (straight from the torso).
Legs (4 pcs.):
1. We knit 30 stbn around the hole (this amount should be self-pulling).
If you have 29 columns in one leg and 31 in the other - it's not scary - you just need to add or subtract 1 or 2 tbsp. so that all 4 legs are the same for further knitting.
7. Reduce every 6th column.
13. Reduce every 6th column.
14. 15. 16. Knit rows without changes.
Fill the legs (as in the following photos).
17. Reduce every 2nd column (through 1) (to the very end).


Here's what happened.

Here is the body and our tooth is ready.

9. Eyes:
Protein:
Knit ch 3 close in a ring.
1. Double the amount of st.b.s. (6 pcs)
2. Double the amount of st.b.s. (12 pcs.)
4. Knit without changes with a semi-column of blue.
Blue pupil:
Knit ch 3 close in a ring.
1. Double the amount of st.b.s. (6 pcs)
2. Double the amount of st.b.s. (12 pcs.)
3. Double every 2nd column (through 1)
Black pupil:
Knit ch 3 close in a ring.
1. Double the amount of st.b.s. (6 pcs)
2. Double the amount of st.b.s. (12 pcs.)
Blue and black pupils are knitted with a thinner thread and hook No. 3.
Nose:
Knit ch 3 close in a ring.
1. Double the amount of st.b.s. (6 pcs)
2. Double the amount of st.b.s. (12 pcs.)
3. Double every 2nd column (through 1).
4. Double every 2nd column (through 1).

10. Sew the pupils of the eyes onto the proteins, collect the nose with a needle and thread along the edges, tighten, fill and sew to the tooth (eyes and nose).
Then embroider the eyelashes and mouth with the same threads (blue).

11. Handles (2 pcs.):
1. Link 20 ch. close in a ring.
2. 3. 4. 5. 6. Knit the rows without changes.
7. Reduce 3 columns - evenly.
8. 9. 10. 11. 12. Knit rows without changes.
13. Reduce every 4th column.
14. 15. 16. 17. 18. Knit the rows without changes.
19. Reduce every 4th column.
20. 21. 22. 23. Knit rows without changes.
24. Reduce 1 column.
Palms (2 pcs.):
Knit ch 3 close in a ring.
1. Double the amount of st.b.s. (6 pcs)
2. Double every 2nd column.
3. Knit a row without changes.
4. Reduce every 2nd column.
Then stuff.
5. Reduce each column to the end.
Fingers (8 pcs.):
1. Link 3 ch. close in a ring.
2. Double 2 columns (5 tbsp).
3. 4. 5. Knit a row without changes.
The fingers are knitted with a thinner thread and hook No. 3.

12. Sew palms to hands, fingers to palms. Fingers do not need to be stuffed.
Then fill the handles, give them a shape (bend them in the right place and fix the shape with threads - sew) and sew to the tooth.

13. Brush:
3. Double the amount of st.b.s. (12 pcs.)
Then knit the rows without changes to the desired length, take a wooden stick, wrap it with a padding polyester (if it is too thin), put it in a connected "case" and then reduce the columns to the very end.
Then tie 2 rectangles - red and pink, the size of a brush head.
I got it like this:
Scored 8 v.p. and then knitted 8 rows.
see the following photos.
Then you need to sew a red rectangle to the edge of the brush for 3 sides, then fill the resulting pocket with padding polyester and sew the 4th side to the brush. Sew a pink rectangle up (to red).


14. We begin to attach the pile (threads) to the brush according to this principle: Every 2 threads must be hooked onto the loops of the head in the same way as you usually attach the kittyki to the scarf.
In the middle of the brush, I made a pink stripe, and white along the edges.
And you can make it to your liking.


15. We knit a pink stripe and sheathe the pile of the brush around it (as in the photo).

16. Tube of Paste:
1. Link 37 ch. and close in a circle.
2. 3. 4. Knit rows without changes.
5. Reduce every 6th column.
6. 7. 8. 9. 10. 11. Knit the rows without changes.
12. Reduce every 6th column.
13. 14. 15. 16. 17. 18. Knit rows without changes.
19. Reduce 2 columns.
20. 21. 22. 23. 24. 25. Knit the rows without changes.
26. Reduce 2 columns.
27. 28. 29. 30. 31. 32. 33. 34. 35. 36. 37. Knit a row without changes.
38. Reduce 2 columns.
39. - 49. Knit a row without changes.
50. Go pink. Reduce 2 columns.
Then sew up the tube at the bottom and stuff it.
51. Reduce every 3rd column.
52. Reduce every 2nd column - to the end.
Tube cap:
1. Link 3 ch. close in a ring.
2. Double the amount of st.b.s. (6 pcs)
3. Knit a row without changes.
4. Knit a row without changes.
5. Add 1 column.
6. Add 1 column.
7. Knit a row without changes.
Fill the cap and sew it to the tube.
You can also tie a red stripe, sew it to the tube and embroider the name of the paste / the name of the child or something else on it (I embroidered the word Zubik in English). You can also decorate the tube in a different way - to your liking.
I made a skirt and a flower on my head for my tooth, and of course you can decorate your tooth as you like - you can, for example, make him a bow tie or a hat - make him a boy.


So our Zubik is ready.
Dear needlewomen, I suggest you tie such a cute tooth together with a toothbrush and a tube of paste. Such a toy will help your child learn to care for their teeth and bring pleasure and joy.
I will be very happy if you get such a tooth.
If you have any questions about MK, write them in the comments and I will definitely answer.
This is my author's work and idea, and therefore if you knit such a Zubik according to my author's MK and place your photos on the Internet, please be sure to indicate my name as the author of the idea and the MK for which you knitted. Thanks for understanding.
Happy knitting!!!
![]()
![]()
![]()
![]()
The toy is quite large (30 cm), but you can take a thinner thread and a smaller hook, and the Tooth will also be smaller.
Acrylic yarn.
Yarn consumption: white-200 gr, a little orange (for a skirt and flower), yellow (for the middle of the flower), red and pink (for paste and brush), blue (for the muzzle).
Hook number 4.5.
Upper part of the tooth (4 identical parts):
Knit ch 3 close in a ring.
3. Knit a row doubling through 1 column.
4. Knit a row doubling through 1 column.
5, Knit a row doubling through 1 column.
6. Knit a row without changes.
7. Double every 3rd column.
8. Knit a row without changes.
9. Knit a row without changes.
10. Double every 5th column.
11. Knit a row without changes.
12. Knit a row without changes.
So 4 identical parts are ready.
Now you need to sew together all 4 parts (as in the photo).
Stitching takes place with the same thread as knitting.
We begin to knit from the top of the tooth to the body of the tooth.
Tooth body:
1. We reduce 8 columns - along the edges of the tooth - 4 pcs. and between the details of the top of the tooth - 4 pcs.
2. Knit a row without changes.
3. Reduce every 6th column.
4. 5. 6. 7. 8. Knit the rows without changes.
9. Reduce every 5th column.
10. 11. 12. 13. 14. Knit rows without changes.
15. Reduce every 5th column.
16. 17. 18. 19. 20. Knit the rows without changes.
Here's what happened.
Next, we knit a circle and stripes for the bottom of the tooth:
A circle:
Knit ch 3 close in a ring.
1. Double the amount of st.b.s. (6 pcs)
2. Double the amount of st.b.s. (12 pcs.)
3. Double every 2nd column (through one).
4. Double every 2nd column (through one).
Stripes (4 pcs.):
1. Link 10 ch.
Knit an additional 4 rows.
We sew the stripes to the circle - in the same way as in the photo.
We sew the other sides of the stripes to the body of the tooth (as in the photo). We try to sew so that the holes for future legs are approximately the same.
We fix all sides except one (in the photo one side is not fixed - where the needle is), so that it would be convenient to fill the tooth.
We fill the tooth with a synthetic winterizer and give it a shape. Then we sew the remaining unsewn edge of the strip (as in the photo).
We begin to knit the legs (straight from the torso).
Legs (4 pcs.):
1. We knit 30 stbn around the hole (this amount should be self-pulling).
If you have 29 columns in one leg and 31 in the other - it's not scary - you just need to add or subtract 1 or 2 tbsp. so that all 4 legs are the same for further knitting.
7. Reduce every 6th column.
13. Reduce every 6th column.
14. 15. 16. Knit rows without changes.
Fill the legs (as in the following photos).
17. Reduce every 2nd column (through 1) (to the very end).
Here is the body and our tooth is ready.
Eyes:
Protein:
Knit ch 3 close in a ring.
1. Double the amount of st.b.s. (6 pcs)
2. Double the amount of st.b.s. (12 pcs.)
4. Knit without changes with a semi-column of blue.
Blue pupil:
Knit ch 3 close in a ring.
1. Double the amount of st.b.s. (6 pcs)
2. Double the amount of st.b.s. (12 pcs.)
3. Double every 2nd column (through 1)
Black pupil:
Knit ch 3 close in a ring.
1. Double the amount of st.b.s. (6 pcs)
2. Double the amount of st.b.s. (12 pcs.)
Blue and black pupils are knitted with a thinner thread and hook No. 3.
Nose:
Knit ch 3 close in a ring.
1. Double the amount of st.b.s. (6 pcs)
2. Double the amount of st.b.s. (12 pcs.)
3. Double every 2nd column (through 1).
4. Double every 2nd column (through 1).
Sew the pupils of the eyes on the whites, collect the nose with a needle and thread along the edges, tighten, fill and sew to the tooth (eyes and nose).
Then embroider the eyelashes and mouth with the same threads (blue).
Handles (2 pcs.):
1. Link 20 ch. close in a ring.
2. 3. 4. 5. 6. Knit the rows without changes.
7. Reduce 3 columns - evenly.
8. 9. 10. 11. 12. Knit rows without changes.
13. Reduce every 4th column.
14. 15. 16. 17. 18. Knit the rows without changes.
19. Reduce every 4th column.
20. 21. 22. 23. Knit rows without changes.
24. Reduce 1 column.
Palms (2 pcs.):
Knit ch 3 close in a ring.
1. Double the amount of st.b.s. (6 pcs)
2. Double every 2nd column.
4. Reduce every 2nd column.
Then stuff.
5. Reduce each column to the end.
Fingers (8 pcs.):
1. Link 3 ch. close in a ring.
2. Double 2 columns (5 tbsp).
3. 4. 5. Knit a row without changes.
The fingers are knitted with a thinner thread and hook No. 3.
Sew palms to hands, fingers to palms. Fingers do not need to be stuffed.
Then fill the handles, give them a shape (bend them in the right place and fix the shape with threads - sew) and sew to the tooth.
Brush:
3. Double the amount of st.b.s. (12 pcs.)
Then knit the rows without changes to the desired length, take a wooden stick, wrap it with a padding polyester (if it is too thin), put it in a connected "case" and then reduce the columns to the very end.
Then tie 2 rectangles - red and pink, the size of a brush head.
I got it like this:
Scored 8 v.p. and then knitted 8 rows.
see the following photos.
Then you need to sew a red rectangle to the edge of the brush for 3 sides, then fill the resulting pocket with padding polyester and sew the 4th side to the brush. Sew a pink rectangle up (to red).
We begin to attach the pile (threads) to the brush according to this principle: Every 2 threads must be hooked onto the loops of the head in the same way as you usually attach the kittyki to the scarf.
14. We begin to attach the pile (threads) to the brush according to this principle: Every 2 threads must be hooked onto the loops of the head in the same way as you usually attach the kittyki to the scarf.
In the middle of the brush, I made a pink stripe, and white along the edges.
And you can make it to your liking.
15. We knit a pink stripe and sheathe the pile of the brush around it (as in the photo).
16. Tube of Paste:
1. Link 37 ch. and close in a circle.
2. 3. 4. Knit rows without changes.
5. Reduce every 6th column.
6. 7. 8. 9. 10. 11. Knit the rows without changes.
12. Reduce every 6th column.
13. 14. 15. 16. 17. 18. Knit rows without changes.
19. Reduce 2 columns.
20. 21. 22. 23. 24. 25. Knit the rows without changes.
26. Reduce 2 columns.
27. 28. 29. 30. 31. 32. 33. 34. 35. 36. 37. Knit a row without changes.
38. Reduce 2 columns.
39. - 49. Knit a row without changes.
50. Go pink. Reduce 2 columns.
Then sew up the tube at the bottom and stuff it.
51. Reduce every 3rd column.
52. Reduce every 2nd column - to the end.
Tube cap:
1. Link 3 ch. close in a ring.
2. Double the amount of st.b.s. (6 pcs)
3. Knit a row without changes.
4. Knit a row without changes.
5. Add 1 column.
6. Add 1 column.
7. Knit a row without changes.
Fill the cap and sew it to the tube.
You can also tie a red stripe, sew it to the tube and embroider the name of the paste / the name of the child or something else on it (I embroidered the word Zubik in English). You can also decorate the tube in a different way - to your liking.
I made a skirt and a flower on my head for my tooth, and of course you can decorate your tooth as you like - you can, for example, make him a bow tie or a hat - make him a boy.
So our Zubik is ready.
From "Land of the Masters"
further words of the author


Dear needlewomen, I suggest you tie such a cute tooth together with a toothbrush and a tube of paste. Such a toy will help your child learn to care for their teeth and bring pleasure and joy.
I will be very happy if you get such a tooth.
This is my author's work and idea, and therefore if you knit such a Zubik according to my author's MK and place your photos on the Internet, please be sure to indicate my name as the author of the idea and the MK for which you knitted. Thanks for understanding.
Happy knitting!!!
The toy is quite large (30 cm), but you can take a thinner thread and a smaller hook, and the Tooth will also be smaller.
Acrylic yarn.
Yarn consumption: white-200 gr, a little orange (for a skirt and flower), yellow (for the middle of the flower), red and pink (for paste and brush), blue (for the muzzle).
Hook number 4.5.
Upper part of the tooth (4 identical parts):
Knit ch 3 close in a ring.
3. Knit a row doubling through 1 column.
4. Knit a row doubling through 1 column.
5, Knit a row doubling through 1 column.
6. Knit a row without changes.
7. Double every 3rd column.
8. Knit a row without changes.
9. Knit a row without changes.
10. Double every 5th column.
11. Knit a row without changes.
12. Knit a row without changes.

So 4 identical parts are ready.

8
Now you need to sew together all 4 parts (as in the photo).
Stitching takes place with the same thread as knitting.

9.
10.
11.
We begin to knit from the top of the tooth to the body of the tooth.
Tooth body:
1. We reduce 8 columns - along the edges of the tooth - 4 pcs. and between the details of the top of the tooth - 4 pcs.
2. Knit a row without changes.
3. Reduce every 6th column.
4. 5. 6. 7. 8. Knit the rows without changes.
9. Reduce every 5th column.
10. 11. 12. 13. 14. Knit rows without changes.
15. Reduce every 5th column.
16. 17. 18. 19. 20. Knit the rows without changes.

12
Here's what happened.
13.
14.
Next, we knit a circle and stripes for the bottom of the tooth:
A circle:
Knit ch 3 close in a ring.
1. Double the amount of st.b.s. (6 pcs)
2. Double the amount of st.b.s. (12 pcs.)
3. Double every 2nd column (through one).
4. Double every 2nd column (through one).
Stripes (4 pcs.):
1. Link 10 ch.
Knit an additional 4 rows.
15
We sew the stripes to the circle - in the same way as in the photo.

16.
We sew the other sides of the stripes to the body of the tooth (as in the photo). We try to sew so that the holes for future legs are approximately the same.
We fix all sides except one (in the photo one side is not fixed - where the needle is), so that it would be convenient to fill the tooth.

We fill the tooth with a synthetic winterizer and give it a shape. Then we sew the remaining unsewn edge of the strip (as in the photo).
34.
35.
36
We begin to knit the legs (straight from the torso).
Legs (4 pcs.):
1. We knit 30 stbn around the hole (this amount should be self-pulling).
If you have 29 columns in one leg and 31 in the other - it's not scary - you just need to add or subtract 1 or 2 tbsp. so that all 4 legs are the same for further knitting.
7. Reduce every 6th column.
13. Reduce every 6th column.
14. 15. 16. Knit rows without changes.
Fill the legs (as in the following photos).
17. Reduce every 2nd column (through 1) (to the very end).
.
37.
38.
39
Here's what happened.

40
Here is the body and our tooth is ready.
.
41
Eyes:
Protein:
Knit ch 3 close in a ring.
1. Double the amount of st.b.s. (6 pcs)
2. Double the amount of st.b.s. (12 pcs.)
4. Knit without changes with a semi-column of blue.
Blue pupil:
Knit ch 3 close in a ring.
1. Double the amount of st.b.s. (6 pcs)
2. Double the amount of st.b.s. (12 pcs.)
3. Double every 2nd column (through 1)
Black pupil:
Knit ch 3 close in a ring.
1. Double the amount of st.b.s. (6 pcs)
2. Double the amount of st.b.s. (12 pcs.)
Blue and black pupils are knitted with a thinner thread and hook No. 3.
Nose:
Knit ch 3 close in a ring.
1. Double the amount of st.b.s. (6 pcs)
2. Double the amount of st.b.s. (12 pcs.)
3. Double every 2nd column (through 1).
4. Double every 2nd column (through 1).
.
42.
Sew the pupils of the eyes on the whites, collect the nose with a needle and thread along the edges, tighten, fill and sew to the tooth (eyes and nose).
Then embroider the eyelashes and mouth with the same threads (blue).

43
Handles (2 pcs.):
1. Link 20 ch. close in a ring.
2. 3. 4. 5. 6. Knit the rows without changes.
7. Reduce 3 columns - evenly.
8. 9. 10. 11. 12. Knit rows without changes.
13. Reduce every 4th column.
14. 15. 16. 17. 18. Knit the rows without changes.
19. Reduce every 4th column.
20. 21. 22. 23. Knit rows without changes.
24. Reduce 1 column.
Palms (2 pcs.):
Knit ch 3 close in a ring.
1. Double the amount of st.b.s. (6 pcs)
2. Double every 2nd column.
4. Reduce every 2nd column.
Then stuff.
5. Reduce each column to the end.
Fingers (8 pcs.):
1. Link 3 ch. close in a ring.
2. Double 2 columns (5 tbsp).
3. 4. 5. Knit a row without changes.
The fingers are knitted with a thinner thread and hook No. 3.
.
44. Sew palms to hands, fingers to palms. Fingers do not need to be stuffed.
Then fill the handles, give them a shape (bend them in the right place and fix the shape with threads - sew) and sew to the tooth 
45
Brush:
3. Double the amount of st.b.s. (12 pcs.)
Then knit the rows without changes to the desired length, take a wooden stick, wrap it with a padding polyester (if it is too thin), put it in a connected "case" and then reduce the columns to the very end.
Then tie 2 rectangles - red and pink, the size of a brush head.
I got it like this:
Scored 8 v.p. and then knitted 8 rows.
see the following photos.
Then you need to sew a red rectangle to the edge of the brush for 3 sides, then fill the resulting pocket with padding polyester and sew the 4th side to the brush. Sew a pink rectangle up (to red).
46.
47.
48.
49.
50
We begin to attach the pile (threads) to the brush according to this principle: Every 2 threads must be hooked onto the loops of the head in the same way as you usually attach the kittyki to the scarf.
In the middle of the brush, I made a pink stripe, and white along the edges.
And you can make it to your liking.
.
51.
We knit a pink stripe and sheathe the pile of the brush around it (as in the photo).
Tube of paste:
1. Link 37 ch. and close in a circle.
2. 3. 4. Knit rows without changes.
5. Reduce every 6th column.
6. 7. 8. 9. 10. 11. Knit the rows without changes.
12. Reduce every 6th column.
13. 14. 15. 16. 17. 18. Knit rows without changes.
19. Reduce 2 columns.
20. 21. 22. 23. 24. 25. Knit the rows without changes.
26. Reduce 2 columns.
27. 28. 29. 30. 31. 32. 33. 34. 35. 36. 37. Knit a row without changes.
38. Reduce 2 columns.
39. - 49. Knit a row without changes.
50. Go pink. Reduce 2 columns.
Then sew up the tube at the bottom and stuff it.
51. Reduce every 3rd column.
52. Reduce every 2nd column - to the end.
Tube cap:
1. Link 3 ch. close in a ring.
2. Double the amount of st.b.s. (6 pcs)
3. Knit a row without changes.
4. Knit a row without changes.
5. Add 1 column.
6. Add 1 column.
7. Knit a row without changes.
Fill the cap and sew it to the tube.
You can also tie a red stripe, sew it to the tube and embroider the name of the paste / the name of the child or something else on it (I embroidered the word Zubik in English). You can also decorate the tube in a different way - to your liking.
I made a skirt and a flower on my head for my tooth, and of course you can decorate your tooth as you like - you can, for example, make him a bow tie or a hat - make him a boy.
10 years spent by the firm " RegAdvisor"in the Moscow market of legal and accounting services allowed the company to identify the most urgent needs of business people and provide these services at the highest level, in particular - to create a catalog in which you can choose at a reasonable price already, with the necessary package of documents and the opportunity to start working already the next day!See screenshots below.


From "Land of the Masters"
further words of the author
Dear needlewomen, I suggest you tie such a cute tooth together with a toothbrush and a tube of paste. Such a toy will help your child learn to care for their teeth and bring pleasure and joy.
I will be very happy if you get such a tooth.
This is my author's work and idea, and therefore if you knit such a Zubik according to my author's MK and place your photos on the Internet, please be sure to indicate my name as the author of the idea and the MK for which you knitted. Thanks for understanding.
Happy knitting!!!
The toy is quite large (30 cm), but you can take a thinner thread and a smaller hook, and the Tooth will also be smaller.
Acrylic yarn.
Yarn consumption: white-200 gr, a little orange (for a skirt and flower), yellow (for the middle of the flower), red and pink (for paste and brush), blue (for the muzzle).
Hook number 4.5.
Upper part of the tooth (4 identical parts):
Knit ch 3 close in a ring.
3. Knit a row doubling through 1 column.
4. Knit a row doubling through 1 column.
5, Knit a row doubling through 1 column.
6. Knit a row without changes.
7. Double every 3rd column.
8. Knit a row without changes.
9. Knit a row without changes.
10. Double every 5th column.
11. Knit a row without changes.
12. Knit a row without changes.
So 4 identical parts are ready.
8
Now you need to sew together all 4 parts (as in the photo).
Stitching takes place with the same thread as knitting.
9.
10.
11.
We begin to knit from the top of the tooth to the body of the tooth.
Tooth body:
1. We reduce 8 columns - along the edges of the tooth - 4 pcs. and between the details of the top of the tooth - 4 pcs.
2. Knit a row without changes.
3. Reduce every 6th column.
4. 5. 6. 7. 8. Knit the rows without changes.
9. Reduce every 5th column.
10. 11. 12. 13. 14. Knit rows without changes.
15. Reduce every 5th column.
16. 17. 18. 19. 20. Knit the rows without changes.
12
Here's what happened.
13.
14.
Next, we knit a circle and stripes for the bottom of the tooth:
A circle:
Knit ch 3 close in a ring.
1. Double the amount of st.b.s. (6 pcs)
2. Double the amount of st.b.s. (12 pcs.)
3. Double every 2nd column (through one).
4. Double every 2nd column (through one).
Stripes (4 pcs.):
1. Link 10 ch.
Knit an additional 4 rows.
15
We sew the stripes to the circle - in the same way as in the photo.
16.
We sew the other sides of the stripes to the body of the tooth (as in the photo). We try to sew so that the holes for future legs are approximately the same.
We fix all sides except one (in the photo one side is not fixed - where the needle is), so that it would be convenient to fill the tooth.
We fill the tooth with a synthetic winterizer and give it a shape. Then we sew the remaining unsewn edge of the strip (as in the photo).
34.
35.
36
We begin to knit the legs (straight from the torso).
Legs (4 pcs.):
1. We knit 30 stbn around the hole (this amount should be self-pulling).
If you have 29 columns in one leg and 31 in the other - it's not scary - you just need to add or subtract 1 or 2 tbsp. so that all 4 legs are the same for further knitting.
7. Reduce every 6th column.
13. Reduce every 6th column.
14. 15. 16. Knit rows without changes.
Fill the legs (as in the following photos).
17. Reduce every 2nd column (through 1) (to the very end).
.
37.
38.
39
Here's what happened.
40
Here is the body and our tooth is ready.
.
41
Eyes:
Protein:
Knit ch 3 close in a ring.
1. Double the amount of st.b.s. (6 pcs)
2. Double the amount of st.b.s. (12 pcs.)
4. Knit without changes with a semi-column of blue.
Blue pupil:
Knit ch 3 close in a ring.
1. Double the amount of st.b.s. (6 pcs)
2. Double the amount of st.b.s. (12 pcs.)
3. Double every 2nd column (through 1)
Black pupil:
Knit ch 3 close in a ring.
1. Double the amount of st.b.s. (6 pcs)
2. Double the amount of st.b.s. (12 pcs.)
Blue and black pupils are knitted with a thinner thread and hook No. 3.
Nose:
Knit ch 3 close in a ring.
1. Double the amount of st.b.s. (6 pcs)
2. Double the amount of st.b.s. (12 pcs.)
3. Double every 2nd column (through 1).
4. Double every 2nd column (through 1).
.
42.
Sew the pupils of the eyes on the whites, collect the nose with a needle and thread along the edges, tighten, fill and sew to the tooth (eyes and nose).
Then embroider the eyelashes and mouth with the same threads (blue).
43
Handles (2 pcs.):
1. Link 20 ch. close in a ring.
2. 3. 4. 5. 6. Knit the rows without changes.
7. Reduce 3 columns - evenly.
8. 9. 10. 11. 12. Knit rows without changes.
13. Reduce every 4th column.
14. 15. 16. 17. 18. Knit the rows without changes.
19. Reduce every 4th column.
20. 21. 22. 23. Knit rows without changes.
24. Reduce 1 column.
Palms (2 pcs.):
Knit ch 3 close in a ring.
1. Double the amount of st.b.s. (6 pcs)
2. Double every 2nd column.
4. Reduce every 2nd column.
Then stuff.
5. Reduce each column to the end.
Fingers (8 pcs.):
1. Link 3 ch. close in a ring.
2. Double 2 columns (5 tbsp).
3. 4. 5. Knit a row without changes.
The fingers are knitted with a thinner thread and hook No. 3.
.
44. Sew palms to hands, fingers to palms. Fingers do not need to be stuffed.
Then fill the handles, give them a shape (bend them in the right place and fix the shape with threads - sew) and sew to the tooth
45
Brush:
3. Double the amount of st.b.s. (12 pcs.)
Then knit the rows without changes to the desired length, take a wooden stick, wrap it with a padding polyester (if it is too thin), put it in a connected "case" and then reduce the columns to the very end.
Then tie 2 rectangles - red and pink, the size of a brush head.
I got it like this:
Scored 8 v.p. and then knitted 8 rows.
see the following photos.
Then you need to sew a red rectangle to the edge of the brush for 3 sides, then fill the resulting pocket with padding polyester and sew the 4th side to the brush. Sew a pink rectangle up (to red).
46.
47.
48.
49.
50
We begin to attach the pile (threads) to the brush according to this principle: Every 2 threads must be hooked onto the loops of the head in the same way as you usually attach the kittyki to the scarf.
In the middle of the brush, I made a pink stripe, and white along the edges.
And you can make it to your liking.
.
51.
We knit a pink stripe and sheathe the pile of the brush around it (as in the photo).
Tube of paste:
1. Link 37 ch. and close in a circle.
2. 3. 4. Knit rows without changes.
5. Reduce every 6th column.
6. 7. 8. 9. 10. 11. Knit the rows without changes.
12. Reduce every 6th column.
13. 14. 15. 16. 17. 18. Knit rows without changes.
19. Reduce 2 columns.
20. 21. 22. 23. 24. 25. Knit the rows without changes.
26. Reduce 2 columns.
27. 28. 29. 30. 31. 32. 33. 34. 35. 36. 37. Knit a row without changes.
38. Reduce 2 columns.
39. - 49. Knit a row without changes.
50. Go pink. Reduce 2 columns.
Then sew up the tube at the bottom and stuff it.
51. Reduce every 3rd column.
52. Reduce every 2nd column - to the end.
Tube cap:
1. Link 3 ch. close in a ring.
2. Double the amount of st.b.s. (6 pcs)
3. Knit a row without changes.
4. Knit a row without changes.
5. Add 1 column.
6. Add 1 column.
7. Knit a row without changes.
Fill the cap and sew it to the tube.
You can also tie a red stripe, sew it to the tube and embroider the name of the paste / the name of the child or something else on it (I embroidered the word Zubik in English). You can also decorate the tube in a different way - to your liking.
I made a skirt and a flower on my head for my tooth, and of course you can decorate your tooth as you like - you can, for example, make him a bow tie or a hat - make him a boy.
10 years spent by the firm " RegAdvisor"on the Moscow market of legal and accounting services allowed the company to identify the most urgent needs of business people and provide these services at the highest level, in particular, to create a catalog in which you can choose ready-made LLCs at a reasonable price, with the necessary package of documents and the opportunity to start work the very next day!See screenshots below.