Children's crocheted blouse for girls. Crochet blouse with patterns for girls (examples for different ages). A simple version of knitting a blouse for beginners: video mk
Even those who are just starting to crochet can knit this crocheted blouse. You can knit a blouse from yarn of any color. In our case, acrylic yarn was used of blue color, but you can also use yarn to crochet this baby blouse Pink colour, and light green, and red - any!
Regarding the composition of the yarn, give preference to acrylic, since it does not cause allergies, and in terms of thermal properties it is in no way inferior to wool yarn. This blouse is suitable for both boys and girls, because there are no fundamental distinctive features in the clasp. Our description contains data that corresponds to a knitted blouse for a child aged from one year to one and a half to two years. If you want to knit a blouse bigger size, first calculate the loops in accordance with subsequent decreases in the armhole and neck area for the front and back parts and increases for the sleeve parts.
Children's knitted blouse for 12-18 months (1 year - 1.5 years)
Crochet baby blouses: materials for knitting
Take 150 grams of medium thickness acrylic yarn of any color
Select the hook number according to the thickness of the yarn. We have a hook with a diameter of 1.5 and 2 mm.
When knitting a blouse for a 1-year-old child, you need to be able to make the following types of loops:
- Air loop and chain of air loops (you can find out how to perform a chain of air loops here)
- Single crochet
- Double crochet
- Embossed double crochet (same as concave double crochet)
- Embossed double crochet, purl (same as convex double crochet)
Using these types of loops, ordered in a certain way, you can get a knitting pattern for a relief elastic band (shown in diagram No. 1) and the main pattern for knitting our children's blouse (see diagram No. 2).


Knitting density of a children's blouse
Before starting knitting, knit test samples according to the indicated patterns. Count the number of loops per 10 cm in length. You should have 20 loops. If you get more, then take a hook of a slightly smaller number, if less, then a slightly larger one and knit the test samples again.
Crochet children's blouses with description
Crochet children's blouses: back detail
Take the thinner hook and use it to make a chain of 60 air. loops Knit these loops for 5 cm with a pattern according to the first pattern (this will be an elastic band consisting of relief columns). After this, we take a thicker hook and knit it with the main pattern, that is, according to the second pattern. We knit this way for 20 cm and in order to make recesses for the armholes we close 4 loops on each edge and continue to knit further as before. When the child's back detail knitted blouse will be equal to 37 cm from the air chain cast on at the very beginning, then we finish and move on to knitting the front part of the blouse.
Crochet baby blouses: front detail
We crochet the front of the baby's blouse in the same way as the back. In the same way, upon reaching a height of 25 cm from the start of knitting, we close the loops to form recesses for the armholes and continue knitting further in exactly the same pattern. The difference in execution with the back will be the presence of a cut on the front. For this, at the same height as when forming the recesses for the armholes (that is, at a height of 25 cm from the beginning of crocheting the front of the children's blouse), close 4 loops in the center. As a result, our front part will be divided into two equal parts. We will knit these parts equally for another 10 cm. Upon reaching a height equal to 35 cm from the start of work on the front part, to form a neckline on each half from the side of the cut, cast off 2 times 5 stitches in each row. When the front part is equal to the height of the back part, that is, 37 cm, we finish knitting and move on to knitting the sleeves.
Crochet children's blouses: detail Sleeves
Again, we begin to knit with a thinner crochet, making a chain of 40 air loops and knitting it 4 cm with a relief pattern according to pattern No. 1. After this, we continue knitting with the main pattern according to pattern No. 2 with a thicker crochet hook. At the same time, we perform extensions, adding, starting from the 2nd row, in every 4th row 4 times 1 stitch. When the sleeve height of a knitted children's blouse reaches 25 cm from the start of knitting, we knit another 2 cm straight and upon reaching 27 cm from the start of knitting, we finish knitting the sleeve and proceed to knitting the second sleeve, which we will knit similarly to the first.
Sewing the details of a crocheted baby blouse
First we sew the front and back parts. After this, we sew seams on each sleeve and sew the sleeves into the armholes.
We knit a placket along the edge of the front cut
We take a thinner hook, insert it into the loops along the edge of the cut and, picking up all the loops, knit 2 cm with a relief pattern in accordance with diagram No. 1. We make strips along the edge of the cut on both sides. Sew the bottom edges of the strips, placing the right side strip over the left side strip.
Knitting a collar
Using a thinner hook, we pick up all the loops along the edge of the neckline (there should be 56 loops) and knit with a relief pattern according to pattern No. 1 until the height of the collar is 10 cm. We tie the fastener strips and the collar by making 1 row with single crochets.


The described blouse is very warm and beautiful. In order to knit such a blouse, you will need four hundred and twenty grams of 100% cotton yarn, and you can add silk fuchsia thread. A hook for work will require number three. A diagram of the blouse will be shown below the description. So let's make a blouse together using a crochet hook, which is easy to create for a girl if you follow the diagrams!
We crochet a blouse with patterns and descriptions for a little girl
First you need to cast on a chain of seventy-six chain stitches, adding two more lifting loops and continue knitting with the pattern shown in the diagram. Having reached a height of twenty-seven centimeters for the armholes, close the knitting on both sides with a connecting column of six loops. And the knitting can be closed to a height of forty-three centimeters. Thus, the back is ready.
The front part of the product is knitted in the same way as the back. Having reached a height of twenty-nine centimeters, all knitting must be divided into two parts. And at a height of thirty-eight centimeters, it is necessary to make a neckline, which is shown in diagram 2 after the description of the work. Finish knitting when you reach a height of forty-three centimeters.
In order to make sleeves, you need to cast on a hook a chain of forty-two loops, adding two more air loops, and continue knitting according to the pattern, and then perform an increase according to pattern 3. Finish the work, reaching a width of thirty-two centimeters and a height of thirty-four centimeter
To make a hood, you need to cast on a chain of air loops in the amount of eighty-seven pieces, add two more lifting air loops, and continue knitting the pattern according to the attached pattern. Having reached a height of eighteen centimeters in the middle, you need to reduce one rapport in every second row. Already at a height of twenty-seven centimeters the work can be completed.
Before assembling the product, all parts need to be slightly moistened and allowed to dry thoroughly. Next, you can sew the seams and sew in the sleeves. All cuffs and the bottom edge of the product are tied with two rows of single crochets. And each side of the cut must be tied with three single crochets. The hood is folded in half and the narrower side is sewn together. Then it needs to be sewn to the neck, while tying it with four single crochets. The entire finished trim needs to be slightly tucked and hemmed from the inside out, making it look like a drawstring. You can thread a previously prepared lace into this drawstring. Below are diagrams and patterns that show how to crochet a blouse for a little girl:

Let's try to create an openwork children's model with our own hands
The openwork children's blouse described below is intended for the age of thirteen years. In order to knit it, you will need one hundred and fifty grams of acrylic yarn of two different shades. The crochet hook you need is number two and a half. For decoration you will need small beads, about five grams.
The main pattern is knitted according to pattern 1. All patterns are located after the description of the work.
To make an oblique mesh, a chain of six air loops is cast. The chess pattern is knitted according to pattern 2.
All knitting should be started from the neck down. To do this, you need to cast on a chain of one hundred and twenty air loops, so that it becomes forty-eight centimeters along the entire length of the neck. Next, continue knitting the product in one piece. Knit according to pattern 1, starting from the first and ending with the tenth rows. Thus, there should be twenty-four rapports.
The entire width of the yoke should be twelve centimeters. All ready-made elements of the yoke pattern need to be distributed. For the back and front of the product you need seven repeats, and for the sleeves - five repeats. After distribution, the front part of the product and the back are connected. Continue knitting with a bias net in a spiral. The product is knitted in this way up to the waist.
Before moving on to the frill at the bottom of the product, you need to knit checkerboard pattern four centimeters. After this, knit one row of double crochets and continue knitting another twenty-two repeats of the pattern, starting from the fifth row and ending with the tenth row.
In order to knit the sleeves, you need to make four rows first with an oblique mesh, then two rows with a checkerboard pattern, and finish with one row of double crochets.
The product can be assembled. First you need to tie the collar with a dark thread using three single crochets. The second row is already knitted with a double crochet, while you still need to evenly distribute the beads. The lower part of the blouse is tied with single crochet stitches, and you need to alternate three stitches and a “ring” of air loops in the amount of three pieces. Thus, openwork blouse ready for a girl. Below are the diagrams and pattern according to which you need to knit the patterns:


Video on the topic of the article for beginners
Below you can watch some video tutorials that you will definitely like:
Gone are the days when mothers knitted and sewed at home out of necessity so that family members had something to wear. Nowadays, needlework for women is not a duty, but a pleasure that they discover for themselves. How nice it is to see the fruits of your labor on your sweet child. After all, a thing made with your own hands is unique, there is no other like it. A child dressed in a suit or dress made by his mother’s caring hands feels special and dearly loved. A stylish crocheted blouse for a little girl is an alternative to expensive warm blouses from the store. It will become especially relevant in cold weather. Blouse designs, crocheted, many, but let's look at at least one example for a girl.
Learn to crochet a blouse for a girl with patterns
The provided openwork children's blouse is original in that it has a lace pattern and a crochet yoke for a 10-11 year old girl.
The density of the pattern will be 17 loops per 15 rows.
- Let's prepare necessary materials. We will need yarn - 350-400 grams, which contains wool, a hook number 4 and buttons that you like.
- Let's consider schemes 1 and 2.
On them, the pattern begins with a double crochet and a double crochet.
- We begin to knit the part from top to bottom and back again from the middle of the front. We cast on 77-85-85-92-100 chain stitches and knit the row as follows. We knit a double crochet into the second chain stitch, and we knit another double crochet into the next 5-3-3-5-3 chain stitches. Then we remove one chain stitch, knit a double crochet in every 4th chain stitch and repeat this until the end of the row. After this, we should have the following number of double crochets: 63-69-69-75-81. Remember that 1 chain stitch at the beginning of the row is equal to one double crochet.
Next, we begin to insert markers. These could be pins or paper clips. The first marker is inserted after 5-6-4-5-6 stitches, then 13-14-15-16-7 markers are inserted after every 4 stitches. In total, 6-7-5-6-7 loops remain from the last marker. In each row we repeat the increments in the following sequence - 5-5-3-3-2 times, and in every fourth row 0-0-2-2-3 times. The total now is 147-159-165-177-189 loops.
Perform increments as follows. Knit 2 loops in 1. The first time from all the markers in the row, the next time - also from all the markers in the row, but on the other side. Make increments before and after markers.

We look at pattern A2 and knit 1 double crochet in each of the 4 double crochets, then on the next 7 double crochets, based on pattern “a”. Then we look at pattern “b” and knit until there are 10 double crochets left. Using pattern “c” we work on the next six double crochets and one double crochet.
Let's move on to diagram 1. It must be read vertically. In the first two rows, the first and last 4 double crochets on each side are knitted. Then we make increases again near the markers in the 4th row. In the 7th row we begin to evenly add 16-13-16-15-12 stitches. The total is 177-187-197-209-219 loops.
The last row is knitted with 28-30-31-33-34 double crochets, then 6 chain stitches (they are necessary for further knitting of the sleeve), 36-38-40-43-45 double crochets are skipped, then 49-51-55 are worked. -57-61 double crochets, again 6 chain stitches and again skip 36-38-40-43-45 double crochets. At the end we knit 28-30-31-33-34 double crochets.

Now we have 177-123-129-135-141 loops. We remove the old markers and insert new ones through 3 air loops under the sleeve. We knit the first row according to pattern A 2, and then in the same way according to schemes a, b, c. That is, we knit the first and last 4 loops on each side like a double crochet stitch in the first two rows. Continue pattern A2 until the pattern has been worked 4-4-4-5-5 times after the cokteka. Thus, the height of the product from the armhole becomes 24-24-24-30-30 cm from the armhole. This is still only the smallest size. It is necessary to knit 0-4-6-4-6 cm according to pattern A1 to a product height of 24-28-30-34-36 cm.
- Let's move on to knitting the sleeves.
It is necessary to knit back and forth so that the pattern is identical to the pattern on the shelves. The sleeve will have 42-44-46-49-51 stitches. Start knitting from the marker, and make the first row from the wrong side after three chain stitches. The first row is knitted in a stitch with an increase in each chain stitch. At the same time, evenly reduce the stitches with an increase by 6 loops.
Decreases are made by knitting two stitches together.
The next row is knitted with front side one column with two surcharges in every first 3-1-2-0-1 columns with a surcharge. Next, pattern A 2 is knitted like this: pattern “a” - 7 loops, “b” - until 8-6-7-6-7 loops remain, pattern “c” on the last 6 loops. We finish with one column with two surcharges in each of the last 2-0-1-0-1 columns with a surcharge.

Turn the product and continue knitting. Knit the fourth row according to the pattern and decrease equally by 5-1-3-0-2 loops. This makes a total of 31-37-37-43-43 stitches.
Start pattern A2 again and continue working it down 3-4-4-5-5 times. On the third repeat, decrease 0-6-6-6-6 stitches evenly. You should get 31-31-31-37-37 stitches. And when pattern A2 is knitted 4-5-5-6-6 times on the sleeves, you can continue to knit pattern A1 until the sleeve measures 26-30-32-38-40 cm.
The second sleeve is knitted using the same principle.
- The final stage is the assembly of the product. Sew the sleeves together and then sew the buttons onto the left placket.
The provided diagram, a crocheted blouse for a girl, according to which it was knitted, was clear to everyone, and the product itself is ready! Now the question of how to crochet a stylish blouse will not remain unanswered for you, because you really want to create stylish product for girl.
Today we will learn how to crochet a children's sweater with our own hands. This blouse is universal and will suit both boys and girls, you just need to choose the right colors. A detailed instructions The photo and diagram will tell you how to weave it correctly.
Tools and materials Time: 2-3 days Difficulty: 7/10
- white, blue/pink cotton yarn;
- crochet hook 4 mm;
- buttons – 5 pcs.;
- darning needle for hemming;
- scissors.
A crocheted baby sweater is an excellent solution if you want your baby or toddler to be dressed warmly and tastefully.
To make this blouse you will need a 4 mm or size 6 crochet hook, turquoise or pink yarn as the main color and white for the edging. Regarding the choice of threads - select soft yarn made of cotton, semi-synthetic or with a small amount of wool. Make sure that it is pleasant to the body, does not prick and does not cause irritation.

In this master class, a baby sweater is crocheted in the smallest size, but in the table below you can see that it can be woven for children aged 0 to 24 months. Also, using this table, you can calculate the sizes and amount of yarn you need to crochet a sweater.
Abbreviations:
- v.p. - air loop;
- S.S/N – double crochet;
- S.B/N – single crochet;
- conn. Art. – connecting stitch or half crochet;
- PS.S/N – half double crochet;
- PSSN2vm. – 2 half double crochets together.

Detailed instructions with photos
So, let's start knitting.
Notes
- This manual is intended for smallest size. If you need a crochet sweater for a boy or girl of a different age, size changes in the instructions will be indicated in brackets (), [()].
- Turn 2 ch. do not count as PS.S/N.
Step 1: back
Main color. 41 v.p. (45-49-53).
Row 1: (with the right side of the product facing you). 1 PS.S/N in the third ch. from the hook. 1 PS.S/N in each vp. along the entire length. 2 v.p. U-turn. 39 (43-47-51) PS.S/N.
Row 2: 1 SC.S/N in each stitch to end of row. 2 v.p. U-turn.
3rd and subsequent rows: continue knitting according to the 2nd row pattern until you reach length . Finish with the right side, omitting the ch turn. at the end of the last row.
Back opening. Next row: conn.st. in each of the first 4 loops. 2 v.p. 1 PS.S/N in each stitch until the last 3 stitches. 2 v.p. U-turn. Leave the last stitches unworked. 31 (35-39-43) stitches.
Continue knitting the armhole until you reach length . Finish with the right side, omitting the ch turn. at the end of the last row. Secure.
Step 2: Front Left Side
Main color. 21 ch. (23-25-27).
Row 1: (with the front side of the product facing you). 1 PS.S/N in the 3rd ch. from the hook. 1 PS.S/N in each vp. along the entire length. 2 v.p. U-turn. 19 (21-23-25) PS.S/N.
2nd row: 1 PS.S/N in each loop to the end of the row. 2 v.p. U-turn.
3rd and subsequent rows: Continue knitting according to the 2nd row pattern until you reach length . Finish with the right side and skip a ch. at the end of the last row.
Armhole. Next row: conn.st. in each of the first 4 PS.S/N. 2 v.p. 1 PS.S/N in each stitch to end of row. U-turn. Leave the last stitches unworked. 15 (17-19-21) loops.
Continue knitting the armhole until you reach the length. Finish with the front side.
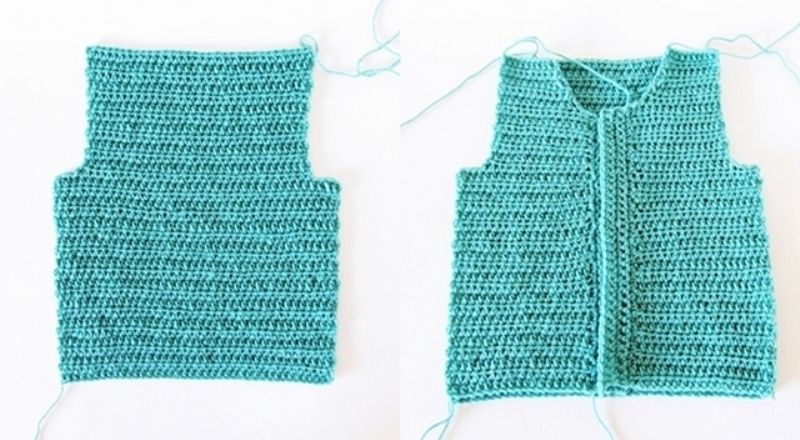
Shape the neck
Row 1: 1 SC.S/N in each stitch to last 3 (3-4-4) stitches. 2 v.p. U-turn. Leave the last stitches unworked. 12 (14-15-17) loops.
Row 2: With the yarn over the hook, pull up a loop in each of the first 2 stitches. Place the yarn over the hook again and pass it through all the loops on the hook, forming PSN2vm. 1 PS.S/N in each stitch to end of row. 2 v.p. U-turn.
3rd row: 1 PS.S/N in each loop to the last 2 loops. PSSN2vm. for the last 2 loops. 2 v.p. U-turn.
Row 4: Repeat row 2 again. 9 (11-12-14) stitches.
Continue knitting until the front is the same length as the back. Finish with the right side, omitting the ch turn. at the end of the last row. Secure.
Step 3: Right Front Side
Tie the same way as left side, but in a mirror image.
Step 4: Sleeves
Main color, ch 29 (31-31-33).
Row 1: (with the front side of the product facing you). 1 PS.S/N in the 3rd ch. from the hook. 1 PS.S/N in each vp. along the entire length. 2 v.p. U-turn. (29-29-31) PS.S/N.
2-3 row: 1 PS.S/N in each loop to the end of the row. 2 v.p. U-turn.
4th row: 2 PS.S/N in the first loop. 1 PS.S/N in each loop to the last stitch. 2 PS.S/N in the last loop. 2 v.p. U-turn.
Rows 5-8: make 3 more rows P.S./N.
Repeat rows 5-8 2 (3-4-4) more times. 33 (37-39-41) stitches. Continue working until you get the length. Mark the end of both sides of the last row with a marker. Make 2 more rows, omitting the ch turn. at the end of the last row. Secure.
Bottom edging:(from the wrong side of the product towards you). Attach white yarn conn. Art. in the lower left corner. 1 v.p. 1 S.B/N in each loop as connecting post. 1 S.B/N in each loop along the entire bottom of the sleeve. 27 (29-29-31) stitches. U-turn.
Version for boys. Next row: ch 1 Working from left to right rather than right to left as usual, work 1 reverse SC in each stitch along the entire length. Secure.
Girls version. Next row: ch 1 1 S.B/N in the first 1 (2-2-0) S.B/N. *1 S.B/N in the next S.B/N. Skip 2 S.B/N. 5 S.S/N in the following S.B/N. Skip 2 S.B/N. Repeat from * to last 2 (3-3-1) stitches. 1 S.B/N in last 2 (3-3-1) S.B/N. Secure.
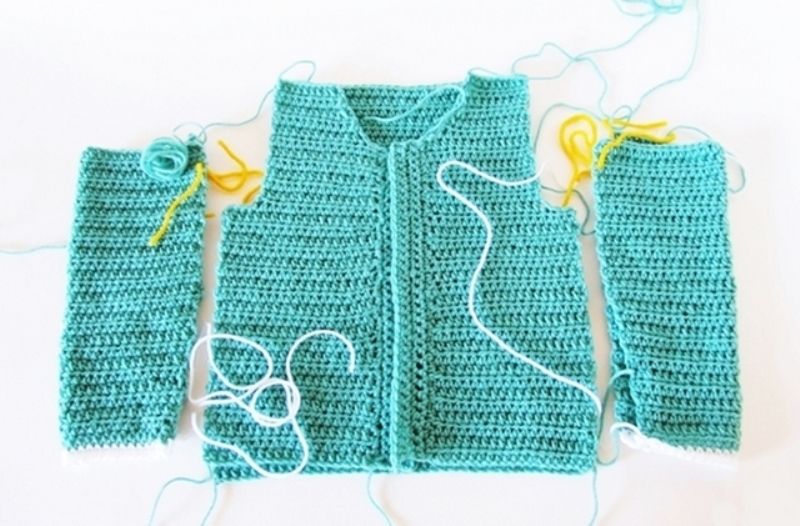
Step 5: Hood
Main color. 77 v.p. (79-81-83).
Row 1: (with the front side of the product facing you). 1 PS.S/N in the 3rd loop from the hook. 1 PS.S/N in each loop along the entire length. 2 v.p. U-turn. 75 (77-79-81) stitches.
2-4 row: 1 PS.S/N in each loop to the end of the row. 2 v.p. U-turn.
5th row: PSSN2vm. for the first 2 loops. 1 PS.S/N in each stitch to last 2 stitches. PSSN2vm. for the last 2 loops. Repeat last row up to 59 (61-63-65) stitches.
Continue working until you get the length. Finish with the right side, omitting the ch turn. at the end of the last row.
Form the back seam. Next 6 rows: connect st. in each of the first 3 stitches, 1 SC.S/N in each stitch to the last 3 stitches. U-turn. Leave the last stitches unworked. 23 (25-27-29) stitches. Secure.

Step 6: finishing
Measure your pieces to ensure they fit. Cover them with a damp cloth and let the cloth dry.
Step 7: Loop Band
1st row: (from the front side of the right front for girls or the left front for boys). Make 34 (38-42-46) S.S/N evenly along neck and bottom edge. 1 v.p. U-turn.
2nd row: 1 S.B/N in each S.B/N along the entire length. 1 v.p. U-turn.
3rd row: 1 S.B/N in each of the first 2 S.B/N. *1 v.p. Skip the next S.B/N. 1 S.B/N in each of the next 6 (7-8-9) S.B/N. Repeat from* 3 times. 1 v.p. Skip the next S.B/N. 1 S.B/N in each of the last 4 S.B/N. 1 v.p. U-turn.
Row 4: 1 S.B/N in each of the first S.B/N. *1 S.B/N in the next missing ch. 1 S.B/N in each of 6 (7-8-9) S.B/N. Repeat from* 3 times. 1 S.B/N in the next missing ch. 1 S.B/N in each of the last 2 S.B/N. 1 v.p. U-turn.
3rd row: 1 S.B/N in each S.B/N along the entire length. Secure.
Step 8: Buttonhole Group
Work on the opposite side from the buttonholes, that is, on the left front side for girls, and on the right front side for boys.
The button side is woven in the same way as the buttonhole group, except for the gaps for the buttonholes. There is no need to do them here.
Shoulder seams
Fold the hood in half along the back seam edge and form a center seam at the back. Pin the edges of the hood to open the neck. Attach buttons or loop strips to the center and weave a matching hood back seam from the center to the back edge of the neck.
Step 9: Edging
On the front side of the product, attach white yarn with a connecting st. in the left side seam. 1 v.p. 1 S.B/N in the same loop as the connection. Art. Make 1 circle of S.B/N along the entire outer edge of the sweater. In the corners knit 3 S.B/N.
Boys version
Next round: ch 1 Working from left to right rather than right to left as usual, make 1 reverse S.B/N in each S.B/N around. Attach connection art. to the first S.B/N. Secure.
Girls version
Next round: ch 1 1 S.B/N in the same loop as the connection st. *Skip 2 S.B/N. 5 S.S/N in the following S.B/N. Skip 2 S.B/N. Repeat from * around. Attach connection art. to the first S.B/N. Secure.

Sew the sleeves above the marker marks along the edge of the armhole. Sew the side seams. In the sleeves, create a gap of 5 cm at the bottom for tucking back. Sew the buttons according to the buttonholes.
A warm crocheted children's jacket for a boy or girl is ready! We wish you good luck!