How to do a manicure at home?
Manicure is one of the procedures for the care of hands and nails. You can do it not only with a specialist, but also on your own, at home.
There are several types of manicure:
- edged (the cuticle is cut off with tweezers or special scissors). This type of manicure is also called classic;
- unedged (the cuticle is not cut off, but moved to the far side of the nail with the help of an orange stick or a device in the form of a spatula);
- hardware manicure.
Well-groomed hands with a neat manicure adorn a woman, but there is not always time to visit a beauty salon. That is why it is useful to know how to make a manicure at home, decorating your nails with an unusual pattern.
How to do a manicure?
Before you start the procedure at home, decide what kind of manicure you will do - edged or unedged. For a classic edging manicure, you will need the following tools: antiseptic, cuticle scissors, fine nail file to shape the nail, polishing file, sanding file, pusher, nippers, bowl of water, clean tissue, sea salt, cuticle softener, hand cream , cotton pads, nail polish remover.
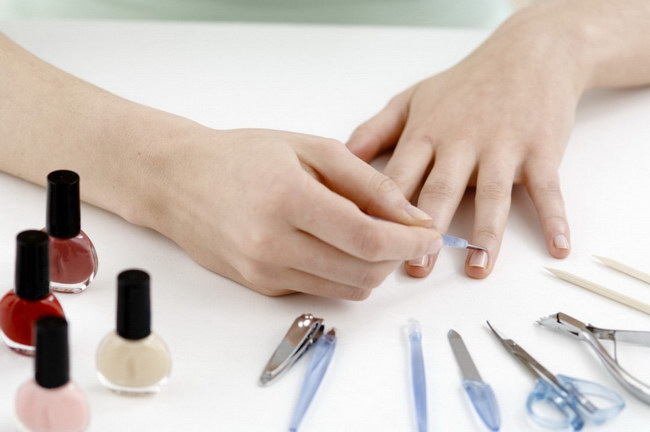
- Remove the remaining varnish from the nail plate. In order for the varnish to be removed easily, press a swab dipped in nail polish remover against the nail for a couple of seconds and hold. Then, moving from the base of the nail to its edge, remove the varnish.
- Shorten the length of the nail. For long nails, it is better to use scissors, and for a slight shortening - a file (so you do not accidentally cut off the excess).
- We file the nails with a fine-grained file. Movements should be in one direction: from the side of the nail to the middle. Then we grind and polish the nails. Remember! Wet or softened nails should not be filed in any case, this will lead to delamination of the nail!
- Apply cuticle softener.
- We make a warm water-salt solution, add a little olive or almond oil to it (the oil will soften the skin of the hands and cuticles) and dip the fingers into the water for about 5 minutes. We take them out and process them one by one, you should start with the little finger, and then in order.
- With a stick, push the cuticle to the base of the nail. If the manicure is edged - carefully cut the cuticle with tweezers in the direction from the edge to the center, without making sharp jerks, with uniform movements in an arc. If the manicure is unedged, we simply push back the cuticle, cleaning the base of the nail from the remnants of the skin. If you get hurt, immediately wash the wound with an antiseptic.
- Do not apply varnish on steamed nails, wait half an hour until they cool down, and then apply the base, varnish and fixer.
A little secret: before applying the chosen color of varnish, cover the nail with a colorless or beige varnish. Wait until it dries, and then cover the nail with the chosen varnish. This trick helps to achieve more saturated colors. If time is short, and the nails are not dry yet, dip your hands in cool water. Water is faster than air to help nail polish set.
The coating should be applied slightly away from the cuticle, and before use, do not shake the bottle with varnish, but roll it between the palms. So you eliminate the appearance of air bubbles in the bottle, which prevent the uniform distribution of varnish.
Another version of the classic edged manicure can be seen in this video.
How to make a beautiful manicure?
Having shown imagination, you can make a manicure at home with an unusual pattern or color. On short nails, a jacket looks great, for medium length, drawings on nails, a manicure with rhinestones are perfect, or, if you don’t tolerate excesses, you can choose an actual summer color by covering the nail with shellac or gel polish. Shellac and gel polish stay on nails perfectly, do not wash off, do not require additional care and look great for several weeks.
Doing your own French manicure (French)
The procedure is best done on pre-prepared nails. So a manicure made at home will not differ from the salon.
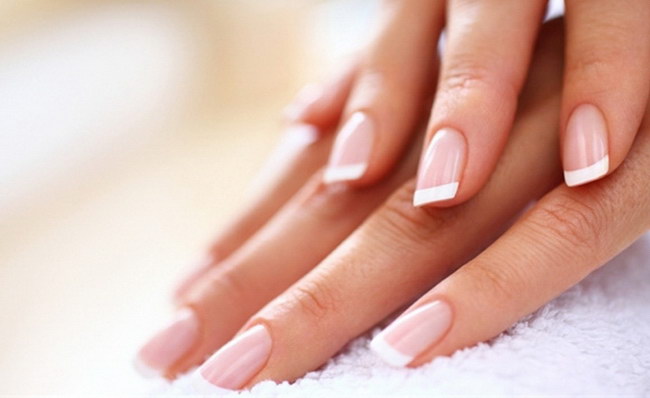
- We take special stencils with which we seal the nail, leaving the edge of the nail no longer than 5 mm long, free.
- We cover the edge of the nail with white varnish.
- We are waiting for the varnish to dry completely.
- We remove the stencil and cover the nail with a transparent varnish of a natural shade. The color of the coating should match the color of the skin. An easy way to keep a French manicure for a long time is to cover it on top with a fixative.
Drawing in the style of "space"
If you want to depict on your nails something more spectacular than a jacket, then you can choose a "space" manicure. To create such a picture, we need a sponge and colored varnishes.

- Apply base coat.
- We form the background with dark varnish (it is better to apply several layers for a more saturated color).
- We apply a little light varnish on the sponge and then press it several times to the nail - this will create a haze.
- With the same sponge, we add bright varnish to the nebula of colors, slightly touching the painted surface to the nail.
- For more effect, you can add glitter.
- Apply the top coat as the last layer.
Unusual drawing with newspaper
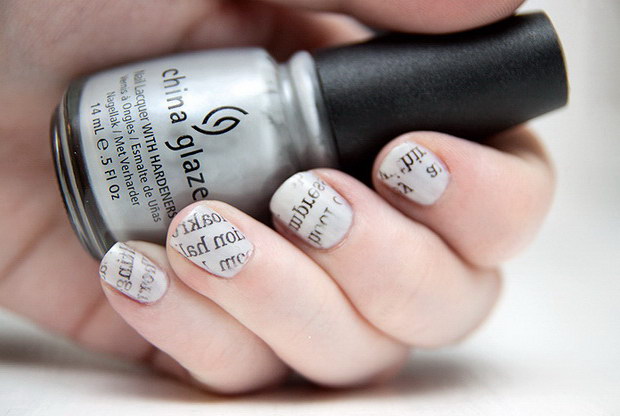
- We prepare pieces of newspapers, which should approximately match the size of the nail plate in size.
- On previously treated nails, apply a uniform layer of white varnish.
- Degrease the surface of the nail.
- Wet the pieces of newspaper with water (not too much, so that the newspaper does not get completely wet) and gently apply the side with the letters to the white varnish.
- We wait 30 seconds and carefully remove the newspaper. If the letters turned out neat - wait until it dries and cover with a fixer on top. If it doesn't work, repeat the procedure.
Ornate drawings on nails with a needle
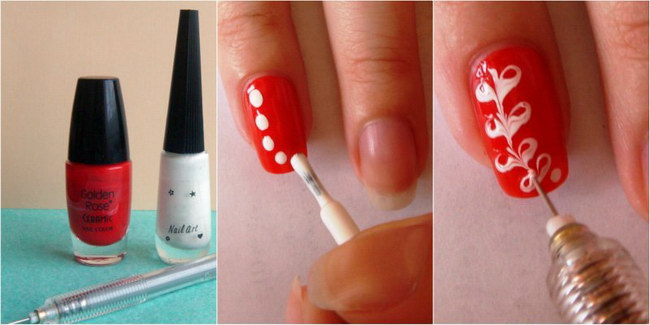
- We cover the nails with a thin layer of base.
- We apply a small drop of varnish for the picture.
- Using a wet varnish, we form the desired pattern with a needle, adding colors if necessary.
- We dry the result.
Diagrams of drawings with a needle. Try combining these patterns to get new patterns.

water manicure
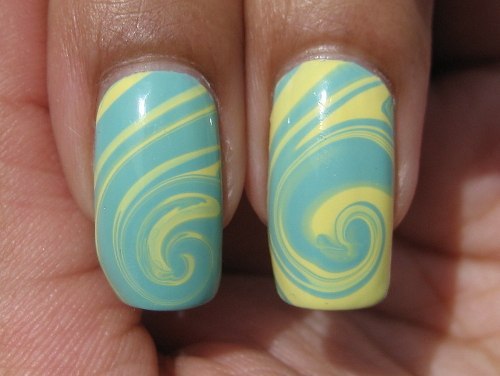
- We apply the main (base) coating on the nails.
- We glue the skin around the nails with adhesive tape or treat with a thick layer of oil.
- Pour water into the container and add varnishes of different colors (5-7 drops each).
- With a stick or a toothpick, we form the desired pattern.
- We lower our finger into the water under the varnish film, hold it a little and pull it out.
- We remove unnecessary lacquer residue from the finger.