Shellac at home for beginners. Stepping through
Women's hands attract the attention of men no less than other parts of the body, so it is important to take care not only of the skin, but also of the nails. Here, a neat and stylish shellac manicure will help women, which can be done in the salon or at home, guided by step-by-step instructions for beginners.
Shellac characteristic
Shellac is a natural product found in nature. This is a resin produced by subtropical and tropical insects, used in the creation of various varnishes, in photography. The product is environmentally friendly, hypoallergenic, it does not contain formaldehyde and toluene.
Shellac is a popular manicure today
CND was the first to use this component in the production of products for natural nails, which developed a unique product that performs the functions of a gel and varnish.
The product quickly gained popularity among women on maternity leave, business women, travelers, all those who have no time to repaint their nails every two or three days.
Shellac features
So loved by the female sex manicure is characterized by such features:
- The ability of this coating to stay on the nail plate from 2 to 3 weeks. This figure depends on the condition of the nails themselves: the harder and stronger they are, the longer the shellac lasts.
- The technique of applying the product is drying all its layers in a special lamp that emits UV rays. Usually such a manicure is done by a professional, but you can use shellac at home, for beginners - a step-by-step guide that will help you choose the right tools and tools.
 The indisputable advantage of shellac is its durability.
 Advantages and disadvantages of gel polish
This product has its positive and negative features that must be considered before applying it. Among shellac benefits worth noting the following:
- Creates a long lasting, durable manicure that can only be erased with a professional tool, therefore, it is not afraid of various chemicals used in everyday life.
- It is harmless to nails, as it is made from a resin of natural origin, does not contain harmful substances that destroy the nail plate (formaldehyde and toluene). Therefore, this coating is suitable for pregnant women or women suffering from allergies.
- Protects the nails from delamination, the appearance of cracks, allows you to make the nail plate stronger, grow it.
- A diverse color palette (more than 100 shades) allows you to create a manicure for any occasion, combine different colors, make beautiful, unusual patterns. Such a manicure will always be unique, it can be limited only by the imagination of a woman.
- Shellac is easily removed at home with a special tool or film. For beginners, there is a step-by-step instruction that allows you to remove the coating without harm to your nails.
 One of the disadvantages of shellac is its high price.
 Despite having many advantages, gel polish has its drawbacks, among which are the following:
- Shellac creates a suitable environment for the development of bacteria that lead to nail diseases. This is due to the fact that due to changes in temperature, the nail plate undergoes various deformations, leading to a violation of the integrity of the coating. Water and dirt can penetrate through the formed cracks, creating good conditions for the development of microbes.
- Covering nails with shellac in the salon is a rather expensive procedure, and the correction of an overgrown nail will be expensive. Applying gel polish at home reduces the cost of the process, but requires skill in covering nails with one hand, in addition, there is a need to purchase special equipment.
- Shellac is not a remedy, therefore, it cannot completely solve the problem of weakened and thin nails, in addition, it does not adhere well to such a nail plate, it can begin to peel off after a few days.
Do not use the product for women suffering from nail fungus, fingers
What resources and tools are needed
To create shellac at home, it is recommended to purchase all the same tools and materials used in the salon. None of the components can be replaced, this will allow beginners to create a beautiful manicure step by step. The list includes the following means and materials:
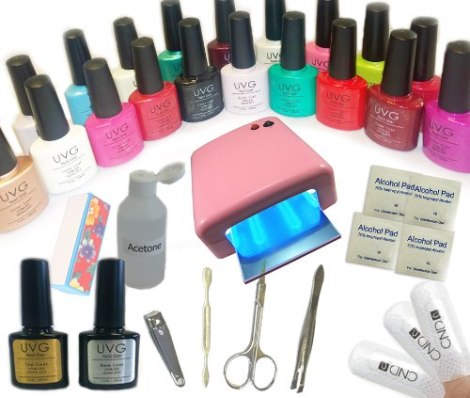 Shellac kit at home
 - hard nail file (220–240 grit), nail clippers, spatula, orange stick, buff;
- cuticle remover;
- brush for dusting nails;
- degreaser;
- lamp with UV rays (36 watts);
- shellac - base, tone, top;
- wipes that do not leave lint;
- adhesive remover.
Choosing materials and tools it is recommended to give preference to the most well-known and trusted companies so that the result only pleases, does not become a disappointment.
Preparing nails for shellac
In order for the coating to fit well on the nails, you must first prepare them. note that gel polish manicure consists of the usual and specific procedures:
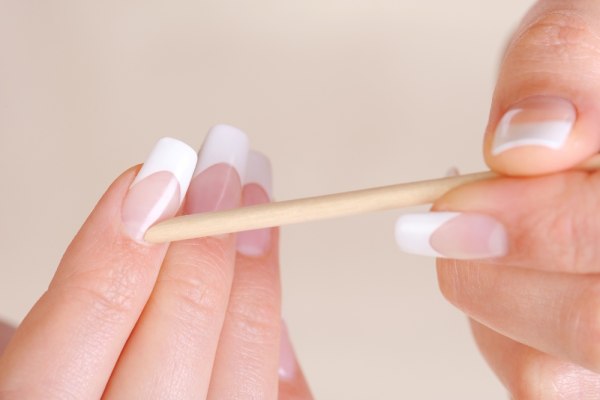 If the cuticle has not grown very well, you can simply push it back with an orange stick
 - Cuticle treatment: carried out in various ways, depending on how much it has grown. Before removing it, you need to make a bath that softens the cuticle and makes it easy to remove. If it has not grown much, then it is enough to push it away with an orange stick. For overgrown cuticles, it is better to use special oil or nail clippers.
- Nail treatment: it is necessary to give an even shape to the nails, treat them with a buff for better adhesion to the coating. Clean your hands of dust with a brush.
Processing the nail plate with a degreaser is a very important step in preparing for a manicure.
It is especially good to treat the sides of the nails with a degreaser.
After applying this product, the nails should not be touched, otherwise the gel polish will not adhere well to the base. The degreaser can be replaced with alcohol wipes, but it is believed that they can affect the quality of the coating not for the better.
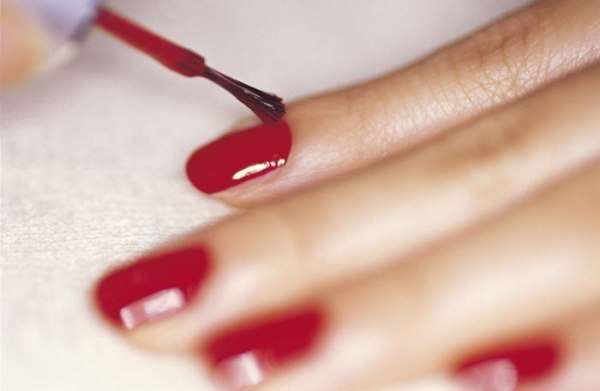
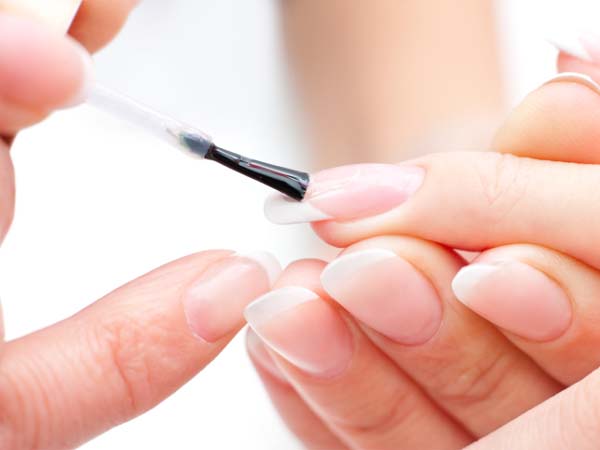
Shellac at home: step by step instructions for beginners
A beautiful manicure can be done not only in the salon. Easy to apply shellac at home. For beginners, a step-by-step guide will help you learn how to apply one color of gel polish, when this skill is mastered, you can try other designs.
The following instructions will help you master the technique of applying shellac:
- Apply a base coat that protects the nail plate. In order for the layer not to be too thick, you need to know the rules for applying the base (this rule also applies to applying other coatings): first, the edges of the nail are painted over, then only the middle, the last touch is sealing the tip of the nail, so the layers will stick better. Drying nails in a UV or LED lamp, the time in the first should be one minute, in the second 12 seconds.
 After processing the cuticle, a base coat is applied to the nails.
 - The main coat is applied according to the same rule as the base coat, but the tips do not need to be painted over. The shellac layer should be as thin as possible. Pro tip: before applying the product, it is recommended to roll the bottle several times in the palm of your hand to better distribute the pigment.
- Drying the color layer in the lamp, drying time 1-2 minutes. If during drying the gel polish swells, then the whole process must be started all over again, with degreasing.
- Applying a second layer of the base, which will create a brighter and more saturated color, if a translucent effect is needed, then this item can be skipped. The second layer of coating should be slightly thicker than the first.
- Drying the new layer with UV rays for 2 minutes.
- The finishing or top coat is applied in the thickest layer. The last layer is dried in the same way as the previous one - 2 minutes.
- The resulting sticky layer is removed with a lint-free cloth and a professional tool, alcohol can also be used, but it can deprive the shellac of its gloss and shine.
It is important to understand that such a step-by-step instruction for applying shellac at home is quite simple, but for beginners it can be quite complicated. Don’t worry if it doesn’t work out right away, the skill will definitely come with time.
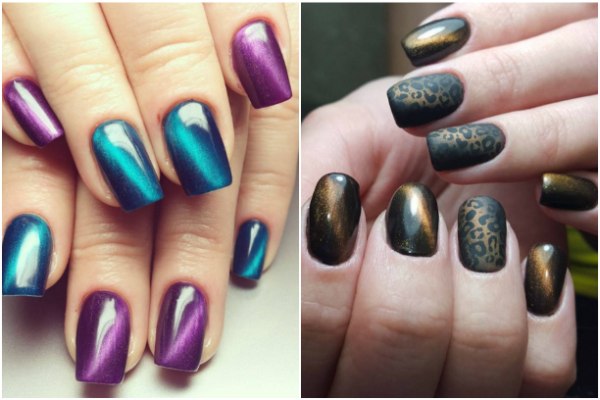 Manicure "Cat's eye" - a popular trend in nail design today
 How to make fashionable shellac "Cat's eye"
A popular manicure this season is the “Cat's Eye”, which got its name from the similarity with the stone of the same name. Such nails look very beautiful and noble. You can create a Cat's Eye manicure at home, because the whole secret is in a special magnet.
For this design, you will need the same tools as with a regular gel polish, the difference will be in the shellac itself - you need to buy a special magnetic tool that comes with a magnet.
The process of creating a fashionable manicure consists of the following steps:
- Preparation of the nail plate and cuticle.
- Treatment of nails with a degreaser.
- Applying a base leveling coat, drying it in a lamp.
- Covering one nail with a colored layer of shellac, drying it in a lamp.
- Applying a second color layer on the same nail plate.
- Creating a design with a magnet, for this it is brought to the painted surface so as not to touch it (about 3 mm from the nail). It is recommended to hold the magnet for 5-10 seconds, during this period the necessary pattern is created. Drying the nail in the lamp.
- Applying a finish coat, drying.
- Removal of the resulting sticky layer.
All other nails are processed using this technology. To make the manicure sparkle even more, it can be additionally decorated with rhinestones.
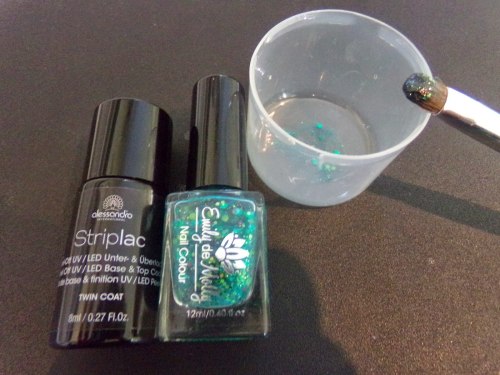 In order for the glitter shellac to be uniform, pre-mix the glitter gel polish
 Secrets of using shellac at home
Making nails beautiful is not so easy if you use shellac at home. For beginners, step-by-step instructions may not be enough, for the reason that they do not know some of the secrets that are available to professionals. To get the desired result, experts recommend the following:
- For a uniform and even distribution of sparkles on the nails, you need to mix them with a small amount of gel polish, mix everything well and only then apply the sparkles in a second layer on the nail plate.
- For the best result, it is recommended to apply shellac in a thin layer, and you do not need to paint over the cuticle, otherwise the look of the manicure will be sloppy.
- To create a French manicure, you should not use a stencil, because after drying it can no longer be removed, and if removed from a wet coating, the border will spread.
- When using shellac as a build-up, there is no need to completely cut off the nail plate, just sand it a little.
Rules for removing gel polish from nails
The use of shellac at home involves not only its correct application, but also requires knowledge of how to remove gel polish. The usual nail polish remover will not help here, you must use professional tools, in addition, it is important to know the procedure itself, which consists of certain step-by-step recommendations for beginners.
To remove gel polish, you need to prepare five discs of cotton, cut into two pieces, ten squares of foil, the size of which should be able to wrap a finger, a special tool, orange sticks and a buff.
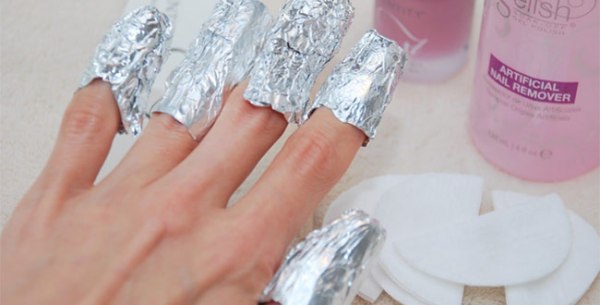 To remove shellac at home, you need foil
 The shellac removal procedure includes the following steps:
- The discs must be wetted with a gel polish remover and applied to the nail plates.
- Wrap each nail with a disc in foil, leave for 5-7 minutes.
- Remove everything from your fingers, remove the remnants of the product with an orange stick.
- If shellac is difficult to remove, it is recommended to hold the soaked cotton wool a little more or rub it lightly.
- Treat the nails with a buff for the final removal of gel polish.
- Make a relaxing bath, rub any care product for hands and nails.
solvents and their analogues should not be used to remove shellac
Thus, you can make shellac yourself at home. For beginners, a step-by-step guide will help you comprehend the intricacies of this process, learn the secrets of professionals, and create a beautiful and original manicure on your nails.
Beauty to you and your nails.
Step by step video on how to make shellac at home:
Useful video on how to remove shellac at home:
Video, which reveals the reasons for the instability of shellac: