How to make shellac at home: photos, videos, step-by-step lessons on non-carrying
Shellac has established itself instantly in the fashion world, and therefore women still do not stop asking questions about what it is and how to properly cover their nails. This is a persistent composition that guarantees the preservation of the original color and shine of nails for several weeks, it is not at all difficult to use it if you have the skill. The regrowth of the nail plate is the only inconvenience that forces you to remove shellac, otherwise it could be worn throughout life, it is so tightly fixed on the surface of the nail.
Instant application of shellac, which can be done step by step at home, is another unconditional convenience that attracts women. Now painting your nails will not seem like a problem, as before, because you have found a way to deal with peeling varnish! Try working with shellac for a fun manicure experience. Step-by-step instructions and useful tips from the wizard are the best training in this matter, you will find all this in the article below.
What you need: tools, materials
The description presented specific materials for applying shellac, and the photo shows a complete kit that every woman should have. 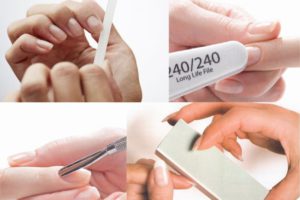
- Shellac. A simple application technology will allow you to make a manicure yourself very quickly, and a large color palette will meet the requirements of the most demanding fashionistas. A combination of two or more colors in one manicure will look especially impressive.
- Base coverage. Protects nails and promotes their high-quality adhesion to colored varnish.
- Top cover. Gives nails a healthy shine and ensures the durability of the coating for two weeks without cracks and chips.
- Ultraviolet lamp. Allows you to instantly dry any composition on a gel basis. The recommended power is at least 36 watts.
- Buff. Eliminates micro-cracks and allows free removal of excess skin.
- Degreaser. Eliminates excess oil from nails. After applying this composition, it is strictly forbidden to touch it with your hands, otherwise applying shellac at home will be useless.
That's all you need for homemade shellac!
How to properly prepare your nails
Sometimes the preparation of nails takes much more time than the stages of applying varnish. A woman who takes care of her hands every week will complete the preparatory steps with pleasure.
If you are wondering where to start, it is important to know that before each manicure, you should steam the skin of your hands, which is done in warm water with the addition of any soap-based cosmetic product. The addition of any strengthening oil that protects the nail plate and stimulates its growth is welcome.
Push back cuticles with an orange stick or metal pusher. Preference should be given to wooden tools that scratch the nail plate less. After that, the steamed cuticle is easily trimmed with forceps and does not spoil the appearance of the nails.
Give your nails the same shape. The varnish looks good on both square and rounded shapes.
Try to give up nippers and scissors and use a nail file so as not to damage the nail plate.
Polish your nails. All irregularities can be eliminated with a soft nail file. Buff, by the way, helps to remove excess fat and makes the nail plate matte. Following this order, you will prepare your nails for high-quality shellac, which will last on the nails for at least two weeks.
Also see a very good preparation video, the steps here are slightly different from the ones above, and they complement each other:
Proper application of shellac at home in 5 steps
Application technology is a simple procedure, but very responsible, because if you miss at least one stage, the manicure can be considered spoiled. Shellac at home is applied to prepared nails of the same length, if possible with a minimum amount of free edge. A visual photo will demonstrate how to make shellac, and a detailed description below will tell you about all the nuances.
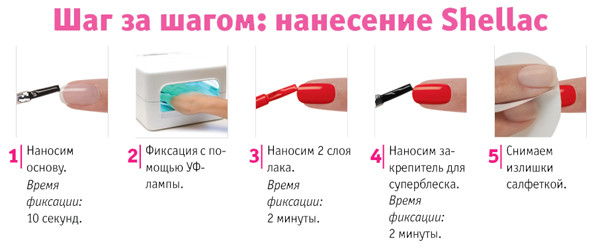
5 stages of application. Click to enlarge photo instruction.
Step 1. Apply the degreaser to your nails with a cotton pad. If you do not have a special composition available, you can get by with alcohol, which has a similar property.
Step 2. Cover your nails with a base coat. As a rule, it is applied in one thin layer and fixed in a UV lamp for 10-20 seconds. It is important to “seal” each layer of the next coating, that is, paint over the top of the nail so that the manicure lasts longer.
Step 3. Apply a color coat of shellac. One layer for a bright and rich manicure will not be enough, but you should not abuse and apply more than three layers, otherwise the coating will seem unnaturally thick. Each coating is dried in a UV lamp for 2 minutes. 
Step 4 Apply top coat. One layer will be enough for the varnish to retain its deep color and give the nail a natural shine that will not disappear under the influence of water and the sun.
Step 5. Apply cuticle oil. It strengthens nails and stimulates their growth.
As you can see, the step-by-step procedure is much easier to perform than you thought. If the description seemed not enough to you, in the video you can learn how to learn how to make shellac yourself and shoot it without leaving your home:
Master Secrets
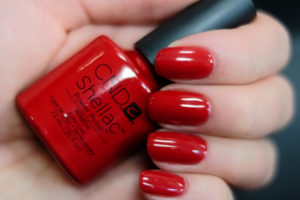
Advantages of shellac over other coatings
Shellac, of course, significantly outperforms other products due to its lasting and rich color, but this is not its only advantage. If you decide that shellac is just what you need, check out the full description of this tool, which will answer the most important question - “how to make the coating more resistant?”.
- Protects nails and does not allow them to exfoliate, which allows them to grow back in a few weeks. This is the perfect way to keep the natural length.
- Does not react with chemicals. After applying shellac to your nails, you can do any work with your hands for the whole time, including hand washing, because the unique coating technique will allow you to stay on your nails for as long as possible.
- Does not contain formaldehyde. Shellac consists exclusively of harmless products, which means that it can be used by women with a high level of sensitivity, including pregnant women.
- Easy to apply. With this coating, you can once and for all forget the problems that are associated with careful application. Shellac resembles a gel, so you can make any movements on the nail with a brush - the product will not dry out.
- Can be removed by yourself. If you are tired of manicures or your nails are already enough of an industry, you can remove the coating at home without spending money on going to the salon.
parting words
Shellac received the best properties of ordinary varnish and gel polish, and in order to appreciate this coating, you should experiment and create a bright design on your nails.
 In order to get a unique color, you can apply multi-colored layers and dry each of them in a UV lamp, as well as experiment with rhinestones and other decorations. At the same time, it is important not to overdo it with the number of layers, otherwise the shellac will last less on the nails than you want. Experts have found that hundreds of unique color combinations can be created this way!
 If it still seems to you that a three-phase shellac, which involves the use of three products (base, color coating and top) is too long a procedure, try purchasing a single-phase shellac so that the perfect manicure is ready in 20 minutes, while the application sequence is violated. As you can see, even an inexperienced craftswoman can apply a shellac manicure at home, since working with it is much more pleasant than with ordinary varnish! Use our recommendations and step-by-step photos - we make the procedure for applying shellac easier for you!
Another video on the correct application of shellac!
In contact with