Connection of crocheted squares diagram. How to crochet motifs. Fastening motifs with connecting posts and chains of air loops
When making and assembling products consisting of granny squares so beloved by many needlewomen, the question often arises: “How to combine crocheted motifs?”
In fact, many have been invented in various ways fastening such elements into a single piece, and in this article we will talk about some of them, the most popular. In particular, we will look at how motifs are connected using connecting and pico motifs. Knowledge of at least some methods of linking individual elements will be useful to any master.
Connecting crocheted motifs: two basic rules
The choice of a specific method of fastening individual knitting elements directly depends on the functional purpose of the lace fabric, on the desired appearance of the product and, of course, on the very shape of the motif. Squares, triangles, hexagons or circles can be connected in different ways, and often the method of connection depends on the imagination of the master. However, whatever fastening method is chosen always works next rule: the connection of motifs in the vast majority of cases is carried out along the front side of the canvas. Tying parts from the wrong side is used quite rarely, when it is necessary to achieve a special decorative effect. The second rule of work is: any connection must be symmetrical. The product will turn out beautiful and neat only if all its parts are fastened with the same tension of the loops throughout the entire canvas.

Ways to connect crocheted motifs. How to choose the right one?
When choosing one or another method of fastening parts of a product, the master must be guided by several principles. As a rule, if a tight gather is required, the motifs are either stitched or joined with single crochets, which are worked into the last rows of the two motifs. These methods of joining parts are excellent for making bedspreads, rugs, and carpets.

If, on the contrary, you need to make an airy, lace fabric, a combination of motifs, crocheted, should be done in columns with one or more crochets. Such fastening methods allow not only to make a very beautiful openwork fabric, but also to prevent possible deformation of the product during its further use. Motifs that are not intended to be assembled into a single piece are often connected by tying arches from picot or air loops.

Fastening motifs with connecting posts and chains of air loops
Several techniques have been developed to join such elements together, including tie-post binding, zigzag binding, or mesh binding. The first method is used in the manufacture of bedspreads or rugs. It allows you to get a durable canvas that will not deform or stretch. How to connect motifs: Squares with straight sides are folded back to back, the hook is inserted behind the half-loops of the last row and a bunch is made using single crochets (dc) or half-loops.

The result is a convex relief path from Art. b/n, which serves not only as a fastening, but also for the second method is used to add beauty and lightness to the canvas. When connecting motifs, chains of air loops are used. Zigzags or a mesh are formed from them. Here's how to connect crocheted motifs: the parts are laid out at a short distance from each other and attached with pins or needles to the pattern. Next, a thread is tied to one of the motifs with a single crochet and several chain stitches are made (from 3 to 5). After which this chain is attached to another motif with a connecting column. Parts are often connected in this way openwork tops, boleros, sundresses, shawls.

Fastening parts at the tops of double crochets, as well as at the ends of the picots
Granny squares or any other elements whose edges are tied with a picot can be fastened using its tips. How to combine crocheted motifs in this way? First, one air loop is made, then the parts are connected by knitting a connecting loop from the center of the picot element of another motif. Next, another VP is performed and secured using a connecting loop in the last column. The connection of square crocheted motifs can also be done along the tops of double crochets. How it's done? The hook is inserted in front of the junction, the working loop is grabbed and pulled out. Then the “working tool” is inserted into the next fastening point and 1 double crochet is knitted: yarn over, insert the hook into the loop, grab the working thread and pull it out. Next, grab the thread again and knit all the loops to the yarn over. Then grab the thread again and knit all the remaining loops. After this, insert the working tool into the next point and make the next double crochet.
Connecting motifs as the product progresses
This method of fastening parts allows you to get smooth, beautiful seams. It is great for assembling hexagons. How to make such a connection of individual crocheted motifs? First, we leave the sides of the first motif unknitted in the last row. Next, we connect two parts in the corners: we replace the central air loop of the arch with a connecting post. After this, we knit the first double crochet into the second motif. Then we drop the loop from the hook. We insert our working tool (in the direction from the face to the back) under the two walls of the loop of the column of the first motif. We pick up and stretch the removed loop. We knit a double crochet and slip the loop off the hook again.

We insert the working tool into the next column and pick up the loop. By analogy, we connect two motifs to the end. As a result, you get a neat twisted seam.
Crochet tips.
This method is effective for combining crocheted strips and crocheted squares of fabric. This connection is quite simple; it highlights the patterned surfaces well.
First, connect two squares on one side: *knit 1 double crochet stitch from the bottom square, 1 double crochet stitch. from the top square, 2 VP*.
knit this way from right to left. Stripes are made from connected quadrangles. The strips are connected to each other along the longitudinal edges: *knit 1 tbsp. with nak. from the bottom strip, 1 tbsp. with nak. from the top strip, 2 VP.*
At the junctions, knit 1 tbsp. with nak. from the corners, 2 VP, 1 tbsp. with nak. from the middle of the already completed connection, 2 VP, 1 st each with nak. from the corners.
This connection is very decorative; it hides well the not very smooth sides of the squares
Tie the square as follows: *1 tbsp. without ac., 5 VP*. In the corners knit 1 tbsp. without nac., 7 VP, 1 tbsp. without nac. When tying the next square, attach one of the sides to the last square: * 1 tbsp. without voltage, 2 VP, 1 connecting st. for the arch from the VP of the opposite side, 2 VP*. In the corner, knit 1 tbsp. without voltage, 3 VP, 1 connecting st. from the 4th VP of the last square, 3 VP, 1 tbsp. without nac.
When tying, the 3rd square is attached to one side of the 2nd square.
The 4th square is attached with one side to the 3rd, and the other side to the 1st square.

This is a very narrow and conspicuous connection. When knitting large items using this method, you can connect the parts with a ladder.
Tie the square as follows: *1 single stitch. 2 VP*. In the corners, knit 3 ch between single crochets. Work both sides simultaneously with the following squares: knit 1 tbsp. without nac. from the 1st square, 1 VP, connect the 4th square in the same way with the last quadrangles. In the corner, perform 1 tbsp. without voltage, 1 VP, 1 connecting st. from the middle Ch of the last corner arch, 1 tbsp. without nac.
This connection is suitable for open mesh edges and patterns that require framing. This method is very good for connecting parts with a ladder.
Knit the square as follows: 2 unfinished sts. double crochet, knitted together, 2 ch. In the corner, knit 2 unfinished double crochets, knitted together, 5 ch, 2 unfinished sts. with nak., knitted together. Connect the two sides like this: *knit together 2 unfinished stitches. with nak. from the 1st square, 2 unfinished sts. with nak. knit together from the adjacent square, 1 ch*. Also connect the 4th square with the last quadrangles. In the corner, knit 2 unfinished stitches together. with nak., then - 2 VP, 1 connecting st. from the middle VP of the last corner arch, knit together 2 unfinished stitches. double crochet
Knitting from motifs- a common and interesting technique that is used both for knitting clothes and interior items.
Therefore, every knitter sooner or later faces the question.
There are several ways to connect motifs with crochet, having studied which, you will easily apply one or another option in practice, depending on your desire.
Crochet motifs You can use the hook itself, as well as using a sewing needle and yarn from knitting squares.
Today we will talk about combination of square motifs.
1. Sometimes crochet granny square motif connected in the last row during knitting, but this way of combining motifs not always possible. Natali Korneeva has prepared a training video for everyone.
2. The most a simple way to connect motifs - stitching motifs using a needle. You will see a video lesson from Olga Bogdanova below.
3. Connecting motifs with crochet using various knitting techniques will help you change appearance products from motifs. The "Crochet and knitting" channel has prepared a series of video master classes, using a half-double crochet, a single crochet, a single crochet, combination of motives single crochets through half a loop and other interesting techniques.
So, let’s move on directly to the master classes themselves:
Discussion of the article
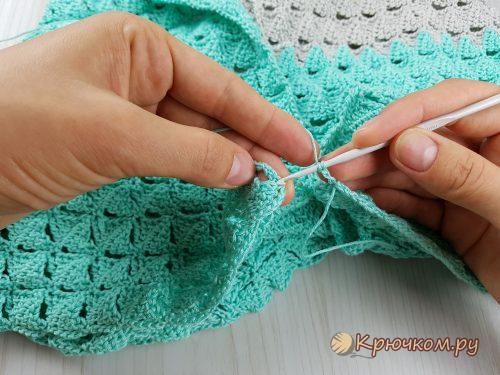
It can be not only dense, but also airy. In this master class we offer you 2 ways to connect any knitted parts using a hook. Moreover, the parts can be knitted not only with crochet, but also with knitting needles. You can also connect not only parts of clothing, but also motifs. Everything is very simple, such seams will only take you a little time.
Video master class on crocheting knitted parts:
Description of the process of joining knitted parts using single crochets:
Please note that stitching is done on the front side of the product.
- Insert the hook into the right part and knit 1 air loop. Then insert the hook from top to bottom into the left piece, pull the thread and knit 2 loops on the hook.


- Next we cast on 6 air loops. You select this quantity depending on the pattern.

- Now again insert the hook into the left part from top to bottom and pull out the thread.

- You have 2 loops on your hook.

- Next, insert the hook into the right part from the bottom up, i.e. from the inside out. The working thread should be to the right of the hook, i.e. as if behind a hook.

- Pull out the third loop. Now grab the working thread and pull it through 3 loops on the hook. Then we again collect 6 air loops and so on...

As a result, you should end up with a seam like this:

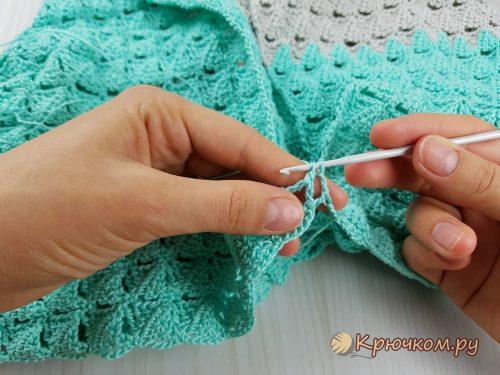
Description of the process of joining knitted parts using double crochets:
This method is more like fillet mesh, since double crochets and 2 or 3 air loops are used. The joining technique here is basically the same as the RLS, the only difference is in the yarn overs.
- In the right part we type 2VP, they replace the CCH.
- Now we make a yarn over, insert the hook into the left side of the product from top to bottom, pull out the thread and knit only the yarn over. You have 2 loops on your hook that need to be knitted together.

- Both halves are connected and the hook is in the middle. Now we collect 2VP.

- We make a yarn over and knit in the left half as before, i.e. pull out the loop and knit only the yarn over. You have 2 loops on your hook.
- Then we yarn over again, the working thread should be behind the hook, i.e. on the right, insert the hook into the right half from the wrong side.

- Pull out the loop and knit only the yarn over. You have 3 loops on your hook that now need to be knitted together.

- Then repeat the steps again. Cast on 2 air loops in the middle, first hook the left side of the product with front side, and then the right one from the inside out.

This is what you should end up with:

As you can see, you can “play around” with this connection method in any way, i.e. vary both the number of air loops and the size of the columns themselves.
We hope the master class was useful for you!
another way to crochet knitted parts
I think it looks very interesting! Besides, great way update or expand the item if it has become too narrow.
An openwork track can not only process the edges, but also be used to connect details and motifs.
a) Tie the edge of the fabric with single crochets. It is necessary to prevent the edge from shrinking and falling apart, so tie it in the rhythm of “three columns in each row, skip one.” Try not to tear the thread in the binding; in this way, “sew” the side seam from the bottom of the blouse to the edge of the sleeve. Taking into account the width of the lace, we make 5 ch for lifting. and tie the second part.
b) Turning the work inside out, we knit arches of 5 ch, with the interval “skip three stitches, make a single crochet in the fourth,” thus knitting until the jumper of 5 ch, which connects the parts.
c) Two ch, single crochet in the middle of the jumper, two ch, single crochet in the stitch of the next piece (this stitch must be symmetrical to the bottom one so that the binding is even)
d) Then we knit 2 ch, a bunch of 3, 4, or 5 double crochets in the middle ch. lower arch, two ch, single crochet in the upper part in the rhythm “through 3 to fourth”.
e) This is an openwork stripe instead of a side seam
f) Finishing the edge of the work neatly is very easy: five chain stitches, a half-dc in the first lower single crochet.