How to make a model of a tank from paper. How to make a paper tank with your own hands? Military vehicle from an old box
We will show you and describe step by step how to make a paper tank with your own hands. This tank model is the most popular. To make a paper tank with your own hands you just need a sheet of A4 paper and scissors.
Instructions for making a paper tank with your own hands.
First, let's prepare everything you need for origami, namely two sheets of paper, first A4, format 30x21 centimeters, second 5x3 cm and scissors. You can also take colored paper. In this case, your origami will immediately take on a unique look.
1. Place a large sheet of paper in front of you as shown in the photo.

2.
Fold in half, along the long side. 
3.
Bend and then straighten one corner first. 
4.
Then do the same with the second corner. 
5.
Do the same on the second side of our sheet (steps 3-4) 
6.
Next, we need to carefully bend both sides so that on the fold line there is a central point formed from two diagonal lines. For clarity, you can look at the photo. 
7.
Fold the corners inward along the fold lines. There are 8 corners in total. 
8.
We place the figure in front of us and bend the top corner down on each side. 
9.
Fold the top of the workpiece until it touches the center line. 
10.
Fold the same strip in half, bending the bottom edge up. 
11.
Then we bend the corners in the other direction so that they don’t interfere with us for now. We do the same as described in paragraphs 9, 10. 
12.
Bend the corners in different directions as they were originally made. 
13.
Place the figure on the table as in the picture. Fold the top corners in half. 
14.
Turn the tank model over to the other side. 
15.
Fold the layout into a ring. Our figure should be fixed, and the large angles should be on top. 
16.
We are making the turret of our tank. We tuck the large upper corners into the folds of the triangles located below. 
17.
As a result, we will get just such a paper model of a tank, only without a gun. 
18.
Now it’s the turn of the small piece of paper that we prepared at the very beginning of the master class. We make a tube out of it. 
19.
We install the cannon in the hole in front. We unbend the folds on both sides at the base, thereby creating caterpillars. 
20. Congratulations, you have made a paper tank with your own hands.
How to make a paper tank video.
Don't be upset if you don't get the craft right the first time. In this case, try again to go through all the stages of assembling origami. Now you know how to make a paper tank.
Don’t forget, we take criticism well, if you don’t like the description of any step in describing origami, leave a review in the comments.
Creating paper tanks can be of interest not only to boys, but also to girls. Firstly, these figures will be excellent toys for them. Secondly, the process of creating a figure itself arouses unprecedented interest in children and develops motor skills. And thirdly, during the process of forming such figures, many parents tell their children about the great wars and their features, attracting children to the history of their state. So, how to make a tank out of paper and where to find a layout and drawing?
Creating paper tanks can interest not only boys, but also girls
A T 34 tank made of paper corresponding to a real vehicle can be glued together using ready-made developments. To do this, you will first need to print the required scan on thick paper. Then you should cut out all the drawn parts.

 To make T 34 from a reamer, you must follow the instructions:
- Fold lines should be found on the cut out elements. A ruler is applied to each of them, and then the free edge of the paper is lifted and ironed. This creates an even fold.
- Once all the folds have been marked, you can proceed to gluing the model.
- The first step is to glue the main body of the tank. To do this, it is advisable to use transparent acrylic glue or quick-drying PVA.
- Then all minor parts are glued to the body.
- Then you can move on to the cannon. First of all, its base is glued together, and only after that the cannon is supplemented with secondary elements. The finished model is glued to the main body of the combat vehicle.
- After this, the caterpillars are assembled. First, the inner circles are made, and only after that they are framed by a single track strip. The finished tracks are attached to the sides of the hull.


It is worth considering that there are different layouts of the T 34 tank, which may differ from each other color scheme and convention. If you can only print a black and white version of the machine, you should color it using acrylic paints. Such processing of cardboard will give the future toy the appearance of a tank with a natural coating.
Gallery: paper tank (25 photos)


Tank IS 7 made of paper
To make this tank, you should also use a ready-made reamer.


- All elements of the development are cut out using a stationery knife.
- Next, using a ruler, folds are made at all places marked for these purposes.
- The supporting structure for the body is made. It is made from two rectangles installed parallel to each other and secured with 3 transverse strips located at an equal distance from each other.
- A body with a circle cut out in it is glued to the resulting base.
- The sides of the body are pasted over, niches for the caterpillar are formed. A tank bottom is being formed.
- The base for the cannon mount is being made. It is done in the same way as for the body. A manufactured turret is installed on the hull. A machine gun and additional elements are glued to the turret.
- Next, the tracks are made: the middle ones are smooth, the rear ones are with teeth.
- The tracks are glued to the bottom of the main body and secured with caterpillar tracks.
This model is quite complex to assemble, so when creating it with children, it is necessary to provide them with extensive assistance. When assembling it with children, you can dispense with several small parts, thereby simplifying the gluing process.
How to make a T 90 tank out of paper?
T 90 can be made using the origami technique. To do this, you only need paper: A4 sheet and a small sheet of paper for notes.

T 90 can be made using origami technique
How to do:
- First, an A4 sheet is folded. First of all, it bends in half lengthwise.
- The perpendicular sides of the sheet are folded, connecting to each other. First, the short side is applied to the lower long side, and then to the upper one. Similar manipulations should be performed on both sides of the sheet.
- The leaf turns over. The corners of the short side are bent towards the ends of the crosses formed from the fold line.
- The sheet is turned over and bent along the resulting lines, forming basic form double triangle.
- The long sides are folded towards the middle so that the resulting double triangles ended up on top of them. The result is a double arrow.
- The newly folded edges are folded towards the outer sides of the rectangle.
- The lateral corners of one of the triangles are bent towards the apex.
- The workpiece is turned over and conditionally divided into 3 parts so that in the end the top of the folded triangle touches the middle of the base of the open one.
- The free corners of the triangle bend inward.
- The “ears” from the previously folded triangle are set into the resulting pockets.
- The result is a tower.
- A small sheet of paper is rolled into a cylindrical shape using a knitting needle or skewer.
- The barrel is inserted into the hole in the turret and glued.
The figurine assembled in this way can be decorated using thick paints, felt-tip pens or pencils.
How to make a tank from origami modules?
To create tanks, you can use the assembly diagram offered by modular origami. To begin, the assembler will need to prepare 1688 triangular modules.
How to assemble:
- First of all, the tower is assembled. Her first and second rows close in a circle. Each row consists of 30 modules.
- The workpiece is turned inside out and supplemented with a third layer consisting of a similar number of elements. In this way, the tower is built up to layer 8.
- The ninth row is assembled from 30 modules, but they should be installed backwards.
- Next you need to start working on the tracks. A chain of 4 rows is made, each of which has 50 modules.
- The fifth row uses 46 elements. The reduction should be carried out in places where the track bends.
- Row 7 consists of 46 elements installed backwards.
- The same scheme is used to create the second caterpillar.
- For each caterpillar, 3 wheels are made. To do this, a circle is made of 2 rows, each of which involves 10 modules. The figure is turned inside out and completed with 5 rows.
- The wheels are placed inside the caterpillar. These elements are connected by a middle bar made of 34 rows: 1 – 5 modules, 2 – 4 elements. Next, the rows alternate.
- A slightly bent piece is inserted between the tracks.
- A tower is placed on top.
- The cannon is made of 20 rows, the width of which alternates: 1st row - 2 elements, 2nd row - 1. The last three rows increase to 4, 3 and 4 elements.
- The machine gun is inserted into the turret.

With this article you will learn how to make a paper tank with your own hands. This instruction includes 2 options for making such crafts. They vary in complexity and technique. The first master class is quite simple and quite suitable for beginners. The second is labor-intensive and complex. If you don't have any experience with origami, try a simpler one first.
A paper tank sounds quite serious. It seems that making such a craft is very difficult. And this is not true at all! Given some free time and some patience, you can easily create one. Read on and you will learn how to make a paper tank with your own hands. 
Materials and tools:
- plain or colored A4 paper;
- gray pencil;
- thin metal ruler;
- PVA or stationery glue;
- scissors.
How to make a simple tank out of paper
This craft is easy to make and perfect for beginners. To make it, you will need one sheet of A4 colored paper, a small piece of paper in a contrasting color, scissors and a pencil. 
Production time – 20 minutes
Difficulty level – easy.

Step 1: Make the folds
Take a standard A4 sheet of paper. 
Fold it in half lengthwise. 
Fold the top left corner to the bottom edge. Iron the folds well and unfold. 
In the same way, fold the bottom left corner to the top edge. Expand. 
You should end up with cross-shaped folds. 
Step 2: Form the Flaps
Place the craft vertically. Fold the right corner down. 
Divide the bottom side into 2 equal parts. 
Leave the first part in place, and fold the second to the lower right corner. 
Repeat on the left side. 
At the top in the foreground you should have a regular triangle. 
Repeat on the other side. 
Step 3: Narrow the Middle
Fold the bottom side towards the center line. 
Fold the paper right down the middle and turn it back toward the bottom edge. 

Iron all the folds with an iron ruler so that they are even and neat. 
Step 4: Form the Tower
Fold the bottom corner of one of the triangles up. 
Lift the right one up as well. 
Roll the craft into a cylinder with all the formed elements facing up. 
Insert the “arrow” inside the square. 
Fold the remaining two corners of the “arrow” into the lower pockets so that you get it as follows (see photo below). 

Step 5: Add a Muzzle
Take a small rectangle of a contrasting shade. 
Roll it into a thin tube. 
Insert the tube inside the tower. Ready! 
You can also make this tank by watching the following video.
How to make a paper tank with a rotating turret
To create this origami you will need:
- 1 sheet of A4 paper,
- scissors,
- pencil,
- iron ruler,
- glue,
- a thin object for smoothing out small wrinkles.


Production time – 1 hour
Difficulty: medium
Step 1: Form the Undercarriage
Take a sheet of A4 paper. 
Fold it in half, and then in quarters. Cut the sheet into 2 equal parts in the middle, that is, into 2 long strips (in the photo these strips are folded in half in width). 
Take one of the strips and divide it into 2 parts in width, that is, in fact you should have 2 quarters of an A4 sheet in your hands. Set one quarter aside and work with the other.
Fold the quarter sheet in half. 
Expand. Fold the bottom side towards the center line. 
Fold the right side towards the center as well. 
Roll the craft into a cylinder. 
Press this cylinder down. 
Bend all corners of the resulting figure by approximately 0.5 cm. 
Fold all the corners inside the shape. 

Use a metal ruler to smooth out the folds to make them more pronounced. 
Fold the top flap towards the center of the figure. 
Repeat on the other side. 
Lift the right semicircular pocket at the bottom slightly. Make it longer. 

Repeat this on all 4 sides. 
Tuck the outer flaps on both sides to the highest point. 
Turn the craft over. Fold the corners up approximately 0.5 cm. 
Repeat on all 4 sides. 
Fold the folded corners back down. 
Place the side elements perpendicular to the axis. 
Using the previously folded folds, bend the craft upward along its perimeter. 

The chassis is ready. 

Step 2: Make undercarriage protection
Take the second quarter of an A4 sheet. 
Fold the top edge about 0.6 cm, then fold it over again. You need to wrap the paper in one direction 2 times. When folding, it is convenient to use a metal ruler. 

Repeat on the opposite side. 
Place the protection on the chassis. The width of the first should be approximately 0.1-0.2 cm longer than the second. 
Fold the extreme corners along the folds on one side by approximately 0.5 cm. 
Fold the corners inward along the curved lines. 

Iron the folds with a ruler. 
Tuck the outermost element up so that the “horns” stick out to the side. 
Turn the craft over and insert the chassis into it. The latter should fit comfortably and tightly into the protection. 
Draw a line with a pencil for the second edge of the protection. 
Fold the paper inward at the marked point. 
Fold the corners on the second side of the protection approximately 0.5 cm. Fold the corners inward along the marked folds. 

Fold the rear flaps down, reducing their width by approximately 2 times. Make them longer. 
Repeat on the other side. 
Take protection and chassis. Put the first one on the second one and check how well they fit together. If necessary, correct minor defects by lengthening or shortening the protection accordingly. 

Step 3: Make the fixing element
At this stage you need to make a fixing element for the chassis and protection on which you will put the tower. Also, with its help, the tower will be able to rotate in different directions.
Take the second half of the A4 sheet. 
Fold the right edge towards the center line. Unbend. 
Cut a quarter of this piece along the folded line. 
Fold the paper in half lengthwise and mark creases along the edges. 
Fold both edges towards the center along the marked folds. 
Fold the corner down on the right. 
On the opposite side, also bend the corner so that you get a triangle in the foreground. 
Expand. You should end up with cross-shaped folds. 
Fold the side flaps inward along the marked folds so that you have a triangle in the foreground. 

Fold the left corner from the bottom side up. 
Repeat on the other side. You should have the following figure. 
Fold the bottom side towards the center line. 
Fold the top side towards the center as well. 
Place the craft on the chassis so that the square element is exactly in the center. 
Next, you begin to bend the figure around the chassis. Make sure that it follows all the contours of the element placed inside. 
Wrap the craft around the chassis completely. Trim off any excess length. 

Insert one edge of the element into the other so that the square is located at the top at the center point. 

————————————————-
Disconnect the fastening.

Place the guard on top of the chassis.

Wrap these parts again with an element with a square at the top. Some actions will be quite difficult to perform, but do not rush, act carefully and you will succeed.

The lower part of the tank is ready!

Step 4: Make a Tower
Cut out a square with a side of approximately 6-7 cm. Bend it along both diagonals.

Fold the paper in half.

Fold the corners down to create a perfect triangle.

Turn the figure over.

Fold the left corner towards the top.

Repeat on the other side.

Rotate the craft. Fold the side corners to the center line so that they are slightly shifted upward.

Insert the lower flap on the right side into the pocket located at the bottom of the side flap.

Insert the right flap into the pocket as well. It should look like this.

Turn the craft over.

Lift the inner pockets slightly upward.

Turn the pocket slightly outward.

Repeat on the other side.

Fold the top corner down. You have made the base for the tower.

Step 5: Make the Turret Guard and Muzzle
Cut out a piece of paper measuring 8 cm x 6 cm. For this work, you can use paper of the same shade that you previously used or use a contrasting color. We used a different shade and it really looks cute! If for each element we use different shades paper, it will look original and fresh!

Fold the piece in half in width. Next, you need to fold this paper in three along the points indicated by the arrows in the photo below.

Here the paper is already folded in three.

Open one spread. Fold the lower left corner from bottom to top. In the same way, symmetrically fold the right corner to the top. Pull the middle up and fold the craft in half. Gently pull the inner valve upwards.

Unfold the craft.

Decorate the third part on the other side of the craft in the same way.

Make sure that the internal valves are placed symmetrically.

Take your tower.

Insert one edge of the green guard into the inner pocket at the top of the tower.


From the bottom side, insert the protection into the inner pocket at the bottom of the tower. Cut off the excess length of the protection.

Fold the cut corner into the middle.

Place the defense on the tower and secure both elements. If necessary, use a little glue.

Cut a small rectangle to fit the circumference of the tower.

Roll it into a thin strip.

Bend one end of the strip perpendicularly and fold it in half to form a small triangle at the top.

Insert this end inside between the green guard and the tower.

Wrap the strip around the tower. Insert its other end on the other side of the protection. If necessary, secure the work with glue.

Roll a tube from a thin piece of paper and secure with glue. This will be the muzzle.

Place the turret on the chassis. To do this, insert the square located at the top of the chassis into the internal pockets at the bottom of the tower.
Place the barrel inside the tower and secure it with glue.


The work is ready!
We tried to tell you in as much detail as possible and show you the technique for making this tank. But if you still have questions and you don’t fully understand how to make this paper tank correctly, watch the following video.
Model for your collection.

Model for your collection.
Developed in the summer and autumn of 1942 at the tank design bureau of the Gorky Automobile Plant (GAZ) under the leadership of Nikolai Aleksandrovich Astrov, the leading developer of the entire domestic line of light tanks of that period.
Print on a printer, on A4 sheets of matte thick paper, cut and glue.
 Model for your collection.
Light tank "Scorpion"(FV101 Scorpion) entered service in 1972, used in reconnaissance units of the British ground forces.
Print on a printer, on A4 sheets of matte thick paper, cut and glue.
 Model for your collection.
The armored personnel carrier was named after a species of Indonesian bull. It is also known as APS-3.
Print on a printer, on A4 sheets of matte thick paper, cut and glue.

Model for your collection.
GAZ-3937 (“Vodnik”) was developed at the Design Bureau of GAZ OJSC. Manufactured at the Arzamas Machine-Building Plant.
Print on a printer, on A4 sheets of matte thick paper, cut and glue.
 Model for your collection.
The Barracuda is designed in a variety of configurations, including an armored personnel carrier, reconnaissance vehicle and police vehicle.
Print on a printer, on A4 sheets of matte thick paper, cut and glue.
 Model for your collection.
Created by the GIAT concern in the 1980s to replace the outdated AMX-30 tank. Serial production began in 1992, with a total of 794 units produced until 2007; as of 2010, there is no further production of Leclerc.
Print on a printer, on A4 sheets of matte thick paper, cut and glue.

Model for your collection.
Panzerkampfwagen IV (PzKpfw IV, also Pz. IV; transliterated as Panzerkampfwagen IV; in the USSR it was also known as T-IV). The most popular tank of the Wehrmacht (a total of 8,686 vehicles were produced), it was mass-produced in several modifications from 1937 to 1945.
Print on a printer, on A4 sheets of matte thick paper, cut and glue.
 Model for your collection.
T-34 (“thirty-four”) - mass-produced since 1940, and since 1944 it became the main medium tank of the Red Army of the USSR. Developed in Kharkov. The most popular medium tank of World War II.
Print on a printer, on A4 sheets of matte thick paper, cut and glue.
 Model for your collection.
The Leopard 2 is one of the most successful and widespread, and by some estimates also the most advanced main battle tank in the world.
Print on a printer, on A4 sheets of matte thick paper, cut and glue.
From paper.
On the eve of the holidays of February 23 and May 9, I want to give you a selection of paper tanks. And most importantly, how to make them yourself.
Also in the article you will find diagrams for origami and templates for cutting and gluing models. There will be, like modern models of combat vehicles, and those from the times of the First and Second World Wars.
In general, not all of the proposed ideas are simple. However, there are also some that a child attending kindergarten can do.
Add the article to your bookmarks so as not to lose it, because at school and kindergarten they will definitely ask you to make a craft, so let the ideas be at your fingertips.
Let's start with simple ideas. Schoolchildren can already create them by repeating the steps in the master classes. however, young children will need adult help.
Master class No. 1.

For this craft you need to take 3 matchboxes, 2 sheets of double-sided green paper, a green bottle cap and a lollipop stick, strips of black and red self-adhesive sheets.
Take a sheet of paper. We put two cardboard boxes on one and measure the length and width. We remove the boxes, and leave 1 cm allowances from the marked lines. Then cut out the wrapper.
Ask your parents to put a lollipop stick in the lid.


We paste the resulting blanks of wrappers over the matchboxes. Two will go to the longest, and one to the shortest.

We cut out the tracks, slightly wider than the narrow sides of the matchboxes.
Cut out 6 circles from black paper and paste them onto the tracks.
From a red leaf we will make a star to decorate the craft.
Master class No. 2.
An option when you need to take one matchbox and a slightly larger box as a basis.
Also, as in the previous version, you need to wrap the boxes with green paper. Glue them on top of each other.
For tracks, take stiffening ribs from cardboard box or corrugated paper dark shade.
For the muzzle, take a chupik or lollipop stick. We wrap it with a green strip and insert it into the cabin. It is fashionable to make a hole for the muzzle, or you can fix it with a heat gun.

Master class No. 3.
Another idea using three matchboxes, buttons and paper.

First we glue one box. Then two. It turns out two blanks: one is smaller than the other.


Place the smaller piece on top of the larger one and secure it with glue.

Glue buttons of the same size along the edges.

Take a soda cap and use a hot awl to make a hole in it, into which we insert a lollipop stick.

Along the edges we imitate caterpillars with black paper.

Master class No. 4.
Very simple idea tank. The main thing is to carefully repeat all the steps in the photo instructions.

From double-sided paper, cut out two strips 20 cm long and 2 cm wide.

Glue them into rings.

We measure a piece of paper measuring 12*7 cm. We mark 0.5 cm from both edges. Then 2.5 cm from this line.


Now those lines 0.5 cm wide need to be bent away from you using a ruler. We bend all the lines one by one, changing the side of the bend.

We make a second similar part of a smaller size 8*5 cm

Let's make a barrel.

You need to take a segment with dimensions of 4-8 cm. And mark lines in length every centimeter. 


We bend it and glue it to the cabin - the smaller part.

We take a large part and glue the cabin onto it, tucking the allowances inward.

We take our “rings” and flatten them a little with our hands to get an oval. Glue the caterpillars in place.

All that remains is to decorate the craft.
Master class No. 5.
A simple craft for little ones.

Cut out similar parts and invite the child to stick the blanks on the right places.

Master class No. 6.
An option for those who like to tinker. Everything here is more realistic than in the previous version.

Place 4 empty matchboxes together. This will be the base of the tank.

Let's take another box for the cabin. We cover them with colored paper.

We pierce the cabin with an awl or a knitting needle and insert the barrel.

We make a hole in the middle with an awl. We need it to make a rotating cabin.

For the muzzle, you can take any thin stick. For example, from a lollipop or a kebab skewer. You can use scissors to enlarge the hole if the tube does not fit.

Take the lid and use a hot awl to make a hole in it.
Now we need a rod. It needs to be heated over a fire and cooled on metal. This is necessary so that the plug is baked on the end. It will hold all our parts together. This work should be done by adults! The child may get burned!

We pass the rod through the cabin and the cover.

We pass it through the base with tracks.

Cut out five strips with a width of 1.5 cm from dark-colored paper. From 4 we make an “accordion” and glue them to the tracks. From the rest we cut out circles and glue them onto the end part of the base.
Master class No. 7.
Option made of paper and sleeves. Very simple and quick craft. However, it looks very decent!

The upper edges of the bushings are painted dark.

We fix them together with masking tape.

We take thick paper and decorate the place with adhesive tape.

We measure out two strips of silver corrugated cardboard, 2 cm wide and a length corresponding to the width of the tracks. Glue the cardboard to the desired places on the sides.

From thick paper we roll up a box without side walls.

We decorate everything with the same leaf color.

We collect the details into one craft.

We will make a barrel from a cocktail tube. Let's wrap it around.

We make a hole in the cabin and check that the tube fits into it and does not fall out.

We insert the barrel and decorate the tank.

Master class No. 8.
Still simple and easy idea for children.

Here is a diagram with dimensions. Transfer it to A4 sheet and cut out all the details. Bend all the pieces along the fold line.

You need two of these caterpillar parts.

Glue black circles onto the front part. The folded allowances are used for gluing with other parts of the craft.

We cover the ends of the caterpillars with black stripes. This is what happens.

We take the base rectangle and glue it, connecting the finished parts of the tank.

This is what the workpiece looks like from the front side.

We cut out the cabin and folded it along the indicated lines, alternating the folding side. 
We make a hole in it and decorate the back of the cabin with a star.
Glue it onto the base.

We roll up the barrel and insert it into the hole.

The craft is ready. You can make an imitation of it Eternal Flame or add orders. You will find a layout of the order at the end of this article.
Paper tank using origami technique - step-by-step instructions for beginners
Now a section for those who love origami techniques. You will see 5 detailed step-by-step diagrams.
Let's start with this option called "Abrams".

Take a spread of the notebook. In total this is A4 size. Fold it along the fold, then in half and cut it. We bend one of the parts diagonally to the middle. Along the marked lines we bend the part so that the edge forms a triangle, as in the photo.


This is the model we get.

Another option for a hand-folded tank.


Another diagram with detailed actions and indicated lines.

Option itself simple product origami.

The scheme is for those who are just beginning to master the basics of this technique. The craft is made from one sheet.

Mastering this technique produces such beauty.


These tank options can also be used for holiday themed gifts and crafts.
Cardboard master class
Paper cardboard allows you to make durable crafts. They will not bend as quickly as the previous ones. And you can even play with them.
There are two master classes before you.
First option.

You need to take corrugated cardboard, it is sold in any office supply store. Or remove from cardboard box upper layer, exposing the stiffening ribs.
We make round rolls from thin strips.

We connect them to a rectangular base.

We twist the cabin on top.

We make a barrel and decorate the craft with flags.

This beauty is made from cardboard.


Option 2.


Ribbons blue color will be used for roller wheels, the cabin and for decoration. Green ones are for the caterpillars themselves.

We roll the tracks from 4 spherical rolls. We take two strips of the same size. The next two need to be taken three centimeters less.

We tie them with ribbon to hold the rolls together.

We make the base for the cabin and tracks.

To prevent them from unraveling, we glue them with PVA glue.

Let's make the remaining details.

Entire compositions are created and sent to exhibitions.

I also suggest watching a video that shows step by step the creation of a tank.
All models can be modified to your liking.
Ideas for tanks that shoot
And now before you are three ideas for cars that were recorded at the shooting stage. Of course, these are comic models of children's creativity. A pom-pom made of red threads, tinsel or toothpicks can “fly” from the barrel.

As we can see, circles and hearts of red paper were glued onto the toothpicks, which imitate the speed and speed of the shot.

Such a fun idea with hearts.

Pay attention to the crafts themselves. They can inspire you to create a wonderful composition.
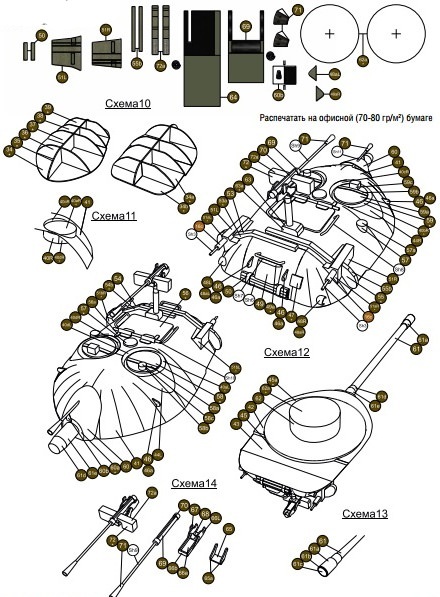
Tanks that can be printed, cut, glued
Now you will have many templates to cut out. They need to be printed on thick paper or photo paper. Then cut out all the parts along the contours and glue them together.

The whole composition: a tank on a pedestal.

The following diagram with assembly instructions.

The next sketch is simple and can be assembled quickly.

T-34 paper tank
When assembled it looks like this.

You need to print these diagrams.


Now detailed diagram assemblies.


Tank T-90
This scheme is suitable for the T-90.


Assembly instructions.


Other famous tanks
Comic idea of a tank with a diagram.


World War II model.

The next model is M-36.

T-40 car.

Schematic machine MK1.

Another option.

There are also modern models.

Izvestny KV-1.

We are making ISU-152.

Model SU-100.


With the right level of care and attention, you can assemble some pretty realistic cars.
Tank coloring pages
Children can use coloring books and templates for appliqués and cards. I'll give you a small selection.


Remember, she promised to give a medal with a tank? So here she is.

Have fun with your children, explaining what a great thing our ancestors did, bringing victory to the USSR!
Paper tank ideas
And in conclusion, a small selection of ready-made DIY crafts. Some people create entirely on their own, while others get help from their parents.
For inspiration, take the idea of bushings.

Or the square cabin idea.

Gift option made of corrugated paper.


Tank made of round parts.


A similar model was made above from green cardboard.

Quick craft idea.


Passionate people create life-size crafts from cardboard and even plywood.


What do you think of the selection? I am sure that both older schoolchildren and younger preschoolers will find inspiration here. Also show the ideas to dads, maybe they will also be inspired and help the kids create crafts.
Tweet
Tell VK