Make your own money tree. How to make topiary from money. Stages of creating the painting “Money Horseshoe”
According to Feng Shui practice, in order to improve financial well-being, there should be a money tree at home, in this master class we will share how make your own money tree. Since ancient times, it has been believed that the money tree attracts prosperity and wealth to its owner’s house, but not everyone loves indoor plants and there is not always time to care for them. To solve this dilemma, you can make topiary from beads or banknotes.
DIY money tree with beads
Everyone loves money, so this craft will also be an excellent gift for your family, friends or even colleagues. There are many variations, but we will consider two options, the first - DIY money tree with beads.
Here is what we will need in the process: thin copper wire; aluminum - 5mm; coins (I took 30 kopeck coins); white and silver beads; floral ribbon; finishing putty (you can use gypsum or ABS); brushes (hard and soft);
thin double-sided tape; a small pot - as a stand, hot nails and decorations of your choice.
First of all, we need to twist blanks of branches with pennies from copper wire. Three coins will be attached to each branch, which means we are making a branch from three small twigs with loops at the end. We will attach coins to these loops using hot nails. We need ten similar branches for our craft.
Before working with beads, pour both colors into one bowl and mix. We unwind the wire without tearing it off the spool and string beads onto it. We form the first branch, connect 8 beads in the inner loop, fasten it one turn. We frame the outer edge with a second loop, take as many beads as needed to make it tight, without gaps. We make the last third row in the same way, and twist the resulting petal, the length of the stem is about two centimeters. Make an indent of 1 cm and proceed to the next petal. Just one branch consists of five leaves.

We weave thirty branches of 5 beaded leaves each. Then we divide the branches into separate bundles - each has one branch with pennies and three beads. Twist the wire at the base and wrap it with floral tape. In total, we collected ten large branches, they need to be covered with acrylic paint, we do this directly on top of the layer of tape. If we place such branches on a flat base and frame them, we get DIY money tree painting.
Now we assemble the tree trunk: we take 3 pieces of aluminum wire, about 17 cm, twist them so that the ends remain free - for stability we move the lower edges in different directions. We attach the branches to the resulting frame with thin double-sided tape, going in order from top to bottom. We wrap the top with floral tape and build up the base of the trunk with available materials at hand (ordinary toilet paper works great).
We place the tree in a pot-stand, fill in the finishing putty mixed according to the instructions to securely fix the trunk. Leave until completely dry, for several hours. Then we coat the trunk itself with the same composition. When everything has dried, we paint it over with acrylic paint (I took brown, but you can use any color), and apply glitter in places on the paint. We straighten the branches. We decorate the pot with pebbles and attach it to a glue gun. The beaded Feng Shui tree is ready.

If we take green mother-of-pearl beads and replace ordinary coins with Chinese lucky coins, we will get a completely different tree, but it also looks very impressive. You can see more details here.

To add some zest, we make two trunks and attach the English letter “S” to them in the middle. We make it all from the same aluminum wire and thicken it with improvised means. Apply a putty solution on top, when it dries, scratch the texture of the wood. We cover the dried trunk with gold paint and decorate the base with moss.

It turned out very original. Such a tree can become a lucky talisman both at home and in the office.
DIY money tree photo
Another very unusual option do DIY money tree - topiary from banknotes, in addition, on our website there is an interesting one in which you will find many ideas for making topiary. You will need about 50 banknotes (I chose five hundred for fun), a small beautiful pot, any ribbons, decorative leaves, a branch or wire as a trunk, a small soft ball and a glue gun.

We cut the banknotes in half and fold the halves into corners. It is better to do this so that the inscriptions on the “souvenir” type banknote remain on the reverse side of the blank. The ball is not large, about the size of a walnut. The larger the ball you take, the more voluminous the topiary crown will be.

We decorate the trunk - wrap it with a beautiful silver ribbon. We make a hole in the ball and use glue to put it on the barrel. Now our tree needs “leaves” - we fold the first three money bags with the protruding edges inward, glue them together and fasten them to the top of the ball. From the central corners, we move in a circle, we will begin to fasten the rest tightly one after another, so that the ball does not show through. As a result, we get a volumetric paper ball. When the tree itself is ready, we begin to build the base. We paint the pot in a suitable color, the easiest way is with spray paint, decorate it with ribbons, attach beads and other decor to a glue gun. When everything has dried, we place the tree in a pot and fill it with alabaster mixture for fixation and stability, wait until the composition hardens. Money Tree DIY video- the lessons very clearly demonstrate the step-by-step process.

A plastic branch with silver leaves is suitable as decoration. We cut off some of the leaves and secure them inside the paper corners with glue. If you don’t have such a branch, other decorations will do: beads, rhinestones, pearls and more. We will decorate the trunk of the tree with the remaining leaves.

All that remains is to decorate the dried alabaster composition, cover it with a thick layer of PVA glue and generously sprinkle decorative sand and glitter on top.
Composition from paper money It turned out very tender, light and beautiful. If you prefer something more original than classic version tree, we advise you to try to depict DIY money tree panel.
New Year's holidays are just around the corner, so we have prepared.
We offer you several ways to make a money tree from banknotes with your own hands.
According to ancient Chinese legend, on the branches of the money tree there are not leaves, but coins that just fall into your hands if you shake the trunk. Fans of Feng Shui and all kinds of talismans are very fond of this “plant”, which, according to popular belief, attracts wealth to the house. You can purchase a ready-made money tree, but it is much more interesting to make it yourself. Learn how to make a banknote tree with the step-by-step instructions below.
Even if you don’t believe in omens, decorate your interior or surprise a friend with a homemade money tree. And it is better that its branches are decorated not with coins, but with banknotes - so that no crisis will damage the wallet.
So, let's try to make one of three options for a money tree from banknotes with our own hands, without extra costs and effort
Money topiary made from banknotes
A great way to make a tree out of banknotes using cheap materials that are easy to find on sale. You will need very little time and effort, but the result will delight you with an abundance of multi-colored banknotes. To make it clear how to make this money tree out of banknotes with your own hands, the instructions are accompanied by photographs.
Materials:
- Clay vase or pot
- Plastic (or foam) ball
- Wooden stick
- Foil
- PVA glue
- Counterfeit bills 100 - 120 pieces
- Accessories for decoration (ribbons, tags with congratulations, etc.)
Instructions:


- From each counterfeit bill (they can be purchased at stores such as bookstores, children's goods, etc.), make a “bag”. To do this, fold the banknote in half, bend one of the edges inward, turn it over and wrap it in a small bag. The edge must be secured with glue. Make a sufficient number of such bags, focusing on the diameter of the ball. They will become the “leaves” of the money tree.
- Wrap the stick in foil, this will be the trunk of the future money tree.
- Pierce the ball with an awl and insert a stick into the hole, securing it with glue.
- Make a “crown”: cover (using PVA glue) the prepared banknotes over the entire surface of the ball, placing the “bag” with the glued corner on the ball.
- Pour plaster into the vase. Place the tree in the vase and wait until the plaster hardens completely. If you were unable to get plaster, you can put the tree in the ground.
- Complete the decor of the finished money tree at your discretion.
DIY “Lush Vegetation”
A little imagination - and a tree made from banknotes can become a real masterpiece! Despite the apparent complexity, anyone can make such a money tree with their own hands if they have the desire.
Materials:
- Flower pot
- Floral sponge (artificial soil for plants and flowers, used to create flower arrangements)
- Styrofoam ball
- A thick wooden stick with one pointed end
- Moss - a small piece around the diameter of the pot
- PVA glue
- About 50 counterfeit bills
- Pins - according to the number of bills
- Artificial leaves 20 pieces
- Accessories for decoration (multi-colored ribbons, stickers with congratulations, etc.)
Instructions:


- Place a piece of floral sponge of the appropriate diameter into the flower pot (you can also use pieces of other shapes, as long as they fill the pot completely).
- Pierce the foam ball in the middle with the pointed end of a stick.
- Make cuts in the center of the piece of moss so that the stick can be easily inserted.
- In the center of the floral sponge, make a circular hole the diameter of the stick.
- Apply glue to the non-pointed end of the stick and stick it into the sponge, after placing moss on the stick at such a height that it will subsequently be on the surface of the pot.
- Fold the counterfeit bills 10 - 12 times horizontally, so that when smoothed, you get a sufficient number of small folds (“accordion”). The ends of the banknotes need to be bent and pins inserted into them.
- Pin the folded bills to the surface of the ball along the entire diameter, placing them in different directions. Make the bills look like a fan by spreading them out.
- Insert artificial leaves into the ball between the bills.
- Decorate the money tree with ribbons, stickers with wishes, etc.
"Handmade" money tree
An original option is to make a combination of embroidery and banknotes. The money tree eventually becomes a painting, framed and hung on the wall. Perhaps this is the most easy way make a tree out of banknotes with your own hands - of course, for those who know how to embroider, or know who to ask about it. If you don’t have a mentor, you can go to and watch video lessons there.
Materials:
- Cross stitch canvas
- Floss threads of different colors
- Embroidery needle
- Tree embroidery pattern
- Counterfeit bills approximately 10 pieces
- Picture frame
Instructions:
- Download and purchase threads of the desired color and embroidery needle. Or buy a ready-made kit with a pattern, outline, thread and needle.
- Take a square piece of canvas that is 5 cm larger than the found diagram on each side, plus 5 cm for processing the canvas before placing it in the frame (total 10 cm).
- Carry out embroidery on the canvas according to the diagram.
- Fold counterfeit bills like an accordion (see).
- Take the bill and connect it in the middle to make a “bow”. You can secure the middle with an auxiliary thread, or you can directly sew it on the canvas.
- Sew each bill to the canvas in such places that it looks like a tree crown.
- Treat the edges of the canvas with an overlocker or overcast it by hand so that it does not fray (to do this, leave 5 cm on each side).
- Place the finished embroidery in a photo frame of the appropriate size. It is better that it is voluminous, then the glass will not accept the bills.
The result should be something like this money tree:

IN modern world financial well-being has come first, and it’s stupid to deny it. Therefore one of best gifts are money or . Or something that will attract money in the future.
In Eastern cultures, and in our country as well, it has become very popular to give all sorts of souvenirs “for good luck and prosperity.” One of them is the Money Tree, which you can make yourself.
The money tree will a wonderful gift on New Year, and in the coming year will definitely bring its dividends to the one to whom it was given. After all New year's night- this is a time of miracles and magic.
Now we will reveal for you some New Year's money magic from holiday portal.
We will tell you how to make a Money Tree with your own hands - excellent. You'll have to worry a little, but the result is worth it, believe me.
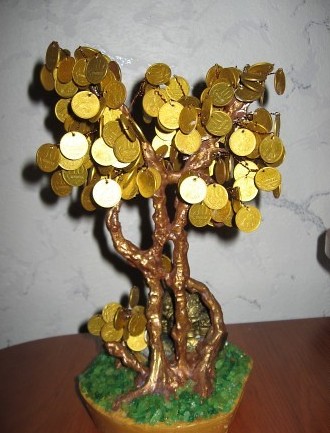
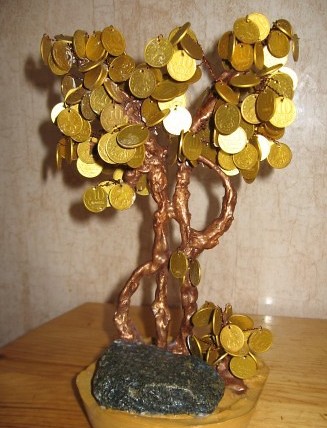
Each of us accumulates a mountain of small change over the course of a year, which they give us in transport, in stores, etc. for change. As a rule, we don’t want to carry it around in our wallet, so we put it in some kind of jar. If you “scrape the bottom of the barrel”, you can find a good handful of ownerless 5, 10 and 50 kopeck coins. Their time has come! It is from these that we will make our Money Tree with our own hands. They will form the basis.
Let's take as a basis all the tens found in the house. You need to drill a small hole in them. If you have a drill sled, then this is a matter of a few minutes, even if there are a lot of coins.

Next, lay the coins out on newspaper or another piece of paper and spray paint them gold. We paint on both sides.
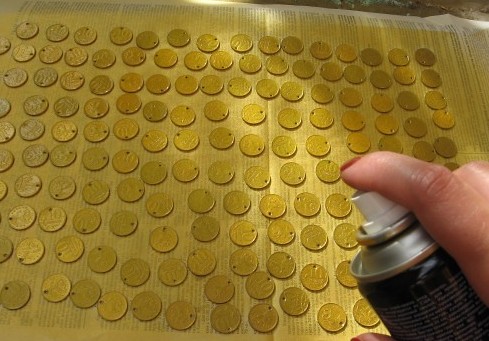
As you understand, the coins will be leaves on the Money Tree.
Now let's take the thin one copper wire and fasten three coins together as shown in the figure. You can attach 5-7 on one branch, but they will bend under the weight of coins - such wire is quite soft.


When a sufficient number of coin branches have been made, take ordinary aluminum wire and bend a dollar symbol from three pieces. We also fasten the component elements with thin copper wire.


We take the prepared branches and screw them to a wire dollar - we make a trunk for the Money Tree with our own hands.


Take deep plastic plate, we will make a pedestal from it. Next, dilute the glue with water approximately in half and add plaster, fill the bottom of the plate with this mixture and coat the trunk. We use a stone to weigh down the pedestal, because wood is quite heavy.
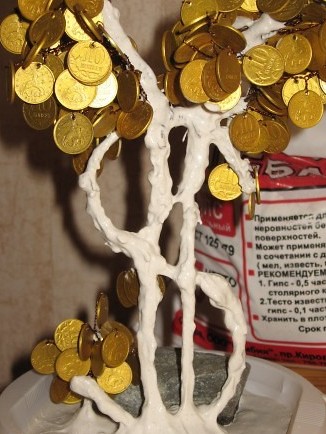
Using gouache, paint the barrel and plate brown.
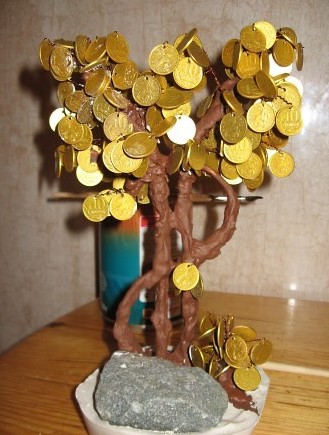
Afterwards, on top of the gouache, you can once again paint the trunk with gold acrylic paint. But this is optional.
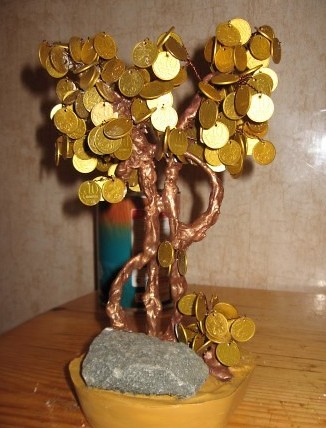
Then we varnish the stone, which is designed to make the structure heavier. His appearance will immediately become more presentable.
We have almost reached the finish line in making the Money Tree with our own hands. There is very little left.
You can attract wealth and prosperity into your life not only with the help of rituals. IN Everyday life We are surrounded by seemingly ordinary things and objects that activate monetary energy and help us get rich. For example, according to the teachings of Feng Shui, an ordinary indoor fat plant - the money tree - provides invaluable help in this.
This modest plant, like a magnet, attracts wealth into the house. In addition to the Crassula, there are other indoor flowers that can attract cash flow, for example, cyclamen and arrowroot. They are united by common features, namely, round leaves resembling coins - a symbol of wealth and well-being.
According to Feng Shui, an artificial analogue can also become a strong activator of financial well-being. For this reason, you can choose a decorative money tree made from coins, stones, beads or other materials.
Which money tree is better according to Feng Shui?
When choosing a money talisman for your home, you should remember that a real tree is more effective than an artificial one. For a person who does not want to worry or waste time caring for a flower, a symbolic figurine of a tree is more suitable. Such a talisman will not dry out or die.

A real living money tree can wither and shed its leaves due to improper care. This sign indicates upcoming large expenses and a possible period of lack of money. Therefore, it is very important that the fat woman feels good. The best option is to acquire trees of both types - indoor plant and an artificial analogue.
You can make an artificial money tree with your own hands or purchase it in a store or market. At the same time, it should be remembered that they cannot be kept in the same room - money talismans should be distributed throughout different rooms. You also need to keep in mind that a money tree made from coins, made independently, has stronger energy.
Sometimes the talisman is made in the form of a money tree made from large denomination bills. Such a product can be presented to the hero of the day or close relative for a birthday. The gift symbolizes prosperity and success. Below you can find a master class on making a decorative money tree from coins, various materials and banknotes.
A well-groomed fat woman is the key to financial well-being
An artificial tree with pebbles instead of leaves or a money tree made of beads can be purchased at a Feng Shui store. It perfectly attracts wealth and does not deteriorate over time. You just need to make sure that it is positioned correctly. But a living indoor tree requires special care. Its leaves should not become covered with dust, turn yellow or fall off. Otherwise, the preconditions for ruin will be created. This plant should not dry out, so as not to provoke huge waste of its owner.

At the bottom of the pot where the tree of wealth grows there should be five coins of the state in whose territory you currently live. This will ensure constant growth in your material well-being. You will have promising acquaintances, favorable circumstances and new sources of income. At Christmas, the coins must be removed and washed in running water. This is done to update the energy of the talisman and.
Master class - how to make a money tree from coins with your own hands (video):
Another video on making a money tree from coins
Where is the best place to place a money tree?
A money tree made of coins, just like a plant, is endowed with a special meaning, and therefore it needs a special place. According to Feng Shui, the tree of luck should be located in the southeastern sector of the house, that is, in the wealth zone. An excellent place for this talisman is the hallway - in this room the path to cash flow will be best opened. To enhance the effect, place a large banknote under the tree.
You can make such a monetary souvenir as a gift to a friend, relatives, or boss. In a word, a money topiary can be useful in more than one situation. If you want, place it in your workplace as a symbol of financial well-being. In the photo gallery you can find enough examples of such money trees that are easy to make with your own hands.
Of course, such an art object does not involve the use of real banknotes, unless you decide to use coins. Fake banknotes can be purchased at souvenir shops and can often be found in children's playrooms. It’s up to you to decide which banknotes to use, but the currency with three zeros, of course, looks more respectable.
And also the money topiary is:
- Alternative to an envelope, in which it is customary to present a monetary gift. A couple of real banknotes may be hidden in such topiary; give a vague hint about this to the hero of the occasion.
- Tree of Happiness- if someone just lacks finances for this happiness. Try to attract them into your life in this creative way.
- Interior decoration. Well, if you are focused on a career and climbing its ladder, such decor will only be appropriate.

And to create such a topiary with your own hands, use the following point - MK (master class).
Topiary money tree: master class
Essentially, this is a master class on how to make money flowers in a simple design, that is, in a pot. By the way, such a MK will be useful to the groom who is waiting for a ransom. When the real money runs out, you can always buy it off with a tricky tree. At the same time, the groom will show his ingenuity.
The master class involves the use of the following material:
- Paper bills (fake) - 33-36 pieces;
- Blank for the crown (either ready-made foam, or in the form of a newspaper lump intertwined with threads);
- Hot glue gun;
- Copper wire;
- Floral tape;
- Pot;
- Gypsum;
- Decorative elements.

The master class begins with making a round base. It’s good if you already have foam blanks; if not, any round object of sufficient density will do. At worst, do it the old-fashioned way - make a lump of newspapers, crumple them well to make a round piece. Drag the lump with threads so that the shape finally becomes round.
To see how else you can make a base for topiary, watch the video.
Do-it-yourself topiary base: how to make a foam ball (video)
The resulting lump should be made green and monochromatic. For this green will do or corrugated paper.
- You need to create flowers from banknotes. There can be many options, some use the origami technique, while others go their own way. Flowers with seven petals glued together in the middle look most aesthetically pleasing. The bill is folded at the corners and in the middle on both sides, the petals tend to the center. Look at the photo, which option is more interesting for you, this is the flower you will get.

Having chosen the flower option that suits you, you need to make a sufficient number of them. As a rule, if you completely decorate a medium-sized crown with flowers from banknotes, you will need at least five dozen of them.

- To fix the flowers you need hot glue. Before gluing, make a temporary stem. Stick any object that resembles it into the workpiece, just do not deform it. Glue the first flower by the tail with hot glue at the very base of the stem (temporary).
- Hold this flower and all the others for a few seconds so that the glue hardens. The work is not in a hurry.
- Glue the second and subsequent flowers not randomly, but according to the logic of movements - first around the stem, and then go up, row by row. There should be no free space between the flowers, look at the photo - all trees have a uniform, dense crown without so-called gaps.
- To make a stem, this master class suggests using copper wire. It is easy to give it the desired bend, fold it in several layers, etc. If you go the simple route, you can then simply decorate the wire with floral ribbon. Actually, that would be a good thing too. Don’t forget to take out a temporary stem, pour hot glue into the hole formed, insert the decorated wire there, and hold until the stem hardens thoroughly.
- Now the tree needs to be planted in a pot; plaster will be needed to secure it in the container. You need to leave literally two centimeters from the plaster to the edge of the pot. Don’t even out the top layer too much; it won’t be visible anyway. The plaster must be allowed to harden, and the moisture, of course, must evaporate.
- The top layer is decorated with greenery - some craftsmen have adapted a washcloth for this purpose. Yes, an ordinary round green washcloth, which will create the desired effect. But other decorative materials, straws, threads, and pile can also become greenery.
- Decorate the stem with your own hands too. Or you can tie a bow from an emerald aspidistra ribbon.
- Beads, buttons, decorative braid - all this is also used, if desired, of course. On the pot itself you can acrylic paints write a wish.

This master class suggests building just such a tree, a fairly simple option.
Money trees: topiary, decoration
Money topiary quite implies creative improvisation. During the process of work, you can deviate from the MK, replace something with your own hands, improve something.
Topiary design options:
- The ball base can be made of polyurethane foam;
- Leaflets from banknotes can be formed according to the principle of an ordinary bag - in numerous photos of topiaries this is exactly what is done;
- Felt leaves can also complement the crown, creating a tree made from banknotes and textile inclusions;
- At the foot of the stem you can decorate upper layer pot of sesal - in many MKs this material is used for decoration;
- The tree may have another trunk - you can also make it with your own hands from skewers, sushi sticks, a plastic stick from a flower shop;
- And the pot can also be different - for example, an inexpensive beautiful flowerpot, a coffee cup, a plastic cup, a small beautiful box.

You can also fold a banknote with your own hands into a fan, roll it into a tube, into an airplane, or tie a double tube with decorative thread. You can get inspired by examples in the photo gallery.
DIY money topiaries: step-by-step instructions (video master class)
The next master class involves forming a crown with souvenir bills and real coins.
Part 1: banknote blanks for topiary (video)
Part 2: registration of the crown with paper bills (video)
Part 3: decorating the crown with coins (video)
Part 4: wood assembly, decoration (video)
DIY topiary is filled with energy good wishes, your efforts, the desire to please the one for whom it is intended. Don’t forget to take a photo of the topiary so that the photo remains in the collection of ideas and successful creative works.
Topiary made of money (photo)