Tapestry embroidery: technique, types of seams. Tapestry stitch and loop embroidery in photo and video tutorial Rapeseed tapestry stitch
The tapestry stitch is a simple, but very beautiful equipment embroidery Externally, tapestry stitch embroidery is quite similar to carpet weaving, but differs in the technique of execution, as well as the tools used by the master.
For work, experienced embroiderers choose wool yarn intended for tapestries. It differs in that it consists of several (most often four) threads twisted together. For this work, needlewomen also prepare a special needle with a blunt end and a large eye.
Having mastered the technique of tapestry embroidery, masters create unique panels, carpets, and also decorate wardrobe items original patterns. Experienced craftsmen They claim that tapestry embroidery is easier to perform than cross-stitch, so it is much easier to master the secrets of such needlework. In addition, embroidery with a tapestry stitch helps create three-dimensional plot pictures. This is its main advantage, since it is impossible to obtain such volume using other embroidery techniques.
Tapestry embroidery technique
The tapestry stitch gives the fabric extra strength, so ready product successfully resists deformation and stretching.
You can start embroidery when all materials, tools, workplace, and a drawing diagram is also available.
Embroidery on a tapestry begins with securing the thread to the canvas. The use of knots is not allowed, since this type of embroidery is characterized by special grace.
It is easy to secure the working thread. It is enough to take a thread half as thick as required. The thread is threaded through the eye of the needle, then passed through one of the holes in the canvas, after which both ends of the thread are connected and passed through the eye of the needle. Next, the design is embroidered according to the selected pattern.
The technique of tapestry embroidery is very similar to making a half-cross. The only difference is that the needle enters the upper right corner and exits from the lower left corner.

Tapestry stitch in cross stitch on front side completely repeated from the inside out. When embroidering with a half cross, vertical stitches are formed on the wrong side. Tapestry embroidery is characterized by a more economical consumption of materials, since it requires half as many threads as cross stitch.
Experienced craftsmen own professional secrets, armed with which it will be possible to achieve high results. In particular, it is recommended to start the embroidery process from the middle of the design. This helps prevent the canvas from warping.
Fabric selection
Since the stitches in tapestry embroidery fit tightly together, excluding gaps, it is important to choose the right fabric for embroidery. It is recommended to purchase canvas made of linen or cotton. This canvas is characterized by rigidity and density. The use of this particular type of canvas ensures a long service life for the product.

In specialized stores you can purchase canvas for tapestry, as well as entire kits for embroidering tapestries. One of the varieties of such canvas is “Stramin”. This fabric is characterized by sufficient rigidity, and it also clearly displays open cells, ensuring a comfortable embroidery process.
Also, needlewomen purchase the “Penelope” canvas. Her distinctive features are the presence of large holes square shape surrounded by small holes. This type of fabric is preferred when it is necessary to embroider very small elements.
You can also embroider on a type of canvas such as monocanvas. Unfortunately, it is not always possible to find this fabric on sale. Some craftsmen prefer to use plastic canvas, using which they can create three-dimensional products ( Christmas decorations, houses).
In specialized stores you can purchase a ready-made set for beginners and experienced craftsmen.
Execution schemes
Tapestry embroidery is done without using a hoop. The fabric is held by the master in his hand or fixed on special devices.

The pattern for making tapestry embroidery is included in the kit. If the master does not want to purchase a ready-made set or there is no such option, the diagram can be found on the Internet, downloaded and used. When choosing, it is important to pay attention to the level of difficulty. Beginners are better off choosing simple circuits, which are understandable and accessible to everyone even without practical experience.
Step-by-step instruction
It is easier to master tapestry embroidery skills if you attend master classes or watch instructional videos.
Masters begin each new row in one of two ways:
- after completing the row, the thread is cut and work resumes on the right side;
- the transition to the second row is not accompanied by a thread break; the stitches are made from left to right.
The end of the thread should be hidden under the stitches after completing the embroidery. Nodules are not allowed in this case either.

Tapestry stitch embroidery involves performing several types of stitches:
- half cross;
- continental;
- straight;
- oblique;
- breathtaking;
- elongated.
When performing a stitch, you need to monitor the tension of the thread. Different tension forces cause the canvas to skew. If the embroidery pattern involves the use different types stitches, it is recommended to perform them in one direction to ensure a high level of aesthetics of the finished product.
At the final stage, the product is washed by hand in warm water. Automatic washing, as well as the use of hot water, can cause shrinkage of the product and slight deformation, so it is better to avoid such actions. Do not wring out the product, dry it on a towel. As soon as the embroidery becomes dry, it is placed in the prepared frame. This completes the creative process.
Making paintings has always been and will be a fine art, no matter how the drawing is created - with paints and a brush or threads and a needle in embroidery. Tapestry stitch is one of the methods of creating beauty along with counted cross stitch, satin stitch, carpet technique and many others. Studying this technique will expand the needlewoman’s ability to make beautiful home furnishings.
From time immemorial people have been engaged in weaving. This mainly applies to clothing fabrics. However, carpets and tapestries also come off the loom. Strictly speaking, tapestries are lint-free wall hangings made using the technique of cross-weaving threads.
Making trellises, or tapestries, involves the use of a loom or a special frame on which the warp threads are stretched. Then a canvas is created, which is used for hems or as seam allowances of at least 1 cm wide using the same threads as the warp. A design is sewn or pinned to it, and then the pattern is made with colored threads.
Tapestries are also called paintings embroidered with tapestry stitches, which adds confusion to the minds of craftsmen and ordinary people.
Let's break it all down
Currently, the concepts of “tapestry”, “tapestry stitch”, “carpet embroidery” and “half-cross” are so intertwined that they are often confused. It is important to understand the difference between these products and embroidery elements, since each of them is beautiful in its own way and is suitable for creating cozy things.
Embroidery in carpet technique
This type differs from the others in that it is ultimately created three-dimensional picture, made with loops (pile). For such creativity you will need soft fabric, yarn or thread, a pencil or fabric marker, and a special hollow needle. The canvas is embroidered according to a sketch drawn on the fabric, while work until the last stage is carried out on the wrong side of the product.
Counting half cross
This element of embroidery is often used in paintings to emphasize the background. . It is done very simply:

The technique may vary depending on the direction of embroidery or the preferences of the master: from left to right or from right to left, the usual left or right tilt of the crosses. However, you should adhere to the chosen pattern throughout the entire embroidery: from one corner to the diagonally opposite one + a vertical transition along the wrong side up or down. This way, you will get slanted stitches on the front side and vertical stitches on the back side.
Embroidery with such stitches implies complete sewing, that is, the fabric is in finished work shouldn't be visible . There are several types of seams:

Each of these types can be made with thread laying or, as they also say, the “block” method. Its essence is that before sewing a line, lay out a thread in the middle of the row and sew it on top. Let's take a closer look at how to embroider with tapestry stitch and what you will need for this.
This technique creates not only excellent paintings, but also individual parts of cross stitch. A tapestry seam is used to fill the background when there is a danger of warping the canvas, since the counted half-cross tightens the base fabric.
The principle of stitches
The tapestry stitch is similar to a backstitch, only on a diagonal. Conventionally, we assume that the row is drawn from left to right, the inclination of the stitches is right. The order is as follows:

When moving vertically without changing the embroidery direction, the algorithm is maintained: from the lower left corner to the upper right. For a vertical transition with a change in the progress of work, the order of stitches changes: from the upper right corner to the lower left.
Operating procedure
The technique of tapestry embroidery is quite simple; a needlewoman of any age can easily handle it. But the work requires care and patience. At the first stages of learning, it is worth using ready-made embroidery kits. Such sets usually include:
- small hard canvas;
- blunt embroidery needle;
- set wool threads or floss;
- embroidery pattern.

The stitch is mainly used with a bias stitch. It has variations in the form of mosaic or diamond and is the easiest to perform, so it is suitable for beginners. This master class provides general recommendations on work and embroidery technique of oblique tapestry stitch.
 To get started, stretch the canvas onto a frame or hoop. Prepare a thread of the length you are comfortable working with. Next, fasten the yarn. It can be various ways: by grabbing the tip from the inside out or using a loop. When embroidering with tapestry stitches, it is best to avoid tied knots.
Now look carefully at the diagram: the order of work will depend on the number of stitches of one color or another. If there are very few elements of the same color and they are scattered throughout the picture, it is advisable to do them first. Do not be afraid of long broaches from the back of the work: taking into account the characteristics of the seam, they will not be visible. Having decided on a color, they begin to embroider.
For beginners, this tapestry embroidery technique will be sufficient. As you gain experience, you can experiment with stitch length, tilt, and the use of different mosaic stitches. From under the hands of a real master it can come out a real masterpiece with a three-dimensional effect.
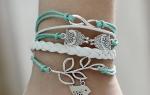
A tapestry is a voluminous embroidery that looks very impressive and expensive.
Today we will learn the technique of tapestry embroidery. Many craftswomen note that embroidery with a tapestry stitch is easier and faster than cross stitch, and the result is no less beautiful.
Materials for tapestry stitch embroidery
The tapestry seam is very tight, so thin fabric this technique is not used. It is best to start by buying special kits for such embroidery, with thick canvas or fabric.
There are several types of tapestry embroidery, and, accordingly, stitches. We will look at two of them, the most popular. For one type, it is enough to choose a dense canvas for embroidery and a long needle with wide ear and a blunt edge. The second method, loop embroidery, requires a special needle and loose, coarse fabric.

This is the needle you will need for the second version of tapestry embroidery with a loop.
In any case, the thread should be very dense: either thick wool threads for a carpet, or floss in 6-7 folds.
Types of tapestry seams: master class
Tapestry stitch embroidery is quite simple to perform, but requires care and patience, because all the stitches fit very tightly together and must be the same size. Each stitch is essentially a half cross.
1. We thread a needle and thread into the upper corner of the square and pull it out from the diagonally opposite corner of the square.

It is in the direction of the stitch that the difference between a half-cross seam and a tapestry seam lies. The half-cross goes from bottom to top, from the lower left corner to the upper right, the tapestry seam goes from the upper right to the lower left corner.
2. We also start the next stitch from the upper right corner to the lower left.

3. The result is a beautiful, dense row of “strokes”:

4. The next row can be embroidered from right to left, the main thing is to follow the basic stitch rule, that is, sew diagonally from top to bottom.
The back side of the product should look no less neat than the front side.
Front side:

Purl:

Tapestry loop embroidery technique
A loop seam looks like this:

This tapestry stitch embroidery technique requires a special needle.
It has a long point with a slot:

And a very thick round eye for thread:

The thread is inserted like this:
A knot is made at the tip of the thread.
We stick the needle into the fabric (in our case it is still the same hard canvas) all the way to the foot. The knot on the thread will not allow it to pass to the reverse side, but the needle will pull the thread so that a loop is formed on the reverse side.
Many beginning needlewomen confuse the tapestry stitch with the carpet technique. Tapestry weaving is created using a special tool, but embroidery involves performing several types of stitches using a needle.
The velvet stitch especially imitates “weaving”, where identical loops are created, secured in each row with crosses, and at the end of the work they are cut and trimmed. But some of the tapestry stitches appearance remind carpet equipment. Let's look at several varieties of this seam.
Tapestry seam: execution patterns
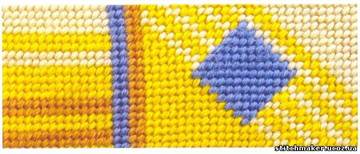
The tapestry stitch in appearance resembles a half-cross, but on the wrong side there will be a different design. The slant of the stitch can be made to the right, left or vertical, but is always created from right to left. Thanks to this technique and the use of thick threads (skein floss, wool, iris, cotton), the fabric becomes dense, without gaps in the fabric. Embroidered with a tapestry stitch on a rigid large fabric or plastic canvas when making paintings and voluminous souvenirs.
Tapestry stitch has several names:
- Oblique. This tapestry stitch resembles a half cross. The needle must be inserted into the same corner. That is, if you started embroidering from the bottom left corner to the right, then all subsequent stitches and rows go in the same direction.
- Oblique with spacer or pads. The thread is drawn onto the front side according to the number of cells, and then it is covered with a tapestry stitch. That is, the canvas becomes without gaps, and the stitches resemble convex beads. This technique uses all stitches in all colors.
Step-by-step technique for embroidery with tapestry stitch
- When using an even number of threads, secure the floss with a loop, as in cross stitch. That is, insert both ends into the eye of the needle, forming a loop at the end. Insert the needle in the right place from the wrong side, make a half-cross and secure the thread through the loop on the wrong side. Make all other stitches from the same corner from which the first one started.
- If the thread is ordinary, then on the wrong side, where the row of the desired color begins, the floss is “tied” through the weave of the fabric. On the front side, tapestry stitches will overlap this thread.
- You begin to embroider all rows from right to left.
- To tilt to the right, start inserting the needle into the upper right corner from the lower left corner. The second and subsequent stitches are performed in the same sequence. To tilt to the left, insert the thread from the lower right corner to the upper left.
Some craftswomen embroider without moving their hand to the wrong side, that is, on the face they immediately “grab” both corners of the diagonal of the cell with a needle. With this method, you can tighten the fabric if it is soft.
Making rows and securing the thread
- Embroidering with a tapestry stitch from a new row can be done in two ways. In the first option, after the end of the row, the thread breaks and the work begins on the right side of the embroidery.
- The second method is expressed in a smooth transition to the second row and embroidering from left to right, but so that the direction of the stitches on the front and back is the same. That is, insert the needle in the second row into the upper right corner from the wrong side and bring it out in the opposite lower left corner. Next, perform all the stitches in the same sequence from the upper right to the lower left corner.
- The reverse side of a tapestry seam should be the same as the front side, that is, consist of solid half-crosses made in one direction.
- After finishing the work, the thread is hidden under the stitches and cut. There should be no knots or tails on the reverse side.
- If you need to change the thread to a different color, then all the rules remain the same as when you started working.
- Using soft fabric use frames that can be turned over to work inside out.

Step-by-step execution of pads
Now let's look at what the tapestry stitch embroidery technique looks like when laying the thread. This method is also called pads.
- The thread is secured in any way described for the usual tapestry stitch from the end of the row.
- The thread is brought out in the middle of the cell before the beginning of the row. That is, you lay a thread on the face of the length that corresponds to the number of cells of the desired color.
- Bring the needle from the inside out also from the left corner up to the right. Subsequent stitches are performed in the same sequence. That is, the half-crosses cover the thread.
- Do the same for the next row. First, bring the thread to the face in the middle of the cells. Then, in the same sequence, from right to left, embroider with a tapestry stitch.
- Fasten the thread after finishing the color or row in the same way as described for the classic tapestry stitch.
The rows are very voluminous and dense. Therefore, embroidering in “sections”, as in cross stitch, will not work. Do the work strictly in rows (horizontal, vertical, diagonal).

Vertical execution of tapestry stitches
Most often, craftswomen make a vertical tapestry seam (also called a straight stitch) with and without thread. The straight stitches of the paintings immediately attract people's attention due to their unusual design.
- Fasten the thread in the already familiar way.
- Bring the needle from bottom to top in each “hole” of the canvas cage. If you are using fabric, try to keep the stitches the same length and count the same number of weaves.
- Please note that on the back and front the stitches are vertical, only on the front side they are more convex.
- To move to the next line, drop from the top corner of the first row to the bottom of the second row.
- Next, do all the stitches in the same sequence from bottom to top. Try to avoid gaps between rows.
- If you need a seam with an inserted thread, then the execution is the same as with blocks, only you make the stitch straight, not inclined.
- When securing the thread, all the rules remain the same as when simple execution tapestry stitch.

Making a catch seam
The catch stitch is used to smoothly transition similar shades when sewing large areas. Often this tapestry stitch embroidery is used to create abstract geometric shapes. It can be made with short and long, oblique and straight tapestry stitches. But when performing long half-crosses, the grip is better visible.
- Fastening the thread is the same as when making a simple oblique seam.
- Start working from right to left with elongated stitches, inserting the needle from the bottom left corner to the top right. Perform subsequent stitches in the same way.
- The new row begins in the opposite direction from the end of the stitch at a third of the previous row. That is, insert the needle from the bottom left corner of the second row into the right one, which is located between the two stitches of the first row. It looks like this: if the stitch is two cells in height, then the second row ends with half a cell of the previous row in the upper right corner. The rows seem to be holding each other.
Mosaic tapestry weaving
There is also mosaic embroidery with tapestry stitch. It is used when creating ornaments or filling the background. This technique consists of three stitches: two short and one long. The embroidery is created in blocks, also from right to left.
- The length of one row corresponds to the height of the extended stitch. A “block” is a square of four cells.
- Start with a short seam from the bottom left corner to the top right corner. That is, if the height of the row is two cells, then the oblique stitch fills the bottom cell.
- Next, from the upper right corner of the short stitch, move to the lower left corner, making an elongated half-cross. That is, a stitch is equal to two cells.
- The next short half-cross is located in the first upper cell opposite the lower same stitch. That is, from the upper right corner of the elongated stitch, insert the needle into the lower left upper square.
- The next block begins with a short stitch in the same sequence. This means that the row is represented by alternating two short stitches with an extended seam.
- The new row also begins with a short tapestry half-cross.

Performing a checkerboard stitch
Original chess tapestry stitch. The technique is a little similar to mosaic block weaving, only it contains seven stitches rather than three. Each half-cross is extended by the same distance, and the longest one divides the square (block) in half. That is, three stitches from the midline different lengths in each direction.
- Work begins on the left side of the square. All stitches are made in the same way from the left to the right corner. Each subsequent half-cross lengthens.
- The embroidery ends with the same short stitch located in the opposite corner of the square.
- The next block also begins diagonally with a short half-cross.
Such squares are embroidered multi-colored threads. If you then sew triangles on the embroidered blocks in different directions, you will get a Scottish stitch. This technique is suitable for making rugs and pillows with thick threads. When combining various block and single stitches, you get beautiful embroidery with tapestry stitch (a master class of all stitches is described above).

Additional information for craftswomen
The length of the tapestry stitch can be one or two squares in height. In the first case, such a seam is called shortened, and in the second version - elongated. Moreover, it can be oblique or straight. You can embroider works in horizontal, vertical or only diagonal rows.
With diagonal design, embroidery starts from the first upper corner. The next row starts from top to bottom and bottom to top. This type of stitching is also called a basket stitch, since the beginning of a new row covers the previous one.
A tapestry stitch with a laid thread is suitable for small projects, and if they are larger, then a “Renaissance” stitch is used. That is, the line in the rows is laid from right to left and from left to right, leaving small transitions on the sides. On the face you embroider vertical straight stitches.
There is a woven tapestry stitch. The tutorial for this stitch is very simple. To begin, make the first row of elongated tapestry stitches from right to left, and then start the second row from the lower left corner, which is perpendicular to the upper corner of the first row. And insert the needle into a third of the cells of the first row. That is, it turns out to be a kind of Christmas tree.
How to apply tapestry stitches?
When embroidering plastic canvas, pillows, panels, carpets, you can vary the seams in length, slope, direction. The masters have gone further and create entire paintings from photographs. For example, the boundaries of a landscape (grass, meadow, flowers, sky, cloud and other details) are transferred onto the fabric, then embroidered with a tapestry stitch. By changing the direction and length of the stitches, the master emphasizes the background and foreground.

Some craftswomen use tapestry stitch when creating simple paintings. Ordinary children's stories are suitable for this. You embroider the picture using horizontal or vertical lines, and the length of the stitches may be uneven and correspond to a certain color.
When creating paintings, ordinary oblique tapestry stitches are used. They are distinguished from a half-cross by the reverse side. That is, if in half-cross stitches there are short straight transitions on the reverse side, then tapestry stitches have long diagonal ones. When doing tapestry embroidery, creating volumes requires a lot of thread.
Brief conclusions
Before embroidering with tapestry stitch, beginners should have working cardboard or fabric “cards” with examples of stitches. This will allow you to create your own original compositions and ornaments in the future, playing with color.
Make a card index of the masters' works, especially with close-up photos, so you can see the directions of the stitches. Try to repeat a similar plot first, and then create your own landscape.
Tapestry is the name of the brothers who opened a manufactory in France in the 16th century. The manufactory produced lint-free carpets for wall decoration that resembled huge paintings. Carpets were woven by hand using cross-weave threads. They began to be called by the names of their creators. The technique of tapestry embroidery is that the work is created using stitches, it resembles cross stitch, but it is done easier and faster, and it looks incomparable.
Fabrics, threads and needles


The tapestry seam is made by counting the thread on fabrics with a plain weave, and is performed exclusively on thick fabrics, as well as on canvas and stramine.
Stramin– a rigid coarse mesh canvas designed for embroidering carpets, paintings, panels and tapestries. During operation, the canvas is stretched onto a frame or machine so that there is no distortion of the design. It is best for a beginner to work on canvas. Depending on the fabric, the embroidery threads will be thick; most often, wool yarn, iris and floss in several folds are used.
It is important to remember that the yarn should not stretch too much, otherwise it will be difficult to achieve even stitches.
There are two types of needles: a simple one with a large eye and a blunt end and a special sharp needle for tapestry embroidery.

Video master class on how to make a non-woven tapestry with your own hands:
It is necessary to maintain consistency between the density of the fabric, the quality of the yarn and the thickness of the needle. For beginners, it is better to purchase a ready-made set.
Tapestry seam
There are many varieties of tapestry stitch, but the main one is the oblique stitch. It is often compared to a half cross. But if the half-cross is sewn from the bottom up from the lower left corner to the upper right, then the oblique tapestry seam runs from the upper right to the lower left corner.

The difference is visible both in the tension of the thread and on the wrong side (threads made with an oblique seam run along the wrong side more tightly, while those made with a half-cross - sparsely).
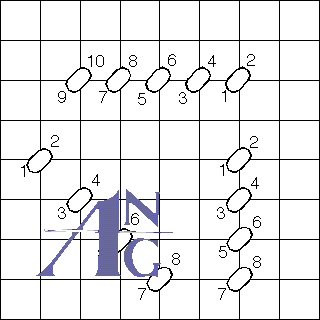
Filling the canvas with oblique stitches step by step:
- From the wrong side, we insert the needle into the upper right corner of the cell and pass it into the lower left, resulting in a diagonal stitch with a direction from top to bottom;
- From the inside out, insert the needle into the upper right corner of the next cell and repeat step 1;
- Perform a row of oblique stitches, repeating pp. 12;
- Go down a row: insert the needle into the lower left corner and from the inside out, bring it out in the upper right row of the cell located one row lower;
- Horizontal rows are made with this stitch from right to left (odd) and from left to right (even).

Horizontally, vertically and diagonally, the oblique seam is performed according to the following scheme:
Embroidery with a tapestry stitch is accessible to everyone, but requires careful execution: all stitches must be made identical and tightly adjacent to each other. The back side should look no less neat than the front side.
The photo shows what an oblique tapestry stitch looks like in embroidery:


Embroidery patterns: