Beautiful do-it-yourself cards for a guy. DIY postcard for your beloved man on his birthday. Sensual frame in red and brown tones
We love holidays and love gifts. And we all love postcards - receiving and giving. Postcards are given for many occasions - birthday or New Year, March 8 or the birth of a child.
You go into a store - there are a lot of postcards, even the text is already printed inside - everything has already been thought out for you and said, but not from the heart.

Gift with love
Only handmade postcards can convey your feelings towards the recipient. Buying a regular cardboard card is easy, but making one yourself means putting a part of yourself into it. After all, when making such a gift, you imagine the person for whom it will be intended.

Remember, we are all in childhood, in kindergarten or at school they tried, they made cards for parents for the holiday - they carefully cut it out, folded it, and glued it on. Then they handed it over. Remember how carefully mom and dad accepted the gift, kept it, and many still keep it with your children's drawings and crafts.
Today, handmade products are becoming more and more popular. Embroidered pillows decorate the home, knitted items are worn with pride. Only the very lazy don’t sew, knit or glue.

Scrapbooking is gaining more and more admirers - photo albums, paper cards, made with love, made in a single copy - become a unique gift for various holiday events.

For anyone who has mastered at least the basics of scrapbooking, there is no question of what to give to a loved one, and these gifts evoke admiration.

The art of giving joy
Creating postcards from paper is called cardmaking. It is based on the use of paper and various additional materials. An experienced scraper will use everything when making a postcard - ribbons, small paper flowers, fabric flowers, cutting - elements cut out of paper, buttons, lace and much more.
There are many techniques for making postcards from paper.

Experienced craftswomen make multi-layered three-dimensional products; the more layers, the more interesting the postcard looks.

The elements are connected to each other with glue and even stitched. The styles in which the craftsmen work also differ - shabby chic, steampunk and others.

It is impossible to create two completely identical postcards.

It is impossible to say that cardmaking is a simple art. Indeed, in the process of creating just one thing, a composition is created, changed, and formed. A scraper must be an artist - know the basics and subtleties of creating an ideal composition, selecting materials, and combining colors.
Sometimes this process of selection and application takes more than one hour, or even a day - the artist is a delicate nature, there is no inspiration, and nothing masterpiece will be created. And sometimes everything seems to come together on its own - and here is a do-it-yourself card for the birth of a child or for a birthday loved one ready.

Look at a variety of photos of postcards - how rich the imagination of the craftsmen is, creating harmonious compositions from many small scattered details.

We create the gift ourselves
Experienced scrappers use special scrap paper for their work - it is thick and has the property of not fading or fading over time. This ensures that your gift will retain its beauty for a long time.

Scrap paper comes with various designs and is sold in sets or individual sheets.
Note!

We will also need:
- Thick plain paper for the base - watercolor is suitable.
- A utility knife and a metal ruler (if you get into scrapbooking, you can later purchase a special cutter to cut the paper evenly - scissors are not the best option for this).
- Scissors for cutting out small parts.
- Glue - ordinary PVA, stationery - will not work, it warps the paper, and over time it will turn yellow. Take Titan, Moment and the like - scrap goods stores will advise you and others - see what is available to you.
- Double-sided tape - it can also be used to connect elements of a postcard, and with porous tape you can create multi-layer three-dimensional compositions.
- Decorative elements - flowers, cuttings, ribbons, pieces of lace, elements cut out of scrap paper - butterflies, birds, twigs and others.

Buttons, pendants, buckles and other small objects can be used to create the composition.

Stamps are often used - with their help you can create an interesting background for a future postcard, add certain elements, and make inscriptions.

An interesting technique when creating three-dimensional cards is embossing - a transparent stamp is applied to the base, which is sprinkled with special powder.
The last stage - the powder is dried using a special hairdryer - the result is a three-dimensional image: most often this technique is used when creating the contours of a picture and inscriptions.

Figured hole punchers - they can make an openwork edge, they can be used to make voluminous flowers and cuttings.
Note!


In general, there are many professional tools for scrapbooking and cardmaking; it makes sense to purchase some only when making cards for sale. But having mastered the art, you will not only please your friends original gifts, but also replenish the family budget.

Select several sheets of scrap paper that match the style and color, apply a background to the base, and decorative elements matched by color on it. The composition must form a cohesive whole so that each element has meaning.
You can use special sketch diagrams; they will tell you how to arrange the elements to create a harmonious composition. Having carefully prepared everything, making sure that every element is thought out, glue it.

If something seems to be missing, add a couple of sparkles along the edges of the flowers, rhinestones, half beads. The main thing is the unity and thoughtfulness of the composition so that the postcard does not look like an appliqué.

There are many tricks on how to make a beautiful card:
- quilling - curls are twisted from thin strips of paper, then they are given various shapes - these elements are glued to the base, creating a pattern, a design - three-dimensional cards are obtained;
- iris folding - small strips of paper, ribbon, fabric are folded in a spiral, overlapping each other - an unusual pattern is obtained;
- shaker card - a multi-layer card with a transparent window, inside which small elements move - foil rhinestones, beads;
- postcard-tunnel - a three-dimensional postcard with many layers, the cut out elements of each layer create an overall spatial pattern.

Note!

The inside of the card can also be decorated with stamps and paper. Can be done unusual postcard inside - when opened, the volumetric element expands - a heart or a bouquet of paper flowers will undoubtedly surprise the recipient.
You can't help but like such a paper postcard - it keeps warmth and a piece of your soul. If you want to master the art of cardmaking, attend master classes experienced craftsmen, which will tell you all the subtleties - how to make a beautiful postcard with your own hands.

Photos of postcards with your own hands


They say that it is no longer customary to give cards. This is complete nonsense, because it’s always nice to receive handmade congratulations, especially if they are from loved ones.
When it comes to a child, through a hand-made picture he will be able not only to express his feelings, but also to show the presence of certain talents and character traits. And give such a card to your girlfriend for her birthday.
In this article I will give not only ready-made templates for creativity, but also ideas that you can implement. All options are not complicated, but will require high-quality materials and a huge amount of accuracy.
You want to please these close women in a special way on their holiday, so you need to choose the right colors. Delicate shades and smooth lines immediately come to mind.
Some ideas can be taken from the article about.
For example, ideas with images of dresses are very interesting.

Let's make this decor with our own hands.

We will need an openwork napkin for cupcakes or sweets and glue.

You can create Beautiful design, having worked well with a stationery knife.
For example, this idea. 
Take thick two-color cardboard, the kind sold in scrapbooking or craft stores.
A drawing is drawn with a pencil; you can take it from anything on the Internet, for example, a cake or candles. Then, using the sharp tip of a stationery knife, it is carefully squeezed out along the lines.
The main thing is to place a board under the cardboard so as not to spoil the surface of the table.
You can leave it this way, but it is better to glue a rectangular sheet as a backing for the inscription.

Another idea where some elements are cut out. The inscription and plant elements can be repeated with a black helium pen.

Check out another idea with an asymmetrical front edge. Here, by the way, some elements can also be cut through.

Another master class on how to make a three-dimensional postcard inside.

For carved edges, you can use special scissors that give a cut in the shape of a curly line. By the way, my daughter and I have already purchased such an office. The child was slightly shocked that scissors could cut more than just straight.
Ideas for congratulating a man (dad or grandfather)
For men, congratulations are needed with a universal design. And it’s even better if there is a special minimalism in decoration.
You can only use a sheet of paper and multi-colored braid, as in this option.

Notice the interesting edges of the leaf. And for the inscription you can use transparent tracing paper. You might have seen this kind of paper in boxes of candy.
Or another very laconic design that is very suitable for a men's holiday.

Here is a diagram for such a composition, you can even print out the template and make an inscription on it.

Look how bright and festive the design looks, but there’s nothing special about it. Just colorful dots placed in a chaotic order.

The scrapbooking technique allows you to create three-dimensional products. Different textures and shades are used for decoration.

Or you can work really hard and make a greeting with origami elements. All detailed master class is described.

I also liked the laconic idea with geometry. For example, using strips. It turns out strictly, but very elegant.

Stripes can not only be drawn or pasted from paper. But take a closer look at dark tape or braid for this purpose.
Making cards from paper and cardboard in kindergarten with children
Children often make appliqués using paper and cardboard. This is the most affordable material and can be made from it different shapes and figures.
For babies middle group there is an excellent master class. Keep in mind that at this age they may not be able to cut pieces straight on their own, so be prepared to help.
We will need:
- Sheet of cardboard
- A sheet of white, green and yellow paper
- Scissors
We need to make stripes 1 centimeter wide on the daisies.

We glue the edges and get a drop.
Cut out circles with a diameter of 3 centimeters from yellow paper. And glue our droplets to the middle.

This is what happens.

Now you need to cut out the stems from green paper. We form flowers.

The junction of the stems can be decorated with a bow.
Another one step-by-step instruction creating a design with daisies.

We draw with paints or a felt-tip pen the place for the inscription.
Cut out 4 daisies and paint over their core. We also prepare in advance three strips of green paper, 0.5 centimeters wide.

We form the arrangement of the stems and glue the strips.

Glue a piece of double-sided tape to the underside of the daisies and trim the stems to make them shorter.

Glue flowers to the stems. We make an inscription and a bow.

The edges of the postcard can be shaded or covered with colored paper. You can not touch them at all and leave them as is.
How to make a card with flowers for a woman's birthday
It is customary for women to be given not only bouquets of fresh flowers, but also postcards with their images.
I suggest making such a cute applique.
You will need:
- Sheet of cardboard
- 2 sheets of thick double-sided pink paper
- two color ribbons
- white textured sheet
- ruler
So first you need to cut out the vase.
I have provided a template for the colors to be cut out.

You need to bend the petals using a ruler, like this.

You can use this template.

Look how tender such a simple congratulation looks. Even a schoolchild can repeat this idea. Moreover, roses can be replaced with another form of flowers or even hearts or circles can be depicted in their place.

An option for those who do quilling. Or a great opportunity to start practicing this technique. There are many on the Internet detailed instructions about this theme.
This decoration turns out to be very self-sufficient; you don’t even need to add an inscription.

For needlewomen who use felt or sewing in their creativity, I offer this idea.
It is better to glue the parts using hot glue.

I think that you can easily implement all the options shown, the main thing is to approach it with soul.
Ideas for simple congratulations on
balls
Balloons are one of the most important attributes of the holidays. And on your birthday they must be present, even if only on a postcard.
Check out the selection interesting ideas. Perhaps they will inspire you for a creative evening.

An idea with grooved balls arranged in a precise geometric grid.
These circles can be cut from packaging cardboard if you remove upper layer and get to the stiffeners.

Better yet, give a whole armful of multi-colored balloons so that the birthday boy can fly away to his swords on them.

A more complex design idea.

Unusual color of balls. They are cut out from background images.

Glue the decor onto bulky double-sided tape. Then you get a 3D variation.

Another simple idea.

Notice how nicely simple small translucent buttons fit into this design.

You can download any font for an inscription and install it in the simplest graphics editor, even Paint on your computer.
Write a congratulation in it and translate it by attaching the paper to the monitor. And now you have a template ready.

The background can be taken not only white, but also black. In general, give preference to contrasting, calm options.

I think that absolutely any needlewoman can use balls in her composition.
Simple gift ideas for your sister or friend
Girls make cards much more often than boys. Therefore, there are many more feminine ideas.
For your friend, you can make a figured congratulation in the form of a crown.
You can use any template for it.

Also cut out animal shapes.

Prepare letters for congratulations from different textures and make an inscription from them.

Just stick on a lot of hearts.

Give the gift of a button rainbow! I liked this idea more than all the others. Incredibly simple, but tasteful.

Another idea is to use a bouquet of hearts. By the way, to make this option more interesting. Machine stitch with white thread along the center line of each heart.

Also stylish and laconic design using a contrasting backing and many circles.
Such even circles can be obtained by using a hole punch.

My dears, I have analyzed those options that you yourself can repeat at home and with the simplest materials at hand. I will be happy if you add this article to your bookmarks.
Romantic, love cards always include hearts and declarations of love on the cards. Such cards are given on occasion or without it: on Valentine's Day, Birthday, on the anniversary of a relationship, on the occasion of reconciliation, as a token of gratitude, etc.
 On the eve of Valentine's Day, the news portal "site" has prepared for you an excellent selection of cards for your loved ones, which you can easily make with your own hands in a matter of minutes.
 DIY postcards
Postcards to your loved one
DIY postcard with a voluminous heart
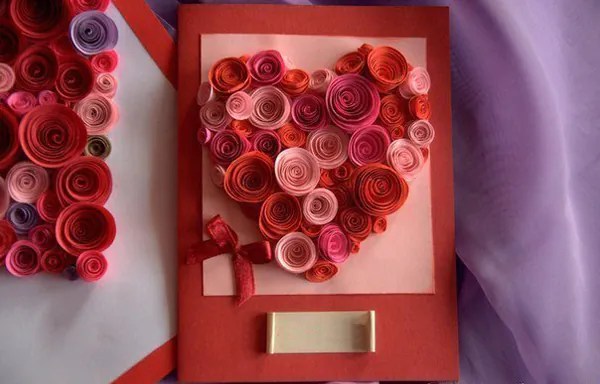 Such a luxurious voluminous heart will be a wonderful touching decoration for your homemade postcard. It's very easy to do. To make it you will need: colored paper, a sheet of thick colored paper (preferably choose red or its shades) for the base of the card, PVA glue and scissors.
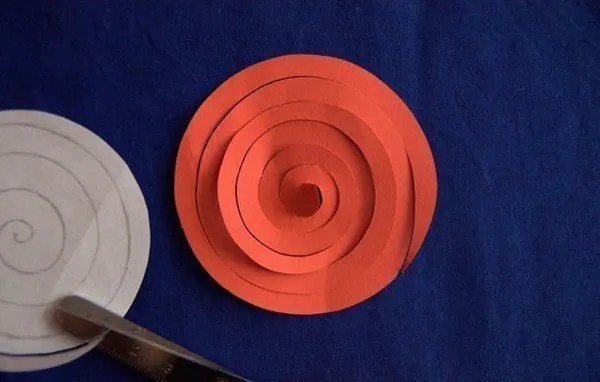
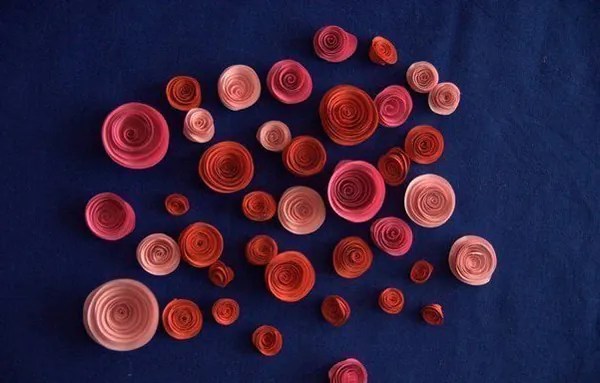 Cut out from colored paper a large number of multi-colored circles. Try to choose paper colors that are the same color, but different shades.
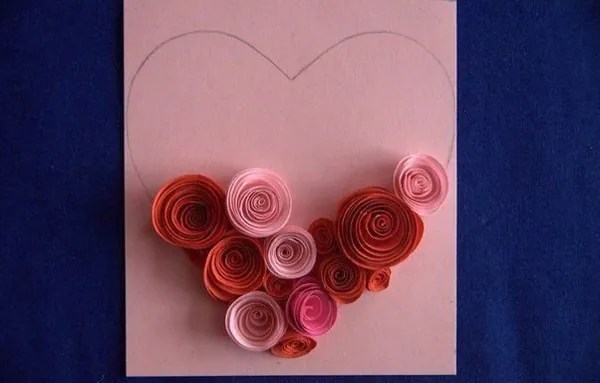 Then, using a pencil, draw a neat spiral on each circle and cut it out. Then form a small rose out of the finished paper spiral and secure it with PVA glue. From the resulting large number of paper roses, form a voluminous heart on front side romantic homemade greeting card. Glue the roses using PVA glue or double-sided tape.
DIY love tree postcard
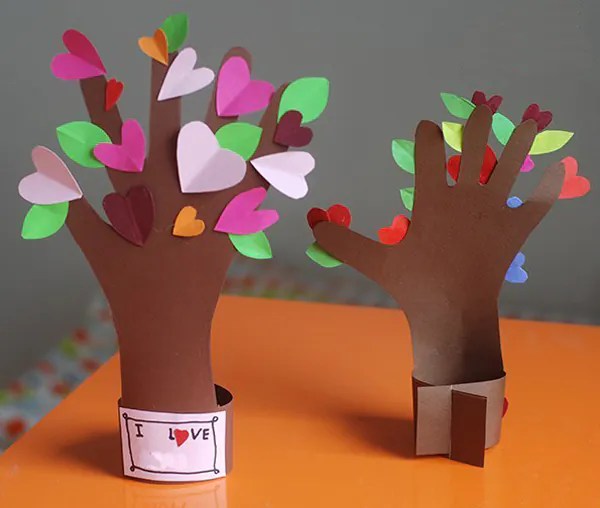 Very sweet and bright postcard, which you can easily make with your own hands from colored paper.

 Trace your palm on colored paper Brown. Carefully cut it out. You should end up with a small tree with a trunk and branches. Since it’s frosty February outside, I really want spring to come soon and warmer weather. rays of sunshine, decorate the tree with multi-colored hearts.


 On each heart you can write declarations of love, give compliments or write to your lover why you love him.
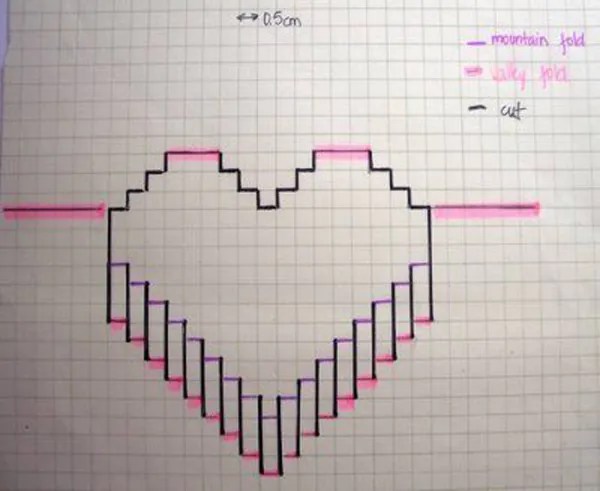
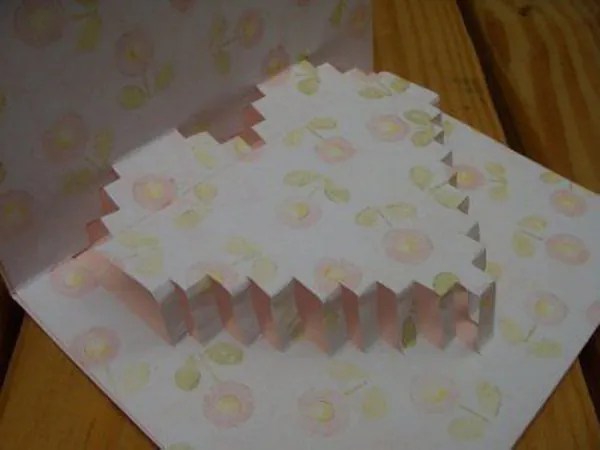
Postcard to your loved one with a heart
 An unusual, but very easy to make postcard. Cut strips of the same width from decorative paper, but different lengths(see template).


 Glue pieces of decorative paper to the shape of the template and glue it inside the card. Cut out a neat, large heart on the front of the card.
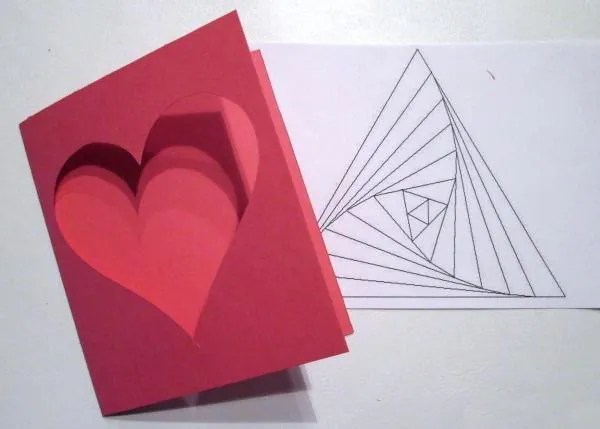
DIY postcard with 3D heart
 This version of a romantic postcard for a loved one is for the most patient and careful people in love.

 Precision and impeccable accuracy are very important in the production of this postcard.
The news portal “site” wishes you to love, be loved and try to make each other’s lives much brighter and warmer.
YouTube channel Red Ted ArtWhat do you need
- Thick blue or turquoise double-sided paper;
- scissors;
- ruler;
- a simple pencil;
- thick white paper;
- colored paper with drawings and patterns;
- glue stick.
How to do
1. Cut a rectangle measuring 15 x 11 cm from blue or turquoise paper. Fold it in half crosswise. Cut a rectangle measuring 14 x 10 cm from a white sheet.
 YouTube channel Red Ted Art
 2. Fold the white piece in half crosswise. On the fold side, make four cuts at equal distances from each other. The first two (at the bottom of the paper) should be the same. The third is about 1 cm shorter, and the fourth is even slightly shorter in length.
 YouTube channel Red Ted Art
 3. Fold the cut pieces as shown in the photo.
 YouTube channel Red Ted Art
 4. Unfold the strips and open the paper. Bend the cut pieces inward along the marked folds.
 YouTube channel Red Ted Art
 5. Cut out three rectangles from colored paper according to the size of the layers of the future cake. They should be quite a bit taller than the white stripes. Fold them in half and glue them to the sheet.
 YouTube channel Red Ted Art
 6. Bend and straighten the white sheet again so that the lines on the cake are more clearly visible. Cut out several candles in the form of small rectangles from bright paper, and the same number of droplet figures from yellow paper. Glue the droplets to the candles and them to the cake.
 YouTube channel Red Ted Art
 7. Lubricate with glue white paper on the reverse side and attach it to the blue base. The card can be signed next to the cake or outside.
What other options are there?
Incredible beautiful card with a voluminous round cake:
A piece of festive dessert is hidden inside this option:
Print it out, cut along the lines and create a card like this:
And here is perhaps the most easy option: with a drawn cake. It looks simple, but very cute:

What do you need
- Thick gray paper;
- double-sided paper of different colors;
- ruler;
- a simple pencil;
- scissors;
- double sided tape;
- compass;
- regular glue and/or glue stick;
- glue gun;
- twine or other thick threads;
- White paper;
- felt-tip pen;
- glue stick;
- colored tape.
How to do
1. Fold gray construction paper in half crosswise. Cut a rectangle with sides 20 and 14 cm from a pink sheet. Cut a rectangle measuring 16 x 10 cm from gray construction paper.
Using double-sided tape, glue the small gray part onto the pink one, and secure the latter onto the cover of the future card.
 YouTube channel Crafting Hours
 2. Cut many strips of colored paper of different thicknesses, but the same length. These are blanks for balls. Conditionally divide one strip into three parts and bend it twice along the lines.
Draw on the resulting part using a compass. Cut along the contour - you will have three circles.
 YouTube channel Crafting Hours
 3. Prepare circles from the remaining colored stripes in the same way.
 YouTube channel Crafting Hours
 4. Cut small triangles from the remaining folded paper. Glue them to the bottom of each circle.
 YouTube channel Crafting Hours
 5. Fold a small strip of paper in half. Unfold and fold each side like an accordion, as shown in the photo and video below.
 YouTube channel Crafting Hours
 6. Make as many of the same parts as you have balls. Glue them to the circles so that the accordions are on top.
 YouTube channel Crafting Hours
 7. Using a glue gun, attach a piece of twine or other thick thread to each ball.
 YouTube channel Crafting Hours
 8. Fold the long edges of the white paper about 2 cm and cut along the contour so that you get two strips folded lengthwise. Fold each one in half crosswise three times. Cut out identical triangles from them so that the bases of the shapes are on the fold. Details are in the video below.
 YouTube channel Crafting Hours
 9. Write one letter from the phrase “Happy Birthday” on each triangle. Lubricate the inside of the flags with glue, put them on two pieces of rope and glue them together. Tie the ends of these two strings together.
 YouTube channel Crafting Hours
 10. Lubricate the accordions with glue on the back of the balls and distribute them beautifully inside the card. Save a few for the cover.
 YouTube channel Crafting Hours
 11. Tie the ends of the twine, twist and cut off the excess. Using a glue gun, attach the letter flags to the card.
 YouTube channel Crafting Hours
 12. Write a congratulatory message at the bottom of the cover. Glue a few balls at the top. Cut off the excess twine and tie it with ribbon.
What other options are there?
You can make a three-dimensional postcard with balls flying out of the box:
Here's a similar option:
Here's how to make balls using the quilling technique:
And this simple card, made using the appliqué technique:
How to make birthday cards with flowers

What do you need
- Thick crimson double-sided paper;
- a simple pencil;
- scissors;
- pink double-sided paper;
- glue;
- colored paper or;
- several beads;
- White paper.
How to do
1. Fold the crimson paper in half crosswise. Draw a smooth line in front, as shown in the photo, and cut along the contour.
 YouTube channel Tonni art and craft
 2. Use scissors to divide a sheet of pink paper in half crosswise. The half should be the same size as the folded card. Glue the paper to the back cover.
Draw semicircles on pink paper along the edge of the cover. For convenience, you can outline the lid or something else. Cut along the outline.
 YouTube channel Tonni art and craft
 3. Form from papers of three two small identical squares of different colors. You can use stickers without adhesive.
Fold one diagonally. Then bend the corners as shown in the photo or video below.
 YouTube channel Tonni art and craft
 4. From the corner side, draw something like a heart on the figure and cut it along the contour.
 YouTube channel Tonni art and craft
 5. Open the part and curl the petals with a pencil. In the same way, fold the second square of the same color, draw a heart on it and cut it out. Open, shade the beginning of the petals and twist them outward. Make a small cut in one place between the petals and glue one petal to the other.
 YouTube channel Tonni art and craft
 6. Secure the second flower to the first. Place a bead in the middle. Make two more flowers in the same way.
 YouTube channel Tonni art and craft
 7. Cut out several small rectangles from green paper. Green stickers can be divided into two parts.
Fold the rectangle in half crosswise, then fold it again. Draw half a leaf on the part. Cut along the outline. You will get two leaves. Make six more in the same way.
 YouTube channel Tonni art and craft
  YouTube channel Tonni art and craft
 9. Attach several beads to the fold of the cover. Write a congratulatory message on white paper, cut it out and glue it to the back sheet of the card in the part visible from the front.
You can write a congratulation by pasting white paper inside. Or add interesting inserts to the inside of the card, as was done in the master class.
What other options are there?
Here you can see how to make a three-dimensional flower inside a card:
In this instruction, the flowers are made very simply - from twisted spirals:
And here is a postcard bouquet. The flowers are made using the same principle as in the previous video:
How to Make a Pop-Up Cupcake Birthday Card

What do you need
- Pink double-sided paper;
- ruler;
- a simple pencil;
- scissors;
- glue;
- White paper;
- double-sided bulk tape;
- paper of different colors;
- Red ribbon;
- felt-tip pen.
How to do
1. Fold a sheet of pink paper in half. Place it so that there is a fold at the bottom. Place a ruler at a slight angle on one edge and draw a line. Approximately in the middle, draw another slanted line so that the figure resembles a pot.
 YouTube channel Crafting with Rachna
 2. Cut out the part along the marked lines. Apply glue to the side edges inside the figure.
 YouTube channel Crafting with Rachna
 3. Connect the elements and press the paper on the sides so that it sticks together. Place a ruler in the resulting pocket and measure the distance from the bottom to the edge. Also measure the length of the bottom edge of the figure, stepping back a little on the sides. The author got 9 cm.
Draw a rectangle on white paper. Two sides should be 9 cm each (or whatever value you get), and the other two should be a few centimeters more than the distance from the bottom to the edge of the figure.
The resulting rectangle should fit easily into the pink pocket. Cut out the white piece.
 YouTube channel Crafting with Rachna
 4. Place the item in the pocket. Measure the length of its top edge and the height of the pocket along with the inserted white piece.
Draw another rectangle on white paper. Its length should be 2–3 cm longer than the edge of the pocket, and the required width should be approximately half the measured height.
 YouTube channel Crafting with Rachna
 5. Cut out the cloud. Place it on top of the white piece so that it covers the pink piece. For convenience, mark the places of their contact with a pencil.
Remove the cloud. Glue several pieces of bulk tape to the visible part of the white part. Attach a cloud to them by placing it on the pencil marks.
 YouTube channel Crafting with Rachna
 6. Cut out small circles of different diameters from colored paper. Glue them to the cream, that is, to the part in the form of a cloud. Cut out a heart from red paper and attach it at the very top.
Tie a bow on the side of the ribbon. Cut out a small tag from white paper - a rectangle with cut corners. Write “For You” or a congratulation on it.
Glue this element to the bottom of the card and attach the ribbon horizontally above the tag.
 YouTube channel Crafting with Rachna
 7. Glue the ends of the ribbon to the back of the card. Write your congratulations on the white removable part.
How to make a heart-shaped card with flowers for a birthday

What do you need
- Thick pink or raspberry double-sided paper;
- scissors;
- ruler;
- a simple pencil;
- White paper;
- stationery knife;
- glue;
- self-adhesive rhinestones;
- peach double-sided paper;
- stationery proofreader in the form of a pen;
- hole puncher;
- pink ribbon.
How to do
1. Cut out a piece measuring 30 x 15 cm from pink construction paper. Make marks on the sides at a distance of 7.5 cm from the edges.
Place the ruler vertically on one side of these strokes. Fold the paper along the ruler. In the same way, bend the sheet from the other edge.
 YouTube channel Mukta Art & Craft
 2. Fold the future card along the fold lines. Cut out a piece from white paper: its width should match the width of the postcard, and its height should be slightly smaller. Bend it in half crosswise.
 YouTube channel Mukta Art & Craft
  YouTube channel Mukta Art & Craft
 4. Open the heart, attach it to the card and trace the outline. Using a ruler, add two horizontal lines at the top and bottom where the shape ends. At the top, near the middle, draw two small vertical lines.
The lines are visible in the photo. And the video below has all the details.
 YouTube channel Mukta Art & Craft
 5. Open the card and cut the paper along the lines on both sides with a utility knife.
 YouTube channel Mukta Art & Craft
 6. Cut out a piece from white paper to fit the back of the card. The height should be slightly smaller so that you can see from above and below pink color. Glue the part from the inside.
 YouTube channel Mukta Art & Craft
  YouTube channel Mukta Art & Craft
 8. Cut out three squares with sides of 5 and 4 cm from peach paper. Fold each piece in half twice. You will get small squares.
On one of them, closer to the corner, draw a circle. Draw something like a triangle in the corner.
 YouTube channel Mukta Art & Craft
 9. Cut out the part along the contours and unfold it - you will get a flower. Make the same elements from other squares. Using a pencil, curl the petals inward.
 YouTube channel Mukta Art & Craft
 10. Apply glue to the edges of each petal of one small flower and glue them together to form a bud. The detailed process is shown in the video below.
Apply glue to the petals of a second flower of the same size and glue the first bud to it. Then attach the third piece in the same way.
Glue the large parts on top of each other, and attach the resulting lush bud on top.
 YouTube channel Mukta Art & Craft
 11. Make two more flowers: one the same size, the other smaller. Glue all three to the side of the heart.
 YouTube channel Mukta Art & Craft
 12. Using a proofreader, write a congratulatory inscription on the other side of the heart. Also print inside the postcard pleasant words. Use a hole punch to make one hole in the middle of the heart, thread a ribbon through it and tie it with a bow.
How to make birthday cards with a butterfly
 YouTube channel Tonni art and craft
 What do you need
- White paper;
- a simple pencil;
- scissors;
- stationery knife;
- raspberry double-sided paper;
- pink double-sided paper;
- double-sided bulk tape;
- pink or red pencil;
- self-adhesive rhinestones;
- peach or pink ribbon;
- simple double-sided tape.
How to do
It has the outline of a butterfly on it, as shown in the photo and video below.
 YouTube channel Tonni art and craft
 2. Cut out the shape. Open the butterfly and divide it into two equal parts with scissors. One of them will serve as a template.
 YouTube channel Tonni art and craft
 3. Draw a pattern on the template as shown in the photo or video below. Go over the pencil sketches with a utility knife and remove any excess paper.
 YouTube channel Tonni art and craft
 4. Attach the template to the raspberry leaf and trace the outlines inside and outside. Cut out the piece with scissors and use a knife to remove excess paper to create a pattern. Make the second wing in the same way.
 YouTube channel Tonni art and craft
 5. Place one wing on the pink paper and trace the outer and inner contours. Place the second wing next to it and do the same.
 YouTube channel Tonni art and craft
 6. Cut out the pink parts along the outer contours. Color in the edges of the patterns with a colored pencil.
 YouTube channel Tonni art and craft
 7. Glue the crimson parts to the pink ones using bulk tape. Details are in the video instructions below. Decorate the wings with rhinestones.
Cut a piece of tape and attach simple double-sided tape to the edges. Glue the wings to them.
 YouTube channel Tonni art and craft
 8. Along the edges of the tape, on opposite sides, make a small vertical cut. Write your congratulations on white paper and roll it into a tube. Wrap it with tape and “fasten” it at the cuts.
What other options are there?
Here is another similar composition:
Here's how to make a card with an elegant carved butterfly:
And another cute option with a voluminous butterfly and an unusual cover:
Good day! A selection of ideas on how to make a postcard for a man with your own hands! A postcard in the shape of a shirt or tuxedo is an original addition to a gift.
It's always difficult to come up with a gift for a man... Let's try to surprise him with this shirt and tie using the origami technique.
DIY postcard in the form of a shirt and tie
This card can be used as an envelope for money or you can write a congratulation on the back side. It is perfect for any occasion - Father's Day, brother's or grandfather's birthday, February 23rd. Instead of a tie, you can tie a bow tie or a headband. This postcard is very easy to make and takes about 10 minutes.
For work we will need:
- colored cardboard or A4 paper, choose the color according to your taste or the taste of the birthday boy
- bright ribbon.

Place the paper face down and fold the vertical edges toward the middle. The folds must be symmetrical and even.
We unfold the edges back and bend the upper corners inward along the fold line. Be sure to make sure the corners are turned evenly.
We fold the same corners in half inward. Try to make the correct fold right away; several folds in one place will not add beauty to the card.

Along the resulting fold line, we continue to bend the top of the paper down. The resulting triangles along the edges will be the sleeves of the future shirt.
We turn the paper over to the other side with the “sleeves” down and fold down a strip from the top along the width of the taken ribbon.
We turn the paper over to the other side and make a collar, bending the upper corners towards the middle.

Unfold the resulting collar, insert a ribbon at the fold and fold it back. Straighten and align the ribbon.
We fold the bottom of the paper upward, under the collar and tie a tie.
DIY greeting card for a man Tuxedo
Let's not waste precious time looking for interesting and original postcard for your birthday, let's do it ourselves. Moreover, it is not difficult at all and only takes 10 minutes!

The theme of our card will be traditional Man's jacket- the tuxedo.
For work we will need:
- paper of only two colors: white and black;
- glue;
- scissors;
- a pair of small white buttons.

Prepare necessary materials so that everything you need is at hand.
Fold the blank under the card in half. Now you need to cut out a piece of black paper that is the right size for the front of the card.
Divide the black rectangle vertically in half and choose the depth of the cut to your taste. Step back 1.5-2 cm from the edges at the top and connect the lines with a ruler. Glue the rest to the card base. Cut a triangle from the black paper.

From the black triangle, cut off the excess, and in the end we will get a butterfly bow.
Glue the bow to the card.
The final step is gluing the buttons.
Beautiful card DIY shirt for a man’s birthday
Another simple idea for a men's card in the form of a shirt and tie.

Fold a piece of paper in half as shown in the picture. Make two cuts on different sides and bend the cut corners.
Cut out a tie from a different color of paper and glue it onto the card. You can also make a bow tie. Glue the corners of the collar of the resulting shirt, attach the buttons.
You can use any accessory that matches the size of the button. Don't use buttons that are too big, it will look bulky.
The postcard is ready!
Postcard Ties
Such a card with ties can be made for any men's holiday and for any man - husband, dad, grandfather, brother. It will take a little time, about 20-30 minutes.

Necessary:
- several matching shades of paper;
- scissors;
- paper glue and, preferably, hot glue;
- wire;
- pliers.

We use wire to make a hanger shape. To do this, bend the wire into a triangle with the end sticking out from above. We bend the hook at the end and twist the remaining edge at the base of the hook. Align all the parts so that the hanger looks neat.

We cut out several ties from paper. Of course, it will be more interesting if they are of different colors and textures.

We bend the ties, place them on a hanger and glue them together.
We bend the cardboard in half for the base of the card; if desired, glue on an additional background; the background color should be a light shade so that the ties do not get lost against its background. Using hot glue, attach the hanger. We sign the card beautifully after it dries.


Original gift packaging for a man
There are many dates in the year to please your beloved man, brother or father. Let's try to pleasantly surprise them with an elegant and original packaging gift.

We take for work:
- white cardboard;
- black paper;
- scissors;
- glue stick.

Creating a package will take 20 minutes. Let's start with the diagram.