Schemes on how to make a Christmas tree from colored paper. Volumetric Christmas tree made of paper on the wall. Christmas tree made of paper without glue: three manufacturing options. DIY paper Christmas trees
The Christmas tree is one of the main attributes of such a large-scale holiday as New Year. Nobody forgets about it, buying live or artificial Christmas trees to their home and decorating it with different outfits, souvenirs, garlands. We will make a Christmas tree out of paper, which can be placed somewhere in the apartment (for example, on a table), or it will not even be a shame to give such a craft to relatives or friends. Next, we will deal with several ways to create Christmas trees from paper.
How to make a Christmas tree out of paper (1 way)
You will need green paper, a ruler, compasses, glue, scissors and a pencil (or a tube for juices, cocktails).

- Using a compass, draw a few circles on paper. Each next circle is 1-2 cm smaller than the previous one. Choose the number and size of the circles yourself, depending on what size you want to see the Christmas tree in front of you.
- We fold each circle in half once, a second time and a third time (that is, you need to fold each circle three times in half). To make the fold lines clear, we draw along the edges with scissors.
- We straighten the circles. We cut a hole in the center of each that matches the diameter of a pencil or tube (depending on what we will use). It is also worth saying that the circles are the tiers of our future Christmas tree.
- We glue the pencil or tube with green or brown paper.
- Now we begin to collect the Christmas tree. All tiers are strung on a pencil.
- We decorate the top of the Christmas tree with a beautiful bead or star. Decorate the Christmas tree, if desired, you can sparkle

How to make a Christmas tree out of paper (2 way)
You will need green paper, scissors, pencil, glue, compasses, ruler, needle, wire.
On green paper, draw a circle with a compass, the size of the lower tier of the future Christmas tree. Next, draw another circle inside the first circle, stepping back from the first one a little more than half the radius.
- Using a ruler, divide the circle into 12 sectors.
- Along the lines of cases, an incision to the inner (second) circle.
- We turn each sector into a cone, which we fix with glue.
- Similarly, we create the rest of the blanks, gradually reducing their size.
- We make a hole in the center of each blank with a needle.
- We turn the bottom of the wire into a spiral.
- We collect all the tiers of our Christmas tree on a wire. We fix on top a cone made of paper.

How to make a Christmas tree out of paper with your own hands using the quilling technique (3 way)
You will need: green paper strips 5 mm wide and four strips of 1 cm each, red and yellow strips 3-5 mm wide, toothpicks, glue (instant and PVA).

- We use four green strips having a length of 30, 20, 15 and 10 cm. Using a toothpick, we twist them. We remove the part from the toothpick and let it bloom a little. We fix the end of the strip with PVA glue. We give all the spirals the shape of a drop by holding and slightly pulling one of the ends of the spiral up.
- Tightly wrap wide green stripes on a toothpick and glue the tip to them, preventing it from blooming. This will be our tree trunk.
- For the top of the Christmas tree, we make a drop from a green strip with a length of 30 cm.
- Now we begin to collect the Christmas tree, fixing its elements with instant glue. We glue the parts of the trunk and give the glue time to dry.
- We insert a toothpick inside the trunk and glue our droplets-twigs. We start gluing with the smallest ones, which we glue to the top of the Christmas tree.
- We make toys from yellow and pink stripes by twisting the paper without using a toothpick. You can fasten the ends until the paper is unwound, or you can make the toys a little looser and give them the shape of small droplets. Glue balls to the branches you like.
- We glue the drop at the very top (do not forget about it), and decoration on it.
- You can make, if desired, a stand. To do this, you will need to make nine curls from white paper strips. Tightly glue the curls together. Now we fix the Christmas tree on a snowy white stand with glue.
How to make a Christmas tree out of paper with your own hands (4 way)
You will need: green cardboard, glue, scissors, adhesive tape, colored paints, pencils, felt-tip pens. As additional decorations stickers, glitter, etc. may be used.
- Fold a sheet of cardboard in half and cut it along the fold line.

- Fold the resulting parts in half again.
- Draw a half of the Christmas tree on one of the halves of the cardboard opposite the fold (see picture).

- Fold the sheets together and cut with scissors along the drawn line. As a result, you will get two Christmas trees of a similar size.
- Mark the middle of each tree discreetly using a ruler.
- Make an incision on one tree, starting from the top to the middle, and on the other from the bottom (base) to the middle.

- Insert the Christmas trees into the cuts to end up with one voluminous Christmas tree.
- To give the Christmas tree more stability, use adhesive tape - use it to glue the lower and upper halves.

- To decorate the Christmas tree, use pencils, felt-tip pens, sparkles and other materials. You can use a hole punch to make small multi-colored circles, which then stick on the Christmas tree. An asterisk can be glued to the top of the head with tape.

How to make a Christmas tree out of paper (5 way)
You will need: colored cardboard, glue, scissors, a hole punch, a small stick with a diameter approximately equal to the diameter of the holes that are obtained from the hole punch, decorations to taste. 
A rectangular cardboard is taken, folded several times as shown in the picture above, and then pierced in the center with a hole punch. Then this cardboard is cut at an angle so that the craft in the end does not look like a Christmas tree (see picture). We drag our stick into the hole, and if it does not hold firmly, then we can fix it with glue. We decorate the Christmas tree. Jewelry can be attached with glue. Such a Christmas tree can be placed somewhere (if you make a basis for it), or you can hang it somewhere. 
How to make an origami Christmas tree (6 way)
The material for such a Christmas tree will be one large magazine or several small magazines. If the magazine has a hard cover, then you can simply remove it.
Do the following for each page:
- Starting from the top right corner, fold the page at a 45 degree angle.
- Fold the sheet diagonally in half again.
- The corner that extends from below the borders of the magazine must be tucked up.
- Do the same with the rest of the pages. this procedure and in the end we get a beautiful origami Christmas tree.


How to make a Christmas tree out of paper using the origami technique (7 way)
First, you will need to make triangular modules, from which the Christmas tree will take shape. They are easy to make. You just need to know how to make them and be careful when creating them.

Modular craft
1. We fold the module
2. We collect twigs
3. We begin to collect the Christmas tree
How to make a Christmas tree from corrugated paper (8 way)


How to make a Christmas tree from paper strips with your own hands (9 way)

You will need:
- colored cardboard or green colored/wrapping paper
- tape (in this example, its width is 6 mm and length is 25 cm)
- fine brush
- 1 bead bright color(in this example golden)
- a few beads of a different color (in this example, 12 brown beads)
- scissors
- ruler
- pencil
1. Draw and cut strips of colored cardboard 4 cm wide and long: 8, 10, 12, 14, 16 and 18 cm.


2. With the tip of scissors or a needle, make 3 holes in each strip: 1 on the right, 1 on the left and 1 in the middle.


3. Take a thin brush and make a small loop at one end.


4. Start threading a thin brush through all the holes in the paper strips. Start with the longest strip and add the next one in descending order. Add 2 beads between each strip.
5. When all paper strips are used, add 1 bright bead to the top of the Christmas tree.


6. Make a loop at the end of the brush so that the craft can be hung. Cut off the excess part of the brush.
7. Pass the ribbon through the loop and tie the ends into a knot.

How to make a Christmas tree out of colored paper (10 way)
You will need:
- thick cardboard or fiberboard
- skewer
- PVA glue, super glue or hot glue
- colored cardboard (possible with patterns and ornaments)
1. Cut a rectangle out of cardboard, which should be slightly larger than the base of the future Christmas tree.
2. Stick the skewer into the cardboard and secure it with glue.


3. Cut out some circles from colored cardboard different size and colors, 3 circles in each group. Make a small hole in the center of each circle.
4. Add a drop of glue to each hole and start stringing circles onto the skewer, starting with the largest. The distance between the circles can be up to 1 cm.
5. Cut out a star from cardboard and glue it to the top of the Christmas tree.

How to make a beautiful paper Christmas tree with roses for the new year (11 way)


You will need:
- old newspaper or unwanted book
- cone
- PVA glue
- scissors
- beads (optional)
1. Make a cone out of paper and make many roses - a few large ones for the base of the cone, medium ones for the central part, and small ones for the top part.
* If you purchased a foam cone, then you need to paste over it with pieces of newspapers (see image).
To make roses (any color), follow these simple instructions:

- Cut out squares of 10x10 centimeters from thick paper.
- Draw spirals on the squares.
- Cut out a circular strip along the intended spirals.
- Wind the paper spirals from the outer edge to the inner.
- Wrap the pink bud tightly and fasten the tip with glue.


2. Start gluing the paper roses to the cone, starting at the bottom of the cone and moving towards the crown.

3. If desired, you can glue 1 bead in the center of the roses - this way you can decorate all the roses or just some.

4. You can add one more piece of jewelry to the crown - it can be a piece of tinsel, a bell or an asterisk.
* If you want to learn how to make an asterisk, visit .
How to make a Christmas tree out of paper (12 way)
You will need:
— colored paper, colored cardboard, an old music notebook or an unnecessary book
- PVA glue
- curly scissors and simple scissors
- thick cardboard
- skewer
- glue brush (optional)
- decorations (sequins, bows, beads, buttons, stars).
1. Cut out a platform for the future Christmas tree from cardboard.
2. Insert the skewer into the cardboard platform and secure it with glue.
3. Start cutting out squares from paper. It will be more beautiful if you cut with curly scissors (they can be found in stationery).
* You need to cut 9-10 squares - first 9 squares with a side of 20 cm, then 9 with a side of 18 cm and so on, reducing each group of squares by 2 cm.
* Choose the total number of squares yourself. You can also choose the size of the squares yourself - if your Christmas tree is high, then you can reduce the size of the next group of squares by more than 2 cm, and if it is short, then less - 1-0.5 cm.
4. Cut out a few small squares from cardboard that will be between the squares of colored paper.
5. Start stringing 3-4 squares of colored paper, between which there will be a small cardboard square.
* If you use 3 squares between the cardboard parts, it is most convenient to cut 9 squares of each size.
* You can fix the squares on the skewer with glue.
6. To decorate the Christmas tree, you can gently apply some glue with a brush to the tips of the squares, then gently sprinkle glitter on them.
7. On the crown, you can glue a button with a bow or something else - an asterisk or a bead, for example.
How to make an original Christmas tree from colored Japanese paper with your own hands (13 way)
You will need:
- colored cardboard
- thick paper with a pattern (can be replaced with colored cardboard)
- colored or wrapping paper (you can use a page from an old magazine)
- a white sheet of A4 paper
- 2 skewers
- pencil and ruler
- PVA glue or glue stick
- scissors
- a darning needle (if necessary).
1. Cut out 14 rectangles of 2 of the same size from colored cardboard. In this example, 2 rectangles are 21 x 28 cm, two more are 18 x 28 cm, then (also 2 each): 16 x 28 cm, 13.5 x 26 cm, 12 x 26 cm, 9 x 25 cm, and 6 x 22 cm.
2. Preparing the basis for the Christmas tree:
Cut plain A4 paper into strips 2 cm wide. Roll the strip into a circle, add a little glue at its end and glue the next strip (see image). Repeat the same action until you glue all the strips into one large circle with a diameter of 3.5 cm.
* The larger the circle, the more stable the tree will stand.
3. Take a large rectangle of colored cardboard and start folding it with an accordion, 1.5 cm wide. Cut the ends of the accordion into a rounded shape.
4. Fold the accordion in half and glue the sides - you have a semicircle.
5. Repeat the same with the second rectangle, then glue two semicircles to form a circle - these will be the branches of the lower level of the tree.
* To secure the halves of one circle, you can pass a thin wire through them and twist its ends from the back.
6. Make similar images for 6 more levels of your Christmas tree.
7. Take colored or wrapping paper and cut off several small rectangles from it, about 2 cm wide, with which you will later cover the skewers.
The skewers will play the role of the tree trunk.
8. Thread the skewers through one large circle. Since you need to leave gaps of about 2 cm between the circles, these gaps need to be hidden, so we will wrap them in small rectangles of colored paper.
9. After each circle, wrap the skewers with colored paper, 2 cm wide, and glue its ends. Continue repeating this action until all branches of the tree are put on skewers.
10. It remains to insert the skewers into the round base (see point 2) and fix them with glue.
* You can decorate the top of the Christmas tree to your taste - a paper star, a bead or a button.
Watch also other videos on how to make a Christmas tree out of paper:
Now you know about the many ways to create a Christmas tree out of paper. Happy crafting!
Coming soon New Year! Do you already feel it coming? An active mother opens another series of materials dedicated to the most long-awaited holiday of the year. And we will start with the most important attribute New Year's festivities- Christmas trees. For the manufacture of New Year's cards, fabric and felt crafts, window decorations for the New Year, Christmas tree templates are needed that can be printed, cut out and used as a stencil. We are pleased to present to our readers a selection of 30 Christmas tree templates for paper cutting.
Christmas tree templates for crafts
These templates will serve as blanks for creating, applications, cardboard Christmas tree decorations,. They can also be used as a pattern for, textiles, a stencil for Styrofoam Christmas trees and plywood.
All images enlarge when clicked:


Christmas tree templates
Vytynanka in the form of Christmas trees - beautiful decoration New Year's window and interior design. Using these templates, you can also create voluminous Christmas trees by printing each stencil in 4 copies and gluing their sides together. These Christmas trees can also be used to make greeting cards, decorate them with a Christmas tree, make a garland out of them.
To carefully cut out a protruding Christmas tree, attach the cut out template to a sheet of thick paper or cardboard using a stapler, place the resulting blank on a rubber (silicone) needlework mat and cut out with a special stationery knife first the internal elements of the image, and then along its contour.
All images are enlarged by clicking. For the convenience of cutting out a template with a symmetrical pattern, fold the sheet with the Christmas tree pattern in half.


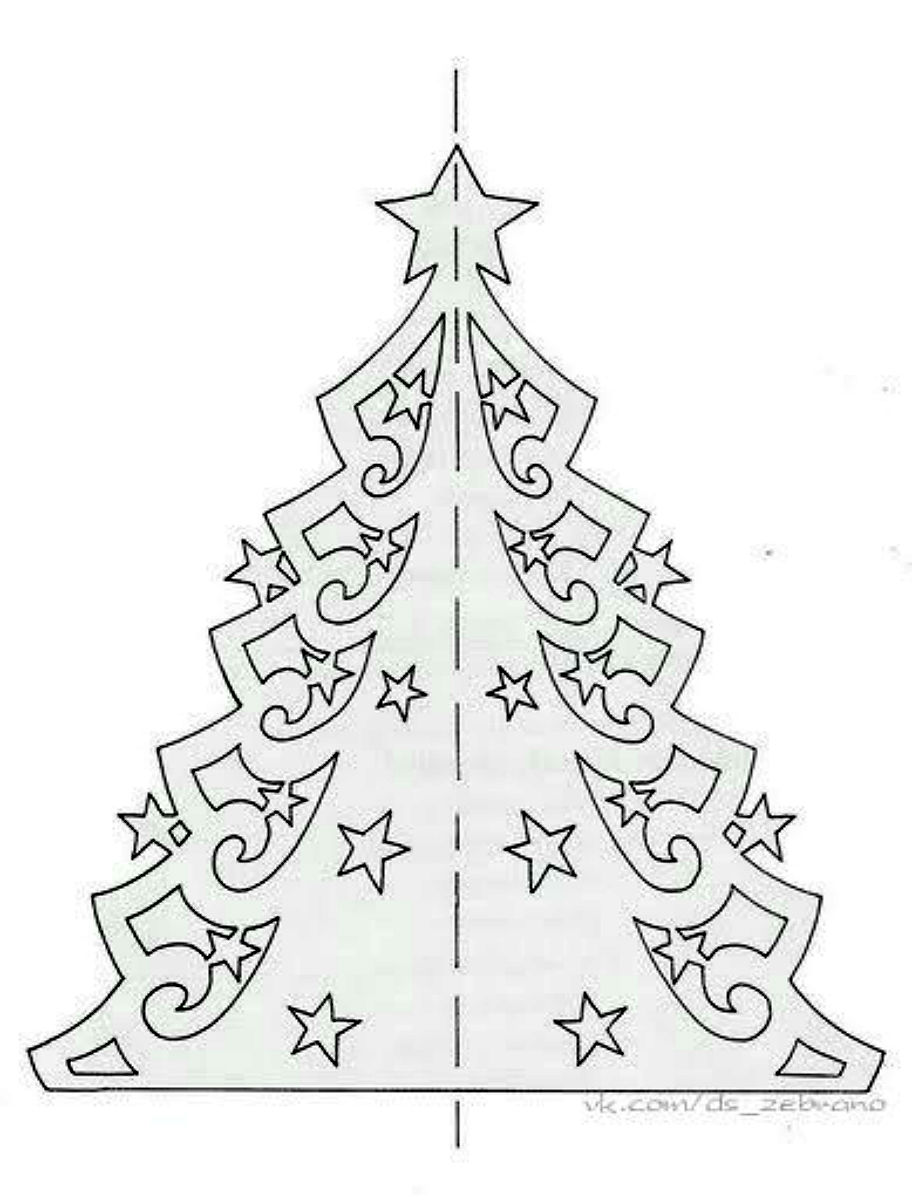


More difficult to cut, but insanely beautiful Christmas trees with an asymmetric pattern.

Today in stores you can see a large number of various trees. However Christmas tree it is not at all necessary to buy, it can be made with your own hands from almost any improvised means. Of course, you simply cannot do without a live Christmas tree at home during the New Year holidays, and a hand-made Christmas tree will perfectly decorate the house or be suitable as a gift to friends and relatives.
Craft: DIY Christmas tree
Christmas tree from magazine pages
To make a pretty Christmas tree out of magazine pages you will need:
- old magazine;
- PVA glue;
- cardboard;
- pen or pencil.
First of all, you need to make a cone out of cardboard and fasten it with glue. Neat circles or flowers of the same diameter should be cut out from the pages of an old magazine.
The resulting circles need to wrap the pencil. Thus, they will turn out a little twisted. Then you can start gluing the circles to the cone, starting from the bottom. The mugs should be glued by pressing them tightly against each other so that the cone itself is not visible. From one circle, you can make a small cone and glue it instead of the top. The tree is ready.

Christmas tree from old magazines.
Video: do-it-yourself Christmas tree craft
Christmas tree from wrapping paper
Christmas tree from wrapping paper make it very easy.
For this you will need:
- wrapping;
- cardboard;
- scotch;
- scissors;
- decorations.
As with most Christmas trees, the first step is to make a cone out of cardboard or thick paper. If the wrapping paper you are going to use is thick enough, you can make a cone out of it.
The resulting cone can be fixed with adhesive tape. Then you need to cover the cone with wrapping paper. To do this, lay the paper on a flat surface with the beautiful side down. Then tape the end of the paper to the cone, and slowly turning the cone completely wrap it with wrapping paper.
Cut off excess paper with scissors. It remains only to decorate the Christmas tree out of paper. To do this, you can cut out the stars and decorate them with sparkles, you can stick buttons, beads, tinsel, stickers or lace on the Christmas tree.

DIY Christmas tree from wrapping paper
Crafts with children: a luminous Christmas tree for the new year
A luminous Christmas tree looks very original and beautiful. In order to make such a Christmas tree with your own hands you will need:
- floristic mesh;
- floral wire;
- cardboard;
- scissors;
- cellophane;
- PVA glue;
- pins;
- decorations.
First, make a cone out of cardboard. Wrap the finished cone with cellophane. Then cut the floral mesh into small pieces and coat with glue. Glue the resulting pieces of mesh onto cellophane. Secure the resulting design with pins and wait until the glue is completely dry. After the cone dries, repeat everything done again. After the glue has completely dried, remove the cellophane from the cone. Secure the garland inside the cellophane with pins. You can decorate the Christmas tree as you wish.

The process of making a luminous Christmas tree

Do-it-yourself glowing Christmas trees
Original Christmas tree made of pasta
In order to make an original Christmas tree from pasta you will need:
- foam cone;
- gouache, acrylic paints or spray paint;
- pasta of various sizes and shapes;
- PVA glue;
- tassel.
First, paint the Styrofoam cone any color you like and let it dry. Then carefully glue the pasta to the cone. Design can be absolutely anything. Then paint over the pasta, carefully coloring all the details. It is better to cover the pasta with paint in two layers. Let your tree dry thoroughly.

The process of making a Christmas tree from pasta

Fluffy Christmas tree made of colored paper
A Christmas tree made of ribbons of colored paper turns out to be very elegant. To independently make such a New Year's beauty you will need:
- thick cardboard cone;
- colored paper;
- PVA glue;
- double sided tape.
First you need to make the base for the Christmas tree, for this we take a thick sheet of cardboard, fold it into a cone shape, fixing it with glue. Then we make thin strips of colored paper, the same in length and width. Christmas trees made of green, red, silver and gold paper look very impressive. Using glue, glue the strips along the edges, getting loops out of them. We attach the resulting loops to one side of the adhesive tape, and fasten the other side to the cone in the direction from the bottom up. Thus, a funny fluffy Christmas tree is obtained.

The process of making a Christmas tree from strips of colored paper

Fluffy Christmas tree do it yourself
Craft Christmas tree: 40 photos and workshops

Elegant homemade Christmas trees from tinsel and balls

Children's craft: green Christmas tree made of cardboard or paper

New Year's crafts with children: a Christmas tree made of cones and balls made of fabric or yarn

Multi-colored Christmas trees made of yarn with your own hands

Children's craft: Christmas tree made of felt and buttons

Flat Christmas trees from dishes - an unusual idea

How to sew an elegant Christmas tree - an idea for the New Year

How to weave a Christmas tree from beads with your own hands

Flat Christmas tree made of twigs for wall decoration

Beautiful Christmas tree made of lace with your own hands

Master class: volumetric Christmas tree made of paper using quilling technique

Stylish tree made of jute and beads

Craft Christmas tree from plastic forks and other utensils

Miniature Christmas trees made of beads

Beautiful Christmas trees from ribbons

How to make a Christmas tree from yarn and buttons with your own hands - master class

Little lace Christmas trees

Crafts - Christmas trees from burlap and spices

Christmas tree made of coffee, beads and satin ribbons

Two Christmas trees from pine cones

Knitted Christmas tree - photo

How to sew a Christmas tree from scraps of fabric

Unusual Christmas tree made of plastic spoons

Gift Idea: Candy and Tinsel Christmas Tree

Christmas tree made of beads - a beautiful craft

Decor of a bottle of champagne in the form of a festive tree

Christmas tree made of satin ribbons for the new year

Flat Christmas trees made of twine and lace

Bright Christmas trees made of colorful balls

Homemade tree from wrapping paper

Fluffy Christmas trees made of yarn with your own hands

Small Christmas trees made of fabric and buttons

Christmas tree crafts from natural material: cones and feathers

Simple Christmas trees made of yarn, beads and buttons

Transparent Christmas trees from Christmas balls suspended in the air

DIY wine cork tree

Funny Christmas trees from twine and ribbons

A simple children's craft - paper tree

Crooked sisal Christmas trees

The Christmas tree decorated with toys has long been considered a symbol new year holidays. And putting it in the house is a good tradition, as well as a way to create a special solemn atmosphere. But it often happens that due to constant employment, lack of free time, it is not possible to poison yourself for the acquisition of a green beauty. Some people who are in love with nature do not want to destroy living tree to enjoy the fresh coniferous smell in the apartment and elegant appearance within a couple of weeks. It is in such situations that it will become more relevant than ever DIY Christmas tree, photos, ideas and 100 workshops on the manufacture of which we will tell in the home-ideas.ru blog.
DIY Christmas balls
DIY Christmas tree made of paper for the New Year
The paper Christmas tree has the most big variety ideas and options for their implementation in practice.

Templates and schemes for making paper Christmas trees
The easiest way to create a Christmas tree out of paper is with a ready-made template. To do this, it is necessary to print the selected figured scheme on thick sheets. Cutting it along the contour is carried out using a special clerical knife or, in the absence of such, using nail scissors. Each Christmas tree blank should be bent in half and the parts of the tree glued together. Get an unsurpassed openwork option.
How to make paper snowflakes - http://home-ideas.ru/2015/12/kak-delat-snezhinki-iz-bumagi/

Below are diagrams and openwork patterns of different levels of complexity that are interesting for creating a Christmas tree from paper with your own hands, which can be used not only by an adult, but also by a child.


Master class on creating a fluffy paper New Year's beauty
There are other ways to make a festive paper tree. And for a visual representation of how fluffy is created christmas tree with your own hands - a master class presented below.

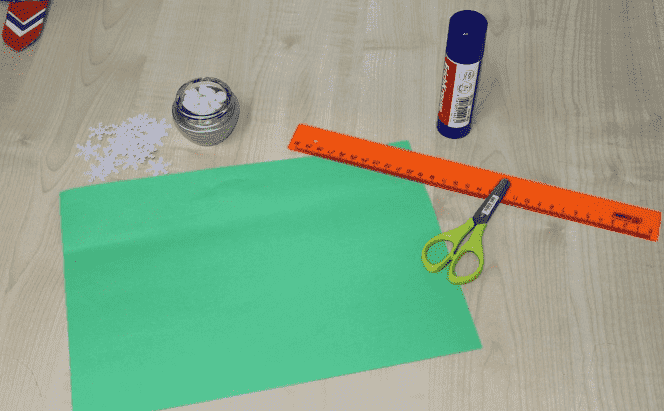
To implement such an idea, you will need a list of necessary materials:
- cardboard;
- colored paper;
- glue;
- scotch;
- scissors.
Crafts for the New Year with your own hands
Step-by-step instruction:
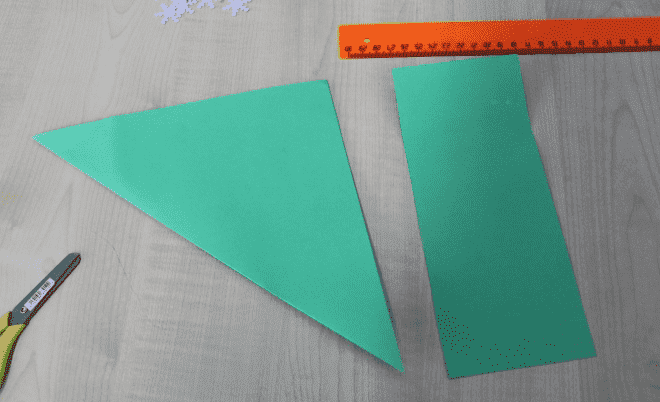
1. Make a cardboard cone that will be used as the base for the tree. You need to fix the cone with glue so that it does not unfold.
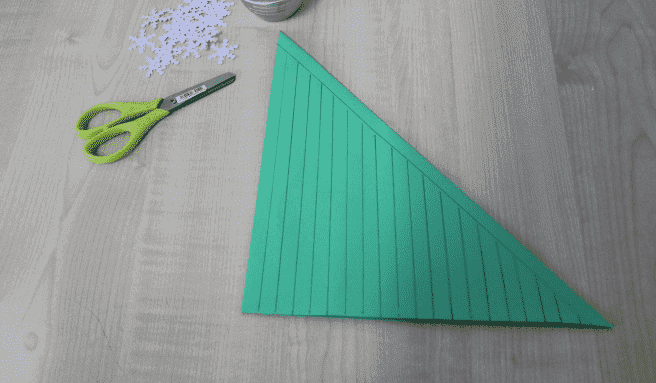
2. Cut sheets of colored paper into thin strips.
Important! It is necessary to carefully monitor that the stripes have approximately the same length and width. This will give the tree a neat, aesthetic appearance.
3. Glue the edges of the stripes to get loops. Also done with glue.
4. Glue the finished eyelets onto pieces of double-sided tape.

5. Wrap the cone-base with adhesive tape with eyelets in the direction from the bottom to the top. The result is a cheerful "shaggy" Christmas tree.

Herringbone from beads: a master class on the realization of the idea
And now the attention of readers is invited to a Christmas tree made of beads - a master class with step by step photo. For such a creative process, you need to stock up:
- wire with a diameter of 0.25 mm;
- green and gold beads.

First you need to dial 9 green beads and 1 golden one on a piece of wire about 40 cm long. Without touching the golden bead, it is necessary to pass the second end of the wire through the green beads in the opposite direction. Thus, a needle is created for the future New Year's green beauty.
How to install a Christmas tree
At the next stage, you need to align the wire clearly in half, tighten the ends tightly. On each side, a couple more needles of this type should be made.
Important! It is necessary to arrange the needles so that they are next to each other as close as possible. This will give the product a neat appearance.
From such small branches, a large branch for the Christmas tree should be formed. For the upper branches, you need to use 10 small branches, pre-harvested, and for the lower ones - 15 each.
It is necessary to collect a Christmas tree from beads in this order:
- for the top - one small branch;
- for the second tier - three large branches, each of which consists of 10 small ones;
- for the third tier - four large branches, each consisting of 10 small ones;
- for the fifth tier - five large branches, each of which contains 15 small branches.
The number of tiers and large branches in them may increase depending on how high the product is planned to be made. The photo below shows step-by-step weaving:

DIY Christmas tree made of felt
Enough in a simple way manufacturing is considered a Christmas tree made of felt with your own hands. Such a souvenir can be used as new year gift for friends or acquaintances. The advantages of felt as a material for a Christmas tree are that it is able to keep its shape well and is not prone to shedding.

To make a felt New Year's beauty, you need to use an arsenal of materials and tools, consisting of:
- felt;
- cardboard;
- adhesive tape (glue);
- scissors.
First you need to prepare cardboard cone, which are fixed with adhesive tape or glue.
At the next stage, you need to cut out circles from felt, different in diameter - as they grow. You can pre-prepare cardboard circles-templates.
The base of the cone must be decorated with tinsel, which is also attached using glue or tape.

On each of the cut out circles of felt in the center, an incision should be made “crosswise” and put on them sequentially - from larger to smaller - on the cone. When all the pieces of felt are on the tree trunk, the resulting beauty should be decorated at the crown with an asterisk, and along the entire height with tinsel.

Simple Christmas trees from improvised materials
If there is very little time left before the New Year celebration, and the main symbol of the holiday is still not in the house, you can make a New Year tree with your own hands from improvised materials, while spending a minimum of time and resources. Consider a few interesting options such unpretentious creativity:
1. Christmas tree from a plastic bottle. Surely every house has a long-lost plastic bottle, dyed in green color. For this purpose, the container itself must be cut into rectangles (5-6 pieces to create tree tiers). Each of the rectangles should be cut into small strips, not reaching the top edge. Such cut rectangles must be wrapped around a previously prepared cardboard cone and secured with adhesive tape. Dressing the Christmas tree in needles should be from the lower tier, moving to the top.


Making a Christmas wreath with your own hands
2. Christmas tree from leftover yarn. Extremely easy to manufacture. This process can be handled by Small child. As in the previous case, you need to make a cone out of cardboard and fasten it with tape / glue. Then the cardboard frame must be well lubricated with the same glue and wrap the yarn around it, leaving no gaps, tightly. Beads and sequins are used as decor.

3. Christmas tree made of tinsel. Stepping through such a souvenir completely repeats the version with yarn with one difference - instead of it, the remains of New Year's tinsel are used.

4. Sweet Christmas tree. Her distinguishing feature- use of sweets as decoration. They are often superimposed on a product made of tinsel. It is recommended to attach sweets with double-sided tape.

5. New Year's beauty from pasta. It will take more time and care to make it, and perseverance will not hurt. As before, the process must begin with the preparation of a cardboard cone. It should be greased with glue and proceed to stick pasta. When the pasta is glued along the entire length in the required quantity, they can be painted with all kinds of colors of paints.

6. Creative Christmas tree made from old magazines. To implement such an idea, glossy pages with colorful pictures are best suited. It is necessary to form a cone from cardboard, which is fixed with adhesive tape or glue. From magazine leaves, a large number of circles of the same diameter should be cut. Each of them must be wrapped around the pencil so that they take on a swirling look. Such twisted pieces of magazine pages should be pasted on the cone in the direction from bottom to top. The crown of the beauty must be decorated with a small glossy cone.

If it is almost New Year on the calendar, and the green symbol of the holiday still does not decorate your home, there is absolutely no reason for frustration. After all, the variety of ways to make Christmas trees allows you to make them in a matter of minutes from the most primitive and unpretentious materials, and the product itself, despite its simplicity, will look interesting and original.


28 Christmas Decorations You Can Make in 10 Minutes
A do-it-yourself Christmas tree made of paper is a very good and, most importantly, timeless idea when the question arises: what can be done and presented for the New Year. Good gift combines sophistication of style, originality of ideas and warmth of the soul.
Of course, all these features are especially noticeable during big holidays. When the magical New Year's days come, we have much more free time, and it can be spent not only with benefit, but also with pleasure.
Here, for example, you can make New Year's crafts with children in kindergarten or school. And you can make a Christmas tree - an original decoration for the office, make it unusual gift to your friends and colleagues.
We have prepared for you interesting ideas Christmas trees from paper, which you can do with your own hands, including with children. Consider a few simple and at the same time original models - both for a gift and for decorating a home or workplace.
Let's start, of course, with crafts for the little ones. These green beauties are not the most difficult, but they are definitely made, as they say, with soul. You can give them to mom and dad. And most importantly, such a decoration can be put under a real Christmas tree next to a gift for a baby.
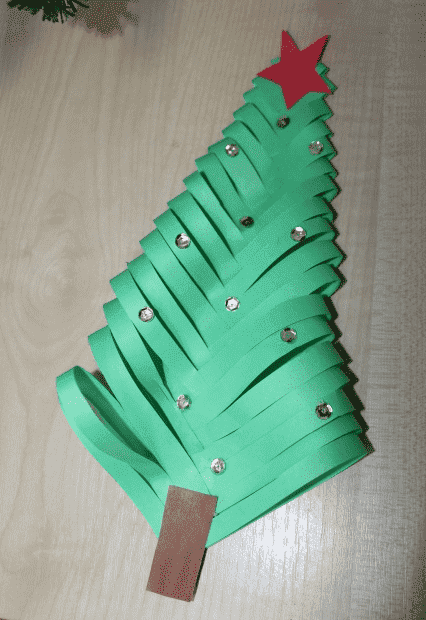
Christmas tree with rhinestones
Here, for example, is a universal model that can be done in almost any group kindergarten. The only condition is that for the smallest it is better to limit yourself to paper and glue, but in senior group You can also use beads for decoration.
We will need:
- sheets of colored paper in green, brown and red;
- glue;
- scissors;
- ruler;
- beads or beads for decoration (you can also take sparkles, artificial snow and much more).
How will we do:
Step 1. First we need to make a square blank. To do this, we bend the triangle on sheet A4, and carefully cut off the rest.
Step 2. Turn the triangle over and draw strips of 1 cm.
Step 3. We cut them from the bottom up, but literally 1 cm does not reach the top edge.
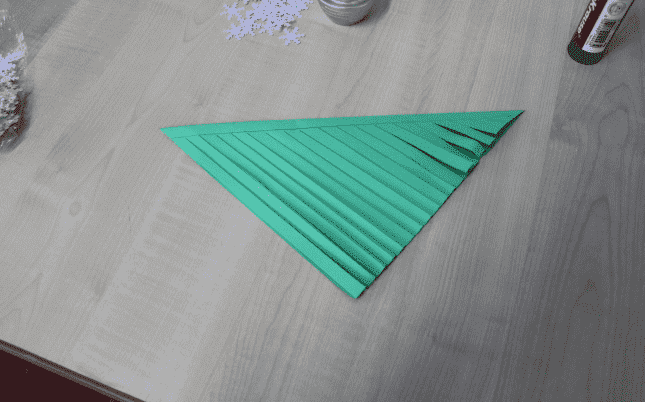
Step 4. We unfold the workpiece and glue each strip to the center in turn.
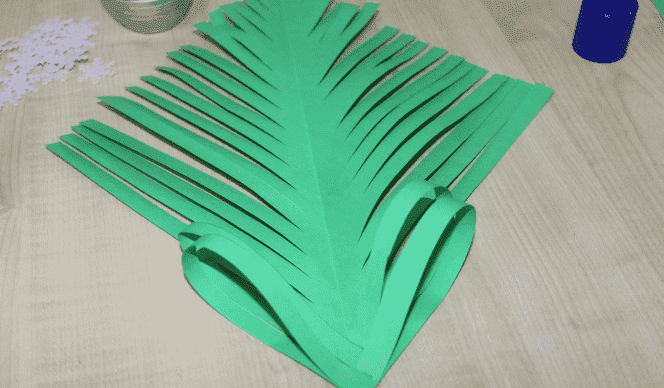
Step 5. After all the strips are glued, let the workpiece lie down a bit and dry. In the meantime, cut out the star on top.
By the way, you can also cut a lot of decorations from colored paper - balls, cones and other figures. Rhinestones, beads, beads also look spectacular - in a word, everything that glitters and creates festive mood. We glue the trunk from below - and you're done.
Original postcard with Christmas tree
It is customary to give cards for almost every holiday, and this good tradition is well suited for the New Year. BUT best gift- This is the one that is made by hand. Therefore, with the kids you can make another interesting figure - voluminous postcard, which is easily folded between two pieces of paper and becomes flat.
We will need:
- sheets of colored paper;
- a thick sheet of cardboard for the base;
- scissors;
- glue.
We will act like this:
Step 1. First you need to take a sheet of cardboard and bend it exactly in half so that the colored part remains outside. It can be any color leaf, but it is preferable to choose shades that contrast with green - for example, dark blue, chocolate, blue colors.
It is important that not only the Christmas tree looks good against their background, but also other decorations - for example, stars, which also need to be glued to the card so that it does not seem empty.
Of these, you need to fold an accordion with the same folds (about 1 cm each). In the middle, the craft is bent so that the result is a bow.
Step 3 . All these accordions must be glued in sequence to the center of the future postcard. They should fit snugly enough to each other so that the tree looks like a holistic, single composition.
Step 4. Now we carefully straighten each strip so that the Christmas tree takes on a three-dimensional look.
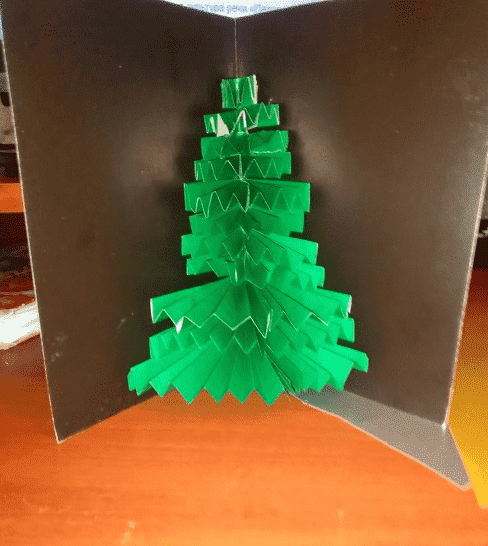
Step 5. It remains only to glue the crown, stars and other decorations on the background of the card. On the reverse side, you can stick a beautiful inscription made in advance, as well as snowflakes, cones, artificial snow and other elements of festive decor.

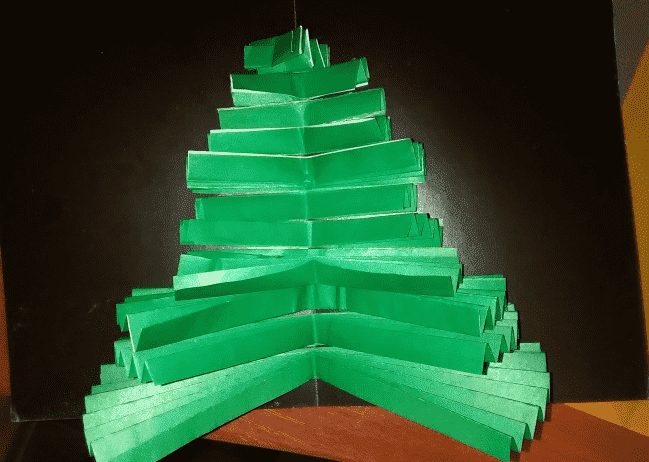
Velvety Christmas tree - an unusual photo stand
And now let's move on to more complex models that you can give to colleagues, relatives and friends, and just please yourself. original decoration for your favorite holiday.
Each person has, perhaps, hundreds and thousands of photographs in stock, but among them there will surely be the very same favorite photo, which in itself creates a festive mood. Why not make a special stand for such a picture?
For the manufacture we need:
- green cardboard - 1 sheet;
- a skein of thick threads of green or blue-green color;
- white boucle threads or cotton balls;
- glue;
- pencil;
- scissors;
- beads;
- glue gun.

To make a Christmas tree out of cardboard with your own hands, we will act in stages:
Step 1. First of all, fold a sheet of green cardboard in half wrong side outward, after which we depict on it a half of the Christmas tree. To do this, you can simply print the template or draw from the sample.
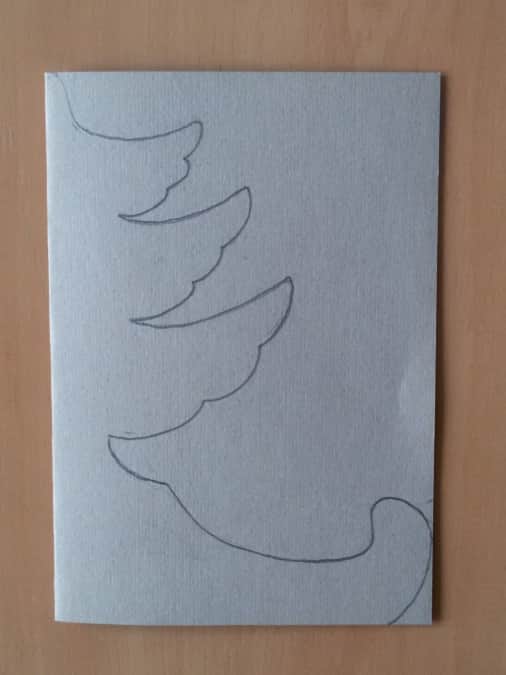
Step 2. Cut out the workpiece along the contour (when folded).

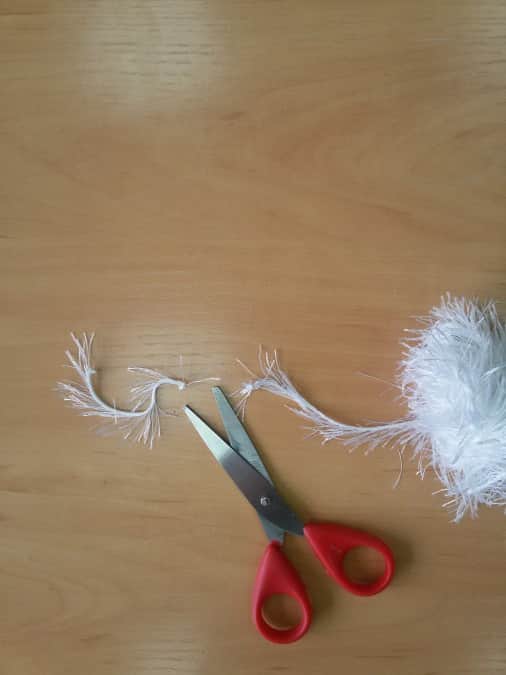
Step 3. Now let's take up the threads. They need to be folded in layers several times and cut into small pieces (1-2 cm each), putting them in a previously prepared container.

Step 4. Now comes the rather painstaking stage of work. Lubricate the surface of the Christmas tree (each branch separately) with a glue stick and stick the skeins on it. It is better to do this in stages so that dust does not accumulate on the sheet.
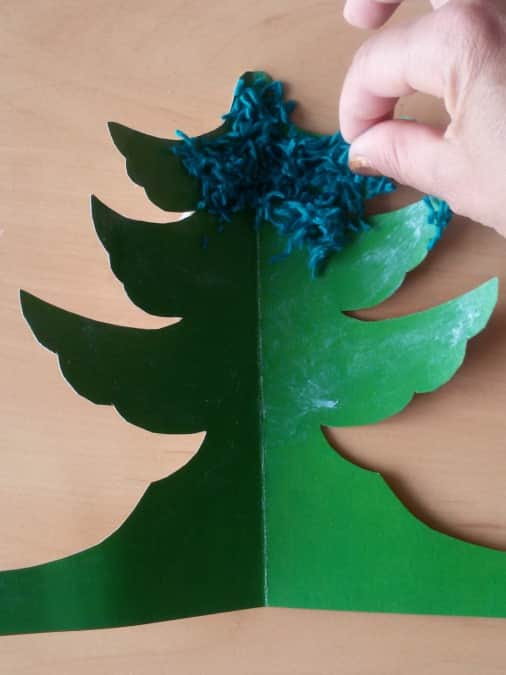
Step 5. In this way, you need to decorate only the top 3 sections, since we will decorate the bottom one differently.

Step 6. Let our tree lie down for a few minutes, and the glue will dry a little. In the meantime, take a boucle thread or just roll up a few small lumps of snow-white cotton wool.

Step 7. These lumps can be glued with a gun or glue stick. The work must be done carefully enough so that no glue stains remain on the surface.
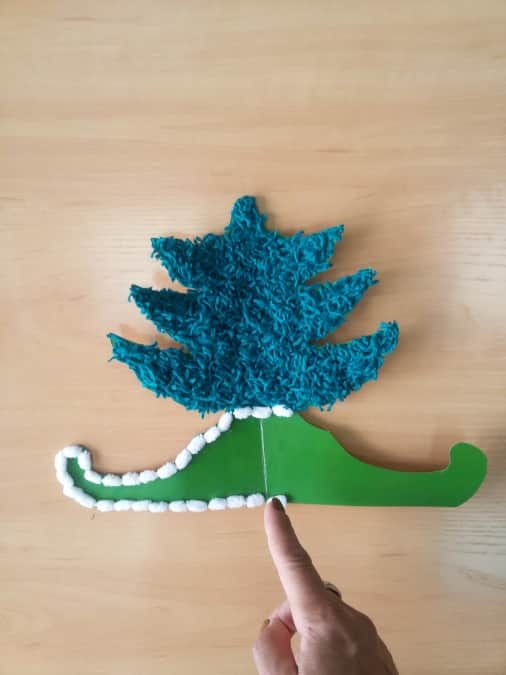
Step 8. And now you need to make tinsel for decoration. For this, a thread-grass or other similar material is used.
Step 9. Glue tinsel and other decorations - we get such a festive photo stand. The original New Year's gift is ready!

origami trees
Origami is classic style making crafts. Anything can be made from paper in this way: from flowers and animals to houses, airplanes and even submarines. But today we are waiting for the New Year, so let's look at a few simple and at the same time interesting models origami Christmas trees.
One tree and a garland
By itself, one craft may not look so impressive. But if we did 10 at once, or even more models and strung them in a garland - it's really festive! Moreover, they should be as simple as possible and produced quickly.
So, we will make one tree, and then a lot of such trees will create a real New Year's fairy tale. Here's how to make such a Christmas tree (see diagram):


Well, then everything is very simple. Such Christmas trees can be put on a New Year's shelf or picked up on threads and hung over a false fireplace or in the corridor, next to a real fluffy beauty, etc. - it all depends only on the imagination and the possibilities of space.

And here is how the instructions for making a Christmas tree out of paper without glue on the video look - simply and clearly.
Modular tree
But a variant of a more complex craft, resulting in real masterpiece. It can be kept as a keepsake until the next holiday. Moreover, it is not at all difficult to assemble such a charm, since all the modules add up the same way: you just need to sit a little and try.
Christmas tree for a corporate party in the office: simple and fast
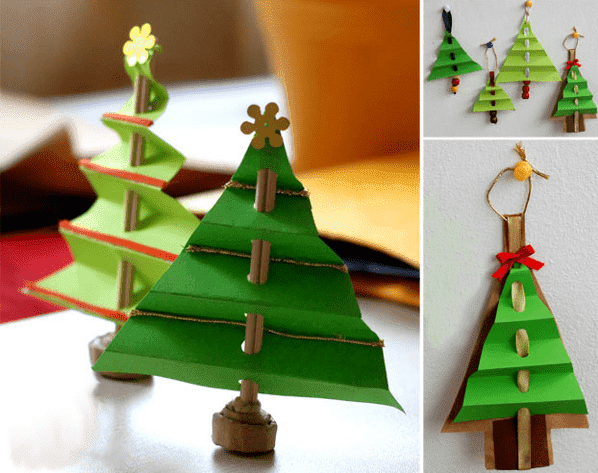
And what about a friendly team that is preparing for the holiday, as they say, in an accelerated mode? Do you need to buy gifts, think over the scenario of the event, and perhaps put something on the table? For decorating the workplace and holding funny contests you can make such a model in haste.
For its manufacture, you will need a minimum of materials that are likely to be found in every office:
- green cardboard;
- hole puncher;
- skewer or wooden stick;
- scissors;
- glue;
- decorations (figurines made of colored paper, cotton balls, ribbons, and in general everything that is at hand).
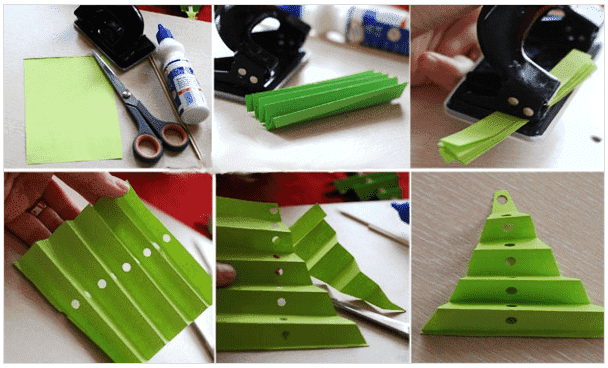
A Christmas tree can be made in just a few minutes. We will act like this:
Step 1. First, fold a sheet of cardboard in the form of an accordion with a side of each fold 1.5-2 cm.
Step 2. Then carefully make a hole exactly in the middle - if there is no hole punch, this can be done with a thick needle or awl.
Step 3. Cut off the side parts in the form of triangles on both sides to get the shape of the Christmas tree.
Step 4. We insert a skewer or a wooden stick into the holes (in extreme cases, a pencil is also suitable), after which we decorate our crafts.
Here's what it looks like step by step instructions on the picture.
And here is what the finished crafts look like. They can be hung and put - solid advantages.
Corrugated paper Christmas tree: options for a gift
Paper is simply an inexhaustible source of creativity. Even from a regular sheet, you can make dozens of different models of Christmas trees. What about corrugated paper? It is indispensable for such crafts, because it imitates needles very well and also looks very attractive.
To make such a New Year's gift, we need:
- white cardboard;
- corrugated paper green and red;
- scissors;
- glue;
- cotton wool and other decorative elements for decoration;
- toothpicks or wooden sticks;
- compass;
- pencil;
- ruler;
- bow.
We will act like this:
Step 1. First you need to make a cardboard cone - this is the basis of the future Christmas tree. To do this, we draw a longitudinal line 30 cm long on the surface of the cardboard, divide it in half (15 cm each), and draw a circle with a diameter of 15 cm (i.e., a radius of 7.5 cm) in the center using a compass. We cut out this circle and make a cone from it with the same height of 15 cm. You can fasten it with a stapler or glue.

Step 2. Now you need to paste over the surface of this cone with green corrugated paper.

Step 3. While the workpiece dries, let's proceed to the main stage - the creation of needles. To do this, from corrugated green paper, you need to cut 120-130 strips 1 cm wide and 15 cm long.
Then we put several pieces one on top of the other and make cuts 0.5 cm wide, as shown in the photo. After that, roll them up with a toothpick or stick. Glue the ends of the strip to make a fluffy pompom.

Step 4. We fluff each of these lumps and glue them onto a cone - that's all.

Step 5. It remains only to decorate as your creative imagination tells you - with bows, beads, sparkles. It turns out a model of a real Kremlin Christmas tree - very impressive and at the same time simple.

Here is a visual video instruction that will help you understand in detail how to make a Christmas tree from corrugated paper with your own hands for the New Year or Christmas. Here is another model, which, by the way, is made even easier, but it definitely looks no worse.
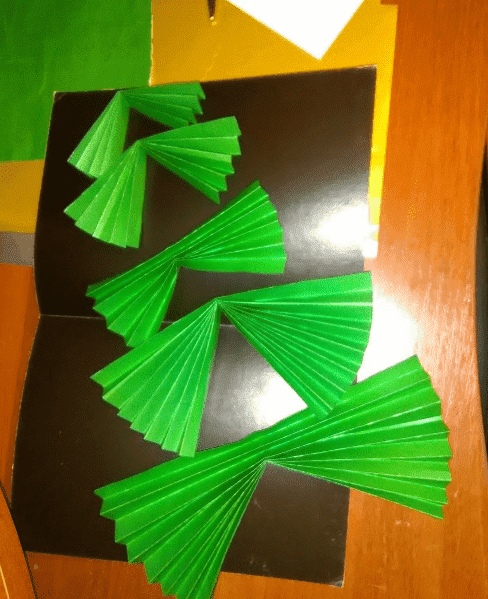
Christmas trees in quilling technique
Quilling is one of the modern trends in decorative art, which, however, has already become widespread among amateurs and professionals. Without exaggeration, we can say that any beautiful model can be made from twisted paper (namely, this is what is called quilling).
Here, for example, are several options for Christmas trees for New Year's cards.


And here are three-dimensional figures, which consist of several modules glued together.


To understand how to make such masterpieces with your own hands, you just need to master the technique of twisting paper strips. From them, you can make almost any model of a Christmas tree from paper.
Can help with this step by step instructions on video:
Christmas tree from old magazines - for lovers of nostalgia
Old glossy magazines or even ordinary newspapers can probably be littered in the house. To “breathe” a second life into these things, you can simply use them for New Year crafts, including making a Christmas tree.
Do not think that the model will turn out to be some kind of “not like that”. In fact, it will give odds to even the most beautiful figures made in other ways. Of course, it is best to use colored glossy pages - then the Christmas tree will turn out to be truly festive.

Here is an example of creating one of the most simple crafts.
Happy New Year!