Herb from a dishwashing sponge. Sponge cakes. Protecting fragile items
Victoria Bezruchko
On the Internet I came across pictures of fake cakes(just what you need for the role-playing game “Shop”, “Cafe”). Cakes can be sewn, made from cardboard or made from ordinary foam rubber dish sponges. And the most interesting thing is You can decorate cakes like this that no two will be alike.
Everything ingenious is simple!
For work we need:
- sponges;
Scissors;
Glue gun;
Glue for gun (black and white).
1) Cut it sponge in half

2) From sponges cutting out the shape of the future cake. We prepare different layers for our cakes


3) Now the most important part is to carefully glue the parts together (as always, I had some injuries - I burned my finger with glue = ()


5) The last part of our work is no less important than the previous ones. All that remains is to decorate ours cakes! Here your imagination and imagination can run wild. Since I needed black glue, and I had white glue in my gun, I urgently needed to put the white somewhere, so I drew snowflakes on top, and some cakes“missed the white cream” in the middle. And I used black “cream” to decorate the top and edges of our treat.

Tomorrow I will take the products to the children’s group, I hope they will appreciate my efforts and will play with interest cakes.

Publications on the topic:
“We invite EVERYONE to the cafe, stock up on cocoa and tea. And we also have a special order for YOU! It’s on a painted and decorated platter.
 Dear colleagues! In our kindergarten No. 43 Ivanishchi village, we invite parents to participate in various events and competitions.
Goal: create a pattern using a foam sponge. Objectives: develop Creative skills children; expansion of children's active vocabulary.
 I am glad to welcome you to my page. Today I want to show you a master class “Flower Basket” using drawing techniques using.
Crafts from sponges for washing dishes are easy to make, since the material is soft, has a smooth surface, can be cut well with scissors, and perfectly takes the required shape with the help of threads or thin ribbons. Sponges come in foam rubber and in the form of sponges with large holes; they are harder and hold their shape well.
In this article we will look at options for making crafts from a sponge with your own hands that children can make preschool age together with parents, children in senior group kindergarten in classes on manual labor. You can play with them, use them to draw and print with stamps. Photos of samples will help you understand what result should be obtained during the work process.
Sailboats
The most simple option Crafts made from sponge are considered to be a boat with a sail. Even kids can do this kind of work. The sponge can be left in its original form by adding a rod from a cocktail tube and a paper sail of a triangular or square shape. Older children will be able to give the craft a shape that is more reminiscent of a real boat.
You can not only cut out the corners at the front, but also create a recess along the entire boat. This is convenient for various games, for example, you can take a Lego man or a plastic soldier for a ride on such a sailboat. You can play with a handmade toy in the bath or take it with you to a river or lake.
Using a yellow kitchen sponge you can easily create your favorite cartoon character - Bob Square Pants. You need to make a craft from a sponge using the appliqué method, since the shape of the product already corresponds to the chosen character. Nose made from half plastic packaging from a chocolate egg, and all other details are cut out of bright cardboard.

Attach the parts to the foam using PVA glue. Can be done additionally wire hands and legs.
Drawing stamps
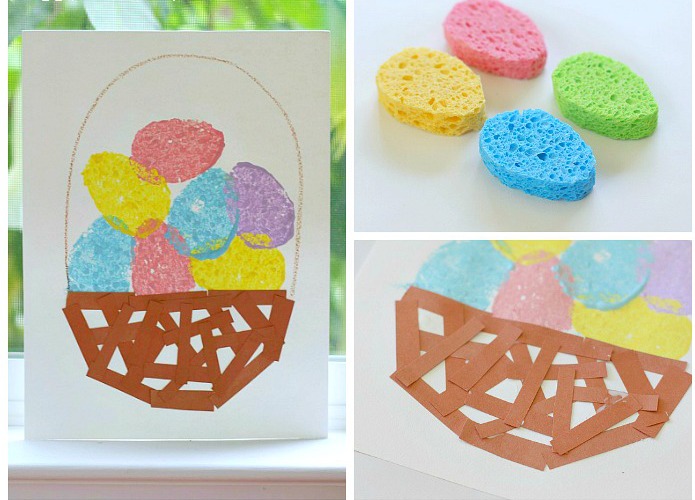
Crafts made from dish sponges can act as seals or stamps to create identical details while painting. In the photo below you can see that the washcloths were shaped into an egg shape with scissors. Then they dip it into a plate with diluted gouache paint and apply it to the work; in our sample it was done using this method. easter basket with eggs different colors.
If you draw a tree trunk and foliage, and cut out the shape of an apple or pear from a sponge, then in a couple of minutes you will fill the entire sheet with bright fruits growing on the branches. It will look interesting and autumn tree with identical printed leaves. Some issue background image, using crafts made from sponges of different configurations, and after the paint has dried, they draw the main plot or ornament. Here you can fantasize in different ways.
Multi-colored balls
If you take several dense multi-colored sponges and cut them into equal strips, you can make multi-colored balls, as in the photo below. Before making such a craft from a sponge, prepare a nylon thread to tie all the parts together; you can use a thin elastic band. Before tying the strips together, they are laid 5 pieces in two rows next to each other and the middle is marked.

If, after connecting them together, it turns out that the sticks are all different sizes, no big deal, they can be trimmed with scissors. You can play with such soft balls even in a room without fear of breaking the windows. It’s good to throw them into the water; they won’t sink, because they have many holes filled with air.
If you attach such crafts from dish sponges to a stick or wire and add a leaf, you will get spectacular flowers. They can be made from either single-color stripes or different ones. Using scissors, the shape of a tulip or flower with rounded petals is cut out from a whole thick sponge using a template.
House
You can make a house from several different colored sponges, as in the photo below. It is interesting to build any structure, it all depends on the amount of material and color. Moreover, the sponges themselves will not suffer at all from such work, and they can be used for their intended purpose even after the construction is completed. To secure the parts, use wooden toothpicks.

If you have a large supply of kitchen sponges, then if you wish, you can build an entire city, and by adding wheels from broken cars, you can make transport.
Furniture for dolls
If you have a growing daughter, then there are always dolls in the house, and the child always asks for new toys to play with. With creative thinking and skillful hands, you can make a whole house with furnishings for dolls. It is easy to make upholstered furniture from kitchen sponges - armchairs, a sofa or a bed, placing them on a prepared base made of cardboard or plywood.

In the sample above, the sponges were joined together even without support, secured together with a furniture cover sewn from fabric. Additionally, cushions-rollers are made from hair. Such furniture will last a long time, and the costs for it are minimal, unlike purchased furniture for Barbie.
bear
A rectangular sponge can be given any shape by tightening the foam rubber. For example, such a cute bear was made quickly. The upper corners were tied with golden rain to create ears. The head was marked with a wider ribbon of the same color. The remaining details of the face were simply drawn with markers.

In the article we looked in detail at how to make crafts from a sponge. This is not at all difficult, because the material lends itself to all types of processing. The sponges are sold in sets, so choosing the right color for the job is not a problem. The variety of crafts depends on your imagination, because you can create anything, from equipment to furniture. Be sure to involve children in working together, this develops motor skills of the hands and fingers, creative and mental abilities, which will later be useful to the child in school education.
A great idea for a craft that is suitable for absolutely all preschoolers, starting from two years old. It’s great that making such “cakes” and playing with them later is equally interesting, and besides, they will certainly become favorite “treats” in the doll’s kitchen!
How to make crafts like this (clickable) |
||||||
 |
 |
 |
 |
 |
 |
|
A brand new dish sponge is a very attractive item in itself: bright, dense, elastic. Why not a cake! This wonderful set of cakes was made by teacher from Armavir Tatyana Kiryushatova.

Please note how simple the craft technique is: small sponges do not need to be cut, and anything can be used as decoration - broken hairpins, scraps of braid and buttons. The main thing is to glue them more securely.
” The set of “cakes” is very durable, and if necessary, they can... be washed!
Variations on the theme of the previous craft: Anna Pristash did not use a dish sponge, but a two-color washcloth with a textured surface, and the result was a real “cake with cream.”

” In general, pieces of “cake” can be easily obtained by cutting a sponge into triangular pieces. Mom is the best person to handle this task. Well, then you can do whatever you want with such a blank!
For example, you can glue a multilayer “cake” ( innerchildfun.com).

You can paint the “cake” with any colors - it will be a multi-colored “cream”. Painting a sponge is easy, and, of course, if necessary, you can always rinse it thoroughly and return it to its original state ( oneperfectdayblog.net).

You can decorate the “cake” with pompoms, beads, sparkles, buttons, or paint a pattern.

And here on the website sugarspiceandglitter.com They propose not to make accessories for the game, but to organize a real training camp for young housewives! As a cream - shaving foam with food coloring, decorations - cereals painted with food coloring. Of course, such a creation will not last long, but the technique of applying the cream can be honed to automaticity!
Master class: Sponge mosaic “A drop of summer on a thin leg”
The master class is designed for teachers additional education and parents.
Purpose of the master class: making crafts as a memory of summer.
To create a craft you will need:
Colored paper yellow color for the background (you can take any one you wish);
Sponges of red and white, yellow and two green in different tones;
PVA glue;
Toothpick;
Wooden or plastic stick;
Light press.
Target: creating a mosaic picture from a washing sponge.
Tasks:
1) develop the ability to use various materials to create mosaics;
2) cultivate a caring attitude towards nature and love for the native land;
3) develop creative activity and interest in creativity.
Progress of the lesson
I. Motivational moment.
One July day, while waiting for a river crossing, I found myself in a forest clearing. I decided to take a walk along it. In the baking season, the stumps had thin stems, and on them were strawberries. I couldn’t resist taking a photo of her. The prankster played a tricky game with me. Bending down, carefully unbending the stems, she looked for ripe berries. What a fragrant berry the wild strawberry turned out to be!
For a long time these scarlet lights haunted me. And I decided to make a craft in memory of the strawberry meadow.
II. Formulation of the problem.
The question arose: “What material is it made of?” From paper? Made from plasticine? I remembered that I recently bought dishwashing sponges of different colors. I was delighted and got to work.
III. Statement of the topic and purpose of the master class.
So, the theme of the master class is “Mosaic from a sponge “A drop of summer on a thin leg.”
.jpg)
IV. Discovery of new knowledge
1. Cook first necessary materials and tools.
.jpg)
2. Using a computer, make an image of a strawberry and copy it (you can draw it yourself) onto a yellow sheet of paper (if you wish, you can take paper of a different color).
.jpg)
3. Let's start doing the work with the berries. Take red and yellow sponges. The craft will be more tender if we tear off pieces from the sponge rather than cut them off with scissors. First, apply glue to the drawing of one berry and, using a toothpick and a plastic stick, place the torn pieces of red color, and yellow color between them.
.jpg)
Then put it under a press, as the sponge swells from the glue. Then continue to fill in the drawing of all the strawberries one by one.
.jpg)
4. Using this technology, fill in the pattern of strawberry leaves with pieces of green sponge in different tones, and then with stems.
.jpg)
5. For the core of the strawberry flower, take a piece of yellow sponge, and the flower itself - white.
6. Ready product Place to dry under a light press.
.jpg)
V. Summary.
Now put the craft in the frame
.jpg)
Hang it on the wall.
.jpg)
It turned out to be a wonderful picture. For me it will be a memory of a strawberry meadow, and for you, your children and guests - a drop of summer.
VI. Reflection
In the summer, you will probably go with your children, family, and friends to the forest, to a meadow where berries or flowers grow. Remember, although they grow in the forest, they also need to be protected, otherwise they may disappear. The forest reveals its secrets to those who come to it as a friend. Become friends too. And you yourself will not offend the one you love, and you will not let others offend you.