DIY decor. Paper bricks. Do-it-yourself imitation brickwork Do-it-yourself papier-mâché bricks
From this master class you will learn how to create an imitation with your own hands decorative stones. An interior decorated with such “stones” will be unusual and exclusive.
To make pebbles we will need: a sharp knife, a ruler, a pencil, Titanium glue, scissors, carton boxes or any other cardboard you have, egg cells, PVA glue.
I watched so many master classes, everything was wonderful, but they were all made raw, that is, from raw material. But this didn’t suit me at all, because there was nowhere to dry it.

We cut the cardboard box into long strips. You can do it with short ones, but with long ones it’s more convenient: then cut to length as needed...

I chose a width that matched my idea of the pebbles and left as little waste as possible from the box.

We tear the cells carelessly along the folds, leaving more relief.

I start gluing from the corners so as not to bother later. Lubricate it lightly, without being zealous, with Titan glue and, without straightening it, but, on the contrary, maintaining the volume, glue it to the prepared strip.

We glue the next piece with an overlap: this will make it more voluminous and close the voids.

So, it seems to be clearer...

Here... It becomes clearer.

I tried to cut off the scraps that were on the edge and glue edge to edge - then less fuss.

Here, the cardboard is being filled. The work is going quite quickly. By the end I was sculpting automatically. But I still tried to glue the edges more tightly.

Here it is - the treasured edge. I cut the piece at a right angle. And even if the corner is “flared”, you can safely bring the edges together, adjusting them to fit the cardboard: more bulges will be added. It is, after all, a “stone”, moreover, as if unprocessed.

We fill up the remaining empty spaces.

Here he is, my “savage”. Rude, uncouth...

I expanded this a little, it seems to be clearer.

So, in a hurry, it turned out 6 x 22 cm.

Now a little reasoning. You need to straighten the surface of the savage a little. To do this you need to paste it over with something. Well, the glue, of course, is PVA. But why... I like these scarves. But at some point they ran out. And out of great laziness I decided to glue toilet paper. I’ll say right away - not very good: extra wrinkles and all that. Although, if you smooth it out a little more, it’s fine. Or maybe more...

Paper A-4. Here, I divided it into three parts. I didn't wait for it to dry. Only here it’s somehow not very clear.

That's better. A-4 - smoother surface, then my creation - from handkerchiefs, and finally - toilet paper.

Another difference is in gluing. Lubricate the surface of the pebble with PVA, apply the paper you like best, and then brush it on top with a brush covered in PVA so that everything sticks everywhere. But the surface of A-4 must be coated separately. Then it gets wet and also sticks well, highlighting the relief.

Well, we’ll clean it up too.

Do you see what the plate is like when viewed from the side? We carelessly glued the rag onto the same PVA: we missed it on the back side with a brush and glued it with it.

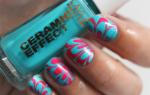
Stone blanks are obtained. Now we select the color and paint: first dark color, and then lighter and lighter. So the recesses visually deepen, and the bulges become more... appetizing, or what? But I was already painting on the wall. On top - varnish. I have acrylic semi-gloss. But if the paint is acrylic, then, in fact, you don’t need varnish, it doesn’t smudge. But I like it better with varnish - the paint becomes brighter and more elegant.

Then you need to carefully place the “mortar” into the seams between the stones.... And before painting, I walked over the surface with a thin acrylic putty.

The papier-mâché technique originated at the beginning of the 16th century in France. “Chewed paper” or “torn paper” - this is how the word “papier-mâché” is translated from French.
This technique was widely used in the manufacture of dolls, figurines, masks and even furniture.
As a rule, the papier-mâché technique is carried out in two ways:
1) A mass is made from soft paper and glue that can be easily sculpted. The composition can be given the most different shapes and sculpt any details.
2) Machining. Using an adhesive composition, torn paper is applied in layers.
To make papier mache with your own hands, you should prepare the following materials:
- form for pasting, that is, the base;
- any type of paper (newspaper, toilet paper, sheets of notebooks, egg trays and others);
- PVA or wallpaper glue;
- gauze or bandage;
- brushes;
- scissors or stationery knife;
- paints.
Preparing papier mache with your own hands.
First you need to shred the paper by hand. It is better to choose paper for this different types. For convenience, you need to prepare a sufficient number of pieces so that it is enough for 2-3 layers.Then prepare the glue. The most suitable PVA glue for DIY papier mache. It can be taken in its pure form, or it can be diluted with water. IN pure form, the glue naturally dries faster, but then its consumption is greater.
Accordingly, the diluted one is well absorbed into the paper, but softens it more and takes a little longer to dry.
During the work process, it is important to take your time and apply each layer after the previous one has dried. The product should also be painted only after all layers have thoroughly dried.
Making a carnival mask from papier mache with your own hands.
Necessary materials:- a ready-made mask made of plastic or you can fashion a mask yourself from plasticine;
- paper;
- glue;
- brush;
- paints;
- putty;
- abrasive tape;
- various elements for decoration;
1. Grease the finished base with oil or Vaseline.
2. Prepare the paper by tearing it into small pieces.
3. Apply the first layer of paper to the mask. Coat each piece with glue and stick on top of each other. Allow the first layer to dry.

4. Next, apply subsequent layers until the mask becomes durable. It is important to apply enough glue to each piece otherwise the mask may fall apart.
5. After all layers have completely dried, cover the model with putty. Remove uneven surfaces using an abrasive tape.
6. Before painting, it is better to saturate the mask with a primer. After drying, cover it with paints.
7. Now you can start decorating. For these purposes, you can use beads, beads, and feathers. There are many options for creativity.


Making a papier mache plate with your own hands.
Perhaps this is the simplest and most affordable thing that even kids can do.Materials:
- plate;
- newsprint;
- cling film;
- PVA glue;
- brush;
- acrylic paints.
1. Wrap the prepared plate in cling film and place it on any work surface.
2. Tear newspaper into small pieces. Remember, the more the merrier.
3. Begin to place the pieces on the plate, coat each one thoroughly with glue. This way you cover the entire surface.
4. Next, apply layer by layer. Depending on the thickness of the newspaper, apply the required number of layers. It is recommended to perform 10-15 layers.
5. All layers must dry well.
6. Next, apply a design to the product as you wish. You can also use a technique such as decoupage to decorate the plate.


Using the papier mache technique with your own hands, you can create great amount unique and inimitable products.
The main thing is not to use hair dryers, heaters or batteries for drying. Products should dry only naturally.
Whatever type of papier-mâché you choose, remember that you can achieve a smooth surface and remove any defects by grinding.
Anyone can create an unusual thing using the papier-mâché technique, if only they have the desire!
find out
Continuing the search interesting ideas for decoration, I came across an interesting article. It turns out that there is nothing easier than making decorative bricks yourself, which you can use to decorate an arch or lay out several rows at the bottom of the wall in the hallway.
To make paper bricks you will need just a few simple inexpensive components, a little free time and a great desire to create!
So, the author made bricks using the papier-mâché technique. The technology itself may have changed a little, but this is called an individual approach to the process.
Necessary materials for making paper bricks:
- egg cartons or any cardboard,
- Bustilat glue,
- starch,
- mosquito net,
- the shape you would like the brick to be,
- brushes, bucket and gloves.

The result is lumps that need to be broken down into smaller ones. To convey the texture of the stone, do not get too carried away. Otherwise, too small pieces will not give such an effect, but will create a smooth surface.  You need to make a paste from starch and pour it into the resulting paper pebbles. You need a little paste just to moisten them. Add bustilate there and mix the mass. We received ready-made “dough” for making bricks.
It’s time to send the mass into our molds, having previously covered them with polyethylene for ease of removal after drying. The thickness of the paper bricks is planned to be approximately 1 centimeter. This should be taken into account when placing it in the mold.  When the required number of bricks is ready, we begin to decorate a section of the wall with them. We coat the back side with glue, or bustylate, and apply it to the wall.
We press it carefully, because such paper bricks are quite fragile material. Leave for a couple of days for final drying.  The final stage will be painting. You can take any paint you like for interior work in a suitable color, close to natural stone. With a brush you need to carefully paint the entire surface.
After drying, we will give the bricks a more lively look; plain ones are too boring. Applying lightly with a dry brush, the lighter tone will add volume and liveliness.


Great idea, minimal cost and wonderful decor!
DIY decorative brickwork. Master Class
The bricks are closer. The seams will later be sealed with grout.


And now in more detail.
After the renovation we had a lot of scraps of MDF panels left. The hand did not rise to throw it away. At first I wanted to make it using cardboard, but when there is such wealth as MDF, why do we need cardboard? My husband sawed me these 6.5x20cm bricks

Mix papier-mâché from egg trays. My recipe is simple - PVA + trays + water + color (so as not to paint later)

Coat the board with PVA and apply the mixture. Many people make it without a base, but only from papier-mâché, but this option seemed fragile to me (I did it elsewhere, it could have broken during transportation) + there is nowhere to put the leftover MDF.
Then we place the finished brick on the radiator to dry until it is completely dry.

After drying, roll it with a roller in the desired color, in this case red-brown, but so that there are gaps left. When it dries, we cover the top with a patina of a lighter tone with a dry brush.

Then we take the finished brick and glue it onto “liquid nails”.

Well, that seems to be all. I will be glad if it is useful to someone.