How to make a cat out of acorns. Crafts from acorns with their own hands. DIY crafts from acorns: photo frame decorated with acorns
Collecting various natural materials is one of the most favorite activities for children on an autumn walk. Cones, twigs, leaves and seeds of plants, chestnuts and, of course, acorns - everything goes into the children's piggy bank. And if you apply creative imagination and skillful hands to them, you can make cute crafts out of them.
In addition, in autumn and winter, we spend much more time at home than in spring and summer, and this is a good opportunity to develop creative abilities. We can make beautiful autumn crafts from natural materials. Isn't it wonderful?
Acorns are usually harvested in September. Choose only hard, smooth fruits, without holes - otherwise insect larvae, traveling from acorn to acorn, will spoil all the stocks you have prepared. The more different acorns (round and oblong, large and small) you collect, the more varied your crafts will turn out. Don't forget to collect the acorn caps. You should not put off making crafts from acorns indefinitely - after all, it is easier to make holes in fresh acorns - they crack less often and do not crumble. Acorns make very cute little men and animals.
Crafts from acorns differ in their shape and size. Best of all, all possible little men are obtained from this natural material, as well as horses, deer, birds, and insects.


Hands, legs, paws and horns can be made from matches, toothpicks, small thin twigs. For the convenience of making crafts, acorns must first be pierced with an awl. Also, acorns can be connected to each other with glue or plasticine.
So, crafts from acorns are interesting ideas
1. "Horse"

To make crafts, you will need: acorns, twigs (matches, toothpicks), glue, plasticine, threads, small wooden blocks, colored paper (seeds).
From threads we make a mane and a tail and with the help of an awl we fix them in acorns. We make holes for the legs and fix them with glue. For the manufacture of legs we use matches, thin twigs or toothpicks. We fasten the neck in the same way. The neck can be made thicker with plasticine. Cut out the ears from colored paper (you can take any suitable seeds) and attach them to the head.
It's not hard to make a human either.
The horse feeder can be fixed with plasticine or glue. The neck, legs and arms are matches, or thin twigs. For a more durable fastening of all parts, we make holes in the acorns with an awl.
We decorate the face of a man and the muzzle of a horse with elements cut out of colored paper or molded from plasticine.
2. "Instructive conversation"

Daddy bunny teaches baby bunny how to behave.
For work, you will need the following materials: acorns, an awl, glue, plasticine, twigs, colored paper, cotton wool.
To make a baby bunny, you need to prepare an acorn in a hat, an acorn without a hat and a twig.
We make holes in the acorns with an awl, sharpen the paws, cut out the ears from colored paper (you can use suitable seeds). Now, with the help of glue and plasticine, we connect all the details.
Similarly, we do the bunny dad. Well, we make ponytails and a collar on the neck out of cotton wool.
By the same principle, you can make other interesting crafts from acorns. Here are some options:

So, by showing imagination and using the gifts of nature, you can make interesting toys for your home puppet theater, beautiful compositions for home and good gifts for friends.

Source: http://karapysik.ru/podelki-iz-zheludej/#ixzz3nUmiAgPi
Here are some more craft options. Look further...
Acorn horse.
To make a horse, we need two oblong acorns of various sizes, it is desirable that a small acorn be “capped” on a branch. We will also need: plasticine, toothpicks, a bunch of grass and an awl.

Connect the horse's head (small acorn) to the body (large acorn). To do this, we will make a hole in a large acorn with a toothpick or an awl. Insert a branch of a small acorn into the resulting hole. You can fix it there with transparent glue (for example, supermoment). If your acorns have already lost their hats, connect the horse's head to their body with a piece of an ordinary toothpick, making two holes - one in each acorn.

Next, we will put our horse on its feet - for this, also with the help of an awl, we will make four holes from the bottom of the acorn-body. To make the legs, we used halves of toothpicks, but you can also take tree branches. Now we will make eyes for our horse - for this we will first glue circles of white plasticine, and on top of them circles of black plasticine of a smaller diameter.

From the grass we will make a tail for our horse. To do this, we will collect 15-20 blades of grass in a bundle and connect them together at one end with plasticine, trim the free ends with scissors. Let's make a mane in the same way. We will fix them on the craft.

Our horse is ready!
Acorn man.
Making a man out of acorns is very simple. To make the head, take a round acorn with a cap. If the cap flies off, fix it with plasticine.The body of the little man will be a large oblong acorn. We connect them with a small piece of a toothpick, having previously made the necessary holes in the acorns with an awl.

Let's make eyes and a mouth from plasticine. We will make the legs of a little man from the halves of toothpicks. For stability, glue them from below with superglue to the inverted acorn caps.

Add toothpick pens with plasticine "mittens".
Our acorn man is ready.

Craft "dog"
To make a dog from acorns, we need: two oblong acorns, a toothpick, plasticine and a couple of maple seeds (helicopters). Let's connect the dog's head and body with a piece of a toothpick at a slight angle (as in the photo) - it is better to make the dog's muzzle from the sharp part of the acorn. From plasticine we blind the eyes, nose, paws and tail.

Let's make our dog's ears pendulous like a dachshund's. To do this, we will take the lionfish seeds of the maple and attach them with glue or plasticine.

Our acorn dog is ready.
Craft "Bird"
To make a bird, we need: two acorns, plasticine, several toothpicks, ash seeds and acorn caps. We connect two acorns with a piece of toothpick, as in the photo. We will make the legs of the bird from the halves of toothpicks, gluing them for stability on the inverted "hats" of acorns.

From plasticine we will make eyes and a beak. We will make the bird's tail from ash seeds, for this we will collect them with a fan, as in the photo.

We fix the base of the fan with plasticine and glue the tail to our craft. Decorate the bird's head with a hat.

It remains for us to add wings - we will also make them from ash seeds. Our craft "bird" is ready.

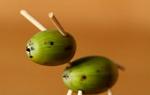
Ant from acorns
To make this craft, we need: three acorns, one of which will be with a “hat”, toothpicks and plasticine. Let's make a head from an acorn with a hat - for this we will stick plasticine eyes to our ant. We connect the acorns with the help of pieces of a toothpick, as shown in the photo.


Our ant will need six toothpick legs (about one-third of a toothpick long). Attach them to the bottom of the craft.

Our acorn ant is ready.
Autumn generously gives natural materials for creativity. Acorn crafts can decorate your home and make a great gift.
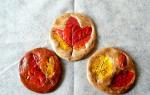
cute faces
To make this craft you will need:
- acorns with and without hats;
- thin markers;
- acrylic paints;
- thin twine or strong thread.
Manufacturing technique:
- The collected oak fruits must be cleaned of dirt, thoroughly washed and dried.
- Carefully remove the hat.
- Make 2 holes in it, pull the thread through them, carefully tie and hide the knot under the hat.
- On each acorn, apply acrylic paint of the desired color in 3 layers and let it dry.
- Draw the eyes and mouth with a thin marker, and cheeks with pink acrylic paint.
- Attach the hat carefully.
- The craft can not be painted, but covered with a colorless varnish.
There are many options for using funny faces. You can color all the acorns yellow and make funny emojis, put them together and attach them to your backpack. If a long braid is woven from twine or thread, then an autumn acorn decoration can be worn around the neck.
Beautiful dolls
To make baby dolls, you need to cook:
- acorns with caps and short twigs on which they grew (fruits should be selected as small, round and light as possible);
- acorns are larger and elongated;
- black thin marker;
- matches;
- acrylic paints;
- scraps of colored material.
Manufacturing technique:
- Rinse the acorns carefully and pat dry.
- Sort into small ones with twigs on hats, which will become the head of a baby doll and elongated ones without hats - the future torso.
- Color each long fruit using 2 shades of the same color: the bottom is light green, the rest of the body is bright green, or vice versa. Color everything in one color or make the baby dolls multi-colored.
- After the paint has dried, carefully connect the body of the pupa and the head closely with the help of matches.
- Draw eyes with a marker.
- Cut out scarves from soft fabric and tie around the neck of the toys.
If the fruits are too dark, then in some pupae the face is lightened using pastel colors. By varying the shades, you can make an international set of baby dolls from autumn acorns, which will delight the kids.
For the head, you can use wooden beads, on which a hat with a twig is glued.
birdie
You can make an adorable bird. To do this, you need to fashion eyes, beak, wings from plasticine, paint the craft with acrylic paints. Several birds with multi-colored wings can be glued to a tree branch. You will get a wonderful composition that will decorate the room.
Table composition
Such a small Japanese-style acorn craft will decorate any holiday table. It is made as follows:
- The collected acorns are washed and dried.
- Hats are carefully removed.
- The fruits are painted in different colors with acrylic paints or colored varnish.
- 2 holes are made in the hats and a thick thread is pulled through them, forming a loop of the desired length, the knot is tied under the hat.
- Hats are glued on top.
- A ceramic vase and a napkin holder (salt shaker, sugar bowl, etc.) are placed on a wicker or simple shallow tray. The rest of the space is covered with a layer of acorns.
- A tree branch is inserted into the vase, and painted acorns are hung on it.
wall panel
To create an original panel with your own hands, you will need to cut a tree 1-1.5 cm thick, which can be shaped in the form of a square, oval, or another shape. The size is chosen at your discretion. The manufacturing technique is simple:
- Sprigs of different lengths and thicknesses are glued onto a wooden blank, hats from acorns are attached to them with glue.
- At the ends or along the branches, cones of different heights are glued.
- Acorns without hats are attached to the branches at the bottom of the composition, forming a semi-flower from them.
- After the glue dries, a hole for a nail is drilled behind the wooden base and the finished panel of acorns and cones is hung on the wall.
If you paint acorns or cones before gluing, then the panel will turn out to be colorful and will look good in a children's room. For a living room, kitchen, hallway or bedroom, the composition is best left in natural tones.
Nest with eggs
A very interesting craft, which will come in handy for Easter - a nest. To make it, you need to prepare:
- several acorns;
- acrylic paints or gouache;
- an old toothbrush;
- toothpicks;
- plasticine and twine.
Manufacturing technique:
- A hole is made in each acorn with an awl or a thick needle, a toothpick is inserted into it to make it easier to paint, and bright paint is applied in 3 layers.
- Stick toothpicks into a piece of plasticine and leave until the paint dries completely.
- After the paint has dried, the fruits are sprayed with a black color scheme, slightly diluted with water, with a toothbrush.
- A nest is made from yarn, twine or rope, wound around the palm of your hand and laid in several layers on the bottom. You can add a thin straw.
- After drying, the blanks are placed in a nest.
Autumn acorn craft is ready.
bunches of grapes
For the autumn harvest festival or for a kitchen panel, you can make bunches of grapes using:
- acorns
- wires;
- awl;
- corrugated colored paper;
- varnish, paints and brushes.
Manufacturing technique:
- Remove caps, wash and dry acorns.
- Prick the awl into the hardest surface that was under the hat, carefully make a through hole. It is not necessary to sharply pierce the fruit, otherwise it will crack.
- Insert the wire, bend the hook at one end, carefully pulling the long end of the wire, drive the hook into the workpiece.
- Corrugated light green paper is glued onto the wire, the acorns are covered with dark purple and green paint, after drying, a colorless varnish is applied on top. You can make bunches of grapes from green unripe acorns.
- Ready "berries" are collected in a bunch using the technique of weaving a wreath of flowers.
- Leaves can be used dry from a herbarium or printed on a printer. Corrugated paper is glued on them, veins are pressed through. The leaves are varnished and fixed at the top of the bunch of grapes.
In a similar way, you can make an olive branch, which will also become a kind of decor for the kitchen.
Autumn is the most generous time of the year to collect leaves, chestnuts, fir and pine cones, twigs and acorns, which can be used to make simple and charming crafts all year round.
Zmey Gorynych
Autumn crafts made from acorns and chestnuts are interesting.
Here is one of them - the fabulous Serpent Gorynych. It is quite easy to make it, for this it will be useful:
- acorns;
- chestnut kernels;
- corrugated paper;
- toothpicks;
- plasticine and soft fabric.
Manufacturing technique:
- In the chestnut kernel, located horizontally, stick 3 toothpicks from above and 2 from below.
- Acorns without hats, also located transversely, are pierced on each upper toothpick.
- Halves of acorns are pierced on the lower toothpicks with the whole side up - these are Gorynych's shoes.
- Eyes, a tail, a nose with a button, a crest and a tongue are made from colored plasticine (the tongue can be made from corrugated paper and then glued).
- So that Gorynych does not freeze, a scarf made of soft fabric is tied around his neck.
Instead of a tuft, you can glue an acorn hat on your head, which will give the Snake a stylish look. If desired, you can combine the tuft and hat.
Crafts for the game "Memory"
Oak fruits are an excellent material for making elements of the rather famous Memory game,
Which perfectly develops memory, trains perseverance and attention. In addition to the acorns, you will need plasticine or paints.
Manufacturing technique:
- Wash and dry the acorns.
- Remove hats carefully.
- Paint the inside of the hat in different colors so that there are a pair of each color.
- Instead of paints, you can use colored plasticine by sticking it inside the hats.
- When the hats are dry, they are turned upside down and, according to the rules of Memory, they look for the same ones.
"Memory" with hats is designed for the youngest children, who still find it difficult to understand the pictures.
Needlewomen often wonder when they need to collect oak fruits for making crafts.
The very first ones begin to ripen and fall to the ground in the second half of August. But you should not collect them, because they are weakened and susceptible to various diseases, so they will not be stored for a long time. The best time to collect is the end of September and the beginning of October. But weather conditions should also be taken into account.
To identify good fruits, you need to break a few pieces and see what's inside. If there is a larva or brown flour, then it is better not to collect acorns from this tree, but to look for something else. Healthy fruits have a uniform color, they are without cracks, mold and rot.
From time immemorial, oak and everything connected with it have been endowed with mystical powers, therefore, crafts made from acorns also have certain properties. It is believed that they contribute to harmony and well-being in the house, and amulets cure infertility, increase attractiveness and prolong youth. How much you can believe in this, everyone decides for himself, but just in case, try to collect these fruits on Thursday, since this particular day is dedicated to Thor, the patron of the oak.
DIY crafts from acorns are a great opportunity to show your imagination. It turns out that acorns can do a lot of interesting things.
Acorns in themselves arouse interest and desire to create an unusual image.

“Crafts from acorns with your own hands are a great opportunity to show your imagination!”
Children's crafts from acorns do it yourself
Crafts from acorns for children should be done using the simplest technology. If you paint the hat red and put white dots on it, you get a bright fly agaric.

With the help of plasticine, you can turn an acorn into an unusual bird. To do this, you need to fashion a beak, eyes and wings. And if you wish, you can create a real composition from several birds, supplementing it with a tree branch, a nest or a flower.

And here are charming birds from an acorn and pieces of felt.

From acorns and chestnuts, you can make not only birds, but also a whole nest:
Crafts from acorns for children to school can be made in a more complex way, using additional materials. Schoolchildren have much more patience and skill than younger children, which is reflected in their work. 
Children's crafts from lamb acorns. The legs and neck of the lamb are made from matches. The fluffy back is laid out from cotton wool.

Children's crafts from acorns giraffes. They are similar in manufacture to lambs, but instead of a match, a long stick serves as a neck. Spots on the body are created using plasticine.

By the same principle, a horse can be made from acorns.

In the same technique, very cute donkeys are obtained.

And if we make the legs short and attach the ears, we will get an animal that resembles a mouse.

From an acorn and thin twigs, you can make a very cute deer. The muzzle can be made from suitable dried flowers.

You can make a cute snowman out of felt and an acorn cap.

You can make a beautiful application out of hats - for example, an owl. It is better to stick caps on a pre-applied contour using polymer glue.

Look at the video on how to make an application from acorns "Fish":
And if you stick hats in the form of ears to a green acorn, and add it with a piece of long chenille wire or braid, you get a mouse that any girl will like. You can make a real mouse family and create a composition from it.

Mouse ears can be made from pistachio shells.

For many, the autumn craft "Mushrooms" will certainly come in handy. Acorns are glued to plasticine cakes. Mushroom caps (chestnuts) are also placed with plasticine on the stomach.

We glue plasticine dots on the hats. We supplement our craft with berries and needles. Autumn fly agaric - ready!

Acorn mushrooms will perfectly decorate the autumn crafts in kindergarten.

You can make a very spectacular squirrel from chestnut and acorn.

From the painted acorn caps you can make a very effective little service.

From acorns you can make a whole family of little men.

Many different people, animals and insects can be made from various natural materials and acorns.

And these little men are made of acorns and other natural materials. The details of the craft are fastened with matches.

See what other wonderful crafts you can make from acorns:
Interior decorations from acorns
You can make an interesting autumn pendant from acorns.

Acorns can decorate a photo frame.

Vase of acorns
Acorns can be glued onto an iron bucket.

You will get a very original vase.

To make a vase of acorns, you can use acorns, plasticine and a large glass jar. Look at the video for an example of such a craft:
Acorns can be painted with gold paint and placed in a decorative bucket. The bucket itself can be filled with plaster, and the acorns can be fixed at the very top. We will get a cozy element of decor.

Acorns make a very beautiful autumn tree of happiness or topiary.

Look at the video on how to make a very beautiful autumn topiary from acorns and cones:
The base of the basket can be made of cardboard, birch bark or any other available material. On top of the base, acorns are glued tightly to each other.

Christmas crafts from acorns
Acorns make very beautiful New Year's crafts.

Do-it-yourself Christmas tree from acorns
From the hats of acorns you can make a very spectacular Christmas tree. To make a Christmas tree, we need a foam base in the form of a cone, a glue gun and acorn caps.

We begin to glue the hats to the base.

When the whole Christmas tree is pasted over with acorn caps, let it dry and, if desired, cover it with golden paint from a spray can. We are waiting for the paint to dry.

Our Christmas tree made of acorn hats is ready! It can become a wonderful piece of furniture and decorate your home for the New Year holidays.

Christmas ball of acorns
Another great New Year's idea for crafts from acorn hats is a ball. For crafts, we need a styrofoam ball, which can be found in a craft store. We cover it with brown paint. We begin to insert acorn caps into it.
The ball is covered with acorn caps
So, with a little imagination and a little effort, you can turn into ordinary acorns.
DIY acorn crafts reviews:
“A good craft made from acorns and chestnuts is mushrooms. It is easy to perform and looks spectacular as an autumn craft. (Jeanne)"
Acorns are an unusually interesting natural material from which you can make a huge variety of crafts to decorate your home, garden or cottage.
You don't need any special skills to make these, because they are very simple, which means that you can make them with the whole family. It's so nice to do any business with the whole family, and quickly and interestingly!
All you need is a couple of tools, acorns, your imagination and, of course, time.
Here are some very simple and at the same time interesting ideas on how to make crafts from acorns:
Craft from acorns and plasticine: a small nest
For this you will need:
- - caps of acorns (pluses)
- - plasticine, clay or legumes (beans, soybeans)
- - artificial grass
- - hot glue or superglue
- - paint (in this example, blue), if you use legumes, instead of plasticine
- - thread or fishing line.

1. From plasticine, make 3 figures that look like small bird eggs. If you are using legumes, then it is advisable to color them.

2. Apply a dab of glue to the inside of each acorn cap and stick some artificial grass on.

3. Put a drop of glue on the legumes, which act as eggs, and stick to the grass. If you are using plasticine, then simply insert the workpiece into the nest.
4. Tie or glue string or string to the craft so it can be hung.

How to make crafts from acorns: a mushroom house

Required materials:
- - acorns
- - glue
- - artificial grass
- - a thread
- - small saw or utility knife
- - a mushroom or other small toy.


DIY crafts from acorns: photo frame decorated with acorns

You will need:
- - acorn caps
- - flat wooden frame
- - hot glue
- - paint and brush (optional)
- - ribbon (length 50 cm, width 1-1.5 cm)
- - a suitable picture or photograph.

1. If your frame has glass, remove it and paint the frame.

2. Prepare the tape and glue the acorn cap to the middle of it.

3. Glue the ends of the tape to the frame (at the corners) so that the frame can be hung.
4. Start gluing the acorn caps to the frame, covering it completely.

5. Insert a picture or photo into the frame and glass.
Crafts from acorns for children: squirrel

You need:
- - paper
- - pencil or printer
- - empty photo frame (no glass)
- - PVA glue
- - caps of acorns.

1. Draw or print a squirrel silhouette on paper and color it dark.


2. Cover the entire silhouette of the squirrel with acorn caps, gluing them with PVA glue.

3. Insert your craft into a photo frame.

How to make an acorn craft: a vase

You will need:
- - plastic pot
- - hot glue or superglue
- - acorns
- - hats from acorns.

- Start gluing the acorns to the plastic container from the bottom up.
- Cover the top of the container with acorn caps.
It is better to keep such a vase on the street, since garbage and insects can accumulate in such a number of acorns.
How to make home decoration from painted acorns

You will need:
- - acorns
- - acrylic paint and brushes
- - a vase (or other container).
1. Paint each acorn with a hat white - completely. Wait for the paint to dry.
2. Paint blue (or other) acorns, leaving the hat white.

3. Paint the hat brown.

4. Pour the colored acorns into the container and the decoration is ready!

Other photos of crafts from acorns


Homemade masterpieces from natural materials are always beautiful, creative, natural and to some extent very stylish. To make interesting crafts from cones on the theme of autumn with your child, you must, of course, collect materials, discuss ideas and successfully apply several of them in practice. The preparation procedure itself is no less pleasant than the upcoming creative process. After all, taking a walk with your baby through a forest or a park, listening to the sounds of nature, breathing in the clean autumn air is just as interesting as creating crafts from cones with your own hands. Why cones? This unusual fruit of a coniferous tree can be turned into anything: in the New Year tree, in the little animal, in the basket, in the flowers. We have already told you how chic they are, in the same article we returned to this immense topic again to show you all the newest, most relevant and most interesting in the current season.
Autumn crafts are hard to imagine without material such as spruce, pine and cedar cones. Before you go to making figurines, crafts and compositions of this material, it must be cleaned of dust, debris and other contaminants, as well as slightly dry, at least for 2-3 weeks after collection. If you do not want to wait so long, put the cones in the oven for half an hour and dry at 200 degrees.
Also in some cases cones can be covered with transparent glue or varnish so they don't fall apart after a while. Children are very fond of working with forest cones, because of their unusual shape, natural color and aroma. Products always turn out bright, beautiful, fantasy!
As ancillary materials in the manufacture of crafts, you can use the following:
- salty dough;
- polymer clay;
- felt;
- plasticine;
- buttons, rhinestones, beads, beads;
- plastic bottles, cups, waste material;
- seeds, vegetables, fruits;
- leaves, acorns and chestnuts;
- burlap, cotton wool, twine and much more.
 All of the above materials are well known to children, as well as their parents, they are accessible and understandable for kindergarten and for home creativity with children. We'll consider many options for crafts from cones in combination with other natural and synthetic materials, and we will also pay special attention to such a type of creativity as crafts from acorns - since these wonderful fruits are often found next to cones - in the forest or in the park.
Autumn compositions for the garden- it is always a flight of fancy, warm autumn colors and a sea of \u200b\u200bchildish joy. 
 Autumn is about bunnies who change their everyday gray coat to white, warm and fluffy.
 Or about hedgehogs that carry their supplies to a warm mink, and then hide themselves until spring.

If you want to make a cute prickly hedgehog out of cones with your child, step by step instructions will help you, as they say. From pine cones, felt and small beads you will get a cute forest animal, and not even one. 
Spruce cones can be used when making a fox figurine.


And if we add “heavy artillery” to the bumps, namely - leaves, acorns, berries, chestnuts, then you will get very beautiful and very original products.


 Some of them may be quite childish - but so real and funny.

And others can be called true works of art that will easily amaze everyone at the exhibition with their originality and beauty. Such a chic product can be autumn fruit topiary.
 Here are some materials you will need to make a topiary, and as a basis, you can use a paper or textile sphere, on which all the constituent elements and decor are glued. For more information on how to make autumn topiary, see the video.
Crafts from cones and acorns: the most interesting
The autumn theme in the manufacture of crafts is inexhaustible and very interesting. In autumn, nature itself inspires the creation of such masterpieces: with its landscapes, its silence and its wealth.
 At what time will you still find so many bright colors, so many fruits and so many ideas to create funny characters? We have collected for you only the most beautiful do-it-yourself cone crafts: photo schemes for children will just help you figure out the intricacies of processing such delicate materials as acorns and cones.
 Products from cones and acorns can be fastened with glue moment, if you are working with a child, do not let him glue the parts on his own. Let him better select materials and help you create a preliminary layout.
  Such a cute sheep can be made from unopened cones, acorns and pistachios. In this case, you don't even need glue, because all parts can be fastened with plasticine, make eyes from the same material, and draw a mouth with a felt-tip pen.
  And such a cockerel can be made with the help of two cones, a couple of acorns, a few leaves and twigs. Fasten the cones with plasticine, as shown in the photo. To make paws, pierce acorns with a needle or awl and insert suitable twigs, securing with glue. From the leaves, make a scallop and a beard, from plasticine or grain - a beak, glue the paws to the body.
When you already have a well-filled hand to create crafts, you can repeat this song.
 Material such as cones and acorns literally lie under our feet in autumn. He simple, versatile, environmentally friendly, and, most importantly, interesting for children and adults, since many wonderful figures can be created from it. We suggest that you carefully consider the options in the photo - they are very simple and cute.


The idea of making a hedgehog out of cones and a plastic bottle is not that new, but it is a simple and very creative way to recycle unnecessary things and garbage that gets in the way. We have already talked about how to craft, so this original way of transforming an ordinary bottle into a cute hedgehog can be familiar to many for a long time. 
We have selected the simplest option for creating a fun hedgehog - from the neck of a plastic bottle, a plastic bowl, three caps, a pair of artificial eyes and an arbitrary number of cones.
Here's what you need to do Cut off the neck of the bottle, pick up a bowl of the right size.
  Glue the bottle to the bowl to get the muzzle of the future beast.
- Glue the cones tightly to the bowl so they don't fall off.
- ahead of hot glue the lids and glue artificial eyes on them.
- Twist the wire around the spout cover.
 And here is another version of the finished product. Such an ornament as a cute autumn hedgehog is suitable not only for a children's exhibition, but also as a decor - for a summer cottage, garden, garden or playground.
Christmas crafts from cones: fast and beautiful
It remains for us to consider the most pleasant and most exciting question - New Year's crafts from cones, because very soon it will be necessary decorate the house for Christmas and New Year holidays.
 From the cones you can make a beautiful Christmas tree.
 Or chic natural candlestick.
 Or a Christmas garland.
  You can also make budget, and most importantly - non-breakable Christmas decorations.
 Moreover, the sizes of jewelry can be both small and colossal.
  By the New Year you can do beautiful door decor. We have already told