Nail design liquid stones photo. Fashionable nail design liquid stones How to make a stone manicure
A beautiful and practical manicure is the dream of every woman. And now the “liquid stone” technique is actively used to create it, thanks to which real masterpieces appear on the nails. Photos of a manicure with liquid stones will not leave any girl indifferent, especially since almost everyone can master this design.
A manicure created using this technique is reminiscent of covering nails with rhinestones. However, instead of heavy, bulky stones and natural minerals, which fall off quite quickly.
This happens especially often if they are attached to natural nail plates, special gels and other additional materials are used. With their help, masters reproduce original patterns simulating gems, gold, platinum and silver.
Liquid stones look very natural and impressive, so it can be difficult to distinguish them from jewelry creations.
How to do a manicure with liquid stones and casting at home
The “liquid stone” technique on nails and photos of this design are gaining popularity, so now you can learn how to do a manicure in this style yourself at home. To do this, you need to prepare tools and materials that are sold in almost any decorative cosmetics store.
Liquid stone on nails: what it is and how to do it.
For a beginner in this matter, you need to follow detailed instructions to avoid ridiculous mistakes.
Another important step in creating perfect nail art, especially for natural nails, is the proper preparation of nails for applying gel and other materials, because the durability and beauty of the manicure depends on the working surface of the nail.
Required materials and tools
To create a manicure using the liquid stone technique, you will need the following materials and tools:
- UV lamp to speed up the drying of each layer of gel.
- Manicure foil that matches the selected stone.
- Colored art gel used to create a French jacket.
- Gel without dispersion.
- Gel paint necessary for applying contours and imprinting foil after polymerization.
- Thick sculpting gel.
- Stained glass gel for stone casting.
- Angled brush for making basic French.
- A basic brush for applying most layers of manicure.
- The so-called hair, necessary for drawing contours.
- Special polymer stones.
- Nail degreasing products.
- File to prepare nails for casting.
Step-by-step instructions for basic design
To create a beautiful and elegant manicure in this style, you will have to follow these steps:
- It is necessary to treat the surface of the nails with a file to remove them. natural shine, because otherwise the pattern will blur.
- Now the nail plates need to be degreased using alcohol or a special product.
- As soon as the nails are dry, you can cover them with gel, and natural nails you need to apply a very thin layer. After this, they should be dried under an ultraviolet lamp.
- Now you need to rid your nails of the sticky layer by wiping them with an alcohol-containing solution and you can begin to form the design, first completing its outline. Here you need to show special diligence, because the quality of the contour determines whether the selected pattern will hold or blur.
- Then, using special glue, you need to fix the foil selected to match the pebble on the nail, and when it is firmly attached, tear it off with a sharp movement.
- Decorate the “frame” of the stone with paint or gel, drying it after application under a lamp.
- Now all that remains is to form the stone itself, using a structuring gel and acrylic materials, and also cover the finished pattern with gel for a shining or mirror effect, drying each layer under a lamp.
Correct technology for applying liquid stones
To create liquid stones, multi-layer manicure technology is used, in particular three-layer manicure. Therefore, they are based on contour drawing, stained glass, and also sculptural gel.
Technique for applying liquid stones:
- At the first stage, the outline of the future gem is drawn with black gel, which in most cases is decorated with gilding or silvering, depending on the chosen foil.
- At the second stage, the prepared outline of the drawing is filled with translucent or transparent gel to create depth of color.
- At the third stage, the formation of a gem occurs. Using a sculpting gel and a fine brush, you can create an original gemstone that looks completely natural.
The technology of applying liquid stones also involves repeated use of a UV lamp, as well as coating the finished pattern with a finishing gel, which will give the stones a natural shine.
Options for imitation gemstones
Judging by numerous photos, the liquid stone casting technique will allow you to create an imitation of almost any precious stone and natural mineral on your nails - it all depends on the level of skill and creative approach of the artist.

But the following gems are especially popular:
- translucent emeralds;
- amber;
- sapphires of various shades;
- juicy rubies;
- rose quartz;
- exquisite pearls;
- luxurious turquoise;
- iridescent malachite.
Liquid stones for natural and extended nails
The technique of casting liquid stones was originally developed for nails extended with gel or acrylic, since it required a fairly high density of the surface to be covered and a good length. Nowadays it is actively used for natural nails, and a manicure made in this style looks quite impressive on them and is not heavy.
 Liquid stone on nails: a new product for manicure and pedicure.
 The only limitation in this case may be the length nail plate. Because to make a high-quality drawing so that it does not blur during application, a lot of free space is required.
Design depending on the shape of the nails
The liquid stone technique on nails, photos of which are becoming increasingly popular in specialized and fashionable glossy magazines, is used on extended and natural nails. Therefore, the design and size of the stone is selected by the master depending on the shape of the nails.

Stone casting can be done on round, square, pointed and oval nail plates, the main thing is that they are not too short. On almost any work surface you can recreate miniature jewelry masterpieces that will delight the owner of this manicure.
Design ideas: popular decor and new items
One of the most popular decors when using liquid stones are oriental motifs, which are performed in most cases on long square nails. Their tips are covered with gold, onto which a simple pattern is applied with bright blue and turquoise gel.
In order not to overload the image, casting is done only on one nail, and is not limited to one gem. At the base of the design there is a large turquoise stone, a little further away a bright red ruby is created, and around them there are many small transparent emeralds, which act as the setting for this “ jewelry».

New decor items using liquid stones represent original spring motifs. So on the nails of fashionistas appear emerald insects, ruby dragonflies, sapphire scorpions and butterflies, as well as luxurious peacock feathers, the “eyes” of which are made of large and juicy gems.
All these designs are decorated in gold, and the background of the nail plate is chosen in the most delicate pastel shades in order to concentrate attention on such an unusual contour of the liquid stone.
Eastern style in drawing
Casting liquid stones is gaining popularity, so masters are happy to experiment, creating jewelry masterpieces on their nails. Particularly beautiful in combination with this technique are patterns in oriental style, because they themselves are distinguished by wealth and luxury, since they are made of “gold and jewelry.”

And liquid stones allow you to achieve stunning results, because gems made on nails look natural and bewitching, turning your fingertips into a luxurious oriental fabric, embroidered with gold and covered with bright red, blue and green stones.
Liquid stones with French
One of the simplest designs in this style are liquid stones with a French finish. This manicure looks elegant and gentle, especially if it is created to match jewelry worn by a woman. Therefore, it is not too flashy and is suitable for Everyday life.
To perform this technique, you need to go through the following steps:
- Using an angled brush and white gel draw a French pattern on the tips of your nails and it is better to choose discreet, pastel shades.
- Dry your nails under the lamp.
- Apply protective gel and fix it under the lamp.
- Using black gel and a thin brush, apply a pattern - the frame of any precious jewelry and dry the nails again.
- You need to apply gilding to your nails using foil, gluing it and sharply removing it.
- The place for the stone should be covered with yellow and silver gel to create depth of color, drying each layer with a lamp.
- Using a thin brush, cover the stone with colored stained glass gel, using the desired shade, and dry again.
- To form the volume of the stone, a sculpting gel is applied to its surface, giving it the desired shape using a thin brush. Then dry your nails under a lamp to harden the stone.
- Now all that remains is to cover the entire surface of the nail with the finishing gel and dry the nails again.
Liquid stone for wedding manicure
Each bride carefully thinks through her wedding image, and a special place is given to the fingers. Traditionally, girls choose a French manicure - stylish and discreet, but with the advent of liquid stones they began to increasingly resort to casting. At the same time, it is not worth decorating each nail with a gem, since the bride’s appearance should remain gentle and not overloaded.

Therefore, most often they work with the ring finger, choosing not too bright stones - pearls, crystal, soft pink or white sapphires and they are framed exclusively in gold or silver to match the wedding ring.
Cost of implementation in the salon and at home (average prices in Moscow)
The liquid stone technique on nails, the photo of which is considered the property and pride of any nail salon and nail technician in particular, is quite expensive. The average price for casting in a salon is 400 rubles per nail. Performing this manicure at home will not be so expensive - masters charge from 100 rubles per nail for their work.
Features of removal, how to remove a design with liquid stones?
This type of manicure looks impressive and is extremely durable, so it is not easy to remove. The main thing to remember is that you should never pick stones off your nails., otherwise you can damage their surface layer.

To get rid of the casting, you will have to use a special machine or a hard file, which you need to grind the pattern until it disappears. But in this case, tedious and long work awaits. And when there is no trace left of the stones, all that remains is to treat the nails with special solutions to remove any remaining gel.
Pros and cons of liquid stones on nails
A manicure created in this style has its advantages and disadvantages, which you should know about before you start implementing it.
The advantages of casting are undoubtedly:
- Durability. When creating this nail art, not rhinestones are used, but special gels, so the stones embodied on the nails will not fly off with any careless movement. So the completed drawing will last from a week to a month or even more - it all depends on the lifestyle of its owner.
- Beauty. This technique will allow you to create real masterpieces on your nails that are not inferior to precious stones and will captivate those around you with their radiance and rainbow tints.
- Relatively easy to apply. For creating perfect manicure it just takes a little practice. In addition, you can always use ready-made pebbles made of special polymer materials that are easy to attach and sit firmly.
- Versatility. This technique is used not only on artificial, but also natural nails.
This manicure has its drawbacks:
- This technique is quite expensive, since an impressive list of ingredients is required to create polymer stones.
- This manicure is designed for long nails, since large free space is needed to complete the patterns.
- In most cases, the finished manicure turns out to be heavy and quite bright, so in everyday life it will look catchy and quite defiant.
One of the most luxurious and original manicures appeared thanks to the liquid stone technique.
With its help, you can create amazing jewelry masterpieces on your nails, at home, that are suitable for special occasions and for every day, and their photographs will not leave any fashionista indifferent.
Video on how to make liquid stones and casting on nails
Nail design “Liquid stones using holographic sequins”:
Liquid stones+Casting:
Today there are many nail design options, one of which is the “liquid stones” coating.
This design looks incredibly beautiful on the nail plate; the created stones sparkle in the light, like droplets of water.
In this article we will talk about the features, techniques and bright ideas of manicure with liquid stones.
Brief description and history of creation

The “liquid stones” technique was created in Russia by Ekaterina Miroshnichenko.
In 2013, this coating option became a real brand and was popular all over the world.
And this is not surprising, because after creating the design, women's hands look as if precious stones were attached to them: sapphires, rubies and emeralds.
The nails seem like expensive material, embroidered with sparkling drops.
When creating a “liquid stones” design, the “casting” technique is very often used. Thanks to this combination, it is possible to obtain a “golden frame”. It gives the nail plate a special beauty, and also highlights the “liquid stone”.
What are liquid stones made of?
When creating “liquid stones,” a polymer substance is used. Thanks to it, it is possible to create a voluminous, slightly convex stone. Polymerization of the substance is carried out using a UV lamp.

When implementing a design, the use of sculpting gel remains mandatory. Ekaterina Miroshnichenko uses this product to achieve a magnifying glass effect. It looks very original and elegant.
On which nails are liquid stones made?

Initially, the “liquid stones” technique involved creating a design on extended gel and acrylic nails that should have been long and dense.
But the high popularity of this technology has led to the fact that today a girl can become the owner of this design with natural nails of different lengths.
Nail coatings for creating designs

In a short time, the “liquid stones” technique won the hearts of many nail art masters and clients themselves, it was noticeably transformed and received a lot of creation options.
But despite this, they are not suitable as a coating regular varnish or shellac, they should be applied only to the nail plate covered with a layer of gel on top.
You can create liquid stones on a colored surface, but this design looks best against a background french manicure.
Advantages and disadvantages
The “liquid stones” technique has a whole a number of advantages, among which are the following:

In addition to the considered advantages, this nail art technique has a certain set of disadvantages:

Tools and products for creating liquid stones on nails
The process of creating a “liquid stones” design is simple. To implement it on your nails, you need to prepare a number of professional tools, namely:

Step-by-step instructions for creating a manicure at home
You can create a “liquid stones” design by following the following plan:
- Perform cutting using casting technique.
Of course, you can omit this step and do without cutting, but this is the author’s idea. To draw the edging, black gel paint is used.
You can also use black gel or special glue for foil.
But the first option is preferable for the reason that drawings with gel paint are much easier to do.
The cut can be presented in the form of an oval, circle, or square.
- Place your nails in a lamp to allow the gel paint to cure. The duration of the procedure is 1.5 minutes.
- Take some gold colored transfer foil and then print it over your cut.
To print the gold foil evenly, you need to make 3-4 jerky movements. Send the material to the lamp for polymerization.
- Now you can move on to the actual formation of the pebble.
For these purposes you need a thick sculpting gel.
To give it the required shade, add gel pigment or a few drops of stained glass paint.
- Take a drop onto your brush and place it inside the cut. Polymerize in a lamp for 5 minutes.
- Remove the sticky layer using a cotton swab soaked in alcohol. Cover the finished design with top gel and dry in a lamp for 2 minutes.
For a description of the liquid stones technology and a visual master class for beginners, watch the video.
Ideas for creating liquid stones on nails
You can use the “liquid stones” technique to create both festive and everyday manicures.
The options presented below are easy to implement, so they can be recreated at home.
Wedding manicure
The traditional design for the bride is the French manicure. Well, you shouldn’t deviate from traditions, you can do a classic jacket, but decorate your ring finger with liquid stones.
You should not decorate all your fingers with jewelry, otherwise you can overload the delicate appearance of the bride. The color of the stones should not be bright.

Oriental manicure
Nail design with oriental motifs is one of the most popular and original trends. Its characteristic feature is the use of bright, saturated colors: red, blue, gold, emerald.
To decorate the stone, you should use an ornate dark-colored edging. It will resemble oriental script.

- When creating liquid stones, you must use sculpture or stained glass gel. It is ideal for creating jewelry that will sparkle in the sun.
- You can complement the design with various monograms made using the casting technique.
- If you need to remove a pebble, then under no circumstances should you tear it off the nail plate. Otherwise, you will greatly harm your nail.
- You can remove jewelry using a router or file with an abrasiveness of 100/100 grit. Of course, such work takes a long time, but it is the safest.
The “liquid stones” design is a great opportunity to create a bright and rich manicure without spending money on purchases. expensive materials. The technique is simple, so you can become the owner of a stylish and original manicure Any girl can do it by creating a design at home.

New nail art techniques never cease to amaze. Talented nail technicians are able to create a unique design using traditional nail materials. Thus, with the gel that is used to simulate an artificial plate, you can create liquid stones on the nails that look like sapphires, emeralds or rubies. We will introduce you to this technique more closely, tell you how to make liquid stones on your nails yourself, and show you beautiful photos and exciting videos.
About nail technology liquid stones
The “liquid stones” manicure was invented by Russian nail artist Ekaterina Miroshnichenko in 2013. Ekaterina Miroshnichenko is the chief technologist of her own brand of nail materials E.MI. She also invented it, which serves as a wonderful addition to the imitation of natural minerals on the nails. The simple-to-use technique of liquid stones for nails was quickly appreciated by both masters and clients. Today, this design is performed by nail artists all over the world.

What kind of technology is this? As we have already noted, in the process of creating a pebble, ordinary gel is used. Neither rhinestones, nor, especially, natural minerals are useful. The result is very believable, but easy to use, which is impossible when using real pebbles for design. “Liquid stones” manicure can only be performed on nails with gel extensions; acrylic is not suitable for this technology. To create a likeness precious mineral The master makes a base of shiny foil on the nail, and lays a drop-shaped colored gel on top. After polymerization of the material, a luxurious decoration appears on the nail. To make the pebble look even more pompous, an edging is made around it using the casting technique.
Benefits of liquid stones
Casting and liquid stones in symbiosis give a spectacular result that will appeal to even the most sophisticated fashionistas and girls who have tried on many designs on their hands. Ekaterina Miroshnichenko’s technique has a number of advantages:
- Liquid stones for nails allow you to become the owner of a unique and inimitable design, since the stone itself can be shaped by a master in any way. color scheme and any size. You can create a design that blends harmoniously with any outfit.
- Manicure with liquid stones is performed using safe materials.
- Both casting and liquid stones are simple techniques that even beginners can master. If you wish, you can learn how to make such a design with your own hands at home, and you will need a minimum of materials for nail art.
- This manicure will be durable, the imitation of precious stones will delight the eye until the next correction.

We will tell you how to create nail designs with liquid stones and what you will need for this.
We perform manicures with liquid stones ourselves
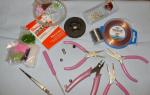
In order to decorate your hands with nail designs with liquid stones, you need to acquire the following materials and tools:
- Transparent gel for extensions.
- Gold or silver to create a stone cut.
- Black and white gel paint, thin brush for applying them.
- Silver and gold glitter gel paint or holographic transfer foil.
- Pigments for coloring the gel in the desired color.
- Ultraviolet lamp.
- Degreaser for removing the sticky layer of materials.

All these materials can be bought in specialized stores for nail art or ordered online. Their cost is affordable, for example, the price of foil is about 40 rubles, a bottle of gel paint will cost approximately 450 rubles and it can be used to create a wide variety of designs. You can purchase materials from the E.MI company designed specifically for manicure using this technology, or you can use gel paint and other materials from other manufacturers.
Step-by-step scheme for creating liquid stones
Before creating liquid stones on your nails, you need to carry out. We would like to note once again that this technique cannot be used on natural nails. Extensions can be done with colored gels, but most often a French gel is used. Against the classic background of French manicure, precious stones look most advantageous. Then step by step instructions creating something like precious stones on your nails looks like this:
- We make cuts using the casting technique. Of course, you can do without cutting and perhaps your design will not need it, but the author of the technique intended it that way. The edging is painted with black gel paint. You can also use black gel, but the paint will not spread and it will be easier to paint. The cut can be of any shape: square, oval, circle.
- Then, if you used E.MI Black Tulip gel paint, the paint must be baked in a lamp for one and a half minutes.
- We take a piece of transfer gold foil and stamp it on top of the cut. In order for the golden coating to be printed evenly, you need to make 3-4 blotting movements.
- If you are making a backing from holographic foil, first apply white gel paint to the place of the future pebble. Alternatively, you can cover the area with glitter gel paint. We polymerize the material in a lamp.
- Now we form the pebble directly. To do this, you need a sculptural gel, which is given the desired shade by adding gel pigment or ordinary stained glass paints to it. The pigment can be stirred evenly, or you can leave light streaks, this will give the stone depth and additional volume.
- Take a drop of colored gel with a brush and place it inside the cut. We polymerize in a lamp for about 5 minutes.
- Remove the dispersion layer from the nail with a degreaser.
- The final step is to coat the nails with top gel without a sticky layer.

You can complement the design with Swarovski rhinestones or cut them. You need to use sparkles, golden threads and glitters with caution, because even one pebble will look self-sufficient. In such nail art, it is important not to overload the nails with glitter and not to shift the emphasis from the stone to other shining elements. Do you like manicure with liquid stones? Leave your opinion in the comments below the article.
Video: How to do a manicure with liquid stones
Manicure technologies do not stand still, and this is confirmed by a new unique technique - liquid stones. Nail art masters have mastered the modeling of stones on nails so skillfully that at first glance it can be difficult to distinguish the resulting design from real minerals. You will learn about the features of this technique and how to perform it in this article.
What are liquid stones
The founder of the technique is Russian manicurist Ekaterina Miroshnichenko. On this moment you can purchase ready-made kits with everything necessary material to create liquid stones. For this, a three-layer application is used, which includes creating the contour of the stone, its volume and the effect of a stained glass window. A successful combination of colors and gel materials helps to imitate natural minerals.
This manicure, of course, obliges you to a certain style of clothing, and is suitable for romantic natures. It is better to highlight one, maximum two nails with liquid stones. If you overdo it with the design, you can get a vulgar version of the manicure, which certainly will not add elegance to the image.
Photo of liquid stones on nails


Liquid stones on nails: step-by-step instructions
If you decide to repeat the idea of a manicure in the style of liquid stones at home, then, in addition to, you will need a number of additional materials. These are special gels - sculptural and stained glass. And to decorate the outline of the stone, you can use silver foil or acrylic paints.
So, the technique of creating liquid stones contains the following steps:
- After preparing the nails, applying the base and color coating, you need to form the base of the future stone. To do this, use dark gel polish to paint oval shape using the casting technique and dry in a UV lamp for 2 minutes.
- Using acrylic paint or foil, process the outline of the stone, applying the material at its base.
- Cover the surface of the stone with colored gel polish. In this case, you can combine different shades to create the effect of natural minerals.
- Apply stained glass gel on top and dry in a UV lamp.
- To create a three-dimensional hemisphere using structural gel, you need to lay out the shape of the stone and dry it in a UV lamp for 2 minutes.
- It is necessary to consolidate the obtained result using finishing coating, which is also processed in a UV lamp.

- This is part of the image of any woman. When you meet a person, you don’t voluntarily pay attention to his hands. And how that same opinion changes at the sight of untidy hands. Perhaps even with a simple manicure, but a woman’s hands should always be very well-groomed.
Now exists great amount various methods, applying various kinds of drawings. In this case, ordinary varnish coating, various patterns, gel abstract paintings, and many other decoration methods are used; it all depends on the skill and imagination of the master. Below you will get acquainted with a very young technique called “Liquid Stones”. Find out how to do this original decor and can it be done at home?
What are liquid stones
A very young technique for performing manicure. It quickly gained popularity, this technique was transformed, and masters began to use many variations of the “liquid stones” technique. It is very important that this manicure is done only on artificial nails or on plates coated with gel material. You have two options to get the manicure you want.
The first is to go to a salon, where they will easily and without stress make you an analogue of expensive stones: diamonds, rubies, emeralds. But for this you will have to pay a tidy sum. If you want not to spend money, then you should try to make such beauty yourself. The work is very labor-intensive and includes more than one stage. Having completed each step exactly, you will achieve the manicure of your dreams with beautiful stones on all fingers.
Cost of manicure in salons
Prices vary from 250 rubles for one stone. Depending on how many stones you want to make. Plus nail extensions or covering yours with gel. Plus a fixer. So it turns out to be a tidy sum. So decide whether it's worth it or not. Or maybe take a risk and do it yourself.
Technique for doing it at home
First stage:
First, let's prepare the nails for gel coating; this coating cannot be done without first treating each nail. If this is not done, then your new manicure will not hold on at all and will quickly peel off. Using a rough nail file, carefully file away the topmost covering of the nail. But do it carefully, otherwise you may damage the structure. If you are working on artificial nails, file off the top layer of gel. After sawing, the surface must be degreased; you can use simple alcohol. Wipe each finger with a cotton swab dipped in alcohol.
Second phase:
Next, you need to cover each nail with a layer of gel; when applying the procedure to already made non-natural nails, the application procedure will have different lengths and thickness. If you are doing it on natural nails, try to apply the thinnest layer possible. For drying, a lamp is used, not a simple one, but a special one, for several minutes. After hardening, treat the gel surface with alcohol to remove the sticky layer.
Third stage:
This stage is associated with the outlines of the boundaries; if the boundaries are not drawn, the drawing will not be clear. Why choose a design invented in advance and apply it directly to the nail. After the design is outlined, apply glue for the foil. If it is not available, apply a simple colorless varnish. Give it time to dry, after which it will become sticky. Outline the edges with varnish and apply the selected foil of any color. Wait until everything sticks, and with a sharp movement, tear off the foil. The contours of the design will remain on the nail - this will be the basis for enclosing the stone.
Fourth stage:
You can choose different liquid stones of the selected color and shade. Depending on what color you have chosen for the stone, apply paint to the place where the stone will be. Masters advise using acrylic paints, but this technique does not exclude the use of glitter and gel for decoration. You remember that after applying the gel you need to hold your fingers under the lamp.
Fifth stage:
After the color has been applied, we create a convex shape for the stone. This is done using acrylic material or structuring gel. These materials have a high density and can harden quickly. Using a brush or toothpick, take a drop of gel and place it on the drawing. Then immediately under the lamp for a few minutes. Then everything follows the scheme, next finger, toothpick, gel, lamp. If there are several stones on one finger according to the design, then they are applied one by one.
Sixth stage:
When all the butu stones are made, a protective layer must be applied. What is it used for? protective varnish or shellac. If you did everything correctly, your new manicure will last as long as possible.
Necessary materials
To carry out this procedure at home, the following materials will help you:
- a hard nail file, or better yet, a manicure set;
- protection gel, multi-colored art gel for the drawing itself, black art gel for applying the contour, stained glass art gel of the selected stone color, sculptural gel of a very thick consistency.
- special brushes;
- special foil for manicure;
- lamp with ultraviolet rays.
Reviews
Svetlana K., 28 years old.“I made myself liquid stones for prom and created a real sensation. My nails looked very rich and sophisticated. My mother was also a big fashionista and at one time she paid a lot of attention to manicure; she shared that they used to glue real small pebbles for beauty. And in the morning there was no one left. My liquid stones lasted for more than one week.
Olga Sh., 30 years old.“For my anniversary, I decided to give myself a trip to an expensive salon with all that it entails, a hairstyle, a pedicure, and a manicure. When it came to manicure, the master advised me new technology liquid stones. I was immediately confused, I decided that it was too expensive for one day, but the master replied that this procedure would be enough for more than one week, and there was no need to be afraid that something would peel off or fall off. So it turned out that I was an ordinary woman: I cook, clean, wash dishes. And all this with liquid stones. At work now every day I am irresistible. I'm thinking about prolonging the pleasure when my nails grow back.
Nastya R., 20 years old.“I made it very expensive and very the first time, I almost went crazy. Yes, I agree it’s beautifully unrealistic, but it costs a lot of money. You don’t run into salons every time. I decided it was better to spend money once than to constantly throw away money. I bought everything I needed and a UV lamp, and the experiments began. At first my friend helped, but now I’m not bad at it myself, I’m coping. Why pay more if you can save.
Natalya E., 34 years old.“All my life I have been working as an accountant from work to home and so on in a cycle. Not long ago, I saw a liquid stone manicure on my young colleague. I wanted innovation and change. I went and did it and realized that everything in life needed to be changed, both wardrobe and makeup. In general, away with the gray mouse, now I’m new and I like myself. Not long ago, I began to notice the looks of the opposite sex on me. Nice.
Taisiya V., 27 years old.“I got this manicure for free. For my birthday, my friends gave me a paid voucher for a manicure with nail extensions and decoration with liquid stones. What can I tell you, I regretted it. I hid my nails from prying eyes for a week. And then she finally went and cut everything down. This is definitely not for me. I'm not used to people focusing on me. I think that such pretentiousness looks absolutely tasteless.
Elena A., 26 years old.“Now a whole cult has developed around these liquid stones. There is little information on the Internet, which is why the price for training in this technique is unrealistically high. If you look at it sensibly, there is nothing complicated there. Just wait a little longer and the technique will be available to any master, as is always the case with any innovations in this industry.
Tatyana O., 23 years old.“My sister introduced me to this technique. She lives in a city larger than the one I live in, and this technology is already quite common among them. I didn’t do the procedure in the salon, but I immediately wanted to master what my sister did for me. Of course, I didn’t succeed the first time, but I didn’t despair. Every time it turns out better and better. I've already done it to all my friends. I'm wondering if I should take up this business professionally.