DIY hut and sleeping bag: master classes. DIY sleeping bag How to sew a sleeping bag yourself
If you like hiking, fishing, or long walks in the woods, check out how to make a hut. Skills related to how to sew a sleeping bag will also come in handy.
How to make a canopy with your own hands?
The type of temporary structure depends on:
- how many people need to stay overnight;
- depending on the type of terrain;
- type of vegetation in the area;
- available funds.
- hatchet;
- strong rope;
- stakes;
- spruce branches or branches with leaves.

- Select two trees that are a short distance from each other. From each of them, find a strong branch growing at an acute angle. They must be at the same height.
- Use a hatchet to cut down young trees and use the same tool to remove branches from them. So you've made some poles. Place the strongest one horizontally in the axils of those two tree branches.
- Select the remaining poles according to your height, leave the longest ones for the roof, and the second largest ones will be used for the horizontal sheathing of the walls. But first you need to make vertical posts. To do this, sharpen the ends of the poles and drive them into the ground in one straight line with the back of the ax.
- Vertical racks different sizes. Place the taller ones closer to the trees, followed by the shorter ones. Then the roof will have a slope. Tie the horizontal ones to these vertical posts with a rope.
- Place long poles on the main, strongest crossbar, first across it, then along it, also tying them with rope.
- Using the same hatchet, chop the spruce branches and place them on the canopy, starting from the bottom. In this case, place the branches with the convex side out.
- The figure shows how to position the structure so that cold wind does not blow into it. In front, at a distance, light a fire, then it will heat the home. The fire should be small so that there is no fire. To avoid it, dig around the fire pit so that the fire does not spread to the canopy.
When going into the forest, on a hike, or on a long walk, be sure to take a small ax with you. It is not heavy, it does not take up much space, but it will help out perfectly in such a situation.
Here's how to make a canopy to keep warm and shelter from precipitation and wind. If you have more time and energy to construct such a structure, then build another shelter.
How to make a hut?
It can be gable, round, or have the shape of a wigwam.
If you are building a building of the first type, then you can also place it between two trees or in a different way. For work, prepare:
- two strong spears;
- one pole;
- thick straight branches;
- rope;
- axe.
Place a horizontal slab on top of the slings and secure thick branches to it. If you do not have a rope with you, then place them so that they are secured to the horizontal poles with knots.

This principle will help you arrange the branches if you are not in a coniferous forest. Look at which side the fire should be in order to heat your temporary home.

If you have poles of well-bending trees, then you can make a rounded structure. You don't need two trees growing next to each other for this. The base is paired poles that are tied at the top.

You can build a hut like a wigwam. To do this, take the branches, place them with their thinner ends up, and tie them here with a rope. Make several turns of wire on the outside. You will now attach branches to it.

So, for such a structure you will need:
- strong branches;
- rope;
- wire;
- knife;
- spruce branches
If you have a tarpaulin or film available, cover the hut with such material and secure the bottom with stones or earth.
If this is not available either, you can use branches without leaves or poles. Make the base of the wigwam, lay the branches at an angle, securing them with rope.

The following photo shows what can be used to cover a gable hut, gives its dimensions and shows the principles of construction.

Here is another example of using improvised means. If you have dried mowed grass available, cover the hut with it. To prevent it from flying away from gusts of wind, place poles on top at an angle.

If you processed grapes or cut raspberries in your garden plot, use these bendable twigs to make a hut for children. Kids enjoy playing in such shelters.

You can plant climbing plants outside that will entwine such a gazebo and become a natural shelter from the sun.

If you don’t have the strength or desire to build a hut, but there is a fire, then rake it a little to the side, when it burns well, lay spruce branches on this heated place. And you can lie down on this natural bed, with your feet towards the smoldering fire. But the fire should be located no closer than 1.5 meters from the bed. If several people need to spend the night, then lay spruce branches around the fire, the fire will be in the center at a sufficient distance.
- If you have to spend the night in a snowy field in winter, then visually mark the perimeter of the square, from which you will shovel snow into the center to make a rounded dwelling.
- Its upper walls need to be compacted with a shovel, unless it is very cold outside and the snow is sticky. If it is loose and the weather is frosty, then pour water over this part of the hut. The upper walls will become stronger.
- Rake out the entrance to the home, make a sufficient recess inside so that you can sit in it.
- Be sure to provide ventilation by making a hole in the ceiling. If you build a fireplace inside, then the size of the room must be appropriate to accommodate people and a small fire. When it burns, it will melt the snow inside the building, making its walls strong in this part of the house.
- Be sure to build a chimney by making a hole in the ceiling so that the smoke comes out through it.

If you decide to build a hut from poles or from spruce branches in winter, also throw snow on top of it so that it is warm in such a house at this time of year.
How to equip a hut inside?
To be able to spend the night in a hut at night, lay fir branches inside. They only seem prickly; sleeping on such a bed, for lack of anything else, is quite soft and comfortable. In addition, a pleasant pine smell spreads.
If you are spending the night not on a warm night, but on a cold one, then you need to take care of the fireplace, observing safety measures. In this case, the hut should be built like a wigwam; tie the stakes at the top so that there is a gap of 1 meter in diameter for the smoke to escape.
In order to prepare a place for a fire, you will need:
- shovel or axe;
- Earth;
- stones;
- later firewood.

For fire safety purposes, install the fire not in the hut, but next to it, at a distance of 1.5 meters.

But if it is necessary to monitor him in turn, otherwise the consequences can be very sad.

Therefore, if you do not want to take risks, it is better not to light a fire at night and wear a sleeping bag to maintain warmth. You will learn how to sew it with your own hands in the next paragraph, but for now, check out how to make flooring. It will allow a person to be not on the ground, but above. To do this, arrange a makeshift bed. You will need:
- 4 low thick logs;
- strong poles for the height of a person and two that you can stuff across;
- spruce branches;
- rags.
Place horizontal and vertical poles on top and tie them with rope. Check the strength of the structure, only then lay spruce branches on it and a rag on top.

If it is not possible to make such a flooring, then place dead wood on the ground and spruce branches on it.
If you are preparing for a hike in advance, then take a sleeping bag with you. In this case, you will be warm at night, and you will not need to risk lighting a fire at this time of day.
How to sew a sleeping bag with your own hands?
These devices are three-layer. The top one is waterproof fabric, the inner one is the same fabric or cotton fabric, insulation is placed in the center.
The type of insulation depends on what time of year you will use the sleeping bag. Previously, they used cotton wool for this. But if you carry this type of insulation on your shoulders, and not carry it by car, it is quite heavy. More easy option- synthetic fillers, such as:
- padding polyester;
- holofiber;
- thermofinn;
- Thinsulate;
- yunsen.
- Sintepon consists of polyester fibers, sometimes natural ones are added to them. It is light and warms well. But the wear resistance of such material is considered low. Over time, its structure is destroyed, so its thermal insulation properties deteriorate, the fibers begin to break through the main fabric and allow cold to pass through.
- Holofiber- a hollow material whose fibers are twisted in the form of a spiral spring. They are connected to each other. The one-piece fabric has a springy structure. Holofiber consists of polyester. Unlike padding polyester, this type of filler is more wear-resistant. It quickly regains its original shape after deformation, retains heat well, its structure is breathable, and it is hypoallergenic.
- Thermofinn- this is a high-quality modern Russian insulation. It contains biological components and conventional highly crimped fibers. It has good thermal insulation, is safe and environmentally friendly, elastic, and holds its shape well even after repeated treatments.
- Thinsulate- This is artificial fluff. The fabric is obtained by weaving thin synthetic fibers that are very light in weight. Therefore, a sleeping bag with such filling is easy to carry and comfortable to be in. Thinsulate retains heat even when wet and dries quickly. This filler has excellent wear resistance, does not shrink, does not deform, and has a uniform structure.
- Yunsen obtained by mixing biological components and polyester fibers, which are bonded together. This filler does not absorb odors, is hypoallergenic, also dries quickly when wet, and has excellent thermal insulation properties. But products with such insulation need to be properly cared for. If you wash your sleeping bag in washing machines, choose a gentle mode, since a strong spin can disrupt the structure of this material and deform the shape of the product.
For lining, it is best to choose a warm fabric such as flannel, soft wool, or microfiber. But if you use the product in conditions of high humidity, then it is waterproof.
You can fill a sleeping bag with down, but then the product must be well quilted so that it does not fall off. In this case, it is better to make the inner lining also from a waterproof material, since moisture is dangerous for natural down. It may become moldy and will take a long time to dry.
After you have decided on the filling and purchased waterproof fabric for the top and bottom, you can learn how to sew a sleeping bag.
Here is one of the simplest options.

Before sewing a sleeping bag, prepare:
- lining and outer fabric;
- filler;
- long detachable zipper;
- scissors;
- large ruler;
- chalk.
- Measure the height of the person for whom you will sew a sleeping bag, add 5–7 cm so that you can stretch out comfortably in it. The width of the product is 70–90 cm, depending on the size of the tourist.
- Let's consider the option if the width of the sleeping bag is 80 cm, the person's height is 1 m 75 cm. Cut out a rectangle measuring 1 m 84 cm by 164 cm from the top and lining fabric. For the filler, we do not add seam allowances, so a rectangle made of this material will have dimensions of 180x160 cm.
- Fold the main and lining fabric right sides to each other, attach padding polyester on top. Sew along its edge. You now have a three-layer rectangle. Turn it right side out so that the filling remains inside.
- Fold this figure in half lengthwise, hem the bottom, tucking the edge of the fabric inside. Sew in the zipper.
- In order for the filler to be better distributed inside, draw segments with a ruler at a distance of 20–30 cm from each other, sew along them, making parallel stitches.

- For such a model, a rectangle is also cut out in size, but at the top a rectangle 60 cm high is made for the head.
- Round its two upper corners and sew bias tape here in the form of a drawstring. Insert an elastic band inside so that the hood fits snugly to your head.
- The same pattern shows that even when constructing it, on the right you need to make a rectangle with sides of 40x80 cm.
- You will sew up the bottom of the sleeping bag and leave this tab loose. But at the bottom it needs to be edged with a seam so that the side stitch does not tear over time.
You can sew another sleeping bag so that it is as warm as possible. The following photo shows its dimensions.

And here is the pattern for this product. As you can see, the hood is sewn together with the main part. This sleeping bag is fastened at the front with Velcro or a zipper.

In conclusion, we suggest watching a video in which the famous naturalist and TV presenter Timofey Bazhenov shows how to quickly make a hut.
Another reveals the secrets of creating a sleeping bag in industrial conditions, which you can take into account.
Pattern of a sleeping bag for a newborn with sleeves
The products are sewn according to the same principle, but the pattern for sewing a sleeping bag must be selected and remade. Let's look at the patterns of 3 models/
Pattern No. 1 - Insulated sleeping bag with hood and sleeves:
A bag with short sleeves can be sewn from natural fabrics, knitted or crocheted. Great for warmer months and indoor sleeping.
Pattern No. 3 - One-piece sleeping bag for babies:
For the pattern you will need a sheet of paper and a pencil; we will outline any sliders. Be sure to add 2 cm to the seams on each edge. Make the bottom of the sleeping bag rounded or straight. Please note that the product must exceed the length of the newborn by 15-20 cm. A sleeping bag that is wide at the bottom narrows towards the top.
The top of the product can be made based on the vest and do not forget to leave seam allowances of up to 1.5 cm.
For a newborn, it is better to leave all the seams out so that they do not scratch the delicate skin.
We use the resulting pattern to cut the fabric. The fabric is selected depending on the place where the clothing will be used. For an outdoor bag you will need insulation.
A sleeping bag can be sewn in different ways:
- one-piece from a whole piece;
- overhead shelves.
There is no need to do any gatherings, as they will disturb the baby and cause pain. The neckline and armholes are cut exactly to the size of the baby.
If a zipper is inserted into a product, it can be along the length of the entire product or just the upper part. In this case, leave an allowance of 2-2.5 cm for the zipper. The zipper is located both in the middle of the bag and at the bottom.
How to sew a sleeping bag for a newborn with sleeves?
In order to sew a sleeping bag for a newborn with your own hands, you do not need to be a first-class seamstress; you just need to know how to use a needle. Loving mother will do a great job of sewing if you carefully study the procedure.
Necessary materials:
- cotton fabric;
- lining fabric;
- bias tape;
- padding polyester;
- buttons or zipper.
Manufacturing procedure:
- Before starting work, you need to draw a pattern on paper or take a ready-made one. When cutting, you need to remember that the length of the sleeping bag must correspond to the height of the child. The bottom of the product is wide to ensure comfort for the baby.
- We fold the cotton fabric in half and mark it according to the pattern, leaving seam allowances of 1-2 cm. We start with the large parts - the back. Place the pattern on the fold line of the fabric and trace it with chalk, retreating a couple of centimeters on all sides.
- The next detail is the front trims. You need to remember that the zipper will be sewn in front, so leave an allowance of 2-2.5 cm under it. We finish cutting with sleeves.
- We perform the same operations with padding polyester and lining fabric. They can be used if a warm model is being sewn.
- We assemble the finished parts into a product. First, the main fabric is connected to the padding polyester with pins or small stitches.
- When the sleeping bag is assembled, we begin to sew it together, with the right sides facing inward. We sew the front details along the sides with the back, and sew a zipper in the middle.
- Turn out ready product, iron all seams and edges.
- We trim the neckline and bottom of the sleeve with bias tape. In a baby's sleeping bag, it is better to make the seams external, treated with tape.
- The bottom of the sleeping bag can be decorated with bright appliqué.
Useful tips
When choosing a material, pay attention that it is natural, without adding lycra or viscose. Models for outdoor use can be insulated with padding polyester, while lining fabric is suitable for indoor use. The clasp for the sleeping bag can be selected as desired and depending on the purpose of use. This could be a zipper, buttons, Velcro, rivets. To make it convenient to change diapers, you don’t have to sew the bag at the bottom, but sew in a drawstring. For newborns, the zipper is sewn along the side seam, and for older children, in the middle of the front.
Make the neckline and armholes according to size; if they are wide, then all the heat will come out. There is no need to use an assembly, it can cause discomfort and pain to the baby. Hard trim (buttons, bows) is best used for walking models or if the child sleeps only on his back.
How to sew a sleeping bag for a newborn video:
A hand-sewn baby sleeping bag for newborns is perfect as a gift for friends and acquaintances.
Loving parents, even before the baby is born, begin to think about the conditions for his comfortable sleep and relaxation in the nursery. After purchasing a quality bed, you should properly organize it yourself. sleeping area. One of the original and very convenient sleeping accessories is a sleeping bag. How to choose a sleeping bag or sew it yourself, knit it and then use it correctly is described in the article.
Benefits of sleeping bags for newborns
IN Lately Many parents prefer to choose not the “classics” - blankets, but sleeping bags for babies. The main advantage of a sleeping bag is the ability to reliably cover a child who constantly opens up and freezes in his sleep. But parents cannot stand by the crib with the baby all night to adjust the blanket. The bag is especially suitable for restless children who at night prefer to roll from one corner of the crib to another, throwing off the blanket, which is why the child often wakes up and cries. It is for such cases that sleeping bags for newborns were created. Such an accessory will become a real find in winter time or in the off-season, when the heating has not yet been turned on.
Other advantages of a sleeping bag for a child:
- The baby does not open at night. This is a very significant advantage. Especially in winter period a sleeping bag for newborns becomes a real godsend for parents.
- The ability to feed a newborn without removing him from the sleeping bag. If the apartment is cool, the baby may be capricious when removed from the heated bed, and a sleeping bag will relieve discomfort.
- Comfort and coziness of sleep - there is no need to tuck the edges in a sleeping bag so that the child can have a truly warm and sweet rest. Newly born babies are accustomed to the cramped “cradle” in the mother’s womb, so a sleeping bag will come in handy.
- Sleeping bag safer for newborns than a blanket. The fact is that the child can either pull the blanket over himself or slide under the blanket himself. The result is the same - the child’s head is covered. This can make breathing difficult, and the newborn may not be able to get out of this position on his own. And when using sleeping bags for newborns, the likelihood of suffocation is much lower.
- An older baby sleeping in a sleeping bag will not be able to climb over the side of the crib on his own.
- It’s very convenient to take with you on a trip or travel, and you don’t have to worry about the edges of the blanket hanging down, which is not always hygienic. At the same time, on any trip, the child will be able to relax comfortably in the conditions to which he is accustomed at home.
Conclusion: a sleeping bag is an important and sometimes irreplaceable accessory that provides a child with excellent sleeping conditions.

Are there any disadvantages to a sleeping bag?
- the sleeping bag is not very comfortable for a newborn. This can especially manifest itself when a child is used to sleeping open, and then suddenly he is placed in an isolated space. However, if the baby sleeps in a sleeping bag from the first days, then such problems, as a rule, do not arise;
- If the sleeping bag is ordinary and not with sleeves, then the baby’s arms will not be covered and may freeze. In a warm room, this drawback, of course, is not relevant.
- It is advisable to place the child in a sleeping bag wearing a diaper, which will prevent the child from getting the sleeping bag wet.
- Changing a diaper at night without waking the baby will be very inconvenient. A sleepy baby needs to be taken out of the bag, undressed, the diaper changed, dressed and placed in the bag. After such manipulations, many children finally wake up. Only very young children do not have this problem, because, as a rule, they only need one diaper for the whole night.
How to choose a good sleeping bag?

Even sleeping gear has its own characteristics and features, and sleeping bags also have them. When choosing, you need to take into account several indicators, which are described below.
- Sleeping bag size
The product must be selected according to the child’s height. So, for newly born children, they buy bags 65 cm long; for babies 3-9 months old, sleeping bags of 70-75 cm are suitable; from 9 months to 1.5 years, the size of the sleeping bag should be at least 90 cm. Older children need a sleeping bag of about 100 cm. -110 cm or more.
Sleeping bags are designed for children up to 4 years old! In a large model there is a risk of getting confused. Therefore, a length of 10-15 cm greater than the baby’s height from the neck to the foot is allowed. To avoid making a mistake with the size, measure the baby’s chest circumference and height before purchasing.
To select a product for a child’s specific height, you should add 15 cm to the body length from feet to neck, so it is recommended to carefully measure your child before purchasing.
- Compound
As a rule, sleeping bags are made from hypoallergenic, breathable, natural materials. The lining is usually made of 100% cotton, and the top is made of polyamide fiber, which gives the product its shape and retains heat. Caring for such a sleeping bag is as easy as shelling pears – it can be washed in a machine at a temperature of 40-60 degrees. Products made from artificial or mixed fabrics are not worth buying.
- Are sleeves necessary?
Typically, sleeves are sewn onto sleeping bags intended for newborns. This will help keep the hands warm and protect the child from accidental injury - scratching the face. If you decide to choose a model with sleeves, then they should not be narrow, because the baby still needs to move. In more expensive sleeping bags, the sleeves are even detachable, which will be convenient for an older child and in a warm room. There are models in which the length of the sleeves is adjustable.

- Sleeping bag neck
The neck should also be spacious so that the child is not in any way cramped by the fabric. Ideally, there should be a distance of 1.5-2 cm between his neck and the neck of the sleeping bag.
- Back of the bag
In order for a newborn or older child to sleep comfortably, the back of the sleeping bag is chosen to be smooth, without appliqués or embroideries, because otherwise the product will rub the delicate skin at night.
- Clasps
As a rule, a sleeping bag has a zipper sewn into it, which is located right in the center of the product (this makes it easier to change clothes for the baby). For older children who are already actively turning over at night, it is better to buy a sleeping bag with a zipper that unfastens from the bottom up - so that it does not come apart on its own or the child cannot unfasten it himself. There are no fasteners on the back so that they do not interfere with children, but many products have additional buttons on the shoulders for adjustment to height.

Sleeping bag with zipper

Sleeping bag with buttons
Features of using a sleeping bag - time of year and room temperature
There are some recommendations for using sleeping bags:
- Lightweight cotton models are usually used when the apartment is warm - above 22 degrees.
- Insulated products will come in handy if the temperature drops to 19-22 degrees.
- Warm, quilted sleeping bags are needed if the baby sleeps at temperatures below 19 degrees.
The temperature at which a specific sleeping bag model is used is always indicated on the product label.
What should I wear for the night?
For children with normal thermoregulation, it is not difficult to choose clothes for sleeping. If the thermometer is 22 o C or higher, a bodysuit with short sleeves or even one diaper. The child is placed in a simple cotton sleeping bag.
If the temperature is approximately 20 o C to 22 o C, wear a bodysuit with long sleeves and a pajama top with a cotton sleeping bag, or just a bodysuit with an insulated version.
And when the thermometer drops to 18 o C or even 16 o C, which is considered the best microclimate for children, along with high humidity levels, use the most insulated sleeping bag and put on a little man, pajamas with pants or rompers along with a bodysuit with long sleeve. In principle, you will quickly figure out what clothes to put on your baby so that he doesn’t get cold, but also doesn’t sweat.
Questions

- Why do they sew sleeping bags without sleeves? The child will freeze?
In fact, children are very susceptible to overheating. Thermoregulation in babies is just being established, and if the baby is hot, heat transfer occurs, which is carried out through the free arms.
It should be remembered that constant thermal comfort is just as harmful as freezing - the thermoregulation mechanisms are not “started” properly, and as a result, the child often suffers from acute respiratory viral infections and acute respiratory infections. If you watch a sleeping baby, you will see that he often sticks his arms out from under the blanket, and this is normal.
So don’t be afraid to buy sleeveless models when the temperature in the apartment (house) is maintained more or less stable.
- How can you tell if your baby is too hot?
Hands are not the most reliable guide; they often feel cold. Touch the baby's tummy or the back of his head; if it is sweaty and hot, it means he is hot. Uncover the child, change clothes if necessary, and give him something to drink.
- How can you tell if the temperature in the room is normal?
For these purposes, there are room alcohol or electronic thermometers. Some include indoor humidity readings. If it is less than 50%, you should think about ways to moisturize. The most effective is with the help of a special device, an air humidifier. We also read: normal temperature in the room with a newborn baby
- What if the child slips inside the sleeping bag?
If the size is selected, taking into account all the nuances and recommendations, this will never happen. The very narrowing in the chest area, as well as the cutouts for the arms, serve as an obstacle.
- The bag with “insulation” seems thin. Maybe cover it with an extra blanket?
Look not at the thickness of the product, but at the label and the temperature threshold at which it is used. Modern materials retain heat perfectly, despite the fact that they may seem unreliable. As for additional covering, you cannot use a blanket with a sleeping bag!
We also read: Summer infant swaddleme (Summer Infant): comfortable swaddling
DIY sleeping bag for newborns


Even those mothers who are not too familiar with sewing machine, can sew a sleeping bag for newborns with their own hands. To sew a sleeping bag, you need to buy a good one, natural fabric(cotton, wool, knitwear, flannel, etc. It all depends on the temperature in the room and the time of birth of the baby. If you are sewing a sleeping bag for walking outside, you can make a layer from some kind of insulation, for example, padding polyester or holofiber. In any In this case, you better know what a newborn baby needs), and also choose a pattern of the right size. The cutting and sewing procedure is as follows:
- Pattern. You can make a suitable pattern if you use a child’s clothing for this purpose. The process is quite simple - you need to take rompers or a T-shirt, mark the outline of the clothing on thick paper, and then add a little extra space for the seams and room for the body. The resulting bag should not squeeze the child in any way. The length of the sleeping bag, as already noted, is calculated based on the baby’s height from neck to feet plus 15 cm. One piece is cut out for the back, and the front part of the bag can be cut out either as a single piece or from several pieces (to make an interesting applique).

- Cut out the fabrics. To cut the back, you need a single piece of fabric so that the seams do not interfere with the child's sleep. It is better to cut the front part of the sleeping bag out of two parts in order to sew in a zipper, but the simplest option would also be a one-piece piece of fabric with a zipper at the bottom.
- Sewing. After the pieces of fabric are cut in, they are turned right sides inward, ground down, and a zipper is sewn in at the bottom (or in the middle). You can sew Velcro or buttons on the hangers. To sew a warm sleeping bag, after cutting the parts, a layer of padding polyester is inserted between each two pairs, and only then the parts are sewn together. You can decorate the sleeping bag in any order - using ribbons, stripes, etc.
Master class: DIY sleeping bag for a newborn
How to knit a sleeping bag?
For women who knit well, it will certainly not be difficult to make a knitted sleeping bag for a child. Thanks to the repetition of body contours and a pleasant fit, the child will have the most comfortable sleep in such a product. For knitting, you need to purchase wool, or wool mixed with cotton, that is, completely natural materials.
To knit a sleeping bag, a newborn needs about 500 g of wool, buttons, and a zipper. The tools that will be needed are 4.5 knitting needles, 3.5 circular knitting needles, and an auxiliary knitting needle. To make an elastic band, alternate knit and purl stitches. The holes for the buttons are closed in the front row with 2 loops, and the same number is cast on from the wrong side.

The back of the sleeping bag is knitted by casting on 49 stitches on 5 needles, the knitting technique is stockinette stitch. In every 2nd row, add a loop until 59 loops are reached. If the bag is knitted for a newborn, with a length of 48 cm, the loops for the armhole are reduced to 53 loops. After about 15 cm of such fabric, 11 loops are closed in the middle, the rest are knitted separately. At the same time, the side loops are also closed to form a shoulder bevel. The loops should be closed approximately 17 cm from the beginning of the armholes.

The front half of the sleeping bag is made with stockinette stitch - cast on 69 loops, add side loops in every 2nd row when reaching 79 loops. The front part of the product can be knitted using any other technique that you like best. After 12 rows, the loops are divided, then knitted separately, after 48 cm an armhole is made (similar to how described above).
If the sleeping bag has a hood and sleeves, then they are knitted separately with 4 knitting needles and an elastic band. Next, all parts of the sleeping bag are sewn together, a fastener is sewn in, and buttons are sewn in if necessary. After finishing work, the finished product needs to be washed, after which you can use it for its intended purpose!
You can choose and buy sleeping bags in the online store Obstetrics - sleeping bags

You can choose a thin fabric, and if you want to immediately make the envelope warmer and more winter-ready, give preference to, for example, chintz with a synthetic padding.
To make such a sleeping bag, you need 1.1 m of fabric with a width of 1.2-1.4 m or 2.1 m with a width of 90 cm.
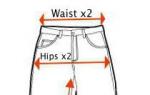
Required measurements, see:
Neck circumference 24 (12)
Bust 46 (23)
Sleeping bag length 70
The drawing starts from a vertical line on which a length of 70 cm is laid
1-3=2-4=% of chest measurement (23 cm) minus 1=22 cm.
From point 2 to the left, the length of segment 1-3 is laid off, equal to 22 cm. From point 3, a horizontal line is continued, on which 22 cm is laid off (segment 3-5). From point 5, a perpendicular 70 cm long is lowered (segment 5-6). Points 6 and 4 are connected. A perpendicular is lowered from point 3. From point 1 to the left, lay half of the neckline of the back of the bag. This is 1/3 of the measurement of half the neck circumference plus 2 cm and minus 6 cm (point 7).
From point 1 on the line of the middle of the back, set aside 1/2 of the width of the neck (segment 1-7), i.e. 3 cm (point 8). From point 7 draw a line of shoulder length equal to 10.5 cm (point 9). On the lateral line (auxiliary) lay 6.5 cm from point 3 (point 10). From point 9, lower the shoulder line by 1 cm. The width of the front neckline is set aside from point 5 - this is 1/3 of the measurement of half the neck circumference plus 2 cm, i.e. 6 cm (point 11). On the mid-front line, mark the depth of the front neckline - this is 1/3 of the measurement of half the neck circumference plus 2 cm, i.e. 6 cm (point 12). Segment 11-13 - shoulder length equal to 10.5 cm.
From point 13, lower the shoulder line by 1 cm. From point 6, extend the bottom line by 8 cm, the end of the resulting segment is connected to point 12. From points 2 and 4, extend the line of the middle of the back and the auxiliary side line by 8 cm.
To build the hood, from point 5, extend the auxiliary line of the middle front by 25 cm (point 14). From point 14, set the width of the hood equal to 17 cm (point 15). From point 15, a perpendicular is lowered and point 16 is placed at a distance of 4 cm from point 13. From point 16, 3 cm is set to the left (point 17).
Points 17 and 11 are connected. From point 11, set aside 3 cm and the depth of the dart - 2.5 cm. From the middle point of the tuck, a vertical line is laid upward 7.5 cm. From point 14, extend the line of the upper cut by 2 cm (point 18). Points 18 and 12 are connected. From point 18 down 2 cm - the outer line of the hood.
When cutting, line the middle of the back to the fold of the fabric. Allowances range from 1 cm to 1.5 cm depending on the fabric.
For comfortable rest In nature, experienced tourists purchase specially designated equipment, the so-called “sleeping bag.” They are usually bought in specialized sports or travel stores.
And the most conscientious lovers of nature recreation make their own sleeping place with their own hands. Why is this necessary? Isn't it easier to buy ready-made? I will say one thing, if you know how to sew, then everything you sew will in any case be an individual item, designed specifically for you. And this is worth a lot!
- Sleeping bags can be made using various synthetic insulation, which will ensure complete rest.
- If you give preference to cotton bags, then it is worth remembering that they have a lot of weight and volume.
- When hiking in the highlands, down bags are indispensable.
Why not make your own sleeping bag?
It won't take much time and won't be difficult. It can be either single or multi-seat, however, single-seat will provide higher comfort and can serve as a piece of personal equipment.
The most clear pattern:
Pattern of the bag-case:

First you need to decide on the materials for making the bag. The most effective would be to use down. It can be eiderdown, goose or duck down. The chicken will get wet and rot, making a very bad smell, therefore, you can also use synthetic materials such as nitron, synthetic winterizer and others. They are quite cheap, although they do not have the same thermal insulation properties as natural ones. These materials are durable, provide good protection from the wind, but their volume will be slightly larger than that of natural materials.
The fabric used for sewing such bags must be downproof. You can use nylon, which is available, characterized by strength, lightness and low cost.
Thick cotton fabrics are used for the inner cover. It can be percale or teak, you can use more thin fabrics. For partitions and lining that will form sections, you can use parachute nylon.
The easiest way to sew a sleeping bag

At homemade production sleeping bag use different ways, however, we will describe the most easy way sewing With this method, two covers are sewn, which will subsequently be inserted into each other and sewn at the neck.
- It is necessary to start making the bag by preparing the parts for sewing; it is better to cut the nylon with the tip of an electric soldering iron, having previously sharpened it. The fabric must be placed on a drawing board or plywood and the parts must be cut out. You need to cut the quilting parts according to the overall dimensions, making an allowance of two centimeters.
- The shape of the sleeping bag can be chosen in the form of a rectangle, a cocoon, or a shortened one, which is used with a jacket, and straps are sewn to the bag so that it does not slip.
- The width of the sleeping bag is approximately 70-90 cm, the length depending on height and model.
- The details of the inner and outer bags need to be drawn with lines, making a gap of 14-16 centimeters; according to this marking, the quilting material must be stitched to the outer and inner bags so that the seams are shifted in relation to each other.
- On one side you need to sew up the down compartments. After this, the compartments must be filled with down and sewn up on the back side. After this, you can sew the lower and upper parts of the bag, first the outer bag, then the inner bag.
- Then you can start stitching both bags, leaving the top edge of the bag free, into which we will thread the tightening cord, having previously stitched the top edge.
- Down can be combined with various synthetic insulation materials. If you use this technology, the top of the bag must be filled with down, and the bottom made of padding polyester. This bag will be cheaper, the synthetic material will shrink less.
- To fill the bags with down and clean them, use a regular household vacuum cleaner. If they are used various materials for stuffing, they are applied in several layers between the parts of the inner and outer bags and sewn in such a way that the seams are shifted relative to each other, and both bags (inner and outer) are sewn using the same technology as when sewing a bag using down .
Making a sleeping bag with your own hands is quite simple. Using this method, you will make a fairly high-quality product without high costs. But if you still don’t dare to do everything yourself, I advise you to read the article about
Of the commercially available sleeping bags for mountain hiking, only blanket bags with various synthetic insulation can be recommended for use. they provide a completely complete rest during the hike. cotton bags are practically unsuitable for outdoor activities due to heavy weight, large volume and high hygroscopicity of cotton wool. When hiking in the highlands and spending the night above the snow line, you can only use down bags or bags with synthetic insulation equivalent to down.
It’s easy to make your own sleeping bag. Which bag should you prefer - single or multi-person? the advantages of a single bag are obvious: higher comfort during overnight stays; there are no problems when distributing participants among tents; when a group is forced to separate (reconnaissance, transporting a victim, drop-offs, etc.). a single bag can serve as a piece of personal equipment.
The disadvantages of a multi-person sleeping bag include its large volume (a three-person bag, if sewn in one piece, takes up the entire volume of the backpack). When planning winter mountain hikes, it is recommended to sew double (in thickness) sleeping bags - one in one. These bags are somewhat heavier than regular ones, but much warmer. In addition, it is possible to use each bag separately.
DESIGNS AND METHODS OF SEWING There are several ways to make down equipment (Fig. 114). the first method (Fig. 114a) is the most labor-intensive, but with minimal consumption of quilting fabric. It is practically not used in homemade production. with the second method (Fig. 114b), the quilting fabric is alternately sewn to the outer and inner covers. The method is also quite complicated.
with the third manufacturing method (Fig. 114c), the consumption of quilting fabric is greatest, and the bag turns out to be somewhat heavier, but it is easier to sew (in fact, two bags are sewn, inserted into one another and sewn together at the neck), it is easy to dry by removing one part from another. This method is most common in homemade production of not only sleeping bags, but also down jackets, vests, trousers.
Rice. 114. methods of making a down sleeping bag: a - with minimal consumption of fabric; b - the quilting fabric is alternately sewn to the inner and outer cover; c - the easiest way to sew; 1 - cover, 2 - quilting, 3 - down, 4 - seam.

rice. 115. Patterns for parts of a single sleeping bag. The sizes are designed for a person with a height of 175-180 cm and are given without gaps on the seams.
There are many designs of single sleeping down bags. We propose a design that is relatively easy to implement in home-made production (Fig. 115). for this you need 8 m of calendered nylon (with a width of 1 m) for the outer and inner covers and 8 m of fabric for quilting. For filling, 0.8-1.0 kg of fluff is required. The bag should be sewn with nylon threads. the weight of the finished bag is from 1.4 to 1.8 kg (depending on the density of the material and the amount of fluff). To facilitate the process of cleaning down and filling a product with down, several devices have been developed using a household vacuum cleaner.
It is advisable to take into account that recently sleeping bags have been used in combination with bedding mats made of polyethylene foam or polyurethane foam, which have high thermal insulation properties, so the bottom of the bag can be made thinner than the top.
It is convenient to cut parts from nylon fabrics with a sharpened tip of an electric soldering iron, placing the fabric on a sheet of plywood, a drawing board, etc. It is better to sew the bag in the following sequence:
- cut out the details of the outer and inner covers;
- cut out the quilting parts according to overall dimensions with an allowance of 1-2 cm (thin parachute nylon stretches a lot and when sewing it is difficult to accurately align the parts);
- attach quilting material to the outer and inner covers so that the seams are shifted relative to each other;
- sew up the down compartments on one side;
- fill the compartments with down;
- sew up the compartments on the other side;
- sew the top and bottom parts of the outer bag;
- sew the upper and lower parts of the inner bag;
- sew the inner and outer bags along the ABC and ADC lines;
- stitch the top edge of the bag for the tightening cord;
- thread the cord.
For a three-person sleeping bag, the following dimensions are recommended: width 170cm (can be narrowed to 150cm at the feet); length 180-190cm, with headrest 220-230cm. to make such a bag you need 17.5 m of fabric for covers, 17.5 m of fabric for quilting (with a width of 1 m) and 2-2.5 kg of down. the weight of the finished bag is 3.2-3.6 kg.
The combination of down with synthetic insulation is quite practical. in this case, the top of the bag is filled with down, and the bottom is made of padding polyester. such a bag is more technologically advanced, cheaper, the synthetic material squanders less than down, and is less hygroscopic. but a combination bag is heavier than a down bag and takes up more volume when folded.
The technology for sewing bags filled with synthetic wool differs from the technology for making down bags. if cotton wool is stuffed like fluff into sections, it will quickly fall off, and this part of the bag will lose its thermal insulation properties. To prevent this from happening, a layer of cotton wool is laid out on the cover, covered with quilting fabric and stitched in the same way as a quilted cotton blanket. further - as in the manufacture of down bags.
when using padding polyester, two or three layers of insulation are applied to the cut out parts of the outer and inner covers (depending on its thickness) and stitched so that the seams on the covers are shifted relative to each other. then the inner and outer bags are sewn together in the same way as when making a down bag.
Does your child throw off the blanket in his sleep? Does the baby wake himself up with his hands? In this case, a sleeping bag will be a good help. It is suitable for both newborns and older children. Sewing a children's sleeping bag with your own hands is not at all difficult. In this article we offer patterns and sewing instructions.
Advantages and disadvantages of a children's sleeping bag: reviews
By studying the experiences of many mothers who have used sleeping bags for babies, you can understand in advance whether you need a sleeping bag.
- Keeps warm due to the fact that the child does not unwrap himself in his sleep.
- Helps the youngest children fall asleep faster and more soundly, especially if the sleeping bag model allows you to fix the handles. Thus, it replaces traditional swaddling, being much easier to use.
- Safer than a regular blanket because it does not cover the baby's head.
- You can feed your baby at night without getting out of the sleeping bag.
- Convenient for a walk, as it is quickly put on and does not slip off in the stroller.
- Takes up less space when folded compared to a blanket, making it convenient for travel.
- If the baby wets the sleeping bag or pees, the product does not dry as quickly, unlike a diaper or blanket.
- Changing your baby's diaper can be challenging as you have to remove the baby from the bag. Although there are models in which it is more convenient to do this.
Requirements for a sleeping bag for a child
It is very important that the product is made from natural or hypoallergenic fabrics, especially if it is used at home and comes into contact with the baby’s skin. The sleeping bag must match the size of the child. In some models, the legs and arms can move freely. In others, the handles are comfortably fixed. Check that the sleeping bag matches the ambient temperature: the child should not overheat, this is no less harmful than hypothermia. The fastener should be safe and not scratch or pinch the baby's skin.
Types of sleeping bags
- An envelope bag, for example, for discharge from a maternity hospital. Convenient for walking. Among these models there are transformers that, as the child grows, turn into overalls.
- Cocoon is a knitted bag that fits tightly and secures the child’s arms. Great for newborns, replaces a diaper, helps them fall asleep faster and sleep soundly, can grow with the child.
A bag that leaves the child's arms free. It is suitable for older children who do not wake themselves up by jumping up. A sleeping bag with sleeves is a warmer version of this product.
Children's sleeping bags for sleeping may differ in the type of fastener: zipper, Velcro, buttons, snaps, ties. What to choose?
The zipper is easy to use and can be quickly and easily fastened and unfastened. It is silent and does not wake the child. Reliably fixes the sleeping bag so that the baby will not unfasten it. There are also disadvantages. It is quite difficult to sew a zipper if you have no experience. It can break and jam fabric, so you need to choose a high-quality mechanism. There is a risk that lightning may pinch the child's skin - protection must be provided.
Velcro is easy to sew on, even an inexperienced seamstress can handle it. They are easy to fasten and unfasten, allowing you to adjust the volume of the sleeping bag and use it for growth. However, when unfastened, they make a sharp sound, which can wake up a sensitive baby. The hard part of the Velcro can scratch the baby's delicate skin, you need to be careful.
Buttons are accessible, reliable, safe, and also allow you to adjust the size of the product. The disadvantage is that they do not apply to all models of sleeping bags. For example, they cannot be used on a cocoon.
Buttons combine the advantages of zippers and Velcro, with one “but” - they are difficult to attach to the product, special equipment is needed. Simple sew-on ones are not so beautiful and reliable.
Patterns of a children's sleeping bag for sleeping
It is not at all necessary to spend money on buying a finished product. Sewing a children's sleeping bag with your own hands is not difficult at all. First you need to decide on the model and fabric.
To create a pattern for a sleeping bag with fasteners on the shoulders, you can use the baby’s existing clothes: blouse, rompers, overalls. Attach them to the paper, add 15-20 cm to the length of the legs and draw a rectangle for the bottom. And add 5-7 cm to the width of the top for freedom of movement. The most difficult parts to cut out are the neckline and armholes - trace them over the child’s clothes.
You can also use ready-made templates and sizes.

The pattern of the cocoon bag differs from the model with fasteners, but building it is also not difficult. You can circle the child’s pants, adding 10-20 cm to their length and 5-10 cm to their width. This is necessary for the baby’s comfort. On the sides, draw rectangles of the same width as the previous part, and in height equal to the length from the knees to the child’s shoulders. This is shown in the pattern below. If you want to make a bag with a hood, then you need to connect the rectangles on top with a large semicircle so that the child’s head fits into it.

Instructions for sewing an insulated children's sleeping bag with a zipper
Creation principles different models similar. The differences will lie, first of all, in the presence or absence of a lining. And also in the method of sewing the fastener. A product with a lining is more difficult to make, but more comfortable to wear.

To sew a children's sleeping bag for sleeping you will need:
- Cotton fabric for the top and for the lining.
- Rolled padding polyester or other insulation (for example, batting).
- Cotton bias tape.
- Zip closure. The length will depend on the age of the child: 50 cm - for 9-12 months, 60 cm - for 1.5-2 years, 70 cm - for 3-4 years, 80 cm - for 5-6 years.
- Snaps (you can use Velcro or buttons).
- Pins, thread, scissors.
Sequencing:
- First draw the pattern on paper. You should have a one-piece back and two front pieces.
- Transfer the pattern from paper to fabric - outer, lining and insulation. Do it as shown in the picture. The printed fabric is the outer side of the bag, the light green material is the lining, and the brown material is the insulation. Don't forget to add seam allowances: 2 cm for the side seams, 1 cm for all the rest. On the front part of the lining, draw a cut line for the zipper. For clarity, it is indicated on the pattern.

- Sew bias tape along the remaining open sections: neckline, armholes, and back opening. She will fasten all three bags together.

- Attach snaps or buttons to the hangers, covering all three layers of fabric.
Children's sleeping bag for sleep is ready!
Judging by the reviews, this convenient item has helped many mothers improve their babies' sleep. Try it too!