Making winter crafts with your own hands for an exhibition in kindergarten. Ideas and step-by-step instructions for making landscape winter crafts with your own hands Winter crafts for kindergarten
How to make a snowman, New Year tree, tits and bullfinches, rowan berries, penguins, Grandfather Frost and the Snow Maiden and other funny winter crafts, are described in detail in the publications of this section on MAAM. The number of artistic techniques and materials for crafts presented here simply cannot be counted.
Flip through these pages at your leisure. We hope that they will become a source of inspiration and new ideas for you. creative activities with kids. A step-by-step master classes and stories from colleagues about their findings are a useful aid in work.
Reflect the winter season through artistic creativity with MAAM!
Contained in sections:Includes sections:
By groups:
Showing publications 1-10 of 1474.
All sections | Winter crafts
Hello, dear friends! I bring to your attention the second part of creative works "Beauty winters - winters!» . The exhibition reveals the main theme. It allows you to see how children's creative thinking develops, their motor skills, how their knowledge gradually improves....
Lesson on the applique “Bullfinch” with children of the preparatory group for school Target: teach children to create a cut-out applique from colored paper with their own hands. Tasks: help children master the technique of cutting appliqué; teach children to convey the image of a bird - a bullfinch, its distinctive features by the method of breaking appliqué; develop fine motor skills fingers...
Winter crafts - Summary of a lesson on appliqué in the senior group “Bullfinches on a branch”
Publication “Summary of a lesson on application in the senior group “Bullfinches on...” Notes on visual arts(application) in senior group. Topic: Bullfinches on branches. Program tasks: Visual: Teach children to compose a composition on the theme “Bullfinches on twigs.” Compose bullfinches from several parts (chest, head, tail, wing....
 Image library "MAAM-pictures"
 Goal: To continue to form in children an idea of winter, to reinforce the sculpting technique (pressing the balls with a finger from above - snow. Program content. 1. Teach children to press the index finger on a plasticine ball, attach it to the base, place plasticine...
ECD for modeling “Rowan Twig” (middle group) Municipal budgetary preschool educational institution- kindergarten No. 5 “Geese-swans” in Starodub Fine arts lesson Topic: “Rowan branch” middle group Educator: Terebilo V.I., Starodub 2018 1. Purpose: to give an idea of the nature of native...
 Winter birds - bullfinches and titmice. On the first day of the week, tits came to visit us. And on Tuesday, look, the bullfinches arrived. There is a rowan tree growing under the window of our group. In winter, various birds flock here to eat delicious berries. Bullfinches were rare guests. And suddenly...
Winter crafts - OOD notes on application in the preparatory group on the topic “Forest in winter”
Abstract of OOD on artistic creativity (application) in preparatory group. Topic: “Forest in winter” Goal: to teach students to independently choose the content of their work and carry out their plans. Tasks to consolidate the technique of cutting out symmetrical objects from paper folded in half to develop...
 Hello, dear friends and guests of the page! The calendar winter has come to an end. In the Moscow region, she did not spoil us with snow, and there were no real frosts at all. Therefore, doing creative work and drawings on a winter theme was exciting and interesting. However, like...
November 8, 2018
Good afternoon dear readers. Today the article will be entirely devoted to crafts on the theme of New Year 2020. Of course, you can not bother with crafts, but go and buy your favorite toy or figurine. But it will not be as dear to you as the one you made with your own hands.
Also, the article will be very useful for those who have small children who go to primary school or kindergarten. Since on the eve of almost any holiday in these educational institutions Children are often asked to make something similar at home, preferably in the style of the upcoming holiday. And then they also hold a competition for the best craft. And of course, you want your child to take at least a prize.
And do crafts on New Year theme It’s doubly nice, as it brings you into the New Year’s mood. The absence of which many adults complain about. We don’t have such complaints in our family. Because before the holiday, our house is transformed into a fabulous decorated house from handmade crafts. These are snowflakes and paper garlands and much more. In general, the introduction was a little long, I suggest we get down to business right away.
Before you decorate your home for the New Year, you need to make all sorts of decorations. You can also save a lot of money on this matter if you use old unnecessary trash for production, which is a pity to throw out and has nowhere to put it.
Required:
- Tinsel
- Glue gun
- Wire
- Old CDs 12 pcs.
- Drill with a thin drill or awl
- Pliers
Production stages:
From a cardboard sheet, cut out a template in the shape of a pentagon with sides of 6.5 cm. We apply the template to the disk and put dots where the vertices are. These points are for making holes in them.

We drill all the disks point by point, and then connect them using wire and pliers. At the end you should get a ball.

It should look something like this.
 Next we glue tinsel onto each disc. We glue along the contour of the disk using hot glue.
This is what happens in the end. Such a craft and story can also be suitable as a New Year’s souvenir.
You can also make a beautiful wreath of pine cones. Although wreaths are not so popular in our country. Still, if you decorate your front door with such wreaths, it will look simply amazing.
You will need the following:
- A few cones
- Decorative elements
- Paint and varnish in cans
- Glue gun
- Wreath base
Production stages:
As a base, you can use foam pipe insulation or a small hoop. You can also prepare a papier mache base.

We paint the base the color with the cones and attach the cones to the base using hot glue.

At the end, you can open the craft with varnish to add shine and decorate it with decorative elements.

A wreath of pine cones looks quite beautiful.
Snowman made of threads and balls.
Well, who else but the snowman is the very first one associated with winter and the New Year. You can make it quite easily; you just need to collect all the necessary materials.
Required:
- Balloons 5-6 pcs.
- Tube of PVA glue
- Skein of white thread
- Decorative elements (ribbon scarf and hat)
Production process:
We pump the balloons with air and make them of different sizes.
One needs the biggest one, the other one needs a smaller one, and the third one needs an even smaller one. And two more very small, but identical. Then we wrap the balls with threads in different directions and coat each new layer with glue.
When the glue dries, pierce the balls and pull them out into their resulting shapes.
All that remains is to assemble the snowman using the same glue. And in the future I will use mine creative potential add eyes, mouth and nose to the snowman.

And also attach the hands. These will be two small balls. Here's what you can do from the materials presented.
Or here’s another master class on how to make a beautiful snowman from an ordinary sock.
You will need:
- Scissors
- Super glue
- Scotch tape wide
- Cotton or knitted sock
- Threads
- Several buttons
Production stages:
We cut the toe just a few centimeters from the heel line. We will use the part with the heel. Tie the sock tightly with a thread and turn it inside out. This will be the base of the snowman. We tie it in the part where we cut it.


And fix the figure in this position. Make a few turns and then tie the thread into a knot. We cut off the excess ends with scissors.
 We make a scarf from a piece of fabric to disguise the threads.
 From the second piece of the sock we make a cap by folding part of the sock several times. Apply super glue to the buttons and attach them to the snowman’s body.

To make the snowman's face I use multi-colored beads. Which I also attach with glue.
Santa Claus from a disposable plate
To create a beautiful and original frost case, you will need the following set:
- Disposable paper plate
- Scissors
- Paints
- Red pompom
- Paper
- Red cardboard
- Eyes for toys
Production stages:
We cut a disposable plate into two parts. Cut just above the middle. And paint the inside beige.

From colored cardboard we cut out a large triangle larger than a plate.

From a sheet of white paper, cut out a strip 2 cm wide and two circles. Cut one of the circles into two parts. Next, we assemble the craft according to the picture.

Christmas tree made of cardboard and threads
You can create small souvenirs in the form of a Christmas tree and give them to your guests who came to meet you New Year.
You will need to cut out corrugated cardboard to cut out such a beautiful Christmas tree. Approximately 15-20 cm in size.

Then wrap it with threads. We attach each turn with regular glue or you can use hot melt glue. We attach a magnet to the back side. 
Such beautiful Christmas trees can be created using this technology.

Snowflake made from popsicle sticks and buttons. It also turns out very beautiful and unusual.

To create such beauty you will need at least 3-5, and at most 7-8 ice cream sticks. We connect them into a star like this. Then we decorate with buttons, which we also attach with hot glue. At the end we attach a rope and hang it on the tree.

You can try to glue a house and a snowman out of cardboard and cover them with cotton wool. And make a small tree from a twig. You will get something similar to this picture.

Or try to make a penguin like this from two bottoms from plastic bottles.

In the year of the pig, you can create such a funny pig. This beauty is made from socks and cotton wool. Watch the sequence and you will understand everything right away. In the same way, we made the snowman a little taller.

An ordinary Christmas tree ball, only painted by you personally, can be an excellent craft. Take Christmas ball Apply plain paint on it; this will be the main background. And then color it however you want. 
And if you have any old glass balls left, you can wipe off all the paint from them and fill them with rubber bands like this. It also turns out beautifully.

Or decorate Christmas balls.

Have you ever seen Christmas balls with a photo inside? See how this can be done.

Beautiful stars that we decorate with beads or seed beads will also fit perfectly into the interior of any New Year's beauty. Or maybe such a star will be a beautiful addition to your New Year's outfit.

And if you show your imagination, even ordinary walnuts can become beautiful New Year’s crafts or Christmas tree decorations.


Or maybe you would like to make these beautiful snowmen from old light bulbs.

This master class will also be useful to you. Because you can make not only snowmen. Look, I think this idea of creating crafts will be interesting to you.
Souvenirs made of fir and pine cones for the New Year
Crafts from natural material They always turn out very beautiful and attractive. Let's start with the simplest and continue with the most complex.

It’s very easy to create a beautiful candlestick using pine cones and threads. You need to take a small jar, a few cones, natural thread and hot melt glue.
We tie a thread around the neck of the jar several turns and make a beautiful bow. We glue the cones with hot glue to the thread. It turns out to be such beauty.

We put the jar on a tray which we decorate beautifully with fir branches and the craft is ready.

If you want to make it a little more beautiful, you can decorate the neck of the jar with semolina, which from a distance will look like snow.

You need to first tint the semolina with chalk. Coat the neck of the jar with PVA glue and sprinkle the area in the glue with semolina. We tie a beautiful bow on the neck of the jar.

You can decorate pine cones in the same way. But for the biggies, we’ll prepare something cooler. Add some glitter to the semolina. Now coat the corner of the cone with glue and sprinkle with semolina and glitter.

You can do without semolina at all, just take golden glitter. And then follow the familiar pattern. In glue then in glitter.

Using white acrylic paint you can make these cones in the snow.

Add a couple of beads and a bow and you will get a beautiful Christmas tree decoration. Next, the decorated cones can be combined on our candlestick.

Now I propose to make beautiful Christmas trees from large cones. You will need small pots, acrylic paints, small stars and hot glue.

We attach the cones to the pot, paint them white or green color. And we attach a small star on top.

Using the same principle, you can make a larger Christmas tree. We make a cone out of cardboard. The height depends on the number of cones. We attach the cones to the cone using glue. Decorate with beautiful bows and beads.

Now the craft is a little more complicated. This technique is called topiary. With the approach of the New Year, a bunch of craftsmen have appeared who make crafts in this style.


Master classes and ideas for paper crafts for the New Year
You can make it out of paper great amount crafts. And the simplest and a little more complicated. And as always, let's start with something simple, and then continue with more complex models.

The simplest thing you can make is a Christmas tree like this. It is enough to cut a circle out of colored cardboard, cut off a piece and roll it into a cone. Then decorate with stars or circles made of colored paper.
But here is a box of chips that was pasted over with sweet souvenirs and it turned out to be a train.

Or here’s a more complex souvenir, Santa Claus using the origami technique. How do you like this idea? If you learn how to do it, you can offer it as a New Year’s card.

You can make a bunny like this using the origami technique with the addition of appliqué.

If you have the desire and time, you can cut out the same paper and glue a beautiful wreath on a door or wall from paper handprints. I think that you can make such a wreath using the prints of the whole family.

Try making this unusual Christmas ball from colored cardboard. We cut several strips of the same length and width. Next, we lay them out so that they all connect in the middle. Then we make a hole and thread a piece of a cocktail tube onto the thread in the middle. There is a small bead at the top. Everything is simple and easy.


Do you have a huge amount of unnecessary newspapers accumulated at home? Then you can find a use for them. Let's make it out of newspaper tubes volumetric New Year's ball on the Christmas tree. We make tubes and wind them layer by layer. Gluing each new layer. Finally, we paint with spray paints and the Christmas tree toy is ready.

At the end of this chapter, I offer a video clip on how to make a cool paper snowman.
DIY felt toys ideas with patterns
Now a topic for those who like to craft with their own hands from such a pleasant-to-touch material as felt. Soft and voluminous toys have always been something unusual and pleasant for me.
You can build such a beautiful Christmas tree from cut out pieces of felt.

We cut the flaps and then assemble them into a single composition.


Or try using this Christmas tree as a basis. Here you will have to tinker.


And if you want, make a larger Christmas tree out of green felt and hang it on the wall. All that remains is to make beautiful toys for her and decorate her.

You can make a Christmas tree toy. Here is an example and patterns.

Here's an idea for making toys for the Christmas tree. You can sew balls, crackers and bells.


Well, of course, what would a New Year be without Santa Claus? Video about how to sew Santa Claus from felt.
Beautiful works for the New Year's competition for school
I don’t know how in your school, but in ours, such competitions are held every year. Well, at least in the elementary grades that’s for sure. So you have to look for and make crafts in order to take part in the competition, and of course, take at least second and third place.
This is a simple craft, but it looks completely different in the New Year. But all you need is a beautiful jar, a small Christmas tree, and a machine.

We attach the Christmas tree to the roof of the car, add some foam chips and ribbon to the lid.


At the end we decorate with New Year's decor and your craft is ready.

For those who have coffee beans, here is an idea to make a Christmas tree from coffee beans. We attach the grains to a paper cone and decorate with decorative elements.

Or you can use candy instead of coffee beans.

And here is a Christmas tree made from ordinary buttons. Gather buttons of different diameters on a thread and the Christmas tree is ready.


And of course you can embroider Grandfather Frost.

A Christmas tree made of beads will also look beautiful.


You can make a beautiful New Year's beauty from a plastic bottle. Just first you need to put it in a pot. We pour plaster into it and place a wooden stick as a trunk. We make a hole in the bottom of the bottle and put the bottle on the barrel. We attach the bottle to the pot with glue and decorate the Christmas tree with tinsel and toys.


Or take a foam ball and cover it with beads or beads. It also turns out to be quite original.

How to make a garland for a Christmas tree with your own hands
Probably the most accessible and cheapest option is paper garlands. And the simplest one is garlands of rings. Probably each of us glued such decorations from colored paper as a child.

Or make a rainbow like this out of colored cardboard.

Or here are some more ideas for creating paper garlands.


And if you spend a little more time creating a garland, you can make it very beautiful and original. I suggest you see what can happen if you try a little.
You can also use cotton wool.

Or buttons of different colors. It will look beautiful too.

And this option is specifically for a street Christmas tree, since this garland is made of ice. We make multi-colored ice cubes. The main thing is not to forget to put the thread so that it freezes in the mold.


Unusual crafts "Winter's Tale" for kindergarten for exhibition
When in kindergarten they give you the task of making a craft with your own hands. This means that the child must do almost everything himself, and not mom or dad did it, but the child just carried it. Therefore, I give the simplest thing that your baby can do practically on his own.
Here's an idea on how to make Santa Claus from a star. There is cutting, coloring and applique.

Try making a winter picture with your child from cotton pads and sticks.

Or this idea of creating a snowman from cotton swabs and a foam ball.

A bottle, wire, and rags can make a fairy-tale character.


But of course, something more complicated is a house made of plastic ceiling tiles. The child, of course, won’t be able to do it on his own, but he can help cut it out.

Or here’s an example of what kind of houses can be made from all sorts of things.


Beautiful New Year cards for children Master class and templates
If you decide on a gift, then you will definitely need a postcard to accompany the gift. And you can easily do it by following our tips. Here are just a few templates for you to print.


You can decorate a standard postcard book with a grandpa or a fairy-tale character like this.


And if you want, you can make a voluminous congratulations.

You can also design your card in scrapbooking style. Well, isn't it beautiful?

Here is a master class on creating beautiful New Year cards. Take a look, you might find something for yourself.
Do you want to do something that no one else will? Take this Christmas tree postcard into service.

Print this template on your printer. The dotted line is the fold line.


And we glue it the same way as in the photo. All that remains is to do everything beautifully and arrange it. You can find out more about how to make such a postcard by going to.

This selection of crafts for the New Year has come to an end. Perhaps there will be another selection soon. Follow our blog and you will definitely find what you are looking for. Well, for today, all the best to you in the coming year.
Parents of children who go to kindergarten often have to rack their brains over crafts for the next thematic exhibition. In addition to the fact that works are required for all holidays, seasonal exhibitions are sometimes organized. Winter crafts for kindergarten are no less popular than for Autumn Day. Use cases various materials there will be less here, but if you use your imagination, you can make a very interesting composition with your own hands.
What to use for winter crafts in kindergarten?
It is somewhat easier to do this kind of work in the fall. The thing is that the gifts of nature during this period are quite generous. Therefore, you can use not only what has grown in the garden bed, but also those materials that simply lie under your feet, namely leaves, acorns and cones.
In winter everything is a little more complicated. In order to create an interesting winter composition, you have to take the materials that are at home. Most often, cotton wool, glitter, White paper, cardboard and beads.
But this is far from full list what can be used for winter crafts to a kindergarten. For example, a number of interesting logs come out of ordinary ear sticks. Don't forget about such interesting material as cotton pads. They can be taken for either snow-covered Christmas trees.
Don't forget about plastic bottles and toilet paper rolls.
From these materials you can make a lot of interesting crafts, including those related to winter themes. For example, it is unnecessary plastic bottles that become an excellent basis for cute penguins.
As the New Year approaches, many people think about such a convenient material as tinsel. It is also used to create winter-themed crafts.
As for the base, many parents use cardboard out of habit. But recently, more interesting options have begun to appear on sale. For example, we can mention foamiran. This is a convenient material that can become the basis for making various crafts, for example, beautiful Christmas tree.
Trees for winter crafts in kindergarten
Many parents use a fairly common theme, namely “Winter Forest”.
There can be quite a lot of options for its manufacture, depending on what material is chosen by the master. But the foundation is most often done in the same way. To do this, you need to make several cones out of paper and place them on a sheet of cardboard.
Next, the main thing is to process the workpieces correctly. To do this, you can take tinsel, cotton wool or thread. The cones are wrapped neatly necessary material. Then you can sprinkle them a little with glitter, and then fix them on cardboard. After that, pieces of cotton wool are laid out, which can also be made to shine. At this point, the “Winter Forest” craft can be considered complete.
For the manufacture of winter trees You can take other materials, for example, ear sticks or foamiran. If the craftsman has skills in working with beads, you can make a beautiful snow-covered tree. To do this, take beads and wire. The result is very interesting option, which is sure to impress everyone present at the exhibition. From long beads you can assemble a wonderful christmas tree. It can be additionally decorated with large beads, which will serve as Christmas tree decorations.
To add variety to the winter forest, you can build a small house. Various materials are also suitable for this. Interesting solution will use ear sticks. They are quite comfortable to work with and the end result looks great. Another popular material for making houses is popsicle sticks. If a lot of them have accumulated over the summer, it’s worth building a house. This craft is easy to do. The sticks need to be glued together, and then the roof must be built. The top should be draped with cotton wool and sprinkled with glitter. Such a house in the forest will look just wonderful.
Snowman made of threads
It's hard to imagine real winter without such a character as a snowman. He can become the main character for a winter craft for kindergarten. There can be several options for making snowmen:
- The first option involves using cotton pads and thread with a needle. First you need to take 5-6 disks and thread a thread in the middle. An alternative way would be to use a stapler. The main thing is to keep everything in the middle. Next, you should fluff the workpiece, but carefully so that it does not fall apart. Then, using scissors, the cotton ball is given a rounded shape. You need to make a pair of such balls, and then connect them together.
The blank is decorated with a plasticine carrot nose and eyes. Hands can be made from sticks. You can also put on a kind of hat for the snowman, the role of which will be played by the cap of a water bottle.
- The second option involves using threads, small balloons and PVA glue. One of the most important tasks here will be the correct selection of the size of the balls. One of them should be larger, and the second one should be slightly smaller. Additionally, you can take 4 very small balls.
Next, take a white thread, soak it in glue, and then you need to randomly wrap it around each ball. Then the workpieces are left alone for a while, since the PVA must dry completely. After the thread has hardened with glue, you need to pierce the ball and carefully remove the rubber residue. It is important that during this time the thread blank remains in its original shape.
As a result of the work done, you should get 6 balls of different diameters. The largest one will be the body of a snowman. The smaller one needs to be glued on top, it will be the head. Next, all that remains is to make the arms and legs from small balls. The snowman is decorated with a nose and eyes, which can be made from plasticine or polymer clay. Additionally put on the toy knitted hat and a scarf. It turns out to be a very interesting craft made from simple and affordable materials.
New Year's crafts for kindergarten
If the exhibition is dedicated specifically to a holiday, then there will be a lot of options for creating crafts.
For example, you can make it from colored paper volumetric ball. Making such a craft will not take more than 5 minutes. To do this, you just need to cut out several strips of colored paper, then fasten them in the center so that they form a sun. Further ends paper strips connected at the top. Here you should attach a ring, by which the ball can be hung on the Christmas tree.
In a more complex version, the Christmas ball is made from two plastic bottles. From them it is necessary to leave only the bottoms (3-4 centimeters higher). The blanks are combined into a single whole. After this, you can take paints and color the ball. Additionally, you should use glue and glitter to give the product a festive look. At the top you need to attach a string on which the ball will be held when they decorate the Christmas tree in kindergarten.
Recently, a wreath has become a fairly popular option for New Year's crafts. It can be made very quickly if you prepare a circle of cardboard and then wrap it with tinsel. Additionally, the craft is decorated with pine cones, small toys, buttons, etc. The whole job takes no more than half an hour, so this is a great option for busy parents.
We invite you to get creative and return a little to childhood, when any fluff is a ballerina, any box is a house, and any leaf is something magical and unusual. In childhood, imagination is very well developed. It’s better to make crafts on the theme of winter with your own hands for kindergarten together with your kids. Children can suggest and come up with a lot, but the technical side of the issue is up to adults. Further in the article you will find descriptions of winter-themed crafts that you made yourself for kindergarten and many ideas and tips. All that remains is to set aside an evening and start creating magic together with your favorite little ones!
We associate winter with snow, snowflakes, snowdrifts and, of course, Happy New Year. Crafts for a competition or exhibition for a kindergarten on the theme of winter, which can be easily done with your own hands, should reflect these ideas. Based on this, we will select ideas and material for their implementation.
You can make a panel or a drawing. But this may not be a simple drawing, but made in interesting technology. Here's what you can use to fill a canvas for a drawing or a panel on the theme of winter:
- Semolina drawing.
- Application made from cotton pads.
- Application made of cotton wool.
- Drawing from white crushed eggshell.
- Drawing with sugar.
All these types of designs and applications involve gluing ingredients onto a base with a pattern applied with glue.

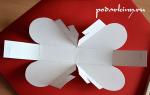
New Year's installations are a favorite type of creativity for kids. For it, you can take an empty unnecessary box and cut off 2 walls from it. There will be a floor with two walls at an angle. This will be the basis for an amazing fairy-tale landscape or scene. Snow can be made from cotton wool, houses and trees can be made from cotton swabs or newspapers rolled into a tube, painted with brown paint, or original logs. Further in the article a master class of one of these installations will be given.
Do-it-yourself winter-themed crafts for kindergarten can be made from paper or empty plastic bottles, from burnt out light bulbs, and generally from anything you find at home. Next, consider a penguin made from an empty plastic bottle and dogs made from light bulbs.
You can also make crafts on the theme of winter for kindergarten with your own hands from threads; photos of such crafts with descriptions are further in the article.

Craft “Winter's Tale”
Now let’s look at the photo and detailed description on how to make some crafts on the theme of winter with your own hands for kindergarten.
We make things from what we have at home
We suggest using for crafts everything that is unnecessary in the house, for example, a burnt out light bulb. If there is a big paw, that’s very good. Let's turn her into a real New Year's penguin. What is needed for such magic:
- burnt out light bulb (preferably larger);
- acrylic paints or gouache and brushes;
- some firth or fabric in black, red and white;
- ribbon;
- glue (use a heat gun if possible).

So let's begin:
- Paint the entire light bulb white and let it dry thoroughly.
- With a pencil we draw the front part: the face and belly, which will remain white, the rest is painted black, except for the place where the light bulb is screwed into the socket. We paint this place with red paint. Let it dry.
- Draw the eyes and beak and let dry.
- We cut out oval wings from black felt or thick fabric and glue them on both sides.
- Cut out a red rectangle for the scarf and cut the ends, tie the scarf.
- We attach a ribbon to the top of the head and cover it with a strip of white felt or fabric on top. You can attach a pompom to the top of your head.
The funny penguin is ready.
Penguin from a plastic bottle
Now let's see how to make a penguin or Santa Claus from a plastic bottle. The scheme is very similar and simple. For this craft you will need 2 empty identical bottles. We cut off only the bottom from one, and cut the second in half and glue the bottom of the first eggplant to it with tape or glue. It turned out to be such a block.

Now we paint it white and let it dry. Then, in the same way as with the light bulb, we draw the contours of the front part for the penguin or the face if we are making Santa Claus. We leave them white, paint the rest either black (for the penguin) or red (for Santa Claus). Then we draw the face and draw other necessary details. We put on a cap and a scarf, if we made Santa Claus, then we glue on a beard from cotton wool or felt. Like these ones interesting crafts You can make it with your children from unnecessary things.
Panel “Snowman made of cotton pads”
What's winter without a snowman? Children love to build snowmen in the yards and poke around in the snow, rolling lumps for him. But they will also really like making such a winter hero at home from scrap materials. What is needed for the creative process:
- thick cardboard for the base, light blue or dark blue;
- cotton pads;
- colored paper or thin felt;
- White paper;
- paints and brush;
- scissors;
- PVA glue.

Let's start building a snowman:
- First, let's create a landscape around us. Cut out 2 colored rectangles from felt or paper and glue them onto cardboard. Cut out a brown tree trunk and glue it on.
- We glue snow roofs on houses or half a cotton pad. We make the base of the snowman from two cotton pads. Glue on the snowman a cap made of felt or colored paper and a scarf.
- We glue the discs as snowdrifts and snow on tree branches.
- Cut out small snowflakes from white paper and glue them randomly.
- Now all that remains is to paint the details: the snowman’s face, the windows.
A wonderful winter panel for the kindergarten is ready.
Winter panel made of semolina or sugar
Another fascinating and interesting option for a picture or panel on the theme of winter is painting with semolina or sugar. Kids will be delighted with this activity. To make such a panel, take colored cardboard, PVA glue, a simple pencil and sugar or semolina.
Draw any winter design on cardboard with a pencil. For children in kindergarten, the simplest one is possible. Then coat all the parts that need to be painted with glue. Now pour semolina or sugar boldly and thickly over the entire picture. You need to leave it like this until the glue dries. Then just lift and pour out all the remaining grains that did not stick.

You can make a panel with a winter theme from plasticine with your child. To do this, you will need thick cardboard as a base, plasticine and a simple pencil.
You need to draw a simple winter story on cardboard. Mom can help here. It could be a landscape, a Christmas tree, a snowman or any animal. And then decorate the picture, but not with paints, but with plasticine, as if rubbing small pieces of the desired color, filling in the details of the picture. A child can handle this well, only under the control of his mother.
A similar panel can be made from thread crumbs. Everything is exactly the same until the moment of coloring. Before coloring, you need to finely chop the threads different colors and place each color in its own container. Then coat each element of the design separately with PVA glue and apply crumbs of thread onto it. This is how we fill in all the elements of the picture.
Crafts from threads
Snowman made of threads
You can try to make a beautiful, openwork and large snowman from threads. What is needed for this:
- two balloons and polyethylene;
- white cotton threads;
- PVA glue;
- branches for pens;
- cap and scarf for decoration;
- buttons for eyes;
- orange paper to make the nose look like a carrot.
Let's start tinkering:
- We inflate the balloons and wrap them in polyethylene.
- Wrap the balls randomly with thread coated with PVA glue. The thread must be passed through a tube of glue and wound.
- Let the balls dry and burst the air base, pull them out through any gap air balloons from the inside.
- Glue 2 balls together and place the snowman on a stable surface. To do this, you can glue a ring from a strip of thick cardboard.
- Now we decorate the snowman with a cap and a scarf, and glue twigs instead of hands.
- We glue the buttons in place of the eyes and nose with a carrot from a rolled up paper cone.

In general, you can decorate such a snowman at your own discretion.
Christmas trees made from balls of thread
Now let’s make a cozy, homely and Christmas tree from balls of thread. To do this you need:
- threads of different colors. It is better to take half-wool or acrylic;
- thick paper, from which we will make the base of a cone or a purchased polystyrene foam cone;
- any beads or flowers made from ribbons and tulle for decoration;
- thick wire;
- pot or empty low jar;
- fabric, mesh or tulle for decorating a pot.
- jute rope.
- glue in a gun.
- gypsum.
Let's start creating:
- Let's make the base. First, beautifully bend a small piece of wire for the leg of the Christmas tree and wrap it with jute rope.
- Dilute the gypsum thickly in a bowl and transfer the required amount into a Christmas tree pot, stick the stem in and wait until it dries.
- We decorate the pot with fabric and decorate it with a cone or flower.
- Now the Christmas tree itself. We make a cone out of paper or take a ready-made one from polystyrene foam and put it on the leg.
- We wind balls from different threads. You can involve children in this activity; they will be happy to help.
- Cover the cone tightly with balls, leaving no gaps.
- All that remains is to decorate our cozy woolen beauty. Glue on beads, fabric flowers, or whatever you want.

You can make such a Christmas tree without a base from a pot and a stem, just a cone of balls. It's both easier and faster. You can add sisal balls to the balls, if you have them, or make balls from coffee beans by simply pasting over thick lumps of paper painted in Brown color coffee beans
Winter New Year's wreaths
Such wreaths are classics of the genre. They decorate the room in winter, preparing for the New Year. They can be made from whatever is at hand; they can be used:
- spruce branches;
- cones;
- chestnuts;
- pieces of paper or cardboard;
- acorns;
- bay leaves;
- dried flowers;
- coffee beans;
- paper flowers:
- flowers made of fabric or ribbons;
- just branches;
- New Year's balls of different sizes;
- the same skeins of thread and so on.

To make a wreath, the main thing is to understand the principle: first we make a base out of cardboard or buy a foam ring from a craft store and decorate the base as you wish. You need to stick the selected elements tightly onto the base, you can combine them, and then decorate them with a ribbon bow on the side and hang them on a string.

This wreath can be sprayed with glitter varnish or gold or silver spray paint.
In winter, when the leaves fall from the trees and even the late flowers fade, the garden becomes gray and dull. Even the most beautiful courtyard loses the lion's share of its charm in the cold season. However, there are many ways to decorate your site. Find out what DIY winter crafts you can make for your yard and garden. Learn to create unique decor from the most unexpected materials - ice, snow, cones, plastic bottles and much more.
What crafts can you decorate a winter garden with?
In summer, the main decoration of the garden is flowers and trees. With the onset of cold weather, we have to look for new solutions. The most important thing that can be done is to provide a place for evergreen shrubs or plants with decorative berries and bark at the landscape design stage.
Green bushes of boxwood, thuja, and bright spots of rowan or viburnum berries look elegant in the cold season. For the same purposes, plant hellebore, rose hips, dogwood, pampas grass, and holly.
Even in winter you can make your garden beautiful and cozy
And to make the area look even more elegant and interesting, make creative winter crafts with your own hands. Involve children in the work; they will certainly enjoy creating unusual things from ordinary materials.
Snowmen and company are traditional winter guests
What's the most in winter garden? Of course snow! With its help you can turn the site into a real one. winter's tale. The first thing that comes to mind is to make a snowman. This children's fun can be put to good use by decorating the finished snowman with a cute scarf and hat, and handing him a decorative broom.

Cute snowman
Together with your children, you can sculpt the most fantastic figures out of snow and decorate the finished creations. Regular watercolors, gouache, food coloring and even brilliant green are suitable for this. Adding color to your snow creations is very simple:
- First, prepare liter jars or cut plastic bottles for stirring paints. Fill them with water.
- Dilute paints in water. Remember that the solution must be quite saturated so that the finished figurine turns out bright, not pale.
- Start painting the snow. It is convenient to paint a large area of the same color using a spray bottle. If you hate to smear the sprayer with paint, just pour the solution into a plastic bottle and make more holes in its lid. Narrow stripes or lettering are best achieved using a small watering can with a thin spout. Paint complex elements with large brushes or a piece of foam rubber.

Creative craft made from snow
Instead of snow figures, you can build a real castle, build an Eskimo dwelling or an impromptu fence. For construction you need to make snow bricks. Very useful for this carton boxes. They are packed tightly with snow and then carefully shaken out. Finished blocks are stacked on top of each other according to the principle brickwork.
Kingdom of ice on your own property
Another available material for unlimited winter creativity is ice. If you have children, invite them to make winter crafts from tinted ice with you. Multi-colored ice figures do this:
- Prepare a sufficient amount of water in separate containers and stir the paints in it. The richer the solution, the brighter the figures will be.
- Pour water into molds. To do this, use children's “pasties”, buckets, inflatable balls, and rubber gloves. It is convenient to pour water into the balls using a watering can. Tie the filled balls or gloves tightly. Leave all preparations in the cold overnight.
- Dip the frozen blanks into a bucket of warm water and remove the mold (just tear the balls). That's all. Figures similar to candy canes can be placed along paths, under trees, at the gate.

Ice figurines resemble candies
Ice pendants for trees are made using the same principle. Use as molds Silicone forms for baking, children's sand molds or any other suitable container. Before pouring water, do not forget to put a piece of rope in each container to attach the finished crafts to the branches. Pendants made from various berries, flowers, and petals frozen in clean water look very attractive.

Ice pendants on the branches
If you plan to spend winter evenings in the garden, make unusual candlesticks from ice. Sequence of work:
- Prepare two cylindrical tin cans of such a size that one of the cans fits easily into the other. The gap between the walls should be 1.5-2 cm.
- Fill a large jar with a 2-4 cm layer of water and leave until frozen.
- Insert a second jar into a container of frozen water and pour water between the walls.
- Dip the frozen mold into warm water and carefully remove the jars.
- Place a tablet candle or light bulbs from a Christmas tree garland into the resulting ice vase.

The combination of ice and fire is mesmerizing
Evergreen decorations
There is a catastrophic lack of greenery in the winter garden. Add color with evergreens. The most affordable material for such decor is spruce or pine branches. You can decorate a fence or gate with garlands or wreaths of thorny paws. Evergreen compositions will replace flowers in empty flower pots and flowerpots.

Frame for wreath
A wreath of fir branches for a gate or entrance door is made like this:
- Bend a ring for the base of the wreath from thick flexible wire and secure the ends so that it does not fall apart.
- Cut the twigs into pieces 20-25 cm long.
- Secure the branches with thin soft wire around the circumference of the base, overlapping each subsequent branch with the attachment point on the previous one.
- Decorate the finished wreath with ribbons, cones, and clusters of winter berries such as rowan or viburnum.

Connecting branches to the base

All branches are fixed to the frame
If you want to make a composition for a flowerpot, the branches also need to be connected with wire and, if possible, attached to the flowerpot so that the winter bouquet is not scattered by the wind.

This is what the finished wreath looks like
Fabulous winter crafts from pine cones
An empty flowerbed will be completely revived by a basket of pine cones. You can also make tree pendants or unusual garlands from them. When working, keep in mind that the craft will be exposed to the weather, so the pine cones should not be fastened together with glue. It is better to connect them with soft wire, passing it imperceptibly between the scales.
Arrangements of pine cones in the garden look elegant on their own, but if you wish, you can paint them in different colors with spray paints. Work must be carried out on fresh air, but not in the cold, otherwise the paint will lie unevenly.

Cones for decorating a fence
Elegant vine compositions
If you are at least a little familiar with the principles of wicker weaving, decorate your area with openwork figures made of flexible rods. The advantage of such compositions is that snow practically does not linger on them and the figures are always in sight.

Balls made of vine
Wicker balls of different sizes look very impressive, and they are very simple to make:
- Prepare a sufficient number of long willow twigs. If there is no vine, you can use any smooth, flexible branches, for example, the root shoots of maple, viburnum or lilac. The rods must be damp and flexible.
- Bend one twig into a ring along the diameter of the future ball and secure the ends with wire. Prepare 6-8 such rings.
- Insert the rings one into the other, forming the outline of a ball. Secure the intersections with wire.
- Using thinner twigs, braid the ball in different directions. Tuck the ends of the twigs inward so that they do not stick out.
- The finished ball can be tied to a thread and hung on a tree or attached to a strong thin stick and stuck in a flower bed.

Wicker balls with garlands
Snowman made from plastic bottles
What to do when there is not enough snow, but you really want to decorate your yard in winter? Make a cute snowman from plastic bottles! The work seems difficult only at first glance. In fact, making such a winter craft with your own hands is very simple.
To create a snowman you will need:
- many clear plastic bottles of the same size;
- a skein of thin flexible wire or synthetic twine;
- thick wire for the base;
- strong scissors or a construction knife and awl.

Snowman frame
Stages of work:
- First of all, make the frame of the snowman. For the large bottom ball, bend the pieces of wire in an arc, then stick them into the ground, forming a dome.
- For the snowman's head, bend 6-8 wire rings and insert them into each other to form a ball frame. Fasten the rings at the intersections.
- Connect the upper and lower balls with wire and use it to loosely braid the frame for greater strength.
- Cut off the bottoms of the bottles. To make the craft neat, all the pieces must be the same height and diameter.
- It is unlikely that you will be able to find the required number of bottles white, so the cut bottoms will have to be painted. Use spray paint or regular enamel. If you decide to paint the blanks with enamel, then simply pour a little paint into each bottom and distribute it, tilting the blank from side to side.
- Collect the prepared bottle bottoms into long garlands. Pierce each piece on both sides with an awl and pass wire or strong synthetic twine through the holes.
- Start forming a snowman by wrapping the tape from the bottoms around the frame from bottom to top. To prevent the bottles from slipping, secure each turn with pieces of soft wire.
- Draw a face and buttons for the finished snowman.

The bottoms must be the same color and size

Connected bottle bottoms

These are the snowmen you can make from bottles
How to decorate a porch or terrace at home
With the arrival of cold weather, the summer outdoor terrace becomes a completely uncomfortable place. To make your house look attractive, attach homemade lanterns under the roof or on the windows, and decorate the porch with cute crafts.
Openwork lanterns made from cans
Tin cans usually end up in the trash, but they can easily be turned into unusual street lanterns. The walls of the cans, covered with a through pattern, transmit light well and color the surrounding space with light spots.
To make lanterns from cans, prepare the following materials and tools:
- small tin cans;
- spray paint;
- wire;
- a printout of a beautiful dot pattern to fit the size of the jar or a hand-drawn design;
- enough sand to fill the jars to the top;
- hammer, nail;
- candles-tablets.

Lanterns made from cans
Sequence of work:
- To prevent the cans from deforming during operation, fill them to the top with sand, fill them with water and leave them in the cold overnight. The frozen mixture will prevent the walls from losing shape when using a hammer.
- Wrap the patterned paper tightly around the jar and secure it with tape to prevent it from moving while you work.
- Cover your work surface with a scrap rag. Using a nail and hammer, punch holes in the jar along the outline of the design. At the top edge, make two holes for a loop from which the flashlight can be hung.
- Wait until the tin thaws, shake out the sand and dry the workpiece. Attach a wire loop to the top edge.
- Cover the flashlight with 2-3 coats of spray paint and leave until dry.
- Place a candle in the finished craft.

The lights behind the glass look very cozy
Lantern made of garland and glass jar
You can also make a beautiful lantern from an old New Year's garland, in which half of the light bulbs are no longer lit, and from an ordinary glass jar. It's extremely simple to do:
- Take a glass jar with a volume of 0.2-0.5 liters. The jar can be either the most ordinary one or a shaped one, for example, a coffee jar. Wrap a wire loop around the neck and attach a hanging loop to it.
- Do not fold the garland too tightly into the jar, leaving the end with the fork outside.
- The flashlight is ready, all that remains is to connect the garland to electricity and enjoy the effect.
If you want to make the craft even more elegant, apply your favorite design to the jar using a can of spray paint and a paper stencil.

A family of pumpkins will decorate the porch
Bright pumpkin street decor
Pumpkin is a wonderful autumn vegetable that is quite capable of serving as a decoration for a porch or terrace. Dried pumpkins are not afraid of frost, so feel free to use them to create winter crafts with your own hands.
Carefully cut off the tops of decorative pumpkins, remove the seeds and some of the pulp. Leave the pumpkins to dry in a warm place for a couple of weeks. It is most convenient to make pumpkin preparations in the fall, immediately after harvesting.
Dried pumpkins are decorative in themselves and can simply be placed on the steps of your home. Another option is to turn dried vegetables into lanterns by drilling lots of holes in them using an electric drill.
Crafts for the New Year holidays
When decorating your home for the New Year, don’t forget about the yard and garden. With skillful hands it is possible to turn a site into a real New Year's kingdom.
Luminous sculptures made from cling film and tape
You've probably seen shimmering translucent figurines of deer and other New Year's characters in shop windows. shopping centers, and just on the streets. Few people know that such beauty can be made with your own hands.

Glowing deer made of film and tape
The most interesting thing is that to work you only need a couple of rolls of cling film, a roll of wide tape and a luminous garland. The only difficulty is to find suitable form for wrapping with film - these can be large garden sculptures, interior figurines and other interesting things.
Stages of work:
- Wrap the selected shape tightly and evenly with cling film in 5-6 layers. The more layers, the stronger the sculpture will be.
- Apply 2-3 layers of tape over the film. It is more convenient to work with segments of 25-30 cm. Try to ensure that the tape lays flat and does not wrinkle.
- Using a construction knife or scissors with sharp ends, cut the workpiece and remove it from the mold.
- Place a garland inside. To ensure that the light bulbs fill the space evenly and do not bunch up, fix them in the desired position with pieces of tape. Be sure to take the power plug out.
- Cover the cut with tape. The magical glowing sculpture is ready!

Winter home porch decor
How to make New Year's garlands outdoors
Decorate tree branches, a fence or the facade of your house with bright garlands made of various materials. Even children can be trusted to make these simple winter crafts - they will certainly enjoy making funny little things with their own hands.
First of all, to make garlands you will need strong rope. You can attach anything you like to it - Christmas figures cut out of felt, snowflakes, flags made of colored paper covered with tape to protect it from moisture, burnt out light bulbs painted with paints and much more.

Luxurious snowflakes
Openwork snowflakes made of wire
Another easy-to-make holiday decoration is wire snowflakes. The wire base is decorated with Christmas tree tinsel, foil, and knitting yarn. Such snowflakes are appropriate not only in the yard, but also indoors. They are easy to make, so in a short time you can make a lot of snowflakes, for example, for a garland.
Stages of work:
- Prepare a coil of flexible wire that holds its shape well, wrapping material such as yarn and pliers.
- Print or hand-draw a star template. Bend the wire using pliers according to the template and twist the ends.
- Wrap the workpiece with threads, secure the ends with a small piece of tape. Tie a loop in the corner of one of the rays.
Wire snowflakes can be made into any other shape by bending the wire in the desired direction.
Creating winter crafts with your own hands is a real pleasure. Take an evening to work and use your imagination to enjoy a stylish and beautiful area all winter long.