Christmas ball in patchwork technique. New Year's patchwork ball DIY Christmas balls in the style of patchwork
AND
many other crafts will be easier to do if you prepare the balls you need in advance
sizes. Of course, in specialized stores you can find everything you need
devices, but, as a rule, such magical places for a creative person
There are only in large cities and the capital. The rest have to be imaginative and
get out of the situation on their own. So, for example, in construction
stores sell foam sheets of different thicknesses. Styrofoam can be called
one of the most comfortable materials, the figures from it have practically no weight and
easy to process.
That's just in order to cut the ball you need to work hard, and
It's hard to get the perfect shape. We have developed a special
a device that allows you to cut out the perfect ball and make it very
fast. Using our master class, in just 10-15 minutes you will cut an even and
correct ball.
For cutting out a foam ball, US
it is necessary to make a special device invented by the main Entertainer
site - ourworldgame.ru.
The foam ball cutter is very
an easy-to-make fixture. Find a tube with a diameter equal to the diameter
the required ball (preferably 3-5 millimeters larger than the diameter of the required
ball). The length of the tube should be equal to 4 lengths of the diameter, or more. A tube
must be sufficiently strong, well-kept shape.
What can be used to make a fixture
for cutting balls?
Cardboard tubes from under a roll of linoleum are well suited. They are
strong enough. Also good material is plumbing plastic pipes,
moreover, they come in different sizes, which allows you to make balls from 15mm to
200mm.
To make a device, take the tube of the necessary
length and diameter, on one side of the tube, cut off half of the tube to a length of 1.5-2
diameter length as shown in the photo above. Next, we need the smallest
sandpaper (popularly called zero), glue the sandpaper very tightly
paper on both sides of the tube as shown in the photo.

Here is such a simple device for cutting balls from
foam. Next, we will show how to cut a ball with it.
Which
Is foam plastic suitable for cutting a ball with our tool? Any household
polystyrene, construction, mock-up, in general, what kind you will find, of course, the most mock-up
the best and expensive, below we used a piece of foam from the package, for softness
it's like a construction worker.

Take a piece of Styrofoam with sides - one side
square, slightly larger than the diameter of the tube, the other side is a rectangle with a length
1.2-1.5 lengths of tube diameter. Using our device, we cut out the cylinder,
as shown in the photo above.


We constantly rotate the workpiece around its axis, producing
movements along the axis of the fixture and gently pressing the workpiece to the base
fixtures (see diagram below).

Further, when the ball is formed, it is also necessary to provide
smoothing the surface, for which the above actions should be performed in
other directions until you get a perfect ball. Final step: check
the surface of the ball and smooth out the bumps.

So quickly and most importantly, you can simply cut a ball out of
foam. In this way, you can quickly and easily and, most importantly,
ideally evenly cut the right amount of workpieces.
Today you will see the process of making a New Year's ball, which uses the basic techniques of Japanese kimekomi technique.
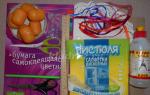
To make a New Year's patchwork ball, you will need:
Scraps of fabric;
- foam ball blank (any size);
- pins;
- felt-tip pen / pen;
- tape measure / centimeter;
- glue stick;
- wooden skewer;
- dummy knife, compasses, scissors;
- lace, ribbon, etc. for decorating the ball.
New Year's patchwork ball step by step:
Take a foam ball as a basis, in this case 60 mm in diameter. Using a centimeter, mark the center line on the ball, divide the circumference in half, mark with pins - this will be the lower and upper points of the ball (photo 1). Draw another line through these points using a centimeter, dividing the ball into four even parts (photo 2). By analogy, halve each share of the balloon, so you divide the balloon into eight even shares (Pic 3).

Now draw a transverse line down the center of the ball. To do this, divide each line from the lower and upper points of the ball (where it was marked with pins) in half, and draw a transverse line along the marks (photo 4-5).
Next, take a compass, set it first at the top of the ball, draw a circle, then do the same on the other side (photo 6). As a result, you will get a blank, as in photo 7. Make cuts along all lines (which have been marked) with a clerical knife to a depth of approximately 1-2 cm (photo 8).

You will need two templates, one in the shape of a triangle and the other in the shape of a trapezoid. Draw patterns on paper, adding an allowance of about 7-8 mm. We advise you not to rush and not immediately cut out all the elements. And first, try to cut out one part, and fix it on the ball. It is likely that you will need to adjust the template, increase or decrease the allowance.
In this case, only two types of fabric were used, so 8 triangles and trapeziums were cut out of a plain red fabric and the same number of elements from a fabric with branches (photo 9). To fix small elements, use a glue stick that fixes the fabric parts and prevents them from moving (photo 10).

Then, using a wooden skewer, begin to carefully tuck the excess fabric into the slots, paying due attention to the corners. For convenience, use a large needle with a blunt tip. For large items, a sandwich knife with a rounded tip is suitable (photo 11-12).
By analogy, fill all the details (photo 13). And after a couple of hours, admire the result (photo 14-15). Now it remains only to decorate the ball with ribbons, cords, beads, bells, pompoms, bead caps (photo 16).

New Year's patchwork ball is ready!
A little over a year ago I came across a book by the famous American patchwork designer Jinny Beyer called "Patchwork puzzle ball". And I still do not stop sewing on this book, making more and more new discoveries for myself. It is worth changing the color and your ball is already unrecognizable! Application areas may also differ: from a children's toy to an element of interior decoration.
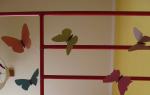
Here are a few uses for the ball. In the first place - a ball, like a New Year's decoration. There are no number of examples of this.
Balls are great as a Christmas tree toy, if you sew a beautiful ribbon on them in advance.
This is a great gift for friends, and for any occasion! Here is an example of a New Year's gift.
And how balls can decorate the interior, if you connect a whole creative team to their production!
In second place is a ball, like a children's toy, it is especially good for the little ones. Such a ball is safe, quite light. I made more than one of these for my little grandson. Here are some examples.
This ball was sewn first, it is small in size and very soft. For such a ball, fabrics with a children's pattern, with pictures are perfect. By the way, the balls can be washed in the washing machine.
The second ball I made a lot bigger and put a rattle in it
A child can learn the names of vegetables and fruits by playing with such a ball. In addition, in this ball, I tried to use the maximum number of colors to make it an additional teaching tool for a child to learn color.
And now I bring to your attention two master classes on sewing balls. Balls are sewn by hand.
Master class No. 1 "Christmas tree decoration"
The diameter of this ball is about 7 cm.
1. Download the file with patterns for both balls. For this ball, we only need pattern #1, i.e. triangle. The pattern is given in full size and taking into account seam allowances of 0.65 cm.
Tip: patterns for balls are very convenient to make from special plastic.
So, cut out 20 triangles: 9 red, 9 yellow and 2 flowered.
2. First, sew two large triangles as shown in the photo. Sew, as it were, around a triangle in a flower, without breaking the thread.
3. Add the rest to the resulting triangles, referring to the photo. And also, as it were, sheathe the large central triangles in a circle with single small ones, without breaking the threads. These are the future hemispheres of our ball. At this point, make a noticeable mark on the wrong side of the two triangles that lie closest to each other in the photo (red and yellow triangles). This is the junction of the two hemispheres.
4. Sew the remaining triangles together on each of the hemispheres to make "cups" - hemispheres.
5. Now it remains to connect both hemispheres to each other, starting with those two triangles that you should have marked. Be sure to leave a small hole for turning and stuffing the ball. Also don't forget to sew on the ribbon.
The ball is ready!
Master class on sewing the second ball "New Year's gift"
The diameter of this ball (blue ball) is about 18 cm.
1. Download the file with balloon patterns from here. For this ball, we will use patterns 2, 4 and 5. Patterns are given in full size, seam allowances are taken into account and are 0.65 cm. Make patterns for all shapes. With the help of pattern No. 5, it is necessary to cut 6 octagons, with the help of pattern No. 2 - 12 squares, and with the help of pattern No. 4 - 8 hexagons, two of each of the four colors.
2. Sew the details of the first hemisphere of the ball in the same order as shown in the photo. I recommend at this stage to make a clear mark on the wrong side of the square marked in red, this is the future place of attachment of the first half of the ball to the second.
3. Do similar operations with the second hemisphere, guided by the photo below. And also make a mark on the wrong side of the octagon, marked with a red oval, this is the junction of the hemispheres.
4. Sew both hemispheres together, starting from the place indicated in points 4 and 5, it is marked with pins in the photo. Don't forget to leave a hole to turn the ball inside out.
5. Our ball is sewn, turned inside out, now you need to fill it with pillow stuffing and sew up the left hole with a blind seam.
After the balloons are sewn, they can be decorated. For example, embroider with beads, ribbons, or do it the way I did. Even at the sewing stage, after the details were cut out, I applied glow-in-the-dark machine embroidery.
Creating a New Year's collection of toys this year, I realized that Christmas balls decorated with embroidery definitely appeal to me more than others. Perhaps this is due to the fact that the final stage of their creation is preceded by two stages, each of which immerses me in a special atmosphere of comfort, peace and, in some ways, even magic.
The process of embroidery has a calming effect on me. I like to sit comfortably in an armchair, lay out an embroidery pattern, needles, floss around, turn on my favorite movie or audio book and immerse myself in meditation, watching how the details of the future drawing appear on a clean canvas.
After the drawing is embroidered, the second, more creative stage of its design begins. For me, it is always mysterious and unpredictable. There are not so many design options, I don’t want to repeat myself, so sometimes there is a feeling of dissatisfaction with the result. The embroidery design stage is more emotionally colored for me, it requires a special mood.
It so happened that this year I did not do all the MKs that I planned. I wanted to correct this omission. It turned out to be a kind of New Year's gift, an exchange of experience and best practices. If you are interested in learning how faceless foam blanks and embroidery fragments turn into a beautiful Christmas decoration, welcome to my workshop!
Option one. Hemisphere Styrofoam Blank Decoration .
As the name of MK implies, for work we need a half-ball foam blank and a completely ready-to-use embroidery fragment. In my case, the embroidery is decorated with beads imitating falling snow. All beads should be sewn onto the canvas in advance, at later stages of work it will be impossible to do this.
I plan to place the embroidery fragment on the flat part of the hemisphere. Before cutting the canvas, make sure that there is enough material for the hem. It is better to leave more allowances, the excess can always be cut off in place.

Mark the outline on the workpiece with a simple pencil, cut it with a clerical knife, lightly grease the flat surface of the hemisphere with glue (I use Titanium), place the embroidery fragment on the workpiece, make sure that it is symmetrically aligned and, using an awl, carefully tuck the protruding edges of the canvas into the slots . Since the glue that we previously applied to the flat part of the hemisphere securely fixed the canvas, do not rush when tucking in its ends. From my own experience, I can say that this stage of decorating a hemisphere (ball) may require patience and skill from you. The canvas can be quite rigid and does not want to be tucked into the workpiece without creases. Her stubborn temper can only be overcome with patience. Sometimes you have to smooth and fill the canvas into the foam almost a millimeter.
In our case, the intermediate result looks like this. It's not very elegant and neat yet, but we'll fix it!

I decided to cover the reverse side of the hemisphere with fabric. If you have never worked in the patchwork technique without a needle before, I want to draw your attention to how important the choice of fabric for decoration is. First of all, the fabric must be thick enough to completely hide the texture of the foam underneath. Of great importance is the surface that you are going to fit. With a flat surface, as a rule, there are no difficulties. But the convex or concave parts of the workpiece can be a problem. For such cases, I advise you to use stretchy fabrics and avoid cotton (creases and folds are almost always guaranteed with it).
Cut off a piece of fabric for fitting, remembering to leave the allowances needed for tucking into the ball.
Before starting work, lightly grease the surface of the ball with glue. It's best to put a little glue on a piece of fabric beforehand to check if the fabric gets wet and if the glue leaves stains on it. Even if the fabric passes the test, do not apply a thick layer of glue to the workpiece. It will take quite a bit, only to fix the tissue in order to prevent its displacement.
Tuck the edges of the fabric into the same slot where you previously tucked the canvas. Since the foam blanks are quite dense, and fabrics of different thicknesses have to be filled into the same slot, we will need to apply a little force and effort to do this neatly. In decorating foam balls, the awl seemed to me the most convenient tool for this purpose. I used to use a ripper, but experience has shown that it is more suitable for working on thin substrates, but gets stuck in foam.
The bright red fabric perfectly fitted the ball and completely covered the foam. Now it's time to think about decor. It is necessary to mask the slot with decorative tape.

Before you finally cover the slot, do not forget to make a deeper hole in the ball (the awl will come in handy again), pour glue into it and insert a ribbon for which the ball will be hung on the Christmas tree.
I picked up a beautiful woven golden ribbon for decoration.

Front view.

The tape should be measured and cut in advance, smeared with glue and carefully attached to the workpiece, paying attention to the fact that it does not move and completely covers the slot.

If possible, I try to decorate the loop beautifully.

It seemed to me that the red background looked a bit empty and I decorated it with three decorative elements with star-shaped rhinestones in the center.
This is how the hemisphere looks on the Christmas tree.


Option two. Decoration of the foam ball blank.
For work, we need a finished piece of embroidery,

glue "Titan" (for convenience, I pour it into a disposable syringe), a foam ball blank (in the photo, the blank is shown with a hanging loop already fixed in the center), scissors, an awl and a lot of decorative ribbons.

As planned, the ball will be decorated with two fragments of embroidery. Each is located in a round frame. Using a compass, draw a circle on the ball on both sides. We cut the contours of the circle with a clerical knife.

We coat the surface of the first circle with glue, apply a fragment of embroidery to the workpiece and, using an awl, carefully fill the canvas into the slot.

We perform the same operation symmetrically on the other side of the ball.

We cut off the excess edges of the canvas, fill the rest into the slot.
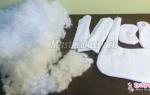
The remaining surface of the ball is covered with a white cloth.

To make the fabric look more elegant and embossed, I wanted to cover it with a second layer of knitted openwork fabric.
In this case, the adhesive for fixing is applied to the slot.

It's time for decorating. Here I did not restrain my imagination. Let there be a lot of gold, because the ball is a New Year's!
All decorative elements are glued with my favorite "Titan".


I tried to shoot the ball from different angles so that you can take a closer look at it.


And this is how the handsome man looks festive and elegant on the Christmas tree.


In conclusion, I would like to wish those who love to embroider, create and invent not to be afraid to try something new, discover unexplored types of needlework and delight their loved ones with beauty, in which you invest not only your skill, diligence and talent, but also a part of the soul!
I sincerely thank all the needlewomen who share their secrets and best practices, inspire and inspire! Let's grow, develop and improve together!
Happy New Year!!!
Hello!
Dear friends, let's make with you wonderful balls for decorating a Christmas tree or just a room.
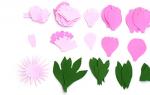
Such balls are very beautiful and original.
What we need for crafts:
- Styrofoam balls (you can buy them, or you can make it yourself, see how to make such balls);
- Beautiful, shiny fabric;
- Thick threads;
- Needle-pins;
- Stationery knife;
- Marker;
- Satin ribbon.
Step 1.
We outline on the foam balls the lines of the future pattern.

Step 2
With the help of a clerical knife, we make shallow cuts along the marked lines.


Step 3
Now, you need to carefully tuck the pieces of fabric into the slots, cutting off the excess fabric before the final dressing. Combine different colors across the fields of the ball.


Step 4
We take a thick thread, thread it into the slot and wrap the ball around them, fixing the turns of the thread with needle-pins. In the future, the places of turns of the thread will be fixed by the overlap of other turns. Alternatively, clear super glue can be used to fix it.


Step 5
We make the final turn of the thread with a loop and fasten it with a pin, with a bow previously pinned on it. You can glue the eyelet and bow with hot glue or super glue, there are several options. Also, balls can be decorated with rhinestones, sequins or beads, everything is up to you.


That's all, a wonderful Christmas decoration is ready!
Friends, do not forget to share our ideas on social networks.