A chest of postcards sewn with threads. Box of postcards: a master class with diagrams and videos. How to make boxes from postcards with your own hands
- a postcard measuring approximately 20x25 cm;
- ruler;
- pencil;
- colored threads;
- needle;
- awl;
- scissors.
Many of us have preserved postcards that were used to send by mail to congratulate those who live far away from us. These postcards, after the advent of the Internet and telephone communications, began to lose their relevance. Especially now there are newer and more modern postcards.
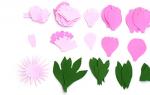
From those postcards that will no longer be used for their intended purpose, you can make original boxes for small items, jewelry, and so on. To do this, you must first cut out templates from thick paper. For example these:
Finish each piece with an overcast hand stitch, where the thread will remain behind the needle:

Then connect these parts together. Which parts need to be interconnected, shown in the upper figure. Part number 2 is the inside.
You can turn on your imagination and make very unusual boxes. If there are no postcards, you can use cardboard boxes (for example, from under sweets in a box).


Even our grandmothers were familiar with the technology of making caskets from postcards. Old postcards and washed x-ray film were used as material for their manufacture.
Now you can use beautiful postcards or drawings, as well as laminating film or transparent film for color or black and white printing.
For the case you will need postcards in the size:
2 pcs. - 6x8 cm
2 pcs. - 6x4 cm
Bottom and lid
2 pcs. - 4x8 cm
2 pcs. - 3x8 cm
Sides (corner or oval)
2 pcs. - 3x3x4 cm

All parts are sheathed with a buttonhole seam with a step of 2 mm.
We make a seam from right to left with a distance of 3-4 mm from the edge of the part, moving away from us, the end of the needle is wrapped around the thread and the stitch is tightened. The next stitch after 4 mm, etc. At the end of the seam, we stick the needle 2 3 times at one point and tighten the thread.
Then the parts are connected to each other: with a needle, grab the threads from the upper loop seam of one part with the threads of another part.
The walls are assembled, then the bottom is sewn. We make the lid separately, and then sew it to the body of the box.
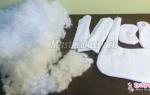
In order not to be empty inside, you can make another bottom.


Oh, yes, this is a purely Soviet theme. My grandmother had a whole mountain of such caskets, each one had its own purpose.
It's nice that such prescriptions are still in trend.
The main thing is to find cute unnecessary postcards, preferably either in the same color palette, or beautifully contrasting with each other.
Next, we decide on the shape of the future box, make blanks: cut out the details from the postcards or take them entirely, sheathe them with a looped seam. The frame itself can be made of cardboard and fabric, as in the video below, or from the same postcards, preferably folded in two layers for structural strength.
Keep the master class:
The box turns out to be voluminous, plump. Based on her motive, you can easily create a rectangular box. Personally, I would change the lid, making it not a pyramid, but just a flat layer, like this:

Here are some more ideas for inspiration:


Such a box can be made for a gift, or for yourself, from postcards.

There are a lot of such good things as postcards at home, it’s somehow not nice to throw them away, they are all donated for the holidays, but to use for such a box is what you need. How to do it step by step

this is the diagram for our cover

and this is the body parts

side panels


back wall, and top cover

And the principle of work itself, you need to sheathe all the details with a needle and thread

and then fasten the necessary parts together with a needle and thread

and you get a pretty big box.

In order to make a beautiful box of postcards with your own hands, you will need:
The box can be made in any shape you like, for this, several identical parts are cut out of the postcard and sewn together. A detailed master class on making the box is presented below.
Let's start by drawing and then cutting out the main details of the cardboard box:

Details will be as follows: legs, cover, sides, bottom.
Then we take postcards. It is desirable that the cards were in the same color scheme. Glue the postcards with glue on both sides.
Now we process each detail with a seam using a needle and thread.


The last step is to make inserts and sew the lid.

Our retro-style box is ready.

Sometimes a certain number of greeting cards accumulate, which it is a pity to throw away, but you don’t know where to use them. So there is a way out :), you can sew such wonderful boxes


Below is a diagram of this box.
Shifting a lot of accumulated greeting cards, you do not know where to put them. It's a pity to throw away such beauty, but it makes no sense to store it. It turns out they can be put to good use. This is especially true for desperate craftswomen who seek to learn new creative areas of needlework. Postcards can make an exquisite and spectacular jewelry box or a colorful gift box. Even for beginners, this business will be able to do. To help will be training master classes, with step-by-step instructions.
How to make boxes from postcards with your own hands
For work, postcards of the same size and similar subjects are selected. It takes a little time for one craft, but a lot of fun is guaranteed. In addition, you will need: scissors, thread with a needle.
A simple version of the box with your own hands: a master class for beginners
Need: postcards of any motives, floss threads and a needle with a wide eye. Threads can be selected in accordance with their color scheme of pictures or in contrast. First of all, we determine the size of the future box. Consider the option with the following parameters - 8.5x14.5x9 cm.
Let's start the master class:

It's so simple, and most importantly, quickly, you can make a beautiful craft. This can be a gift for you or for close friends.
Gallery:
(25 photos)
How to make an oblong box, like a chest
 For such a master class, you need to stock up: postcards of the same direction, thick threads, a sewing needle. Everyone can individually select the dominant color palette, contrasting performance is not prohibited.
In this example, a size of 8x16.5x5.5 cm is taken. It is not necessary to strictly adhere to it, it all depends on the desire and possibilities. The procedure for making crafts is as follows:
- According to the scheme, you will need: bottom, size 8x16.5 cm - 2 pcs.; two rectangles for the lid - 16.5x8 cm and 16.5x10 cm; two parts for internal placement - 5x8 cm and 5x16.5 cm; two outer ones - 7x8 cm and 7x16.5 cm. Two sidewalls will be curved, 8 cm long and 7 cm wide.
- We draw all the necessary elements on paper, making a diagram. The components of the casket from postcards are cut out on them.
- It is more convenient to cut the side plugs like this: the upper and lower blanks are cut out, connected to each other, placed end-to-end on paper, outlined with a pencil. The resulting sketch is reduced on each side by 2 cm. For the body, 8 pieces must be made, and for the cover, 2 more pieces.
- To make the craft durable, it is necessary to duplicate all the postcard parts from cardboard. Thus, 44 components are obtained: 22 from postcards, 22 from cardboard.
- To make it more convenient to sew by hand, first we go through on a typewriter, without threading. When connecting, it is permissible to experiment with the type of stitch. You can make an overcast seam, but with different loops. If you put several twists into one hole, you get a rather original radiant pattern. The knot is left on the wrong side.
When changing the thread, so that the bundle is not noticeable, the needle is hooked under the already existing loop. On the reverse side, it is displayed between two stitches. Thus, the visual image of the edge design is not spoiled. All details are processed in a similar way.
Now it remains to sew everything in pairs. Two bottoms are combined, and fixed around the perimeter. The lateral sides consist of an inner solid wall and an arcuate outer one. Valves are inserted into the formed tunnels. First you need to sew the bottom edge, then go up. Thus, a frame is obtained. It remains to sew the bottom and the lid on one side. This is how the box turns out.
To give a decorative effect, you can add it with curly legs. How are they made? Everything is pretty simple. The height and intricacy of the bends are chosen individually in each case. A rectangle is drawn, with parameters 3x16.5 cm. Any ornament is easily recreated in the lower part. You will need 2 front and 2 side legs, in duplicate. Blanks are cut out, sewn along the sides and attached to the base.
How to make surprise boxes
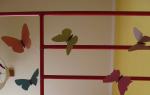
 The proposed master class is simple, but the craft turns out to be extremely original. To make such a box, would need: colored cardboard 20x9 cm, colorless plastic, double-sided tape, archival quality paper, postcards, decorative butterflies, small details for decoration.
First you need to make a box. Take a square made of cardboard. Depending on the parameters, two parallel lines are drawn, crosswise. The corners are cut out, and a cruciform blank remains. We make even folds so that the sides and bottom are proportionally even.
For the lid, we retreat from the edges by 2 cm. Thus, equal sidewalls are obtained. According to the scheme, corners are cut. The resulting pattern is glued. After that, go to the external design. Outside and inside, the walls are pasted over with postcards. Optionally, beads, sequins or something similar are attached.
Inside will be butterflies on plastic skewers. When you open the box, they will effectively appear. For this to work, the plastic must bend easily. Plastic strips are cut out, 19–20 cm long. Butterflies are attached to the top, and the bottom is fixed to the bottom of the box. That's it, the surprise is ready!
Caskets for folding personal little things or as a gift to loved ones can be easily made with your own hands. This will require a minimum of effort, without any financial investment. The process itself is so exciting that it draws you in from the first steps. If you turn on your imagination, then you can safely experiment with shapes and sizes. The result is a true work of art.
Attention, only TODAY!
Good day!))) At the request of Marieta, I show the manufacture of this casket. Might come in handy for someone, either as a gift or for yourself.
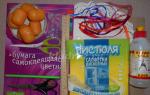
We will need: postcards of any size and subject, a pencil, a ruler, scissors, a needle, threads. Threads can be taken in any color. You can choose according to the color scheme of the product, or in contrast. I have threads for filing documents in the photo. I will "sew" with them. We decide on the size of the box. I have a box with dimensions 8 * 16.5 * 5.5

For the box you will need: bottom - 2 pieces with dimensions 8 * 16.5; cover - 1 piece with dimensions 8*16.5 and 1 piece with dimensions 10*16.5; inner box: side wall - 2 pieces with dimensions 5*8 and 2 pieces with dimensions 5*16.5. External details of the box: 2 pcs with dimensions 8 * 7 and 2 pcs with dimensions 16.5 * 7. That is, the curved parts correspond in length to the dimensions of the inner box, and 2 cm more in height than the main parts. We disassemble postcards by color, well, or as you like. and start working with a pencil ruler and scissors. For the bottom, I took a double postcard, immediately cut out both parts. Below in the photo is the lid of the box. You can see the top and bottom

We also need side flaps for the box. I make them like this: I cut out two parts - the top and bottom, connect them in this way (photo 1), put them on the paper (photo 2) and make a sketch with a pencil, then subtract 2 mm on each side and the valve is ready (photo 3). You need 8 of these valves for the box (all eight will be the same size) and two valves for the lid

Here is our box in expanded form. For strength, I re-cut all the details on cardboard. In total, for the box I made 22 parts from postcards and 22 parts from cardboard.

Now I'm getting ready to sew. I connect the cardboard and the postcard (one whole blank) and punch holes on the sewing machine (without thread, step 4)

Here's what happened

Then I start sewing the details. First stitch, needle behind the product. If I'm not mistaken, the seam is overcast. I make three loops in one hole, helping with my fingers to make a "foot". Instead of three "legs", six are made on the corner. You can experiment with the technique and styles of seams.

How do I change the thread so that there are no knots. I finish the “foot” on two loops (photo 1) and hide the knot on the wrong side (photo 2). I thread a new thread and hook the needle under the threads (photo 3)

On the reverse side, I bring out the needle between the loops (photo 1) as a result, it is not even noticeable that we changed the thread (photo 2). I also close the row by inserting a needle into the very first loop of our work (photo 3).

Thus we tie all the details

Now we connect the parts together. The easiest way to connect the bottom of our product. We sew the two halves with each other through the edge (photo 1). Side walls take one part long (outer wall) and short (inner wall). We sew one side together (photo 2), we also sew the other side with a b / o edge, but the outer wall will be an arch (photo 3)

Valves must be sewn into the resulting "tunnels". We start sewing from the straight side (photos 1 and 2), and then we sew the semicircular side.

As a result, out of 44 blanks, we first have 22 sheathed pictures, then we sew them together and we have only 6 left (photo 1). left just a little bit. We take the side walls and connect them as shown in photo 2 .. Then we connect everything in a circle (photo 3). We have a box frame

We sew the bottom into the box, at the same time tightening the corners. Will sit like a glove

I show the sewn-in bottom on the reverse side. It remains to sew the cover. But only on one side!)))) If your lid does not reach the edges of the box (this can also be) advice: pull off the corners of two adjacent parts with a thread and Everything will be fine

Here is the box

Show from all sides and inside

This time I wanted to make the legs of the box. I know, I didn’t hit the color a little, and it doesn’t matter. Choose the height of the legs yourself, which one you like, you can draw whatever patterns and pretzel you want. I'm not an artist, so it's simple and concise))) How did the legs: I drew a rectangle 16.5 * 3 (for the long side). To make it easier to explain: ABCD rectangles. Side AB=CD=16.5. AD = BC = 3 cm. So I increased the side of the CD by 0.5 cm on each side. I have a parallelogram. Here, on the lower part of this parallelogram, you can draw different patterns. I did it so that the legs did not stand straight, but, as it were, on a corner. Similarly, I made 2 long and two short "legs". From cardboard, sheathed, sewed together, and then sewed to the bottom of the box. On this box is ready.
You can make a box of postcards for personal little things with your own hands: any size, original shape, and, most importantly, it will have a unique look - turn on only your imagination.
Materials needed: old postcards, embroidery thread (mulina), a needle with a wide eye.
Old postcards can be precious as a memory of people, words written by them, events. If you are not ready to part with them, you can find a replacement: buy new postcards, or stick beautiful pictures from magazines on cardboard, and then cut the necessary details on this basis.
Scheme for a cover pattern:

Chassis of body parts:

I propose to consider the box from all sides in order to understand what to connect with what.
Side view: side panels and side insert.

Bottom view. bottom.

Back panel, back wall; cover on top.

The principle of operation is as follows:
(consider the example of creating a bottom)
We take two postcards. We adjust them to the required dimensions (see the case cutting diagram). We put one on top of the other, connecting their back sides.

Draw straight lines around the perimeter of one of the postcards (better than the one that will be located inside the box). Retreat 1 cm from each side and draw a smaller rectangle. These lines will be guidelines for the next operation.
We sew two layers of postcards with a “loop (edge) seam”.
We select the threads by color to match the selected postcards. The thickness of the thread is 5 additions in this work.

One important technological point: so that the knots at the ends of the threads do not spoil the appearance, we hide them. To do this, we make the first puncture on the back of one of the postcards. The knot will be inside between two layers of paper.

In a similar way, we sheathe all the prepared parts of the box.
assembly into a single structure. Adjacent parts are applied one to the other. We drag the needle and thread through the horizontal crossbars between the columns of the seam - we get a twist.
So we connect all the other details together.

Get a pretty roomy box. It remains to find her a worthy place in the interior

Master class on making a box of postcards
author: Pakhmutova Svetlana Alexandrovna, educator, MBDOU No. 227, KrasnoyarskThe master class is intended for school students, for preschool teachers and primary school teachers
I bring to your attention a master class on creating a box of postcards, which will be an excellent gift for family and friends on March 8. The box can be used for storing jewelry and other interesting little things.
Integration of educational areas: "Decorative and applied art", "Knowledge"
Purpose: The box can be used both for storing jewelry and other interesting little things: notes with secrets, badges, coins. It can also be used as a piggy bank. It is also possible to use it as a gift wrapping, where you can write a congratulation on the lid
Target: make your own box
Tasks:- develop artistic and creative abilities of adults and children
- develop fine motor skills and memory
- learn about the history of boxes
History reference
The word "casket" came into Russian from the Polish language, where "szkatuɫa" means a small chest. The first mention of the use of chests by man dates back to the 3rd millennium BC, the world learned about this thanks to archaeological excavations conducted on the territory of modern Egypt. The most popular and found in various sources chest of Egypt is the front ceremonial throne, which is a chest with a high back, legs and armrests. There is a theory that the chests were used not only as storage, but also served as some furniture. All modern furniture originated precisely from the chest, which later decreased in size and turned into a box.

The first mention of the casket, as the caskets were originally called in Russia, dates back to 1598, namely the word "casket" - in 1610: "Yes, from the casket she gave the boyars and princesses and the treasurer a gold ring"
Fixtures and materials:
1. Postcards or scrapbooking paper;
2. Scissors;
3. Threads;
4. A set of needles;
5. Ruler;
6. Simple pencil;
7. Stationery knife;
8. Cutting mat.

Working process
1. To make a box, you need to prepare templates:
Attention! The dimensions of the manufactured box can be any. The sizes I have given are samples, you can change the shape of the box, its dimensions
For side walls
- Rectangle size 10 * 12 cm, in the amount of 4 pieces;
- Rectangle size 14 * 12 cm, in the amount of 4 pieces;
- A semicircle with a radius of 4.5 cm in the amount of 8 pieces.
Templates required for the manufacture of side walls:

For top cover prepare the following templates:
- Rectangle size 12 * 12 cm in the amount of 1 piece;
- Rectangle size 12 * 18 cm in the amount of 1 piece;
- A semicircle with a radius of 5.5 cm in the amount of 2 pieces;
Templates needed to make the top cover:

For the bottom of the box you need to prepare the following template:
- Rectangle size 12*12 cm in the amount of 1 piece.
The template needed to make the bottom of the box:

2. After all the templates have been prepared, we select the threads necessary for making the box

3. Now it is necessary to sheathe all prepared templates with a loop (edge) seam.
Looped edge seam:

Prepared templates:

4. Now it is necessary to connect the sheathed templates into one block, sewing the parts together:

5. Then we sew the resulting parts (4 side walls, 1 cover and 1 bottom) together:

6. Congratulations, our jewelry box is ready! I hope it will be a great gift for mom, grandmother, sister on March 8th.