Spring mobile with your own hands. Master class with step by step photos. Mobile. Do-it-yourself hanging mobiles Summer mobiles for kindergarten
How can you deal with very young children who still do not know how to crawl, let alone walk? For them, you need to create a developing environment: pictures on the walls, hanging toys, rugs and, of course, mobiles. All these objects are near the baby, he can observe them, feel something, turn, stretch and examine them. So mobiles on the crib are designed to attract the attention of the baby, teach the eyes to focus, and he himself to concentrate on something interesting.
The mobile needs to be changed as soon as the baby loses interest in it. There is little use from a boring pendant. For example, Maria Montessori has developed as many as 8 mobiles for masks up to 6 months old. They are quite simple, but well thought out. I will devote a separate material to her mobiles.
In the meantime, I suggest turning on your imagination and preparing scissors :) We will make mobiles out of paper and other simple materials. Cheap and kids love it. I conceived many different beautiful mobiles that moms can easily make with their own hands. I'll start my series with butterflies.
Mobile “Butterflies fly!”
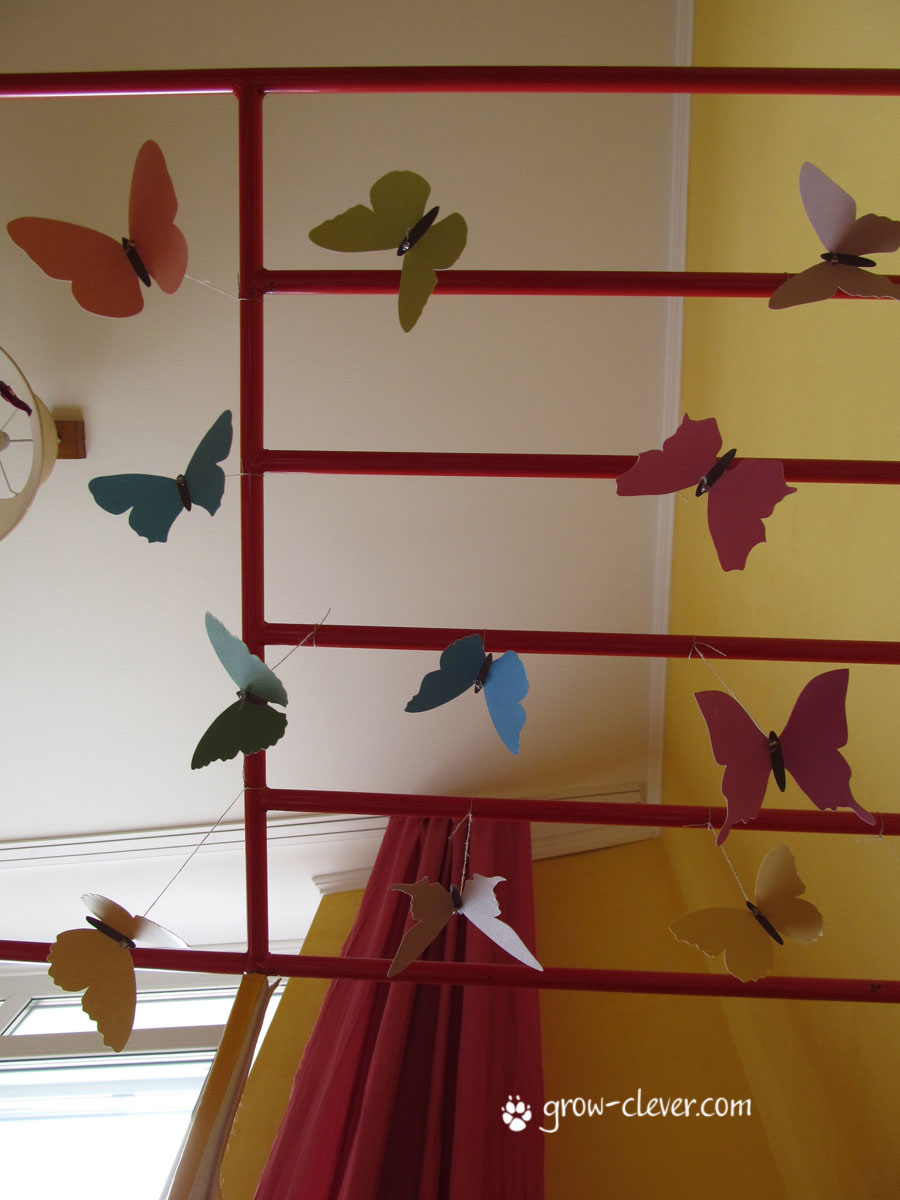
Mobile with butterflies. Bottom view
Especially for this mobile we drew and colored butterflies. And you can download the finished .

Butterflies-blanks
Then you need to cut out all the butterflies. This was the hardest part. I cut them out for a good movie and nail scissors :) Oh, yes, all the wings need to be bent in the color direction.

Cut out butterflies
To hang the butterflies, I fastened a bead on each thread, and then with a needle I stringed the butterflies on the threads.

Mobile pendants
Then I tied each suspension of the mobile to a sports corner :) Ksyunya has so far lost her keen interest in it, so now this corner has become a developmental complex for Sima and a house for Xenya's games.
Master class on making a hanging mobile "Spring mobile"
Sorvanova Olga Anatolyevna, senior teacher of MDOU "Kindergarten No. 3" Sparrow ", VologdaDescription: Suspended "mobiles" play a special role in the interior. They carry a semantic load that develops the general theme of the design of the room. With the onset of spring, nature comes to life: the first flowers bloom, insects wake up, the familiar songs of birds are heard more and more often... , country house.
Purpose: The master class is intended for kindergarten teachers, parents and all creative people who like to change their interior.
Target: Bringing ideas to transform the space of the room.
Tasks:
1. Introduce colleagues to the option of decorating the premises on a spring theme
2. Show the steps of making this composition
3. Create an atmosphere of spring mood
Materials: Scissors; white threads; needle; glue-moment "Crystal"; garden hanging ornaments; artificial sakura branches; narrow satin ribbons.


Stages of work:
1. Divide the sakura branches into several smaller branches and sew them to the hanging cover on four sides.


2. Inside the cover we fix hanging garden decorations: butterflies, ladybug, dragonfly, bird.

3. Unfasten the remaining sakura flowers from the branches.

4. Arrange the flowers on a satin ribbon and secure with glue.

5. We sew the finished tape along the edge of the cover from the inside.

6. Spring composition is ready! Now it remains to find a suitable place to place it.
Thanks for attention! I hope that someone will take note of this idea! Children's suspended mobile. MK and ideas...


It's so easy to make a bright colorful hanging mobile together with a child (or for a child), which can be hung on a wall, a chandelier or a window, so that passers-by can admire your creativity. Toddlers will love the idea of making this movable DIY toy.
1. This cute cockchafer is made from an egg carton in just half an hour.
We will need:
1. 2 cells from an egg carton
2. Colored cardboard or a piece of old wallpaper, postcards lying around
3. Gouache: red, orange, brown, green, white and red,
4. Scissors
5. Shank
6. Braid
7. Twigs
8. 1 black pom-pom
9. Eyes
10. Glue
11. Brush
12. Hot glue
Body
1. It is necessary to prepare an egg carton: turn it upside down, take the paint of the desired color and paint the cells. Painting should be paired, that is, we paint 2 cells with one color. 
2. After the paint has dried, carefully cut out the cells and remove unnecessary cardboard remnants from the workpiece. 
Wings][
3. Cut out the wings of 2 pieces (2x2 cm in size), and glue them together with a pattern on the outside. 
body + wings
4. We fasten the torso and wings in such a way that between the 1st and 2nd parts of the torso there are wings and a braid that will come out of the middle.
Head
5. Take a pompom, stick eyes on it. Using hot glue, we attach horns to the top of the head, which can be of completely different shapes.
Body + wings + head
6. Use hot glue to connect the head to the body 
7. We tie the finished beetle to the prepared base of wooden rods 
2. Or try to make such a wonderful butterfly mobile with your kids:
They can decorate a bedroom or a children's room, or give it to someone - everyone will like such mobiles! What’s more, they are so soft and dainty! Well, how about we start the process?
To make a butterfly mobile you will need:
. A small wreath (about 30 cm in diameter) or a hoop from a hoop, or something else rounded (whatever you find);
. Fishing line;
. Pink ribbon transparent or colored - at your discretion;
. Ribbon with polka dots or other ornament, or a strip of tulle;
. Artificial creeper 45 cm long;
. Remains of plain white or pink tulle;
. Double sided tape or glue.
Operating procedure
1. Wrap the wreath with green liana and polka dot ribbon. 
2. Cut out 32 large butterflies and 32 smaller ones. You can do it with the following pattern: 
3. Cut 4 pieces of fishing line 56 cm long. Using glue or double-sided tape, connect small and large butterflies, leaving 13 cm of fishing line free on top. On each segment of the fishing line, you will get 4 butterflies. 
4. From the remains of white or pink tulle, cut 8 strips 13 cm wide and 50 cm long.
Take 4 more pieces of fishing line 56 cm long. Gather pieces of tulle on a thread with a needle, leaving pieces of thread along the edges - you will get 8 lush school bows. Tie these bows to the fishing lines - 2 for each.
From a pink ribbon, make 8 pieces about 50 cm long, burn the edges so that they do not split. Now tie them with bows on fishing lines - 2 for each. In general, you should end up like this: 
5. Alternating fishing lines with butterflies and fishing lines with bows, tie them to a wreath. You can vary the height: for example, tie butterflies higher, bows - lower, or just anyhow - everything is up to you. Carefully cut the line at the very top.
3.Here is another amazingly beautiful butterfly mobile:
How to make such a simple but colorful mobile "butterflies" out of felt or paper, which will be great for decorating a child's room? Yes, very easy!
You will need plates of multi-colored felt or felt, white threads, beads, thick cardboard for the base and two white lace paper napkins.
Instead of felt, you can use colored double-sided paper.
First, we cut out a circle from thick cardboard along the diameter of the napkin, which we then paste on it.
Then we cut out 19-20 butterflies according to the template (they do not have to be all the same size).
![]()
Then we string the butterflies on a thread, alternating with felt beads or small cardboard circles (radius 1 cm), if you chose the cardboard option. Felt butterflies can be made in two layers and sewn together with large stitches, stepping back from the edge of about 0.5 cm.
We need to make 4 threads with butterflies. Arrange the butterflies by color first on the table and see what combinations they look best in. Each thread starts with a large knot and a bead. Take threads about 1.5 m long and do not cut them off until the last moment.
When all the threads are collected, four holes will need to be made in the cardboard circle with an awl. We will thread the threads in them, adjust them in height, then tie knots and only then cut off the excess.
4. Mobile "Solar system"

5. Hanging mobile "Bright Aquarium", which the kids themselves can make.
|
Materials: It is desirable that the base of the fish and the voluminous body be of different colors. |
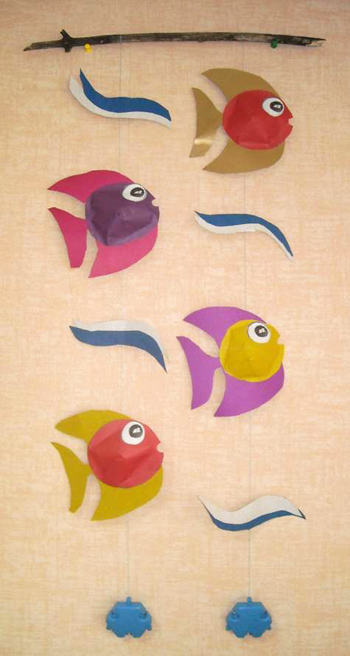
|
In general, for the manufacture of such mobiles, you only need colored paper, glue and threads. Everything is very simple!))


6. And of course, no one canceled sewn mobiles)). That's really where the variety of colors, shapes and ideas is really!
We offer you creative ideas for inspiration to make a mobile for a crib with your own hands. In the article you will find interesting solutions for creating pendant toys, a list of necessary materials and options for attaching a mobile to a bed.
The mobile will be of interest to the child in the first months of life. You can purchase toys for hanging over a crib in the online store (,) or make it yourself from paper, sew it from fabric or felt, or crochet it.
The benefits of the mobile
The mobile helps the newborn:
- Develop vision: the child estimates the distance to the object by eye and correlates his actions with this information.
- Concentrate on the subject.
- Focus your gaze.
- Distinguish and recognize objects (shape, colors).
- Practice tracking moving objects.
- Calm down: smooth movement and gentle sounds (tinkling bells or rustling paper) evoke positive emotions in the child.
Be sure all mobile mounts must be strong, and hanging toys must be safe and bright.
Options for attaching the mobile to the crib
You can buy on Aliexpress ready (or) for hanging homemade toys and easily fix it on the crib.
As a stand for attaching a mobile, you can use a canopy bracket (on) or do it yourself from a metal-plastic water pipe, giving it the desired shape.
A round wooden hoop for embroidery (on) can serve as a frame for attaching homemade toys. Decorate with a cloth and the mobile holder is ready!
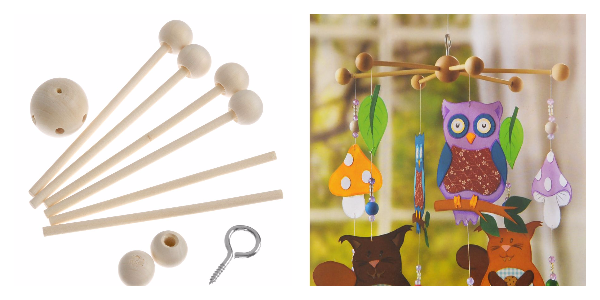
You can purchase a wooden kit (at Ozon.ru, at), which consists of balls for hanging, sticks for assembling the mobile structure and a hook for fastening. The set will allow you to create an original mobile for a crib.
In order to get a full-fledged mobile and the carousel with toys could rotate to the music, purchase a special music module for the mobile ().
Ideas for creating a mobile
Look at the photo and get inspired by ideas for making a mobile for a crib with your own hands.
1. The artificial flower baby mobile will be a beautiful decor element in the children's room.
For manufacturing, you will need a foam base for a wreath (in) and decorative flowers (on). Use hot glue to glue the flowers to the base and the flower mobile is ready!

2. Amazing mobile made from a bicycle wheel and paper airplanes folded from the pages of a comic book magazine.

3. Paper mobile made using the quilling technique.
If you are not familiar with this type of creativity, then you can master the art of making three-dimensional compositions from strips of paper twisted into spirals by reading quilling books for beginners (c). You will find materials for quilling in, in.

4. Eco-friendly children's mobile made of wooden elements.
You will find wooden blanks on, in 
WE RECOMMEND
5. Homemade mobile with balls of thread
Take a round balloon, grease it with a thin layer of petroleum jelly and wind randomly with cotton thread moistened with PVA glue. When the glue dries, pierce and remove the balloon. Mobile hanger is ready! Do this with several balls of different colors and sizes. 
6. Mobile over the changing table from paper lanterns
Paper lanterns can be purchased at.
If you have an older child in your family, offer a creative kit to create a kusudama ball (na, na, na). Kusudama is a ball of paper flowers gathered together. The process of creating kusudama is simple and exciting, it will bring a lot of pleasure to the child, and a hand-made flower ball will decorate the room of a newborn brother or sister.

7. Mobile from ribbons and pieces of colorful fabric.
An embroidery hoop is suitable for attaching ribbons.

8. Mobile for a child made of colored feathers and beads.
A large selection of decorative feathers is presented in online stores and

9. A mobile for a bed made of paper pendants, made using the origami technique.

10. An idea for those who know how to crochet.
Knit mobile pendants - miniature amigurumi toys in the form of animals with bright characters and cute faces.

11. Children's mobile made of felt

12. Colored mobile for a newborn with woolen thread pompoms.
With the help of a special device for making pompoms (in,), you can easily make pompoms from yarn or create a children's mobile from ready-made decorative pompons (in on).

13. Mobile from lush pom-poms
Hang fluffy tissue paper or fabric pom-poms above the crib (on).
Do-it-yourself mobile for decorating a kindergarten in the spring. Master class with photo
Do-it-yourself spring carousel of flowers for kindergarten. Master class with step by step photos.
Ashmarina Irina Vladimirovna, teacher of MBDOU No. 108, Nizhny Novgorod.Description: the master class is designed for children 5-7 years old, primary school students and their parents, teachers and for all creative people who are ready to create crafts with their own hands.
Purpose: interior design of group rooms, music halls, classrooms and for the home.
Target: making flower arrangements out of paper for interior decoration.
Tasks: arouse interest in this type of activity, teach children how to work with paper, educate creativity, independence. To develop the imagination of children, fine motor skills of hands, accuracy, to interest parents in joint activities with children.
Spring came to us carousel
Nature wakes up from hibernation
Cheerful, cheerful April
Rejoices with excitement and shaking!
(Lyudmila Sytenko)
Materials: tinted colored paper, white, A4 size, colored cardboard, PVA glue, scissors, a simple pencil, a stapler, a green satin ribbon 0.5 cm 8-10 m, a mayonnaise bucket lid (or a finished ring), a compass, a ruler, coin "50 kopecks", decorative leaves (4 pcs.), paper clip, double-sided tape.

Safety precautions when working with glue:
1. Be careful with glue!
2. Apply glue to the surface of the product only with a brush.
3. It is impossible for the glue to get on the fingers, face, especially the eyes.
4. If the adhesive gets into the eyes, immediately rinse them with plenty of water.
5. At the end of the work, be sure to wash your hands and brush.
6. When working with glue, use a napkin.
Safety precautions when working with scissors:
1. Store the scissors in the indicated place in the specified position.
2. When working, pay close attention to the cutting direction.
3. Do not work with dull scissors and loose hinges.
4. Do not hold scissors with the blade up.
5. Do not leave scissors with open blades.
6. Do not cut with scissors on the go.
7. Do not approach a friend during work.
8. Pass the closed scissors rings forward.
9. While working, hold the material with your left hand so that your fingers are away from the blade.
Stages of work:
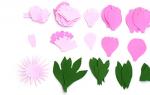
We prepare stencils for flowers from colored cardboard using a compass: circles with a diameter of No. 1 \u003d 10 cm, No. 2 \u003d 8 cm, No. 3 \u003d 6 cm, No. 4 \u003d 4 cm, the middle of the flower with a diameter equal to the coin "50 kopecks", leaf for the flower: length 7 cm and 3 cm wide.

For a large flower, you need to take stencils of circles No. 1, No. 2, No. 3, a smaller flower No. 2, No. 3, No. 4. We choose colors for flowers depending on the interior of the room for which the "Spring Carousel" is performed.

On each circle in the middle we apply the core of the future flower with a coin.

Then we divide each circle into sectors using a ruler and a pencil. First into 4 parts, then into 8 parts, then into 16 parts. 16 is the number of petals in our flower.


Cut along the line of each petal to the core of the flower.


Each petal is rounded.

Now fold the petals in half.


We begin to collect the flower. We collect a large flower from stencils No. 1, No. 2, No. 3. We select colors for the interior or as you like. You can collect not only from several colors, but also one-color.


We collect a small flower from stencils No. 2, No. 3, No. 4.
For my "Spring Carousel" I collected 6 large flowers and 4 small flowers.
Preparing leaves for our flowers. We cut out green leaves according to the stencil, at the rate of 2 leaves per flower.
Green stripes 0.5 cm wide and 10 cm long, also 2 strips for each flower.

We fold each leaf in half and make cuts to make the leaves look voluminous.


We twist with scissors.

We also twist the strips with scissors. It is more convenient and safer for children to wind on a pencil. This is "grass" for decorating a flower.

To each flower, on the reverse side, we glue 2 leaves and 2 strips - “grass”.


Ready for the carousel.
We take a lid from a bucket of mayonnaise.

Cut out the bezel from it (you can take the finished ring, if any).

The rim is wrapped with a green satin ribbon.

We take 4 green satin ribbons 90 cm each and fasten them at the top with a stapler.

From above, above the finished green ring, leave a little on the future hook-clip, we tie ribbons on four sides.

We begin to fasten the flowers, with the help of a stapler, on ribbons. Distribute in a checkerboard pattern.

When attached, glue the core of any color on the flower.

And on the back of the flower, glue the color of our flowers.


This is done to hide the staples from the stapler.
At the ends of the ribbons, you can glue decorative leaves.

For the ends that we left above the ring of our "carousel", we will hang it. We take a paper clip and insert it into the ribbons. We “mask” the paper clip with the help of a flower. We attach the flower to the stapler.