Original and unusual crafts for the New Year. Simple DIY winter and New Year crafts for children. Step-by-step description and photos
With the approach of winter and New Year's celebrations, schoolchildren begin to be given assignments regarding the preparation of winter holiday crafts for exhibitions and for decorating classrooms. Let's see step by step what crafts for the New Year 2018 you can make for school yourself or with the help of mom and dad?
We will consider the most original and magical ideas step by step and we will understand all the details and subtleties of the creative process.
The article provides several master classes with detailed description working on a craft. All that remains is to prepare everything you need for work and follow the instructions.
New Year's snow globe

One of the most amazing and fabulous crafts that you can make with your own hands for school for the New Year 2018 is a snow globe. We have all seen such balls many times and all the time, as if spellbound, we looked at the whirling snowflakes, and the mood became festive, New Year's. We suggest making such a ball yourself. It's quite simple and incredibly interesting.
First, let's prepare everything you need:
- Glass jar with lid. You can buy a jar specifically for crafts, choosing it in the desired shape and size, or you can choose one from those you have at home. For example, a jar baby food or any glass jar with a screw-on lid from canned food.
- Any small figurine, such that it fits in a jar and on the lid with its base. You can take a ready-made figurine, for example, from a kinder surprise, or make your own figurine from plasticine. But in this case, it will need to be covered with clear nail polish so that snowflakes or glitter do not stick to it.
What you will need for work:
- glycerin (sold at the pharmacy);
- distilled water (sold at any gas station);
- plasticine;
- thermal glue, “Moment Crystal” glue;
- glitter, white pieces of plastic (sold in a nail art store);
- wooden stick (you can use a sushi stick). We will use it to stir the solution;
- a small piece of lace for decoration.
When everything is ready, let's get creative:
- First you need to attach the figurine to the lid of the jar. To do this, we will make a small stand in the form of a slide from plasticine so that the figure does not go deeper into the lid. We attach the plasticine slide with thermal glue to the inside of the jar lid. Then we attach the figure itself to the slide using thermal glue. Here it is important to check that the figurine on the lid fits well into the neck of the jar. If the plasticine gets in the way when screwing on the lid, it needs to be cut off a little.
- Now we make a solution with sparkles and snowflakes. To do this, fill the jar a quarter full with glycerin and add distilled water, but not to the edge of the jar, but leaving a little space so that the figurine fits there and the water does not go over the edges. Afterwards, stir the solution thoroughly with a wooden stick. At first the solution will become slightly cloudy, but very quickly, in just a couple of seconds, it will become transparent. Now pour sparkles and snowflakes from white plastic into it and mix again.
- Next, you need to thoroughly wipe the neck of the jar from moisture and glitter, coat it with Moment Crystal glue to seal it and immediately screw the lid on tightly.
- We turn our ball over onto the lid. It's almost ready. It remains to decorate the base, that is, the lid beautiful lace. We cut the lace to a length that is equal to the diameter of the lid and glue it with thermal glue.
That's all. A wonderful DIY craft for the New Year 2018 is ready for school. She turned out beautiful, magical and bewitching.
Step-by-step video of making a Snow Globe:
Textile dog Tilda - patron of next year
For those who are a little familiar with a needle and thread or can sew on sewing machine, there is a great opportunity to show off your skills at school and submit a Tilda-style dog sewn for the New Year for a craft competition.
The coming 2018 will be under the sign of the dog. According to traditions, for the holiday it is customary to give each other the symbol of the year so that the whole next year will be successful. So on creative competition For school, you can make a craft with your own hands in the form of a symbol of the New Year 2018.
Let's take a closer look at how to make a beautiful, cute dog out of fabric.

Let's prepare everything that will be useful in the work:
- fabric for the dog's body. It could be thick knitwear, felt, bike or any other, pretty thick fabric white(as in the video). Or the color you wish;
- pink fabric for the inside of the ears. It is better to take thin cotton;
- cotton threads for knitting pink and white. From these we will knit clothes for the dog and a nose;
- stuffing for soft toys. It is better to take padding polyester by the meter.
- wooden stick for stuffing parts. You can use a sushi stick.
- a pair of small black beads for the eyes.
- thread and needle.
- pattern of a dog. It can be transferred to paper directly from the video screen.
- pencil and scissors.
Let's get started:
- We transfer the pattern to the fabric folded in half. We make the ears separately, one side on white fabric, the other on pink fabric.
- We sew all the parts on the machine, leaving unstitched places for turning and stuffing the parts.
- Now we cut out the parts, make small notches in a circle so that when turning them out, the seams do not pull.
- We turn all the parts inside out and stuff them with padding polyester quite tightly. All parts except the ears. The ears just need to be turned out and ironed.
- Now carefully sew up the places left for stuffing.
- Sew on the dog's hind legs and tail with a needle and thread.
- Now you need to knit her a beautiful T-shirt. We knit a small pipe in a circle with a mesh pattern and put it on the dog, and then sew on the front legs.
- Can be linked beautiful flower from pink and white yarn and decorate the front of the T-shirt under the muzzle with it.
- Sew on the dog's ears and eyes.
- We knit the spout in a circle using single crochets for several rows and sew it in place of the spout.
The symbol of the year - a wonderful elegant dog is ready. It will take its rightful place at the exhibition New Year's crafts At school.
We sew a dog, the symbol of 2018, according to the video tutorial:
Photos of DIY crafts for the school New Year competition:
Magic card 4 in 1
Now let's look at another option for crafts for the New Year 2018, which you can make with your own hands for school, for an exhibition, or as a gift to loved ones. This is a magical 4D postcard.

Before you start creating an amazing card, let's prepare everything you might need:
- white thick A4 paper;
- ruler;
- scissors, stationery knife;
- double-sided tape, glue (PVA or stationery);
- simple pencil.
Let's get started:
- Make markings on the reverse side of the sheet with a pencil. On each side we measure 10 cm segments and draw lines through this marking. It turned out 6 squares 10/10. Divide these squares equally in half. We got rectangles.
- Mark dotted lines along the rectangles, dividing them in half.
- We cut out 8 marked rectangles 5 by 10 cm only along those lines that are drawn continuously, do not cut the dotted lines.
- We bend the resulting rectangles so that the edges are bent in half to the dotted line (as in the video). So we bend all 8 rectangles.
- Now we begin to glue all the parts. We do everything as indicated in the video. We glue 2 parts with the wrong side up, and we glue the parts on the sides with the wrong side down.
- We apply glue to strictly defined places (they are indicated with a pencil in the video). Thus we glue 4 parts.
- Now we turn the figure inside out. It folds along the lines.
- We glue 2 more parts in the same way as shown in the video.
- We open the doors again and do another addition. Align and glue the remaining 2 parts face up. We apply glue where shown in the video on all parts.
- Let the glue dry well.
Check if you did everything correctly. The card should open easily with the doors in the middle and form even squares. If there are any irregularities, they need to be trimmed with scissors so that they do not interfere with opening.
The postcard mechanism is ready, all that remains is to decorate it. On each of the 4 surfaces of the card, draw different pictures or New Year's inscriptions.
Video tutorial on making New Year's cards to school:
This amazing craft for school will not leave anyone indifferent. The technique is quite simple, you just need to carefully and carefully glue all the parts. Well, then drawing 4 pictures on spreads is generally simple and interesting. You can choose any New Year's story or write bright congratulations Happy New Year.
Photo ideas for crafts:

Snowman made from a sock

Paper Christmas tree in a jar

A very beautiful and original New Year's craft for school!

Creative Christmas tree
Snowman made of threads
Effective and very beautiful craft For the New Year 2018, you can do it yourself for school using simple cotton threads. We suggest making a snowman.

Let's prepare everything we need to create a New Year's openwork snowman:
- a skein of white cotton threads;
- 3 balloons;
- PVA glue in plastic packaging;
- hot glue gun;
- felt in red white and orange colors;
- buttons for eyes and for decorating a snowman;
- twigs for handles and brooms;
- a little synthetic padding for a stand in the form of a snowdrift.
When everything is prepared, let's start working on the snowman:
- First we make balls for the snowman's body. To do this you need to inflate Balloons different sizes. The biggest one, the smaller one and the little one. It is better to wrap these balls in cellophane so that the threads do not stick to them later. Now we pass the thread through a bottle of glue and randomly wrap the balls. Afterwards, you need to blot the wrapped balls with glue again and leave them to dry, preferably overnight or for a day. After they have dried, deflate the balls and carefully remove them from the thread balls.
- We glue the openwork thread balls together with thermal glue. The biggest one is at the bottom, the smallest one is at the top.
- The snowman is ready, all that remains is to decorate it. We take the twigs and glue the handles.
- From felt we cut out a nose with a carrot (we make a cone from a semicircle) and a smile. Glue buttons instead of eyes.
- Glue the buttons in the form of a fastener.
- We make a cap and a scarf from felt and put them on the snowman. For reliability, you can secure it with glue.
- Now we make a whisk and glue it to the handle of the snowman and the edge to the bottom ball.
- We place the snowman on a padding polyester base that can be glued to cardboard.
- You can decorate the snowman to your liking.
The snowman turned out great! At the school, at the exhibition of handmade crafts for the New Year 2018, it will take its rightful place.
Video on making a snowman from threads:
Stylish Christmas tree made of pine cones and spices
What is New Year without a Christmas tree - the main beauty of the holiday. For the school exhibition, you can make a stylish Christmas tree from pine cones and spices.

It is very easy to make such a Christmas tree, despite the fact that at first glance it looks so beautiful and very difficult to make. Before work you need to prepare everything you need:
- sheet of thick paper. You can use whatman paper;
- sackcloth;
- hot glue gun;
- scissors;
- cones;
- decorative tape;
- walnuts, cinnamon sticks, dried orange slices, whatever you find at home;
- spray can with artificial snow or gold acrylic paint optional.
Well, everything is prepared, let's start creating:
- We make a cone out of paper, trim the edge evenly. Cover the cone with burlap, folding the edges inward at the bottom.
- Now we decorate the Christmas tree with cones, nuts, and everything we have prepared for the beauty. All the beauty needs to be glued evenly from top to bottom.
- After the beauty is dressed up, you can spray her with artificial snow from a spray can or golden paint, or with glitter varnish if desired.
This is a very simple and entertaining activity. Try to make such a Christmas tree with your own hands for the school crafts exhibition for the New Year 2018. It will be appreciated and will bring a lot of aesthetic pleasure to students and teachers.
Video lesson on creating a Christmas tree from natural materials:
All craft options are very interesting and involve a moment of creativity. It is not necessary to strictly follow all the instructions; you can use your imagination and add something interesting to the decor of the craft. The main thing is to make any thing with a good mood and try very hard, then everything will work out!
? Video lessons of New Year's crafts
Craft bookmark:
Sock snowman:
New Year's snowflake made from pasta:
Crafts from tubes:
What could be more magical than a Christmas tree during the New Year and Christmas? In the evening, when the lights are turned off, a fairy tale begins in the mysterious flickering of lanterns in the branches. Everyone comes up with their own magical story.
For some, the nutcracker defeats the king of mice, for others, snowflakes dance in circles. We decided to compose a fairy tale about a Christmas tree elf. It will constantly change, acquire new plots, be supplemented with characters and, most likely, will be different every year. Only the beginning of our fairy tale will always be the same: - Once upon a time, in his cozy house, among the fluffy fir branches, there lived a little Christmas tree elf...
Like this fairytale house We decided to make it with our own hands today. Join us, because the fairy tale is already beginning!

For the walls we will take a rectangular piece from a cardboard box. Let's cut a hole for the window and mark a place for the door. We will strengthen the walls with “wild stone”. Let's take the pieces eggshells and glue it with PVA glue.
To make the appearance of our masonry more realistic, we need to imitate traces of cement mortar in the seams. And the shells will hold on tighter this way. We will cover the walls with regular gray toilet paper. When it dries, we clean off the excess, exposing the protruding parts of our “stones”.


When the scales of the cones stick well, we will attach a pipe, because there will probably be a fireplace or stove in the house so that our elf can live warm and can cook magic potions or porridge.
Let's twist the pipe from a small piece cardboard and cover it with lentils, as if it were a fireproof pebble.

To make it even more important, we will make a ladder for the roof. She's from the same toilet paper, twisted into flagella. Yes, we almost forgot about the frame for the window, let's cut it out of cardboard.

Now let's put the roof in place and paint the facade of the house. We will do this with regular gouache. Although acrylic will be better, it does not need to be varnished.


All that remains is to glue the finished fairytale house onto the base. Since we planned that our elf will have light in the window, we will cut a hole in the base for the LED.

We wanted to decorate the “yard”. Snow is cotton wool, and a snowman is made of it. A Christmas tree is that “torn off” cone, painted in green color. This is not necessary; perhaps your elf will live in a hanging house. Then only the bottom and the loop will be useful.


We made such a fairy-tale house with our own hands in just one evening, and the little Christmas tree elf has already begun to live his own life. A bathhouse, a cellar, and even neighbors with their own houses have already been invented for him, this is a hedgehog and a squirrel.

Decoupage - decorating a bottle of champagne for the New Year
A gift made with your own hands is always original and unique. Do you want to surprise your loved ones? Decoupage a bottle of champagne. This New Year's craft will not go unnoticed.

For decoration you will need:
- A bottle of champagne;
- three-layer napkin with a New Year's motif;
- PVA glue;
- acrylic paint;
- decorations.
First of all, you need to clean the bottle from stickers. To do this, put it in a container of warm water and leave it for a while.


Cover the entire open surface of the bottle with acrylic paint. The first layer can be applied with a brush. After drying, we paint the bottle a second time, but use a piece of sponge (“smack it”).

In just an hour, the acrylic paint will dry, so you can remove the tape from the neck and proceed to the next stage of decoration. Take a decoupage napkin and tear out the selected fragment of the design from it.

We remove the two bottom layers from the napkin, and lay the top one front side down on the stationery file. Carefully pour some water over the drawing, straightening out all the wrinkles.


We smooth the file with our hands. We make sure that the napkin is securely fixed on the surface, and then carefully remove the file from the bottle.

We dilute PVA glue with water in a ratio of one to one. Apply this solution to the entire surface with the pattern using a brush. Its movements should be from the center to the edges, we try to smooth out all the wrinkles and expel the bubbles.

After the glue has completely dried, take fine sandpaper (preferably “zero”) and carefully sand the contours of the napkin. We also process those places where unevenness has formed.

Next, take a sponge or a piece of foam rubber, dip it in acrylic paint, and “smack” it along the edges of the pattern fragment. In this way we try to disguise the transition from the napkin to the main surface of the bottle.

The work is almost complete, all that remains is to add some “zest”. For example, glue a ribbon to the neck. The easiest way to do this is with a glue gun. The braid will not only complete the entire ensemble, but will also close the transition from paint to foil.

DIY New Year's snowflake
The New Year holidays are approaching and New Year and Christmas motifs are increasingly heard in our creativity. I suggest knitting a small snowflake that can be used to decorate children’s mittens and hats, and by attaching a loop to the snowflake, you can hang it on Christmas tree. This snowflake is knitted very quickly and easily. Even a novice knitter can handle this job.

Materials and tools:
Karachay acrylic yarn of white or blue color. I took this yarn so that the loops could be seen better. Hook number 3 is suitable for this yarn.

You can use thinner yarn, then the snowflake will be even smaller.
Abbreviations used in the text:
VP - air loop;
СС2Н - double crochet stitch.
We will complete the entire drawing in one row. Let's start by casting on four chain stitches. We close 4 VPs into a ring with a connecting loop. Next, we collect 3 VP.

We knit 1 CC2H into a ring.

We knit a chain of 4 VPs.

And we close the chain of 4 VPs with a connecting loop to the beginning of the chain. We dial 5 VP and close to the same point. Next 4 VP and a connecting loop to the same point. We knit 4 VP to move to the next ray of the snowflake.

We knit 2 CC2H with a common top: On the hook there is one loop from the last VP of the chain of 4 VP, one more loop remains from each unknitted CC2H.


We knit three loops on the hook in one step.

We close chains of 4, 5, 4 VPs with a connecting loop in common top double crochets. After each ray we knit a chain of 4 VPs. We complete the motif with a connecting loop in the first ray. We cut the thread and fasten it.

If you want to use a snowflake as a Christmas tree decoration, you will need to tie a loop and starch the product.


The snowflake is ready! The master class was prepared by Svetlana Chalkina.

Plasticine mittens - winter craft
What could be warmer and more pleasant than warm woolen mittens that warm your hands on a frosty day. If you make them with your own hands, for example, from plasticine, then such a craft can rightfully be considered a winter craft. With these mittens you can catch the magic winter's tale, because they are made with love and will definitely come in handy as a gift made from the heart.
On the eve of the New Year, copies of Christmas trees, Father Frost and Snow Maiden are usually made. The mittens offered are unique, the craft is not similar to others. And it will be all the more interesting to make it with children, especially since it is so simple.

What you need to use to sculpt mittens:
- white and blue plasticine;
- a small strip of lace to create a believable knitted texture;
- toothpick
How to make mittens from plasticine
The white and blue set is a very good option for sculpting the chosen craft. Mittens should be woolen, knitted, cozy. They are indispensable in the cold season, when there are snowdrifts on the streets, the sun shines brightly, but does not warm. We definitely buy new accessories for ourselves and never go out without taking this important thing.

First, make soft pellets to create the top of the craft. You need to prepare 2 balls of different sizes. The larger one will be for the palm, the smaller one for the thumb cell. Soften the plasticine in your hands and immediately proceed to the next step.

Press down the larger and smaller white pieces to form flat cakes. Then, on one side, lightly squeeze on both sides, on the other, on the contrary, round and smooth with your fingers. Lock your palm and thumb together. Smooth out the joint. The body of the craft itself is ready. You shouldn't stop at this stage either. You need to act quickly while the plasticine is still warm. Now we need to create a knitted texture.

Make the bottom part - blue cuffs for accessories. Pull two blue pieces into flat cakes.

While the plasticine on the white part of the craft has not yet hardened, make a lace surface, or rather, an imitation of it, using a piece of lace. Press the lace onto the soft plasticine and apply slight pressure with your fingers onto its surface. After you remove the fabric, an imprint will remain on the soft surface that will be very similar to the desired texture.
Instead of lace, something knitted, such as a napkin or even socks, will also work. Experiment and be surprised, because this is what it is unusual way applying a relief pattern to a plasticine surface.

Make both mittens textured. On a blue background, use a toothpick to also create a knitting effect by drawing small notches.

Pin the mittens together to complete your craft project.

Interesting winter option for children's creativity it is done very quickly. In the process of work, children will learn not only to create parts different shapes and size from plasticine, but also to create unusual relief patterns on a smooth surface. Now think about what other plasticine-knitted items you can make. For example, model a hat or sweater using the same scenario.
New Year's deer made of felt - DIY craft

New Year's deer is a very common symbol of the upcoming holiday. Soft toy in the form of this cute animal, made with your own hands, can serve as great decoration New Year's tree, as well as a pleasant souvenir given from the bottom of my heart.
The process of sewing a deer is a very exciting activity and, at the same time, quite simple, which even a primary school student can handle.
For work we will need the following materials:
- Medium density felt, brown or gray;
- paper;
- pen or thin chalk;
- threads to match the felt or in a contrasting color;
- padding polyester or other filler;
- ready-made eyes or beads;
- sequins, beads or beads.
Draw the silhouette of a deer on paper or print out a ready-made template and cut it out.

We transfer the image onto felt and carefully cut it out in duplicate.


We are preparing decor that will make the deer brighter and more festive. In our case, the decoration is a snowflake, crocheted from the remains of red threads. We cast on 11 air loops and close them into a ring, then perform 14 sc (single crochet) inside the ring.

Using a double crochet (dc), we knit a “flower”, trying to distribute all the stitches evenly.

In the formed arcs between the dc we knit 5 dc, between which we make arches of 10 dc. loops

We tie the resulting element sc, knitting a picot from 3 air. loops approximately in the middle of the arch.

Iron the resulting snowflake with a hot iron, trying to give it the correct shape.

Sew a snowflake to one side of the deer. The middle of the snowflake can be decorated with sequins and beads or a button.


Glue on the eyes.

We prepare the padding polyester and sew the blanks together, starting with the horns. It should be noted that there is no need to stuff the toy with padding polyester too tightly, as this may cause the seams to become uneven.


New Year's souvenir is ready!

DIY New Year's topiary


DIY candles - crafts for the New Year
Candles have always been an integral attribute of any holiday, romantic evening. After each celebration, you most likely throw away candle stubs that could have been put to good use. If you have accumulated candle stubs, you can make new candles with your own hands.

Necessary materials:
- Old candles;
- toothpicks;
- small sticks;
- molds.

You need to melt the wax until it becomes completely liquid. To do this, place the wax in molds in a water bath.

Preparing the molds.

When the wax has already become liquid, pour it into the prepared molds.

You can use a cotton thread as a wick, or take it from old candles. To prevent it from floating, we take a metal holder from the old candle and attach the wick.


Then we immerse it in wax.

Place any stick on top to secure the wick.


Let the candles dry for a day.


When the candles are dry, remove them from the molds. To do this, put them in boiling water for a few seconds.

To decorate the candles, I used gold ribbon and paper napkin. After I wrapped the candles, they became more festive.

To decorate the candle in the glass, I used a Christmas tree decoration, tying it to the glass.

So in a simple way You can make New Year's candles with your own hands. You can experiment with different molds, or decorate finished candles with coffee beans.

Step-by-step master class with photos on how to make it -.


DIY New Year's composition with hats
Create a New Year's atmosphere in your home with a fun arrangement of miniature hats. This master class is ideal for creative activities with children.

Necessary materials:
- Multi-colored knitting threads;
- a cylinder made of thin cardboard;
- white acrylic paint;
- dry branch without leaves;
- glass bottle of wine or champagne.

Let's make hats from threads. Take a cardboard cylinder and cut it into rings 1.5–2 cm wide. You can also make rings yourself from thick paper, fixing them with a stapler.

Cut 30 cm of thread and fold it in half. You will need approximately 30–40 such pieces, depending on the diameter of the ring.


Thread the thread, folded in half, into the paper ring. Thread its ends into the resulting loop and tighten the resulting knot.


Tie the remaining threads on the ring in the same way. Try to place them close to each other, avoiding the formation of gaps.


When the ring is completely braided, thread the ends of the threads through it, as if turning it inside out.


Tie the ends of the threads using an additional thread of the same color.

Trim the ends of the threads, forming a neat pompom on the hat.

Straighten the cap from the inside, making it more voluminous. Fluff the pompom.


Make hats in other colors in the same way.

Let's make a small winter composition. To do this, you will need a small dry branch, which can be found in the park.

Paint it white, creating the effect of a snow-covered winter branch. Leave it to dry.


Take an empty one glass bottle and apply 2 coats of acrylic paint evenly, being careful not to leave very visible brush strokes. Let it dry completely.


Putting the composition together. Place the branch in the bottle. Put caps on small branches. You can decorate the branch using threads and beads.


Detailed master classes with step by step photos Here - .


Wreath for New Year and Christmas from willow branches
The next master class is “Do-it-yourself Christmas wreath.”

To make the decoration we will take the following materials:
- Willow twigs (medium thickness);
- New Year's tinsel;
- cones;
- items for decorating cones (paints, glitter, beads, rhinestones, etc.);
- moment glue, thin copper wire or nylon threads for attaching decorative elements.
Important! To prevent the vine from breaking, you need to weave it as soon as it is broken. If the branches dry out, nothing will work.
Let's start forming the wreath.

We take several thin branches (long ones) at once and form a ring, intertwining them with each other.

If it doesn't work out right away correct form, don’t be upset, with subsequent weaving the ring will even out. It is necessary to weave the vine by securing the end between the rods of the previous circle.

Thus, we continue to weave the wreath to the required size.

The basis for the festive wreath is ready, now you can move on to the decoration.

We take tinsel and wrap the finished ring so that the gaps are visible. At the bottom of the wreath we leave a little space for attaching decorative cones.

Let's move on to decorating the cones. To do this, you can use everything you have enough imagination for (paints, rhinestones, beads, ribbons, glitter, and so on).

The end result was these beautiful decorative cones.

To attach the cones to the wreath, you can use instant glue, thin copper wire or nylon thread. In my case, moment glue was used.
That's it, the wreath holiday decoration home ready. A minimum of effort and time was spent, but maximum pleasure was gained from spending time.
You can even get the whole family involved. This way everything will be much more interesting.

New Year's crafts - DIY felt boots
You can put a New Year's gift for your child in a felt boot that you sew with your own hands.


You can hang this textile decor on a Christmas tree or a doorknob.

To work you will need:
- A piece of fabric;
- edging for top;
- decorative braid and beads for decoration.
If the fabric is thin, you can make the felt boots double - lined, it will look more voluminous and presentable.
Decide on the size of your boot. Re-make the felt boots pattern. It is as simple as possible, you can draw it yourself, leave a little space for seam allowances.

Since in this case the fabric chosen for the felt boots was raincoat fabric, the pattern was also transferred to the lining.

Secure the fabric with pins, sew along the line, and cut out the blank.


In the rounded areas, carefully make cuts with sharp scissors. Turn the boots inside out.


Felt or a thin strip of fur is suitable for edging. The remnants of coat fabric are used here.

Decorate your boot with snowflakes or applique. Sew on a loop so that the felt boots can be hung. Make the buboes from a small piece of bouclé, collected and sewn into a ball.


Such a boot can be useful not only as packaging, but also as decoration.
New Year's boot with a bunny
New Year's gifts are the most desirable for all children. They write letters to Santa Claus, asking him to give them toys and sweets. Then they expect all their desires to be fulfilled. A good wizard always responds to their requests. Under the Christmas tree New Year's Eve children find plush bunnies and bear cubs, dolls and baby dolls. You can also make a gift in the form of a craft with your own hands from any materials available for children’s creativity, for example, plasticine.
This lesson shows the stages of making a plasticine craft for the New Year in the form of a bright boot with a bow, filled with gifts, the main one of which is a white bunny.

For sculpting New Year's gift prepare:
- white, red, blue, black, green plasticine;
- tool.
How to make a New Year's craft from plasticine
The plasticine set contains not just bars, but a whole treasure, toys, accessories, even gifts for the New Year. All products are easy to make yourself, having at hand detailed instructions, which is what this one is detailed master class. Fantasize and enjoy the creative process.

To begin, take red plasticine and knead it thoroughly in your hands. Form a boot from the soft mass. Pull the mass into a cylindrical part, then pull out the resulting cylinder on one side and press it with your fingers at a right angle.
In the right places, simply smooth the surface of the boot, giving it a believable appearance. The base of the craft is ready. Of course, in reality, the part should be hollow inside, but we will not cut a hole, and we will simply place the bunny toy on top, or rather, we will only make its upper part.

To decorate your New Year's product, pull out several threads of white, green, of blue color. Roll out the soft mass with your fingers with light pressure, pressing it onto a hard surface.

Use a thin green sausage to make a edging for the boot top. Use a blue sausage to model a bow - it will look very beautiful on a gift. Twist the white and red sausages into a flagellum. Press down over the entire surface. Trim off the excess on both sides. Then bend it so that you get Santa Claus's staff.

Form blanks for the top part of the bunny figurine. U plush toy we will show only the head with long ears and front paws. Use white plasticine for modeling.

Glue white cheeks onto the head ball and pierce them with a toothpick, showing the hairiness. Attach black eyes and nose. Shape the remaining white pieces into the shape of ears and paws.

Glue the parts to the top of the red boot so that the impression remains that the bunny is sitting inside and just looking out.

Add the decorative elements prepared earlier. Place a white and red staff near the bunny's head. Add a bow to the top of the boot.

A unique plasticine gift dedicated to your favorite holiday - New Year - is ready. Having made the same base, you can put a bear or a gingerbread man in the boot. Any option will be welcome and so cute.


You can also involve children in making the following New Year crafts. Such joint creativity will bring great joy to both children and parents. After all, for the winter holidays you want to decorate your home in a special way. No need to own complex techniques handicrafts, you can try to make something interesting from plain white paper.
We all learned to carve as children. lace snowflakes made of paper folded in several layers. But decorating your home with snowflakes is too banal and simple. Use your imagination, let it openwork weaving will turn into dresses for graceful ballerinas floating under the ceiling.

For work you will need the following materials:
- Sheets of white paper;
- scissors;
- pencil;
- fishing line

First, on paper, draw with a pencil the silhouettes of graceful ballerinas who raise their legs and move their arms to the sides. Or download ready-made ballerina templates. Cut out their images along the outline. Then make the most openwork snowflakes so that they are fluffy and light.

Try to cut the hole in the center so that the ballerina can fit into it. Glue snowflakes at the dancers' waist level.

Watch the video tutorial on how to do this Christmas decoration- DIY ballerina snowflakes.
Volumetric foam snowflakes
The same openwork snowflakes made of paper are taken as a basis, the design is transferred, for example, to polystyrene foam or polystyrene foam. Using a sharp knife, all the necessary elements are cut out, and the result is unusually beautiful, voluminous snowflakes.
DIY New Year's toys.


New Year's bustle with gifts and preparation holiday menu This also applies to home and office decoration. Decorating the room creates festive mood and helps you forget about fatigue and the annual report.
Crafts on New Year theme make it possible to awaken the dreamer and inventor in the soul. Involving children of any age in the process helps strengthen family traditions and values.
Any material at hand is suitable for crafts; if you wish, you can buy something in handicraft stores. Don’t be afraid of experiments: it is non-standard solutions that attract attention and deserve admiration.
Will complement the exclusive interior of cardboard boxes, which we already talked about earlier.
New Year's figures: Santa Claus, Snow Maiden, Snowman
Well, what's the New Year without the main characters? Flat or voluminous, made of paper or plastic, simple or complex - there are plenty of options for every taste. It all depends on the time you are willing to spend on the craft and patience.
Santa Claus made of cardboard and felt
To make a cheerful and cute Santa Claus you will need: a toilet paper roll (or a cylinder of the required size from cardboard), small scraps of red, white, black and yellow felt, glue, cardboard and 2 beads or buttons for the eyes.

Manufacturing process:
- cover the sleeve with red felt;
- cut out felt and glue a black “belt” and “plaque”;
- from white felt we make a “face”, “beard”, “mustache” and “nose”;
- We make a cap from red felt, glue it, and cover the seam with a white felt ribbon, like a real hat;
- from cardboard and black felt we make a flat base for a figure in the form of boots;
- We make handles in mittens from red and white felt and glue them to the “body”;
- At the tip of the cap we make a white pom-pom (glue two felt disks together);
- glue on bead eyes and a red mouth.

The craft can be placed or hung on the Christmas tree. In the second case, when making a pompom, they glue between the disks beautiful ribbon or shiny lace.
Santa Claus from a plastic bottle
For the craft you need to prepare: a plastic bottle (volume 0.5-1 liter), red and white acrylic paints, glue, scissors, black marker and white thread.

Manufacturing process:
- paint the bottle red or cover it with paper;
- we draw the eyes with a marker (here you can improvise: “sly squint”, “mischievous wink”, “delight”);
- for the beard and hat we glue the material and paint it with white paint;
- Glue a thread pompom onto the bottle cap;
- draw snowflakes and mittens;
- Cut out a snowflake from felt and glue it to the hat.
The finished figure of Santa Claus can be decorated with sparkles or tinsel.
Clay Snow Maiden
An interesting version of crafts made from modeling clay, suitable for both kindergarten, and for home decor. The Snow Maiden figurine turns out to be hollow.

The sculpting technique includes the following steps:
- from “sausages” of medium thickness we make a pyramid (smoothing the seams to get a solid, even figure);
- for the head we roll a ball, which we secure with a match;
- we braid a braid from thin flagella, make a “fur” frill and a collar for a fur coat, a kokoshnik and sleeves with mittens;
- When the figure hardens, we begin to paint (mix the paint with glue).
You can make other New Year's characters in a similar way.
Paper Snow Maiden
To make a cheerful Snow Maiden from paper you will need cardboard, colored paper, glue and pencils.

We roll a sheet of cardboard into a cone and get a base, which we then cover with blue paper. We also make sleeves from cardboard.
On thick white paper we draw the Snow Maiden’s face with pigtails and carefully cut it out. From white paper we cut out the openwork trim of the “fur coat”.
Glue all the parts together and, if desired, draw on the decorative elements with a marker. Instead of blue colored paper, you can take white paper and color it with a pencil.
Snowman made from white plastic cups

The craft can be of different sizes, but it will be equally easy to work with due to its light weight. You need to prepare: several packages of disposable cups, a stationery stapler, glue, colored cardboard for a cap, a marker and an old scarf.
Manufacturing process:
- we connect the cups around the circle using a stapler (orient the bottom towards the center of the circle);
- adding rows, we get the first hemisphere;
- we make the second hemisphere unfinished (without a top) so that the sphere stands stably on a flat surface;
- we connect the parts with a stapler and get a “lump”;
- in the same way we make a second “lump” of smaller radius;
- glue two spheres together;
- We make a cap from cardboard (you can sew it from fabric or take a ready-made one);
- we make eyes, nose and mouth;
- we decorate the buttons (you can put tinsel, a wad of foil or colored paper in the required cups).

Come up with original decoration The snowman is quite simple.
Snowman made of thread and glue

For this craft you will need: white threads (preferably thick ones for knitting), PVA glue, 4 balloons, colored paper and felt-tip pens.
Manufacturing process:
- inflate air balloons the required sizes (torso, head and arms);
- wrap each ball with thread dipped in glue and leave to dry;
- after a day, we pierce the balls with a needle and remove the scraps;
- from the resulting white balls we collect and glue the figure of a Snowman;
- we make eyes, a nose and a smile from paper or draw with felt-tip pens;
- create a headdress - a paper bucket;
- tie a wide ribbon children's scarf or tinsel.

To complete the composition, you can make a broom from a wooden kebab skewer and wide ribbons of colored paper.
Decorative Christmas tree
The Christmas tree, which is usually decorated, is recognized as the indisputable and permanent symbol of the New Year. But the Christmas tree itself can become a decoration. Introducing 5 best options decorative New Year tree.
Christmas tree made of pine cones

A small but cute Christmas tree will be made from a beautiful pine cone (fir cones are smaller and more elongated). Possible different variants coloring and decoration.
To make the Christmas tree look more realistic, “plant” it in a small plastic flower pot (flowers are sold in stores in them, but after transplanting into a ceramic pot they often do not find use at home). You can also make a pot from puff pastry or plasticine.
Fluffy Christmas tree with sweets

New Year's holidays were remembered from childhood by the aroma of chocolates. It will be great if a New Year's harbinger, strewn with sweets, appears on your desktop. We make a cone from white cardboard. Starting from the bottom, glue green tinsel in a circle, alternating each row with a row of candies. The top of the Christmas tree can be decorated with a star made of colored paper or candy. Instead of chocolates, you can use different sweets.
Vegetable tree

For registration festive table You can make a Christmas tree out of cauliflower. Small or chopped carrots, pomegranate seeds, and tangerine skin clippings are suitable as decorations. You can hold the cabbage florets together with puff pastry.
Christmas tree made of threads “with lights”

A simple Christmas tree made of threads with the light of a tea candle flickering inside will fill your home with coziness. To make it, we wind any threads soaked in glue onto a cone of the required size.
After 24 hours, when the glue has dried, take out the cone and decorate the craft with beads or other small and light decor.
Natural mini-Christmas tree made from spruce branches

When there is no room in the apartment for a real spruce, but you really want a resinous smell, you should think about creating a mini version from small branches. To do this, place an elongated piece of floral sponge in a decorative bowl or clay pot.
At the next stage, the branches are evenly stuck into the sponge, repeating the silhouette of a real Christmas tree. You can decorate the finished composition with physalis, dried flowers or dried orange slices (natural spruce branches go better with natural materials).
DIY Christmas tree toys
Toys self made unique designs are more popular and create a special atmosphere in the interior.
Gnomes from fir cones and felt

Cute toys with pendants will be a great decoration. There are many different variations and room for creativity.
Felt Snow Maiden

The Snow Maiden can be made using finished pattern or prepare your own version on paper. In the pattern you need to take into account all the elements. We decorate the finished figurine with beads or sparkles.
Garland of woven paper balls

Eat different techniques weaving 3D figures from paper. The simplest of them: cut colored paper into strips, take one strip and glue it into a ring, intertwine two more strips and also glue it into a ring.
For balls of small diameter you need to take strips of 8-10 cm. The larger the ball, the large quantity strips will be required. We string the finished balls onto a ribbon or decorative rope and get a bright multi-colored garland.
Northern penguins from plastic bottles

All you need for the craft is an even number of bottles (if there are any) different volumes, you’ll get a funny family), threads for pompoms, scraps for cutting scarves and multi-colored acrylic paints. Coloring does not require artist skills - just desire and a festive mood.
Plastic snowflakes

A wonderful decoration in the form of multi-colored snowflakes can be made from the bottoms of plastic bottles of any size: cut off the bottom, use a hot nail to make a hole for the ribbon and paint with felt-tip pens or draw patterns.
Button decoration

Buttons are actively used in needlework to decorate any crafts. In building Christmas tree decoration Both decorative buttons of the same color and old unnecessary buttons can be used. The elements are strung on copper wire, and the junction of the two ends is decorated with a bright ribbon bow. A similar version of the craft is a vertical decoration in the form of an icicle.
The symbol of the coming 2018 is the Earth Dog
When decorating the interior, you cannot ignore the “mistress” of 2018 - the Earth Dog. In 2019, the relay race according to the eastern calendar will be continued by the Yellow Pig, and in 2020 by the White Rat.
White dog made from cotton balls

For the craft, a cardboard frame is first made, which is covered with cotton balls or pieces of cotton swabs.
Pompom dog

You will get a cute puppy from pompoms. For the craft, take two pom-poms of the same size (head and torso) and one small one (nose).

We tie the pompoms together with thread and glue the felt ears. For the eyes, you can take black beads, and for the nose, sew a lump of black material.
Cute felt puppies

A great idea would be to hang funny felt puppies on the Christmas tree. The pattern for the craft is easy to make yourself.
Funny puppy made from socks

To create such a dog, you will need basic cutting and sewing skills. Initially, the future body and head are formed from one sock, which are filled with padding polyester and then separated by tightening them with threads. Afterwards the head is completed with eyes, a mustache and eyebrows are embroidered.

From the other two socks, a pattern is made for the ears, paws and tail, which are also filled with padding polyester and secured to the body.
Selected ideas for crafts for the New Year 2018 will help make the interior not boring and magical in a festive way. More ideas on New Year's decoration V .
All the people are looking forward to winter holidays. This is a time of fun, celebration and Have a good mood. To create the appropriate atmosphere, you can make interesting crafts with your own hands. This exciting activity is sure to please both children and adults.
You don't need to have any experience to do this. Toys, symbols and crafts can be made from various materials and improvised items. Plus, you can save on buying Christmas tree decorations or New Year's souvenirs.
The symbol of next year will be the earth dog, so be sure to prepare a toy in honor of this good-natured animal. There are many craft options out there, so there are plenty to choose from.
Of course, in one article it is impossible to describe the instructions for making all possible New Year's crafts. But you will learn a few interesting options. You can use them or come up with something original.

On New Year It’s nice not only to receive gifts, but also to give. Handmade gifts are especially appreciated. Since the mistress of the coming year will be a dog, it is necessary to prepare the appropriate craft.
Paper dog for small children

If you take just a few minutes, you can make your own origami dog. Young children will really like this craft. To do this, you need to prepare a square piece of white or yellow paper.

Now the paper needs to be folded diagonally. This will be the head of the future dog.

Now you need to form the ears. To do this, the extreme corners need to be folded at a short distance, the tips should extend beyond the edges of the paper, as shown in the image.

To make a muzzle, you need to turn the bottom corner up.

Now the craft needs to be decorated. To do this, you can use a marker and draw eyes with a nose. But it’s better to draw them on a separate sheet and cut them out, then glue them to the craft. Cut out a tongue from colored paper. Place a dot in the place for the antennae with a marker.

That's all. This craft can be done within five minutes.
Towel dog

From ordinary kitchen towels you can make interesting toy. First you need to fold a small towel in half to determine the middle. Then roll the rolls on both sides towards the center.

Now they need to be folded in half and secured with an elastic band or thread that matches the color.

To form the muzzle, you need to flatten the upper part of the workpiece, pull it forward a little and also secure it with an elastic band.

Now take the ribbon, fold it in half and tie the ends, pull it through the hole behind the muzzle.


The ears are ready, now you need to make the eyes. To do this, you need to fold a sheet of black paper in half, cut out the eyes of the required size, put them on an elastic band and glue the edges. Now you need to thread the elastic band under the ears and straighten the dog’s eyes.

Now all that remains is to glue the nose.

Such a simple way to make a beautiful toy.
Dog made from plastic bottles

For this craft we will need the following materials:
- 3 bottles of 250 ml.
- 30 traffic jams.
- 8 larger diameter plugs.
- Styrofoam.
- Glue.
- Wood burning tool.
The first bottle needs to be burned into a circle at the bottom, as shown in the photo below.

Apply a layer of glue at the base of the neck of the second bottle.

Now the two bottles need to be connected and fixed. Don't forget to remove the labels.

Now you need to glue 14 pairs of corks.

The first pair needs to be glued in the middle of the bottom bottle.

After this, you need to glue the third bottle, as shown in the photo.

Wait for the glue to harden. After this, you need to glue the corks on the side of the first bottle, closer to the neck, and in the middle of the second bottle. Do the same on the other side.

Now take plugs with a large diameter and glue them together. You should now have four pairs.

Now they need to be glued together with two pairs of small plugs.

The paws are ready, now they need to be glued to the base.

The next step is to fix your eyes.

You also need to glue pairs of plugs to the tail.

The dog needs to be painted in any color that you like best. If the animal is a girl, then make a bow out of felt. Carefully cut out a bone from the foam. Draw pupils on the eyes and glue a black plug in place of the nose.

The beautiful dog is ready.

As you can see, nothing complicated. Even children can handle this craft.
Crafts for school from pine cones

To develop motor skills in the imagination of children, it is necessary to instill a love of love from early childhood. creative activities. To do this, you can make various crafts. You can start before the New Year holidays. The cones are excellent material, from which you can make various souvenirs, gifts, figurines, and decorative items.
New Year's wreath

- First you need to prepare the foundation. Any newspaper will do for this. It needs to be twisted into a tube, rolled into a circle and secured with a stapler. To fix the shape, it is recommended to wrap the ring with tape.
- Glue the pine cones around the base using a glue gun.
- If desired, coat the craft with varnish or paint.
Christmas tree made of pine cones

It is impossible to imagine New Year's holidays without a Christmas tree. But natural wood cannot always be placed indoors. In this case, children can make their own Christmas tree from pine cones.
To do this you need to follow a few simple steps:
- Make a cone of the future tree from cardboard.
- Using a glue gun, glue the pine cones with the open side outward to the prepared base.
- Cover the craft with green or golden acrylic paint.
- When the paint is dry, decorate the New Year's beauty with sparkles, toys, and various beads.
Christmas decorations

The children can make their own New Year's toys for the school tree.
- To begin, tie a thread to the base of the pine cone.
- Cover it with paint using a regular sponge, and sprinkle with glitter if desired.
- To make the paint dry faster, you need to hang the cone.
- In order for the toy to be preserved for many years, it is recommended to varnish it.
- You can glue a ribbon in the form of a bow to the base.
Animals made from pine cones

- A head for animals can be made from pompoms. They are easy to make with your own hands. To do this, prepare two circles of cardboard, cut out the middle and wind threads around them. Then cut the threads along the edges, remove the cardboard and pull over the middle. You can use beads for the nose and eyes.
- Paint the cone in the required color, glue the head and other parts of the body to it.
Toys made from pine cones and acorns

Even kids can make this craft. To do this, you need to prepare the open cones and glue the acorns to them using plasticine. Eyes, mouth and nose need to be drawn on paper, cut out and pasted.
Other options for New Year's crafts from pine cones
You can make many DIY crafts from natural materials. Below, see examples of such creativity.


You can make a wide variety of interesting crafts from cones. Therefore, you can definitely come up with something to make for your child’s school.
Crafts for home from magazine (paper)
From plain paper, newspaper or magazine, you can make a wide variety of crafts for the New Year holiday.
If you have experience in weaving, then you may find the photo instructions for making a Christmas tree useful.


Paper cones

You can use a foam ball or crumpled paper as a base. First you need to cut strips 2.5 cm wide.

Then the strips need to be cut into squares, which need to be folded, as shown in the photo below.

You need to attach the blanks to the prepared ball. To do this, you can use glue or pins. You need to start from the bottom row.

Glue a thread or ribbon to the top. You can make paper leaves to decorate the cones.

This craft will be an excellent decoration for a New Year tree or room decoration.
Crafts in quilling style

For this craft we will need old magazines. You need to cut strips out of them. Their width should be approximately 5 cm. Now you need to fold them across, then straighten them and then bend the edges towards the center, and then fold the strip in half. Look at the image to see what this process looks like.

The prepared strips need to be twisted into circles. To prevent them from falling apart, add a small amount of glue.

Now we need a baking dish. In the example we used the star shape. You need to do several circles. After this, fold the strip, as we did at the very beginning, and lay it around the perimeter of the mold. Then lay out the circles, connecting them with glue.

When the glue dries, you need to remove our workpiece from the mold. Thread a string so that you have something to hang it from.
3 Ddroplet

You need to make a droplet-shaped template from cardboard. Then use it to prepare a piece of colored paper. The drops need to be folded into one stack and the middle cut out as shown in the image.

Then you need to carefully glue the sides together. For volumetric crafts you will need approximately 16 drops.

Attach a thread or ribbon at the top.
Check out some more paper craft ideas.


Use a little imagination and come up with something original. After all, there are a huge number of ideas.
The most interesting crafts
Let's look at a few more options for New Year's crafts made from different materials.
Snowman

An interesting toy can be made from ordinary high socks white.

Prepare rice cereal and fill the bottom of the golf course with it.
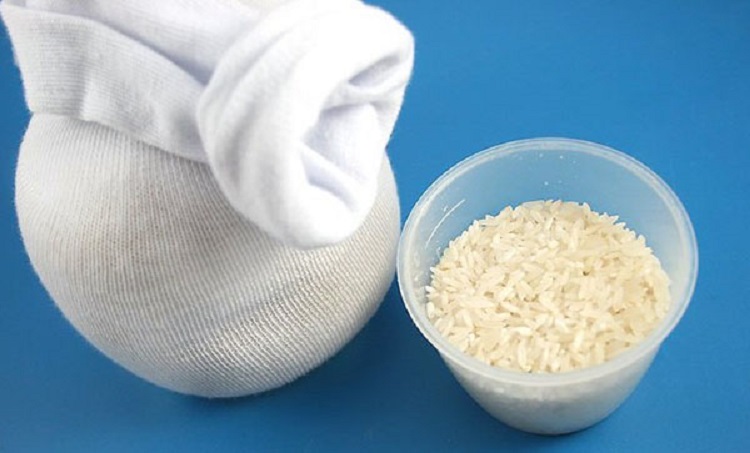
Now the filled part needs to be tied with an elastic band. Now you need to make the middle part of the snowman, which should be slightly smaller.

The third part needs to be filled with cotton wool.

Secure the top with an elastic band or rope. Shape the toy so that it is stable.

The remaining part of the sock needs to be folded. This will be the snowman's hat.

Make a mouth and eyes from pieces of felt.

Make a scarf from a multi-colored piece of fabric or ribbon.

Make hands from twigs.

If desired, the hat can be decorated.

Find a suitable option for the nose. You can decorate your snowman in many different ways.

Father Frost

You can make the main character out of puff pastry New Year's holidays. To do this, you need to knead the mass so that it lags behind your hands, and then put it in plastic bag. From a small piece you need to form a ball and flatten it a little, then put it in a foil cone. Roll out the workpiece. The result will be a base.
Make a small sausage out of the dough and secure it at the base of the cap. Another sausage will be needed for the collar. For the nose you need to make a small ball.
Make another small sausage, twist it like a rope and press down the edges. This way you will have a beard that needs to be secured to the base. Make a mustache from two pieces.
Use the remaining dough to form hands and mittens. Place the craft in the freezer and within a day you can color and decorate Santa Claus as you wish.
A few more ideas

Christmas decorations made from light bulbs

A ball of thread soaked in glue

Volumetric paper snowflake

As you can see ideas interesting crafts so many. You can choose the appropriate option or come up with an original New Year’s craft that you can easily make with your own hands.
One of the most long-awaited holidays, uniting disparate families and filling the house with a cozy and peaceful atmosphere is the New Year. With a little effort and some creative ingenuity, you can spend the winter holidays in a fun and original way, even without significant financial investments. Our section will help you with this “ Crafts for the New Year».
The unifying theme for all New Year's crafts is snowy winter, sparkling toys and unbridled fun. New Year's crafts collected in our section can be given to relatives and friends, to please school teachers and classmates. You can spend many happy moments with your child making beautiful and useful New Year's crafts.
Here you will find a variety of ways to make Christmas tree decorations, elements New Year's decor for home, greeting cards and fairy figurines.
Among the most popular New Year's crafts posted in our section are the following groups:
Christmas decorations in the form of balls, mini-figurines, stars and lanterns
Snowflakes made of paper, beads and wire
Figurines New Year's characters in the form of snowmen, Santa Clauses and Snow Maidens
New Year's garlands with decorated photographs of loved ones and friends
Greeting Cards from cardboard, foil and scrap materials
Glowing decorative elements using LED elements.
The distinctive features of New Year's crafts are that they can be made for individual gifts to loved ones, and also used as holiday decor. By taking with them a New Year's craft made by your children, each guest will bring a piece of happiness and New Year's mood into their home, and a unique gift will remind them of the New Year's holidays spent together for a long time.
Many parents are apprehensive about the start of sales. New Year's toys, factory garlands and various Christmas tree tinsel. It is quite difficult to pass by such splendor, and it is very expensive to purchase everything that your beloved child desires. At the same time, produced together with the child Christmas decorations Made from scrap materials will not only help you save money on real gifts, but will also bring much more joy to your baby. After all, the attention that you give to the child in the process joint creativity, is appreciated by the baby and pleases him much more than purchased jewelry.