Sewing tilda toys is a hobby for girls with a good soul. Tilda doll patterns for beginners with their own hands Patterns of toys in the form of a tilde
I first met Tilda a couple of years ago at some needlework forum. This naive rosy-cheeked and so cozy doll fell in love with me at first sight. I generally like everything so unusual, vintage and beautiful. Once upon a time in my youth I sewed toys, so I had a burning desire to try to make Tilda, because there is nothing complicated about it. The main thing is the details and endurance of a unique, characteristic only to her, style.
My first pattern was intended for beginner wizards, but I still use it to this day, having slightly changed and improved the proportions. Large parts are easier to sew than small ones, although longer, especially by hand. Therefore, for starters, it’s worth practicing on tall dolls. How to sew such a Tilda-style Doll, I will tell you now.
Materials for sewing Tilda for beginners
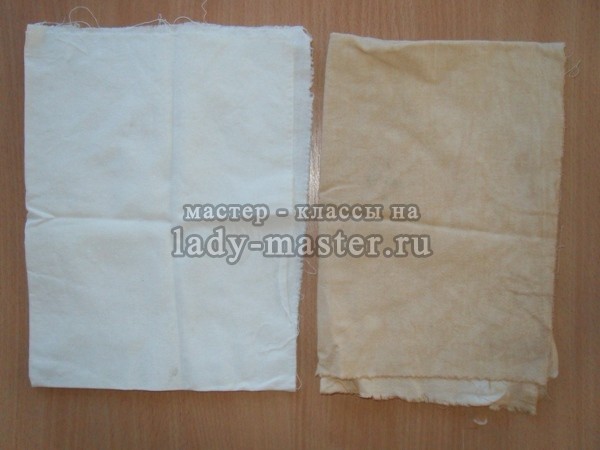
We will need several pieces of fabric of different colors, but always from natural fibers. I did not buy anything, everything was found at home in stocks of old clothes. For the body and clothes I used cotton - white and in small flowers. The sleeve from an old woolen sweater came up as hair, which I unraveled to get wonderful curls. I also used lace to decorate Tilda's blouse and shoes. As well as two small buttons, braid for the same shoes, two decorative flowers in the hair, a thin white ribbon to stretch into pantaloons. These decorative little things can also be found at home, for example, cut buttons from old things, tear off lace from a blouse that has long been boring. For work, you will need white, black and red threads (my Tilda has a mouth), blush, padding polyester, scissors, paper, a pen, pins and a needle.

The working process
1. On paper, wallpaper or newspaper, you need to draw a pattern for the future Tilda. The optimal size for the first experiment from the top of the head to the edges of the legs is 50-60 cm. Cut out the finished pattern.


2. Next, take the fabric from which the doll's body will be sewn. If there is no material of a suitable (dark beige, flesh, light brown) color, you can make it that way. Ordinary white cotton perfectly turns into a pleasant swarthy color if it is soaked for several hours in coffee or thick tea infusion. I used coffee: good effect and aroma.
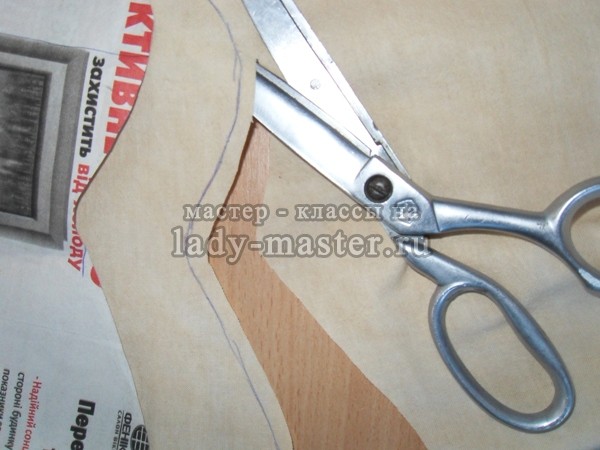
3. All fabrics with which you will work must be ironed so that there are no folds or wrinkles. Lay the pattern on a flat rag cloth and circle it with a pen. Each part requires two copies - back and front.

4. It is necessary to cut the pattern not along the very contour of the pattern, but with an indent of 0.5 cm at least. This margin is necessary so that the edges do not fray after stitching.
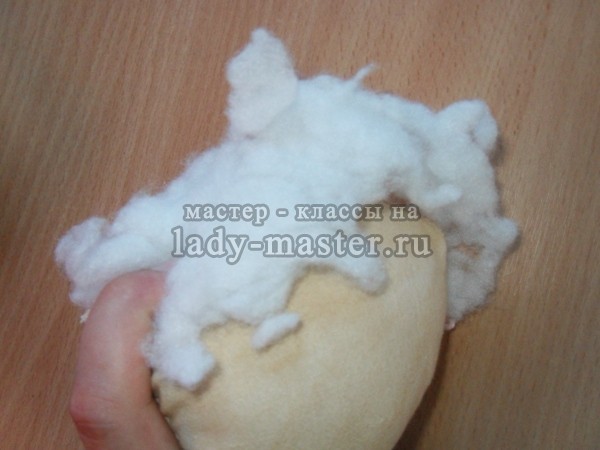
5. When everything is already cut, it's time to sew the details. It is easier and more convenient to do this with a regular laying stitch, making small, even stitches and following the lines drawn on the fabric. Leave the bottom of the torso, arms and legs at the bases unsewn, so that later they can be stuffed through the holes with filler.
6. Finished parts must first be turned out. To make it neat, because the neck and limbs are rather thin parts, use a pencil or pen, just stick the blunt edge inside. Carefully and with a moderate density, fill all parts of the body of the toy with synthetic winterizer, after filling the holes, fasten with pins so that the filler does not come out back and it is more convenient to connect everything together.
7. Sew on the arms, sew the legs in a straight line, tucking a little edge on the body so that the threads do not climb and look aesthetically pleasing.

8. In the area of \u200b\u200bthe elbows and knees of the doll, it is necessary to make tightenings so that they can bend (make several even stitches, pulling the thread well and pressing the synthetic winterizer inside).

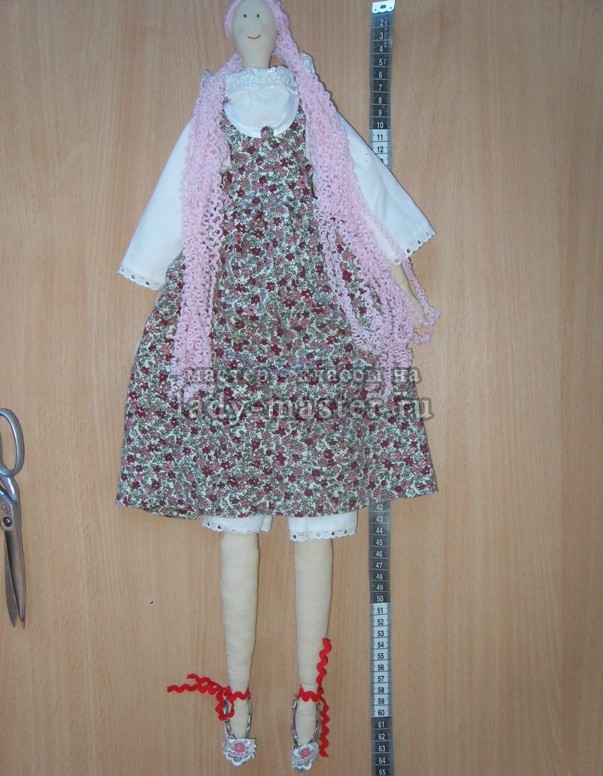
9. The body is ready, now it remains to dress it and give it a human face. Clothes for Tilda can be sewn according to your own taste. The standard option is a colorful sundress, white blouse and underpants.

10. A pattern for underpants can be made according to the same pattern that was sewn for a doll, measuring the desired length - approximately from the line just above the waist and to the knee, adding in width so that they come out lush, and not tight. Pants are sewn from two identical parts, the upper edge is tucked and hemmed, leaving a cavity inside it, and the lower edges are decorated with lace. Pull the tape through the hole in the hemmed top to fix the underpants on the Tilda figure.

11. A blouse can also be made from two identical halves that are sewn together. I made it a little more complicated - I separately cut a sleeveless jacket with a longitudinal slit on the back for ease of dressing and sleeves for it. Then she sewed, collecting small folds on the sleeves in the area of the shoulders to make them more magnificent. Cuffs and collar, as well as underpants, were decorated with lace.

12. Sundress consists of upper and lower parts. The top is a short top with the same vertical slit at the back, the edges of which overlap each other a little, like the blouse.

The bottom is a fluffy skirt slightly above the knees, for which it is necessary to take a fabric two to three times the width of the top in order to make frills during stitching with a connecting buttonhole. When the top and skirt are already together, connect the hem, do not forget to hem the bottom edge.

13. On the back of the sundress there should be buttons for fixing. Sew them on, make and process holes for fastening. The area around the neck can either be hemmed or decorated with a thin light ribbon.

14. Shoes for Tilda are sewn along the leg, or rather the pattern of the legs. Circle only the edges, draw an oval. Leave one in this form, and remove a piece from the other in the form of a v-shaped cutout. This will be the top of the shoe. Transfer the oval details to the white fabric, and the curly ones to the one from which the sundress was sewn. Cut with an indent and sew along the contour of the sole and toe. When turned inside out, decorate with a small piece of lace and a button in the middle, and attach a ribbon long enough for ties at the back.

15. The doll is already dressed, shod, but faceless and hairless. Cut off a piece from an old knitted wool sweater and start making hair. By unraveling it, you will get a wavy thread. I decided that the pale pink hair color of my Tilda would suit my face, so I chose this one.

When you pull enough threads for a good head of hair, cut them into strands of the same length and sew to Tilda's head in the middle, separating them with a seam in the middle.
16. With black threads, embroider two noticeable points on Tilda's face - these are her eyes. Usually these dolls do not have a mouth, but I decided that my girl would be prettier with it, so I made her a cute smile with red threads. With the help of any blush available in the cosmetic bag, we make rosy cheeks for the doll.

17. The final stage is a hairstyle. Take a couple of tiny decorative bows, ribbons or flowers, divide the curls into two parts and tie two tails.

I got such a slightly modern Tilda, she sits on a pedestal near the TV and decorates our living room with herself.


If you follow my master class, follow the basic principles of work, but do not forget to show imagination, for sure, her sister will appear at your home very soon, just as sweet and positive, and most importantly, made with your own hands and soul.
One of the most popular types of creativity today is the manufacture of author's interior toys with their own hands, including tilde dolls. Many needlewomen use the ideas of its creation to decorate their home with this cute textile thing.
Tilda doll was born in 1999 thanks to the Norwegian artist Toni Finnanger. Each creation of this master is copyright licensed, dolls are loved and recognizable by many all over the world, but the trouble is that they are not cheap at all. In this article you will find several master classes, designed for beginners, in which we will talk about how to sew a tilde doll with our own hands and share patterns. If you have the skills gained in school labor lessons, making such a doll with your own hands will be available even to novice craftsmen.
General rules for making a tilde doll with your own hands
There are many options for products in the tilde style, these are not only dolls, but also very popular hares, and lambs, and snails, and cats. All of them are united by several important rules established by Tony:
- Products are made only from natural fabrics such as linen and cotton;
- Dolls are sewn voluminous, so they must be tightly stuffed with sintepuh or holofiber;
- Hair is made from voluminous soft yarn;
- The faces of the dolls are conditional, that is, a pair of close-set eyes are made in the form of clear dots, a blush is applied to the cheeks.
The use of aged materials is not welcome, fabrics for the doll itself, as well as for her clothes, are taken, as a rule, new ones. If you want tint fabric with tea or coffee to give it a flesh tone, then this must be done carefully so as not to get divorces. It is recommended to sew the details of the doll on a sewing machine, since accuracy in execution is important. For doll clothes, you can choose different styles, but perhaps the most popular are country and boho style.
Materials for making a doll
For sewing a tilde doll with your own hands you will need the following materials

There are slight differences when cutting and assembling tilde style dolls, so below are separate master classes with photos, patterns and step-by-step instructions that should help novice needlewomen sew a tilde doll or toy with their own hands. And you can choose which of the master classes is right for you.
Master class - tilde doll for beginners
Tilde sewing method described in this master class is the most popular.

Master class on decorating a doll

Master class - do-it-yourself tilde hare for beginners
As already mentioned, tildes can be created in the form of animals. The basic rules for choosing fabrics, patterns and sewing such toys remain the same as for making dolls. It is worth looking at this charming tilde hare with a photo, as you will immediately want to plant a couple of these in your living room!
Below are photos of a tilde pattern in the form of a hare and clothes for him, as well as a description of the master class.

We hope that our master classes helped to settle adorable and cuddly toy in your house. And after sewing your first tilde doll, it can be very difficult to stop, because there are so many reasons to give gifts to yourself and your loved ones!
Sewing dolls tilda


Tilde... Surely many needlewomen heard this word and became interested in sewing rag dolls. Ours also decided to pay attention to this type of needlework. The Tilda doll is not just a toy, it is a real brand that was created in 1999 by the Norwegian craftswoman Toni Fanniger. And who would have thought that after a couple of years, such, at first glance, unsightly dolls would gain dizzying popularity and spread far beyond the borders of their homeland. To date, there is no such country where you have not heard about these charming fabric crafts. Well, those who first heard about them can get to know them on our website, which has more than one interesting "". You will not only learn more interesting information about them, but also learn how to sew Tilda!
Simply mesmerizing with their charm and appearance. What kind of characters they are not represented! These are naive, touching dolls, in a nightcap, lanky farm girls in aprons and dresses with large peas, gentle and cute, chintz "flying" cats, Tilda snail, bears and much more. But what gives them all a special charm is the fact that tildes are made by hand.
We will tell you in detail how to sew a Tilda, at the same time, giving it character and personality. For this, in each master class, you will find details that you can use in your work. But, if you are a skilled seamstress, then you can sketch the patterns yourself, using only Tilda photo. Also here you will learn how to make hair for dolls, how to sew clothes for them and much more.
Having become acquainted with the Tild sewing master classes on our website, you will surely see that they are all united by some common similarities, or rather, features. These are dotted eyes, a playful and bright blush on the cheeks, puffiness. Lush forms are Tild's calling card. Indeed, even with some elongation and elongated growth of toys, they still have rounded shapes. , of course, speaks for itself; but also Tilda summer resident also sewn quite well-fed.
The sewing technique and materials are also almost the same. More often Tilda dolls are made from natural fabrics (linen, cotton, calico or wool), also called Tilda fabrics. They are sewn by hand or on a sewing machine - who has what skills or whoever is more comfortable. However, handmade seams once again only confirm that you made a particular Tilda yourself, and not just bought it.
Tilda dolls so easy to make and not overloaded with numerous small details that they can be made with children. Very often, toys made as a result of joint work with children become home amulets or personal talismans. For amulets, it is usually sewn or Tilda summer resident.
Anyone who has ever encountered a Tilda doll at least once in their life will not remain indifferent to her. tildes ideal for decorating the room, and can also be a wonderful, extraordinary gift. Do you know why? Yes, because you can make them yourself with your own hands, which adds to them a special value and warmth. Would you like to pleasantly surprise your loved ones, give them joy? Then, without hesitation, pick up a needle, thread, find suitable pieces of fabric and start creating! Let your characters be a toy for a child Tilda princess or festive - they turn out the most beautiful!
Tilda doll is a cute and original interior decoration. Their diversity is simply amazing. Patterns of Tilda dolls are very different, but at the same time they have a lot in common with each other. Despite the fact that these toys are perfect for children's games, nevertheless, their main purpose is to add bright colors, warmth, comfort and beauty to the atmosphere of our home.
Products in the Tilda style are sewn not only in the form of dolls. On the Internet you can find Tild patterns for rabbits, bunnies, cats, bears, giraffes, and even snails. Over time, the needlewomen come up with more and more new versions of these wonderful dolls, bringing their ideas.
We will try to make today's workshop on sewing a Tilda doll as detailed as possible, in it, of course, you will find patterns that will facilitate the process of making a doll. For needlewomen with experience, it may seem too stretched. But it is precisely such a master class and patterns that will help novice craftswomen who want to try their hand at sewing Tilda dolls with their own hands.
Tilda doll: master class for beginners. patterns
In order to start making a toy in the Tilda style, you must first decide which one you want to sew, and understand what you need. In the event that you have never made a Tilda doll before, a master class and patterns will definitely help you in this matter.
 It is better to start from the simplest and move on to more complex ones, you should not immediately take on complex products. If you are going to start sewing Tilda for the first time, a detailed master class and patterns with sizes are exactly what you need. They make it possible to correctly calculate the details and avoid mistakes.
Mastering the skill of making a doll with your own hands, choose a master class and patterns that are not very complicated, with a minimum number of details. Patterns for beginners are ideal.
Master class on the selection of materials
When choosing fabrics, it is worth considering the fact that Tildas are sewn exclusively from natural materials. You can take, for example, cotton, wool, linen. The body of the chrysalis, as a rule, is made of matter, flesh, beige or white. It is also possible to dye the fabric with cinnamon or tea. If you want to use fabric with a pattern, make sure that the print is small and matches the size of the doll.

Master class on the process of sewing Tilda
The whole sewing process begins with the fact that we prepare the fabric. It needs to be ironed, folded in half, right side inward. Then the pattern is placed on the material, pinned with pins, and outlined with chalk or a special marker. All parts are stitched, leaving a small opening for stuffing, and cut out. 
If the products have bends, small notches must be made in these places. Such toys are stuffed, as a rule, with holofiber or sintepukh. The head and body are stuffed evenly and tightly, but the arms and legs are not particularly stuffed. Also, so that the legs and arms are movable and can bend freely, they do this: they are half filled, stitched along, and then stuffed to the end. All unsewn places are sewn up with a blind seam.
Hair for Tilda
To create hair for a doll, you can take various materials: threads, wool, ribbons and others. Now needlewomen often use boucle yarn. There are also several ways to fix hair: they can be sewn, glued, rolled with a special needle, drawn.


Tailoring workshop
There are two ways to sew clothes for Tilda: one-piece and separate. In the first version, there are parts of clothing in the pattern itself. This method is best suited for interior dolls. This is because with further use it will be impossible to change the outfit of such a doll.
 If you are planning to sew a Tilda for your baby, then it is best to make clothes that can be taken off and put on. Because for sure the child will want to change the dresses of his beauty.
Tilda's appearance features
All dolls made in the Tilda style have special features: they all have small black eyes that can be embroidered using a French knot, or simply painted with acrylics. A light blush is applied to the cheeks with ordinary blush.

Lovely Tilda dolls easily win the hearts of both adults and children. By making such a charm with your own hands, you can give a lot of positive not only to yourself, but also to those people who you can give these charming toys, which you will endow with warmth and positive emotions! Create and have fun! 
According to the apt statement of the unsurpassed Coco Chanel, handmade things are a luxury. Therefore, handmade soft toys, even for beginners, allow you to increase the positive when decorating the interior, preparing unique gifts for children, souvenirs for relatives and friends.
For such crafts, you will need patterns and diagrams that correspond to the plan, improvised means and following a simple technology for their manufacture.
For sewing needlework, you need to prepare:
- pieces of fabrics, ribbons, lace;
- thick paper / cardboard for creating patterns, and in order to transfer them to the fabric, also carbon paper and pen / pencil;
- environmentally friendly toy fillers;
- threads of various tones and strength;
- ruler, scissors, awl, pliers, needles, thimbles;
- small details for face decoration, fasteners on clothes and decor;
- iron;
- sewing machine (if necessary).
Choosing fabric for toys
Based on the characteristics of a particular toy, the following fabrics can be used:
For beginner creators of soft toys with their own hands, it is important to take into account these features in order to choose a fabric that matches the image when transferring patterns and patterns.
Simple and primitive soft toys: patterns for beginners
Such a group of toys, called "primitives", can be the first step towards making more complex options. They are cut on a double folded fabric and sewn from one piece with a head, paws and torso. Separate sewing of the head, ears, paws, tail is also allowed here.
Most often these are volumetric figures of different animals, fish, birds. Their simple creation needs accuracy, but does not require special efforts and skills, a lot of time. Moreover, one pattern can be used to create larger products as decorative pillows. The finished handmade craft is suitable for kids to play, as pendants, key chains. 

One of the popular options among beginners is a cat toy using ready-made pattern templates.
With the help of simple schemes, it is possible to create your own favorite toy of a wise owl from colorful cotton, printed chintz. 

Using a selection with photos, it is easy to comprehend several steps of the work. 
Do-it-yourself soft toy, patterns and patterns for beginners of these simple products allow you to use any fabric with a minimum of decor. "Primitives", made in light colors, can be turned into fragrant colored gifts.
To do this, they are impregnated by boiling in a strong brew of tea, coffee with the addition of vanilla, cinnamon, followed by drying in the sun or in the oven at + 120 ° C. After that, a fragrant souvenir toy can be painted and dressed up.
How to stuff soft toys
Previously, cotton wool and small fabric patches were used to fill soft toys. However, today these materials are being replaced by lighter and more hygienic synthetic materials (sintepuh, holofaybnr, synthetic winterizer, foam rubber, etc.).
They do not come true, allowing products to retain their original shape even with prolonged use and repeated washing. It is perfectly acceptable to use old sweaters made of light yarn in the form of finely cut strips.
It is also allowed to stuff toys with undyed, peeled and combed sheep's wool (sliver). At the same time, you need to be sure that the future owners of such crafts do not have an allergic reaction. The vulnerability of this material lies in the susceptibility to moth damage, deformation when wet.
If it is necessary to weight some toys (balls, rattles, etc.), soft fillings can be combined with pre-calcined cereals, seeds, husks, pebbles.
Self-made pillows in the form of different animals, birds can be stuffed with medicinal herbs (mint, sage, lavender, fennel, lemon balm, jasmine, etc.). In this case, the individual tolerance of the components contained in them should be taken into account.
Step by step instructions: how to sew a fabric doll
When making a soft toy with your own hands, patterns and patterns for beginners are the first step towards realizing your plan.
The next steps are as follows:
- Selection of the necessary fabrics, their washing, ironing.
- Transferring the pattern to the fabric and cutting all the details with a tolerance for seams, hem (0.5 cm each).

- Basting the resulting parts of the future toy along pre-planned lines (starting from the head, and then the torso, limbs).

- Stitching all the details according to these bastings (manually or using a sewing machine).

- Filling all elements with environmentally friendly materials.

- The final attachment of each part to each other.

- Face, clothes.
How to make a doll face and hair
For the outer shell of the head, it is necessary to make a bag of the desired size from cotton fabric. After filling it with the selected material to designate the neck, wrap the lower part with dense threads 2-3 times. Then wrap the prototype of the head with a piece of flesh-colored knitwear.
To do this, fold it with the front side inward and place the manufactured head on it, mark the lines of the back of the head and neck, then cut the workpiece, and then turn it upside down.
When forming eyes, nose, mouth on the doll's face, you can use special plastic blanks, buttons, beads, etc.
The second option is sewing / gluing self-made parts from colored fabric or embroidery. Along with this, you can draw the contours of the elements and further color them. The choice of any of the methods depends on what a do-it-yourself soft toy should be.
Patterns and diagrams for beginners can also tell you which of the materials is best used for hair, namely:
- woolen yarn, which should be sewn to the head, and then create the desired hairstyle;
- special tresses (fastened hair on fabric strips);
- yarn for felting;
- felt for making ponytails / bangs, which, after transferring patterns to it, are sewn to the head.
In addition, the hairline is often imitated by painting it with a safe paint of a suitable tone.
Tilda and its varieties
The peculiarity of Tilda dolls, created at the end of the 20th century by Norwegian designer Tony Finnanger, is the simplicity and clarity of the lines of all details, the use of only natural materials. These ruddy-cheeked, unlike any other toys with long disproportionate limbs, small eyes are made in delicate pastel colors.
During this time, tildomania won sympathy in different countries of the world, enriched with various types, in particular:

Textile bear Tilda
Such a stylized toy, when using quite affordable materials, has a more complex way of execution than human dolls. The simplest option for making a Tilda bear is to cut out 2 elements, sew them together and fill them. The fabric can be of different textures, colors.
Photo and pattern:
Tilda toy. Hares
Do-it-yourself soft toy: patterns and patterns for beginners for making a Tilda Hare are not at all complicated. 
After cutting and stitching the cut parts on flesh-colored fabrics, you must follow the execution algorithm:
- filling blanks of body parts;
- sewing limbs, ears to the body with a head;
- making/drawing a nose, mouth, peephole;
- dressing the Bunny in pre-prepared pants, a jacket, etc.
Step by step instructions: soft toy cat
Just a few simple steps you need to follow to create a charming Matroskin cat:
Pattern making:

DIY toy zoo
Using templates, ready-made patterns, diagrams of different representatives of the fauna, you can create your own mini-zoo. It can be homemade bears, monkeys, dogs, cats, giraffes, elephants, deer, hippos and other favorite animals.
Such a nice company will become a bright element of the interior of the children's room, a source of its psychological comfort. The creation of a toy zoo, according to teachers, psychologists, is also an important educational moment.
Fur animal: instructions for beginners
For the manufacture of such toys, you can use both natural and artificial fur. If it is easier to work with the latter, then in another version a real exclusive is obtained. Therefore, it is more advisable for beginners to start with medium-sized products made of artificial material. The first step is also to prepare the pattern and cut it, taking into account the allowance for future seams.
It is important to remember this nuance - you need to work with fur not with scissors, but with a sharp clerical or special knife for tailors.
In order to avoid damage to the fur, short, not deep sharp movements of the tools are made from the wrong side of the material. The cut parts are folded face inward and sewn from the inside out. In this case, it is necessary to leave small holes for stuffing with filler, which is then closed with a blind seam.
The last steps are attaching all the elements of the muzzle and adding accessories that match the image.
Owl pattern from fabric: how to sew an owl
Beginners can make an owl with just 2 pieces of different colors using one of the simplest patterns. 
Further work consists in the formation of a triangle from the cut out elements, connecting the parts first by basting, and then stitching (starting from an acute angle). After that, the future head is fixed by pinning this part with a pin, and then bending the corner to form a beak. 
The formed body (the lower part after the pin) must be filled with prepared material and sewn at the bottom. Then sew the corner-beak to the tummy, and glue the cut-out white circles-eyes with black pupils from beads / buttons onto the face. Photo of an owl created in half an hour:
Master class felt dog
To prepare a puppy pattern, a beginner will need a template. The toy is made using pieces of white, brown and black felt, thread, a needle, scissors, blanks for eyes, hot glue in a gun.
Algorithm for further actions:
- transfer patterns of details to felt;
- cut out all the parts circled with a ballpoint pen, and then sew and leave a small hole for filling;
- fill the blank with the rough end of a pencil / wooden stick;
- fastening all parts and completely closing the hole;
- muzzle decoration, attaching a colorful collar in the form of a ribbon / bow / “butterfly”, etc.).
To give the toy a more natural look, you can tint the felt with a colored pencil lead in several places (inside the ears, on the paws / muzzle / tummy).
How to sew a bunny from felt
Step-by-step master class of a felt bunny: 

Sock soft toys
The basis for one of the easiest toys to make is 1 sock of an attractive color without scuffs and holes, which has lost its pair. If you want to make a “chubby” toy, you need to shorten it by cutting off the part that covers the foot, and also move the elastic band on top of it. The unworn parts of children's tights that have become small, cramped are also useful here.
Beginners can, before starting work from the inside, mark with a felt-tip pen the location of body parts (head, neck, legs, torso). This will help minimize proportion errors. The technique of work allows the combination of several colors from other socks to designate a “mask” on the muzzle of animals, their tummy, paws, etc.
There are many options for creating "sock" toys with the initial production of patterns, measurements for the location of body parts. Many make cute toys in a hurry by first filling the products and forming the ears from the tied ends of the top of the socks, and then drawing the outlines of the muzzles, waist, and various accessories on this figure.
Master class Hare from a sock
One of the quick options for making a sock Bunny:
- Fill the sock with cotton wool or cereals (to make the product heavier for its stability).
- Measure the distance from the part of the toe to the intended neck and tighten this place with an elastic band / tight threads.
- Measure a smaller piece for the head and tie tightly to prevent spillage of the filler.
- Divide the edge of the sock remaining on top into 2 parts, and then cut out the ears from them, giving them a standing / drooping position and sheathe them with small thick stitches along the cut lines.
- Attach a pompom tail to the bottom of the back.
- Decoration of the toy: gluing oval / semi-oval circles of a different color on the tummy; attaching eye-beads made of denser tissue of teeth, spout.
- Decoration of the Hare (a bow on the head between the ears for girls, and for boys - on the neck).
To create many soft toys according to the proposed patterns and patterns, beginners do not need to have sewing skills. Here, the important point is independence, creativity and the desire to create something unique with your own hands. It is advisable to involve not only adult family members, but also kids in this pleasant activity, subject to the safety rules for handling sharp objects.
Article formatting: Vladimir the Great
Video on the topic: DIY soft toy
How to sew a primitive cat:
Soft toys from socks:


