Rooster made of balloons. DIY ball - Christmas tree decoration made of threads and glue, video. How to make a ball with your own hands, master class. Preparing the threads for work

Toy made of thread and glue “Cockerel”
1:602We will need:
1:638- PVA glue,
- threads No. 40-60,
- thick thread,
- inflatable ball,
- scissors,
- colored paper,
- eyes,
- ribbon on the bow.
INSTRUCTIONS:
1:884Inflate a balloon the size of an apple, tie it well, and cut off the end of the thread. Thread the end of the thread from the spool into a needle and pierce the plastic bottle with glue through the edge.
1:1204Remove the needle, wipe it and put it away, while the thread should be easily pulled out of the bottle and lubricated with glue.
1:1406Hold the ball in your left hand and wind the thread around it with your right. Make each turn in a different direction. Dry the wet cocoon on oilcloth for 4-5 hours. The finished cocoon should be hard. You should not dry it on a radiator or with a hairdryer: the ball may burst. A poorly tied cocoon will crack when dried as the ball descends.
1:2002Hold the dried cocoon in your left hand by the tying point, and with your right hand take a needle and pierce the ball, it will begin to descend with a sharp crackling sound, after which remove the remains through the hole at the tying point.
1:400Then cut out the details from colored paper (comb, 2 wings, beak, breast, tail), and make a bow from a ribbon. Glue the cocoons together and glue all the parts.
1:667 1:677 2:1182

It turned out to be an interesting cockerel. Sometimes stationery glue is used to make balls of thread, and Oksana uses PVA. I wonder if there are other options?
4:791 4:801Cockerel made of threads.
4:838 4:848
spread Balloons wrap it with glue made from flour and water and wrap it with threads. let dry. Pierce the balls and remove them from the threads, leaving the base of the threads. Connect two balls with glue or tie. Add paper or fabric details. Plant in a pot for indoor flowers on green paper.
5:1903Elizaveta Rumyantseva
Nothing is impossible for diligence and art.
To create something original with your own hands, for example, a lampshade for a lamp or a decoration for a holiday, you don’t need to stock up on expensive materials. It can be regular threads and glue, which can be found in any home. Knowing how to make a ball of thread and glue, you can build a variety of original decorative elements that will decorate not only the interior, but also any celebration. If you don’t know about this technique yet, read the instructions below and feel free to start creating.
DIY crafts from threads and glue
It’s good to make such crafts with children, because making them is not difficult. Finished goods can act as an independent decoration or be part of more complex compositions, for example, a snowman or a cockerel. In addition, it is not necessary to make a spherical-shaped product - with the help of threads and glue it is easy to build even a heart for Valentine's Day. The decor can even look like feathers, Christmas trees or snowflakes. First you need to stock up on materials:
- A thread. Important condition selection of this material - it should have a slightly loose structure so that the glue can easily saturate it.
- Habitual balloon, sold in office supply stores. For large crafts, it is recommended to inflate it no more than 15 cm, and for New Year's decorations It is better to use a fingertip purchased at a pharmacy with a diameter of up to 6-8 cm.
- Glue. The main factor influencing the outcome of the work. PVA has proven itself well for such crafts. Office glue or a mixture based on PVA, water and corn starch in a ratio of 1.5:0.25:0.5 is also used - the main thing is that the mixture has the consistency of sour cream.
In addition to the 3 main elements for crafts, you will need:
- scissors;
- fatty cream or Vaseline;
- Bowl;
- "Gypsy" needle.

New Year's balls made of threads
Don’t rush to buy Christmas tree decorations in the store - try to build them yourself. This will be a more original decoration of the Christmas tree, which will only emphasize the family atmosphere of the holiday, especially if you do it together. In addition to the basic elements, stock up on all kinds of beads, seed beads, feathers or ribbons for decorating finished crafts. Next, proceed to follow the instructions on how to make balls of thread and glue:
- Inflate the balloon to the desired size and tie the end. Lubricate thick cream or Vaseline.
- Next, either soak the thread in the adhesive composition, or pierce the container with glue at the very bottom with a needle and push it through the hole.
- Pull it and gradually wrap it around the inflated balloon.
- Secure the end of the thread under the already stretched one.
- Leave to dry for at least 1 day.
- Then gently deflate the balloons.
- Decorate the resulting toys with beads, seed beads, spruce branches or bows. To give the effect of falling snow, soak the product in glue and then roll it in semolina or powdered sugar.

DIY surprise ball
If you wind more threads, the product will be almost opaque, so you can put sweets or other small gifts inside. You will need the same materials, only for larger immersed elements you will need a “surprise loader” - a medium-diameter tube made of thick cardboard. If you manage to find one, then start making crafts:
- Prepare the adhesive and pull the thread through it.
- Pull a balloon onto one end of the tube and inflate it.
- Carefully load your intended surprise. Remove the base of the ball from the tube and tie it.
- Wrap with glue-soaked thread as you wish - whether the gift is transparent or you want to hide the surprise.
- Hang the product and leave to dry.
- Deflate the balloon.
- The surprise is ready - decorate it with any accessories depending on the holiday.

Balls of thread for a wedding
A wedding celebration is also a holiday, the decoration of which can be such thread products. Instructions for making wedding jewelry:
- Inflate all the balloons at once.
- Hang it on some kind of bar.
- Apply Vaseline.
- Take pure PVA or mixed, as indicated above, with starch and water.
- Pierce the bottom of the tube of glue with a needle or soak the thread in a bowl of glue.
- Wrap each ball so that the threads intersect.
- Leave the products to dry.
- After drying, deflate the balloons and decorate the decorations with fresh flowers, rhinestones, ribbons, beads or LED garlands.

Ball in a ball
If there are no threads in your house, but you bought a lot of balls, then make another original gift or holiday decoration. Only one ball should be larger. In addition, you will need a small pump. Next, let's look at how to make a ball in a ball:
- Insert the small one into the large one.
- Insert the pump into the smaller balloon and inflate it, but not too much.
- Pull the tail of the inflated balloon, tie it in a knot and release it inside.
- Inflate a large balloon. Insert the next ball, repeat with it the same as with the first.
- Repeat until there is no space left.
The symbol of 2019 is the Rooster and it should be in every home. It will not only decorate the room, but will also serve as a good gift for family and friends. This is a difficult symbol, he loves comfort and cannot stand dull everyday life. You can make it at home yourself or with the help of your children. Joint work with your child will allow you to become even closer to each other and help you develop faster. Let's figure out how to make a rooster craft with your own hands from a variety of available materials - for yourself, for New Year's decor at home or with children for school or kindergarten.
A good gift and a hand-sewn cockerel will become a decoration for your own interior. This pillow can be used in the living room, bedroom, and kitchen. By choosing materials by color, you can add coziness to any room. You can update an already sewn toy and add various applications, beads If you have even minor sewing skills, you can make such a toy yourself.

First, take sheets of A4 paper or old unnecessary wallpaper. Draw details on it. Pick up special fabric. You can make the pillow a single color, or vice versa. For example, the wings are one color, the body is another, the beak and crest are a third. For the pillow, fabric from which pillows or duvet covers were previously sewn is suitable. If desired, you can make not only a rooster, but also additional chickens.


2. Postcard with a cockerel
It’s always nice to congratulate family and friends, but giving something else and a handmade craft is much nicer. For example, it could be a postcard with a rooster - the symbol of the New Year. For this you will need very little.

You will need:
- Colored paper.
- PVA glue, but a glue stick will also work.
- Scotch tape, preferably double-sided.
- Scissors.
Add a little of your imagination.
Layouts with the image of a cockerel can be found very a large number of in the Internet. But if you can draw, then you can draw the image of this symbol yourself. If this is a New Year's gift, then a blue background will do. You can draw snowflakes on it.
You will need two more cockerel figures. You can do more - the postcard will turn out more voluminous. Place double-sided tape on the back of each postcard and stick it to the center of the postcard. Under the picture, write an inscription with a congratulation, For example, “Congratulations,” “Happy New Year,” or “Merry Christmas.”
Open the card and write your wish beautifully inside. Or choose a wish on the Internet, print it, cut it out and stick the wish on double-sided tape. Such voluminous postcard with a rooster will definitely please your family and friends. You can prepare such a congratulation together with your child.
3. We crochet and knit a cockerel
For women who know how to knit, this would be an ideal option to make a cockerel. Such knitted rooster It will decorate your kitchen or bedroom, and is also suitable for a gift.

To make this craft you will need:
- 4 black buttons.
- Textile. An old sheet or other one may come in handy thick fabric. You can choose the color you like best.
- The hooks are small.
- Threads 4 colors. You can recycle old sweaters that are no longer needed. These can be wool or cotton threads.
You can make a symbol as follows:
- First of all, make a pattern of a cockerel on paper or old wallpaper. Cut it out carefully with scissors.
- Transfer it to the fabric, keeping a slight margin of 5 millimeters for the seam.
- Now tie the cockerel's head and body. Gray threads are suitable for this.
- Knit the tummy in brown.
- Make the comb and beak red.


You can knit individual parts or make the entire cockerel. Fill the toy with padding polyester, cotton wool or pieces of fabric that need to be finely cut. Sew buttons instead of an eye to the symbol of 2019. You can replace the buttons with beads from an old necklace. The craft is ready.
4. Rooster made of multi-colored scraps
This toy is ideal for decorating a Christmas tree, raising your spirits and simply decorating your home interior. You can do it at home yourself. During periods of bad mood, you can crush it in your hands and it quickly lifts your mood. Or put it on the window to look at it in the morning after waking up.

You will need pieces of multi-colored bright fabric. The best fabric is bright with beautiful design. Additionally, you will need threads to match the color of the fabric, small buttons or black beads.
In order to make a bright, beautiful cockerel, you will need to do the following:
- Cut out a square from bright fabric. It can be small, medium or large, depending on the size of the toy you want to make.
- Separately, take red fabric. Any other color will not work as you will be making the beak and scallop.
- The details need to be sewn into the corner of the square. You need to put padding polyester or cotton wool inside the symbol's body. You can use the filling from an old jacket instead.
- The edges of the figure need to be sewn together to form a pyramid.
- You can sew long legs on the cockerel and place it on the refrigerator.
- The tail can be made from thin strips of the same fabric. For a brighter, more cheerful betta, a multi-colored tail works well.
5. Plasticine cockerel
You can make this craft with your own hands, together with your child. This will help develop hand motor skills. For this symbol you will need modeling dough or plasticine of different colors, a special board for this activity.

Take plasticine of any color except red (this will be the beak and comb).
- Make three balls of different diameters. The head should be small, just like the head. The torso is the largest circle.
- Make a comb and beak from red plasticine; of white and black - eyes.
- The tail and wings can be made from several colors at once. The wings can be made specifically in the form of a droplet. They can be made simply from paper or thick cardboard.
- The place where the wings will be inserted must first be prepared. Make a mark with a knife and secure it with plasticine.
6. DIY paper rooster
Just as easily as using plasticine, you can make a rooster out of paper with your own hands. All you need is colored paper or plain paper and paints or markers and a little imagination. You can draw the cockerel yourself, or you can find ready-made stencils. It can also be either voluminous or flat. With children, you can make a cockerel from a yellow cone - look at the photo, and find some more complex and naturalistic solution as a New Year's souvenir.

7. Rooster made of ball and thread
Another very easy way to make a symbol of 2019 is to make a cockerel from a ball and thread. All you need is one or two balloons, bright yellow, orange or red threads, PVA glue, as well as buttons and scraps of fabric or colored paper to decorate the toy and give it a finished look.
 Craft rooster ball and thread + fabric
 How to do:
First, inflate the balloon to the desired size. Then we dip the threads in glue and wrap our ball - tightly or not too tightly, as you like - there we will prepare the frame for our future toy. There is nothing complicated, so this craft can be done using New Year and together with the children. By the way, this can be not only a cockerel, but also any other animal.

After the glue has dried, simply pierce the ball with a needle and pull out the remains from the frame. We have the body of the rooster and his head - if you decide to use two balls. Now we take the buttons and make eyes out of them, gluing them to the frame in the right place. We make wings and a tail from scraps or colored paper and also glue them on. Paws can be made from felt, paper or wire and scraps. Here's what you might end up with:
8. Craft a rooster from felt

You can sew a cockerel not only from fabric or multi-colored scraps, but also from felt. By the way, this is almost the most popular idea, since felt does not crumble and does not need edge processing, which means it will be very easy to make figurines and toys. Simple rooster crafts are made from multi-colored sheets of felt: just cut out the necessary parts and stick them on top of each other - you get an easy flat craft. But more complex ones three-dimensional figures You will have to sew from felt, and here it is better to use ideas already created by someone. Here are four ready-made diagrams on how to make a felt rooster yourself, all you have to do is download, print, apply to fabric and cut out:
Felt cockerel - ready-made diagram
And if you think that this is too difficult, then look at the photos of other figures made from this material, perhaps you will like some idea more. By the way, good does not mean difficult. There are very simple solutions for similar crafts, which look very cute and are quite suitable for New Year's souvenirs. For example, pay attention to the heart-shaped cockerel.
9. Rooster made from plastic bottles
Plastic bottles are a very popular material for country and children's crafts. We already wrote here, and today we’ll tell you how to make a rooster out of them. Most easy option crafts is to take one bottle and using colored paper, buttons, disposable tableware and any other available materials to decorate it with the symbol of the New Year.

More complex options are creating voluminous cocks, with which you can decorate your cottage. Here you can no longer do without abstract imagination, the ability to create the necessary forms and combine different colors, since there are simply no ready-made diagrams for such figures. You will have to cut out the “feathers” for the tail and plumage yourself, make a comb and assemble it all into a single shape. But for some, these birds look just like life-like ones - look at the photo for yourself:
10. Crafts from salt dough - rooster
Another popular material for children's crafts is salty dough. It’s not difficult to make, sculpting is as simple as using plasticine, but the figures are stronger and more durable—you don’t have to worry that your child will break everything just because he squeezed his fingers on the toy a little tighter than necessary.

Salt dough cockerel recipe:

Mix 200-250 grams of flour and half a glass or a little more fine sea or regular table salt in a bowl. Add about 150 grams of water and mix everything thoroughly. At the end, pour in 20-30 grams of glue - it is better to use PVA so that the dough holds its shape better and the figures do not fall apart.

Next, we begin to sculpt the figure - we make a body, add a head, attach wings and a tail to it, and also do not forget about the comb and beak. Afterwards we paint with gouache or some special paints. We make all the parts separately, and then glue them together with glue or water. To make small parts and shape them, use a scalp or a thin and sharp knife; when working with children, it is better to take safe plastic tools - a spatula or something that will help you make cuts and create the necessary elements.
Video: DIY Christmas rooster craft
Craft - fire rooster
Everyone remembers that 2019 is the year of the fiery rooster, which means that if you are going to make a figurine, then you should focus on these bright colors. It could be a red rooster, orange, yellow, or you can combine all these shades in one toy. You can make such rooster crafts from different materials- from felt and shreds, from fabric and paper, from plastic bottles, cups and other disposable tableware. You can also make a fiery rooster for the New Year from ribbons, tinsel and Christmas tree balls to decorate with such figures christmas tree or use as a craft for kindergarten.
 A bright fiery rooster is a great idea for a New Year's craft.
Volume craft rooster with children
If a flat figure is not your thing, why not make volumetric crafts in the form of a rooster, which can also be kindergarten Give it to your children and give it to your friends for the New Year? We have already talked about how to knit a cockerel with hooks or sew scraps or fabric - this is the most popular way to do voluminous toys. Crafts for the garden for the year of the rooster are easiest to make from paper, napkins or plasticine, and if everything is clear with plasticine, then with paper you can use various ways, for example, first make a cone out of colored paper, and only then turn it into a cockerel. You can also use techniques such as volumetric quilling or plain or corrugated paper, origami, papier mache and the use of complex patterns and patterns. Does anyone even manage to make a rooster out of cotton pads and sticks, and for the Christmas tree - from Christmas balls, cereals, pasta, coffee beans, cones, chestnuts, acorns and other natural materials.


Bonus: rooster made from cereals for kindergarten
And another bonus craft is a cockerel made from cereals, which can be made for both kindergarten and primary school. You can use a wide variety of cereals; this composition can be made from millet and buckwheat, peas and beans, semolina, rice and other cereals. The more options you have, the more interesting the craft will be - there is a chance to win the competition with your child.

The technology is simple: we draw a cockerel on a piece of paper - parents can do this, and if it’s difficult to draw it yourself, you can always download a ready-made stencil, print it and use it for decoration. Next, use a brush to apply glue to the entire surface that you will fill. natural material. All that remains is to pour in the cereal and let the glue dry. After this, we simply shake off the excess grains and get a finished craft. Cunning: if you use several different grains, then so that they do not mix, it is better to apply layers one by one, “painting” with glue only the areas of the picture that are needed now. But laying out a panel of beans or peas is more difficult - here you will have to place the beans in even rows to each other, having also first applied glue to the paper. Here's what you might end up with:
Photos of rooster crafts
What else can a cockerel be made from? Yes, from anything, from buttons or plastic bottles (you can decorate your garden with such a craft). It can be made of wood or thread, from old things or some other improvised materials, for example, disposable plates. A painting using the quilling technique with a cockerel - the symbol of 2019 - can also be an excellent gift. From satin ribbons, feathers and beads, you can make decorations for a cockerel from paper or fabric.


 A simple craft with children - a rooster made from a paper plate
 Wooden rooster - symbol of 2019
  Cockerel made from disposable spoons and paper - simple craft to a kindergarten
  Bright and stylish hens and roosters made from pumpkins - an idea for autumn garden decor
  rooster out car tires- do not throw away old tires
 Cute beaded cockerels - ready-made color scheme
  Diagram of a rooster made from plastic bottle caps - decorating a fence at the dacha


 A simple rooster made of yarn - a children's craft


 Sewing a rooster - pattern for 2019
 Funny paper rooster - craft for children

 DIY tire roosters

By Chinese calendar Every year it is endowed with its own patron - one of 12 animals. There are beliefs that in each coming year a specific eastern sign influences people's lives. That is why, on the eve of the New Year, it is advisable to learn all the subtleties and features of the patron of the coming year in order to properly meet and achieve his favor.
Having learned the preferences of the patron, you can try to appease him in order to achieve his favor and have success in all your endeavors throughout the 12 months. On January 28, 2017, the Red Monkey will pass the baton to its tenth comrade, the Fire Rooster.
The Fire Rooster is the embodiment of thriftiness, self-sufficiency and extravagance. With the exception of the animal, you also need to become familiar with its preferences.
It is not difficult to guess that the Fire Rooster brings with it fiery and bright colors: orange, red. Sages have long been of the opinion that fire symbolizes a continuous upward striving and has a powerful living energy that has purposefulness and self-improvement.
Red colors have always symbolized love and passion. So we can conclude that 2017 will be full of romantic adventures and adventures.
For established couples, the year promises turning points: marriage, revival of former passion, etc.
According to the eastern calendar, the Rooster appears as a sophisticated, witty and insightful animal. In all his endeavors, he strives for perfection and tries to bring everything he starts to an ideal end. In addition, he simply cannot ignore attention and loves compliments in his direction.
When celebrating the New Year 2017, its symbol should be present in every home, so in this article we will look at how you can make a rooster with your own hands. Such cute souvenirs can also be used as a gift, because they are always priceless.
There are always a few balloons at home. If there is a thread about 1.5 m long left from the yellow ball of yarn, and there are scraps of cotton fabric lying around somewhere in the bins, we will take out the listed wealth, PVA glue, a piece of cardboard and scissors. Let's make a colorful Christmas tree toy - a rooster.

In order to make a rooster with your own hands, you need to prepare:
- a ball of yellow yarn
- balloon
- scissors
- red fabric
- ready-made eyes for toys
- PVA glue, or better yet superglue.

First, let's inflate the balloon to the size we need. This makes it easier to decide what size to make the paws, beak and comb of the cockerel.
From red fabric we cut out a triangle - a beak, two legs and a trapezoid. Last geometric figure will soon turn into a real comb. We won’t decorate the earrings, too many red details spoil it appearance toys.

Fold the trapezoid in half and round the fold line in two places. After this, shorten the base of the ridge slightly.


Lubricate the balloon generously and quickly with PVA glue. We take the ball in our hands and wind the thread around the ball in any order. The number of turns is not limited, only the second row will have to be additionally lubricated with glue.
On the last turn, we decided to leave a loop, with which we will hang the cockerel on the tree.


All that remains is to glue the parts cut out of red cotton onto the yellow base. I must say, the work is not easy. PVA takes a long time to dry. It is better, if possible, to use Moment glue or any other superglue.


While part of the Christmas tree decoration is drying, let's work on the wings of the cockerel. We will cut out a blank from cardboard that is similar in appearance to the crown shown in the picture.

We wind a thread of yarn between the teeth of the cardboard in several layers, after which we fix the bottom of the wing by stretching the thread between the rows. We remove the finished wing from the machine. Let's repeat the procedure again.


We glue the wings to the toy using PVA. We are waiting for the result - for the glue to dry completely for at least an hour. Well, all that remains is to attach the ready-made eyes purchased at the craft store.

We can't wait to put the cockerel on the Christmas tree and admire the toy we made with our own hands.

Everything is fine, just the ball orange color looks more harmonious with yellow yarn. We recommend using fleece instead of cotton.


How to make a rooster from plasticine - master class with photos
Now let's look at how to make such a colorful rooster from plasticine.

For this we will need plasticine of a variety of bright colors and stacks.

Take half a yellow block.

And give it the shape of an egg.


We sculpt a red beak.

Attach the comb as shown in the photo.


Then - the eyes and beak.

We make blanks for wings from green plasticine.

And three blanks for the tail of different colors.

New Year 2017 is the year of the Red (Fire) Rooster, and the most popular gift will be its figurine or image. The Krestik needlewomen have a good tradition: to New Year's holiday prepare thoroughly. And this year will be no exception. Many of us will make or are already making a rooster with our own hands, or even not one, but several at once! After all, you must definitely please your family and friends with a handmade symbol of the year, and yourself with the fascinating process of creating this very symbol in various techniques handmade.
Creating a kind of GUIDE TO MASTER CLASSES from the Internet is also a tradition of our handicraft site, which was born a year ago. For you, dear craftswomen, we have selected on the Internet a variety of only the most the best master classes. Admire, look closely, discuss and choose the most colorful rooster! And then sew/knit/draw/blind/weave it. So, what technology can you use on the eve of the New Year holiday?
If you don’t have time to work, it doesn’t matter. The article contains links to craftswomen who sell finished works.
Cockerels made of paper and on paper
Making cards with the kids
If you are not a professional cardmaker, then before you start creating cards, be sure to read our article “Learning to make New Year cards with your own hands using the Scrapbooking technique.” In it you will not only find many ideas, but also get acquainted with the basic rules for creating postcards.
Any cockerel drawn by your child can be placed on a postcard. If it’s difficult for your child to figure out how to draw a rooster with his own hands, then show him this step-by-step instructions:

And then, it’s a matter of technology. Cut out the cockerel and make it the centerpiece of the composition. For example, your card can be this simple but cute. Use in your work New Year's paper and a bright red ribbon, add snowflakes, twigs and other holiday paraphernalia. Once you have a basic idea, the process of creating a card becomes much easier!

Photo from the site http://itsapatchworklife.blogspot.ru
If your child likes to color black and white pictures, give him this opportunity. Print the card template with a cockerel on thick cardboard and let your child get to work. Next, by cutting out the ball blank, you can add to the card voluminous snowflakes, adhesive half-beads imitating christmas balls etc. etc. Give free rein to your imagination with your baby))

YOU WILL NEED IT
8 more templates for coloring, as well as 2 step by step instructions for drawing more realistic roosters you will find in the archive, which you can download quickly and for free!
Take note of the idea with a cockerel on a stick, like on Elena Yurchenko’s postcard. Her cockerels are cut out of felt, or you can cut them out of paper.

Roosters made of colored paper
An applique made of colored paper can also be placed on greeting card. But such an application can itself act as a postcard. To draw and carefully cut out all the details, children will need the help of their parents, but they can glue them themselves.

Olga-15 suggests making funny cockerels out of paper in her master class.
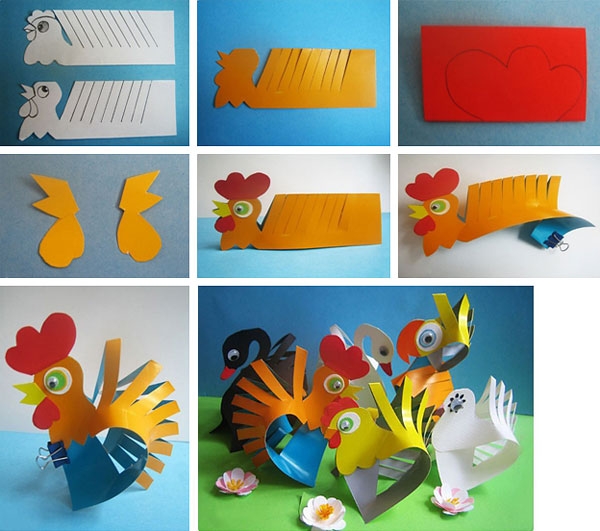
The Rooster blank is a rectangular sheet of flexible paper or thin cardboard, folded in half lengthwise. Its size is 13.5x10 cm. We make 7-10 inclined slits along the fold line (approximately every 1 cm). Their angle of inclination is 50-70 degrees, and their depth is ¾ of the height of the folded sheet.
Ekaterina Ivanova in her video tutorial shows how to make a red rooster using the Origami technique:
Roosters using Quilling technique
A very interesting idea is to lay out only a luxurious rooster tail from quilling paper. It's not as hassle as laying out a whole rooster, and it can turn out very impressive! Here is a rooster without a tail as a basis (see the photo below for how it looked in the original).

Print it on a color printer, and then fantasize about the tail. As an example, here is one such work (although the tail here is modest, but you will try, right?))

And if you are not afraid to make a whole rooster using the Quilling technique, then you can use this ready-made postcard as a basis:

Or this template:

A cheat sheet on the basic elements of Quilling to help you:

Button applique
And here are absolutely stunning handsome roosters, made of multi-colored buttons, half-beads, rhinestones and beads! You can take the contours of the cockerels from our archive as a basis (link just above).


Crochet cockerels
Many needlewomen are familiar with the crochet hook and will be happy to knit a cockerel from multi-colored threads. And Krestik will help you decide on a model and offer several master classes on this type of needlework.

You can also buy knitted cockerels from Svetlana.


Felt roosters
The fastest and easiest options for creating a symbol of 2017 are felt roosters. The material is easy to process, holds the shape of the toy well, and does not require processing of seams. On the contrary, hand stitches along the face of the product give it a special flavor and charm.


Photo from the site https://madeheart.com


Photo from the site http://ktototam.ru/
A rooster figurine carefully cut from thick felt will Christmas tree toy, and pendant.

Photo from the site http://ktototam.ru
And if you decorate the felt cockerels with embroidery, flowers and other decorative elements, it will turn out incredibly beautiful!

Photo from the site http://mmmcrafts.blogspot.ru

Roosters in Tilda style
Well, how can we manage now in our lives without the tilde-Rooster? On the ToySew website there is a master class on sewing this popular toy.

Master Vetic on her blog posted patterns for the Rooster and Chicken Peas based on the tilde pattern. An interesting couple will turn out if you put in the effort and patience!

And for inspiration:

Cockerel Yurik from Orange Toys

Maria Fedorova made a funny video about her tilda roosters (the link to the patterns is in the description of the video!):
Coffee cock toys
Aromatic, or coffee, toys compete with tildes in popularity. There are roosters using this technique.

A coffee cockerel can be like this:

Photo from the site http://zabavochka.com
You can easily sew it yourself using one of the patterns suggested above. “Cross” talked about all the intricacies of creating coffee toys in this master class.
If you think that you cannot cope with such work yourself, contact a specialist. Yulia Charikova made enough branded toys with the smell of coffee and put them up for sale at this address.

Fur interior toys
Oksana Svyatkovskaya will show her vision of a rooster and show how to properly sew it ready-made patterns. Her Rooster is made from faux fur, but who’s to say that this doesn’t happen or that he’s not good?)


In the workshop Everything for creativity (dljatvorchestva) there are a lot of blanks for painting and decoupage. Choose and create!

This is the beauty you can get:


If you don’t want to make a souvenir in the shape of a rooster, then you can decorate any wooden surface with an image of a rooster. The scope for creativity here is simply limitless!!! Here are just a few examples for inspiration:


Roosters felted from wool
Some craftswomen make wool toys that look like real ones! Let's admire and be inspired! And if you really want to buy one of these beauties, then look for them at the Masters Fair (the link is on each photo).


Elenia collected in one place many different Roosters felted from wool and suggested to MK how to create one of them. It turns out very cute!
Roosters embroidered with cross stitch, beads and ribbons
Perhaps you love embroidery more than other types of needlework. Then you can place the symbol of the year on a pillowcase, decorate it in the form of a panel, a picture in a frame or a brooch. The main thing is that the image of the Rooster warms your soul. And if you give away your work, find out the preferences of the recipient.
You will find more than 50 different patterns for embroidering roosters and cockerels in a special album