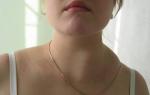
DIY nose for a leather toy. Master class on sewing a simple teddy bear - embroider the nose, mouth and tint. Let's start tinting
Now appeared great amount directions of applied art, and the abundance of goods for handicrafts pleases those who like to invent original and unique things. Beading, origami, knitting, decoupage, sewing, inlay with rhinestones and stones and much more various techniques, with which you can create paintings, clothes, toys and jewelry. On the shelves of bookstores and at handicraft courses you can get a lot of information on creating things with your own hands.
Often things you create yourself are the most an expensive gift, because a lot of effort and love was put into it. By giving a smaller, fun replica to your friend or loved one, you will not only be giving them an item, but one that will keep coming back to that person as soon as they look at that toy. And in this article you will learn how to sew such a doll.
Making a doll first begins with the purchase necessary materials. Although it happens that a toy is made from improvised materials. It can be a doll made from scraps and cotton wool, from old ones and foam rubber. But now you will learn how to sew a fabric doll. To do this, you will need the fabric itself and a pattern of the toy you like. Fold the fabric in half and draw the outlines: arms, legs, head, nose of the doll (if you want it to be convex). You can buy the necessary parts in advance at a specialized store.

A designer doll turns out neater and more beautiful if all its details are sewn together by hand, rather than by hand. sewing machine. But don’t forget to leave a small slot in the body of the future model to fill it with foam rubber, cotton wool, padding polyester or silicone.
When all the parts, even the doll's nose, are sewn separately, you need to turn them inside out so that all the seams remain inside the product. Next, you can start filling the toy; even ordinary scraps can be suitable for this if you do not have special material. You need to fill the doll tightly, helping yourself with a stick.
After this, you can sew the arms, legs, head and torso together. The doll's eyes and nose can be made from buttons, stones and rhinestones, or purchased at a craft store and glued on in advance.
After the doll's body is completely ready, you can begin making hair, clothes and shoes for

Toys. Hair can be made from thick yarn for knitting black, white, yellow and even. Cut a lot of threads 10-15 cm long and fluff them so that they become fluffy. Start sewing them on from the back of the head, but so that they do not cover the eyes and especially the doll’s nose. You can also buy ready-made hair or make it from an old wig. The dress is easy to sew finished pattern from the magazine. And decorated with beads or rhinestones, it will look more elegant and richer on the doll. Shoes can be knitted according to the pattern of booties or socks for babies.
Sewing dolls can take from several hours to several days depending on the skill and speed of sewing, as well as the complexity of making the doll parts. But the main thing is, of course, the result and the joy from it.
Embroider the nose
I will base my story on personal experience. I tried to embroider my first noses using Iris threads. You can use both silk and floss. The main thing is that they are curled and not too thin. I use a long and thin needle for embroidery with a small, neat eye. The shape of the nose can be very diverse. As an example, I am posting my sketch of the shapes of the noses for Teddy bears.

The shape can be figurative and clear geometric. I advise you to try embroidering different variants and already in the process you will understand what you like best.
Stitches can be vertical and horizontal.
 |
 |
If we embroider with vertical stitches, we usually start from the center first in one direction. Then we return to the center and embroider the second part. Try to make even stitches, as if you were embroidering with satin stitch. Use a second layer of stitches to level the surface. In the photo I embroidered a neat oval nose. There are two layers of embroidery here. She emphasized her signature style by wrapping the top along the contour.

An embroidered nose like this can be coated with wax or acrylic varnish. It is better to use wax, which is sold in specialized stores with honey. A regular paraffin candle can leave an undesirable tint and crack over time. The wax is heated and soaked into the nose. Then the surface is rubbed with the metal side. This is how the nose is polished)
The nose does not have to be made of several layers. Sometimes a couple of stitches are enough and the image is complete)

Polymer clay nose
Clay is a fairly pliable material to work with. I used baked. There are usually instructions on the package. It is important to adhere to the specified temperature regime and time. Be sure to consider the power of your oven or air fryer. The smaller the part, the less time it takes to bake. Be sure to bake a test version.

Progress:I cut a piece of clay (1 cm in diameter). I warmed it up in my hands. I shaped it into a ball that was the right size for me. Please note that if the spout is large enough, then you need to twist the foil ball inside. And put clay on top. Otherwise it may not bake. Then she took the blank head of the future animal, covered it with cling film and tried on the nose. As a result, one side began to repeat the silhouette of the place on the head where the nose would be. I gave the front side the shape of a nose. I smoothed out all the seams with a knife. I gave it some bulges with an awl. Make sure that there are no fingerprints left on the surface.

I used the tip of an awl to add texture to the surface. Then I wrapped it in foil and baked for 10 minutes.

I wrap it in foil to prevent the spout from becoming deformed. Since there is a strong air flow in the air fryer, I place a grill on top. Now you can safely bake)
After baking, do not immediately unroll the foil. Let the spout cool. And now it can be painted. I tint with oil and pastel. The first layer is burnt umber diluted in pinene. Then dry pastel to match on top. I let it dry and coat it with acrylic varnish. If you need to add shine, use glossy acrylic varnish. If not, then matte. The spout is ready. It can be glued to the workpiece. And if we added a wire loop to the base, then it could be sewn on like an eye or a button)


Felt spout
My favorite ones are felt spouts. Everyone chooses what they like. But wool seems to me the warmest and most flexible to work with) I use semi-thin combed tape or cord comb. Wool colors can be mixed. Using a felting needle (star no. 38), I give the shape I need. I always pay attention to the anatomical characteristics of the nose for each animal.
 Felt nose for Chihuahua Teddy
Such noses seem to me the most realistic and pleasant to the touch, but this is just my taste)
There are also spouts made of leather and wood. To cut a wooden nose, you will need a little skill, a wood knife and a block. And the authors also work with skin in different ways. Some people cover the base with leather, others heat it and shape it. I will definitely try to make a leather nose and write about my impressions. And novice authors often use ready-made spouts with rivets.

But in fact, there is nothing better than a handmade spout)
Thank you all for your attention and see you again! I hope my knowledge was useful)
Clown
The toy consists of the following parts: suit - 2 parts, sleeves - 2 parts, cap - 2 parts, hands - 4 parts, shoes - 4 parts, head - 1 part, collar - 1 part.
The toy clown can be tied to a child's crib and he will take care of the child's pajamas, which can be hidden in his costume during the day. You can sew it and give it to friends and acquaintances on their birthday. The clown is sewn from bright multi-colored scraps. The parts are sewn together according to wrong side fabric on sewing machine or manually using a “back needle” or “stitch” seam. The two parts of the suit are sewn together, the bottom is pulled together in the form of trousers, having previously placed small lumps of cotton wool inside.
From thick fabric The clown shoes are sewn together with a buttonhole stitch, padded a little with cotton wool or lined with foam rubber, and then sewn to the trousers. The sewn sleeves are pulled together with a thread on one side and secured. Through the hole on the other side, the sleeves are loosely filled with cotton wool and sewn palms are inserted into them, pulled together and secured. After this, the finished sleeves are sewn into the upper part of the clown costume.
The clown's head is made of knitwear. A circle is cut out, pulled over the edge onto a thread, the resulting bag is filled with cotton wool and tightened. It is designed as follows: the eyes are made from transparent pill packaging, into which buttons of the required size and dark color are inserted. The nose can be made from the same jersey from which the head was made. Just like the head, it is gathered with a thread over the edge, pulled together, and then sewn into place.
The mouth is drawn with a red pencil or felt-tip pen, and the clown has a cheerful smile on his face. The cheeks and nose are tinted with a red pencil. Eyebrows are drawn with a black pencil, felt-tip pen, 
Clown hair can be made from any fur, thread, any length and color.
The cap is sewn to the clown's head in advance
finished edge. The head is then secured to the top of the clown costume.
Now let's make sure the toy has a secret. To do this, we sew a zipper of the required length into the back of the suit. This way our clown will have a secret pocket that can be easily closed and opened.
We will complement the suit with a collar, which is cut out of light material of any color. We sew the cut edge with a buttonhole stitch. Its other edge is gathered on a thread, the collar is put on over the clown's head and pulled together.
Clown shoes are decorated with small balls of any color from any material. They are cut into the shape of a circle and pulled together with thread and then sewn on. The cap is decorated with a pompom.
SMILE!
Hard leather nose for Teddy bear, master class.
All photos are clickable and can be viewed in large size
I call them "fried" noses. You will need a stove, a frying pan, thin leather, epoxy glue, a paper clip, and pliers. If you have an electric stove or hotplate, you don't need a frying pan.

Blanks
Cut out the nose blanks in advance. Oval or round will do.
Since the process is unpredictable, cut out about 10 noses per bear at once different sizes, approximately 1.5 times more than desired.

We fry our nose)
For a gas stove - place the frying pan on medium heat and wait until it heats up well. On an electric one without a frying pan, just heat the burner.
Next, throw the workpiece onto a dry frying pan or electric stove, face up. In just a few seconds (it all depends on the thickness of the leather and the temperature of the surface), the workpiece will begin to rise and become convex. The main thing here is not to miss the moment - you need to quickly remove it, otherwise it will shrink and burn. Since it is hot, it is most convenient to pick it up with sharp knives on both sides. Remember, if you hold it on top, marks will remain in this place. You can't put it face down either.

If you want to make nostrils. As soon as the workpiece begins to become convex, hold it in the places of the nostrils with the tip of a knife or other sharp object, preventing the skin in these places from rising. The nose will be fried in this form. If edges burn, trim carefully. Of course, before you get the desired shape and size of your nose, you will have to practice a lot.

Epoxy is useful when making a nose out of leather)
To make the nose hard, you will need epoxy glue. After the nose has completely cooled (this happens quite quickly), turn it over like a bowl. Mix the glue components in the proportions indicated on the package. Please note that it has a very specific smell, so it is best to work with it in ventilated areas away from small children. Pour glue into the spout to the very edges.

Paper clip loop

Paper clip loop
Take a paper clip, bend it in the middle, cut off half or a smaller part, depending on the size and depth of the nose. Fold over the edges. This way, in the future, the loop will stay in place better and won't pop out of your nose. It can also be made from wire if you have it on hand. When the epoxy has hardened a little, place the loop in the middle, leaving at least 3-4 mm sticking out above the surface, preferably more. Make sure it doesn't sink and freeze in the middle. (You can thread a toothpick into the loop, if it does not reach the bottom of the nose, placing its edges on something above the nose.) After the epoxy hardens, the nose will never lose its shape and will be solid.

We come from the back of the head
Then you can put the nose like the eyes. You will need a doll needle and strong threads. Iris will do. Start from the bottom of the back of the head, at the neck, leaving the end of the thread dangling.

We hook it by the loop and go into the same hole from which we came out with the needle.
Come out in the middle of the nose, where the three seams meet. Grab your nose by the loop. To make the loop fit inside, widen the thread with an awl. Enter the same place without catching a single thread.

Fasten the thread
Exit again from the back of the head, next to the thread, but not in the same place. Pull your nose in so that it fits snugly against the fabric and the loop is completely hidden inside. The base can be pre-smeared with instant glue, so the nose will hold especially tightly. Tie a few knots at the back. Insert both threads into the needle, go to the back of the head there, come out further and pull the knots inward. Cut the threads.

Nose can be painted acrylic paints, it is better to apply matte varnish, in one layer, to preserve the texture of the skin)

Nikolai Valuev and the bear - Valuev. The suit is an exact copy, the gloves are from real boxing gloves.
Read more:
MK My new old friend
Everyone loves bears! But not everyone can afford to buy a real antique bear. Alas, they are extremely expensive and, frankly speaking, not very accessible. But everything is in our hands! If desired, we can independently create an almost real “old” bear cub!
First, let's figure out what an “old” bear is? We all know that in different years, the teddy bears looked different. In their manufacture, slightly different proportions were used. Various color combinations and materials.
Here is a simple, but very visual table, broken down by year. It is very easy to understand which period a particular teddy bear belongs to.


So, if we want to sew an old, torture (from the French “to beat, torment”) bear, we must choose the right pattern, materials and clothes for it.
For convenience, I will divide my MK into several parts. This part contains a little theory and some basics, without which you will not be able to choose the right materials and decide on the image.
Shall we get started? :))
Pattern.
For these purposes, only a classic pattern is suitable for us (ideally, take one where the paws have only one seam, that is, they consist not of two, but only of one part)
This is roughly the kind of paw we need :))

The “antique” mohair from the “Schulze” company is very good on a cotton basis, having a short and sparse pile. Viscose and plush are also suitable
It’s good to use kapok for stuffing, but if for some reason you don’t have it, then sawdust and wood shavings are quite suitable
By the way, having chosen the appropriate mohair for your bear, do not forget to check before cutting whether your pattern fits on the piece you have! A piece of mohair can be of different sizes!
Here are approximate mohair layout options

Eyes
Until 1910, shoe buttons were used, and later they began to use glass eyes that were already familiar to us.
Bear proportions
Another important point! All bears claiming to be “old” should ideally meet the following proportions and requirements:
X - body height
½ X - head height
X - arm length
Slightly less than X - leg length
Palm width = sole width
There must be a hump
5 hinges (use cotter pins) Disks, by the way, used to be made of durable
cardboard or wood ;-)

Palms and soles - felt
"triangular head" without darts
Long muzzle
Long, slightly bent arms reaching almost to the knees
We make the ears (two parts) only from mohair
Claws - 4 claws on the paw (not three, not five!)
Ideally, we strengthen the sole of the foot by putting cardboard there (as was done before)
About noses.
For polar bears we embroider with light brown, beige or pink thread
For blacks - pink and red thread
Beige or cream bear - dark brown thread
Brown or yellow bear - with black thread
By the way, the nose of an old bear can be embroidered, or made of plastic or a piece of leather
Here is a wonderfully visual picture of a plastic nose, which I found a long time ago on the Internet (alas, due to the passage of time, I can no longer provide a link to the author of the picture)

And this is the cut of the leather nose.
Well, here are the shapes of embroidered noses from different manufacturers and used in different years


The embroidered nose can be covered with wax, which gives an amazing antique effect;-)
For an old bear of suitable size, it would be very good to insert a howler inside it (a device that makes characteristic roaring sounds when you press it or when the bear is turned back and forth).
How is it inserted? Yes, very simple! In the belly we lay a thin layer of synthetic down (or padding polyester) and insert the howler into the belly (with the side where the mesh (the sound comes from it) is towards the bear’s face). Then the sound will not be dull. The layer of padding polyester must be very thin, pay attention to this! The howler must be clearly palpable, otherwise its sound will be almost inaudible!
Naturally, if you and I decided to sew a bear (let’s say) from the 30s of the last century, then we will have to dress it accordingly! Therefore, approach the choice of a costume for your bear with all care!
Here are the basics, so to speak. :))) For now, you are thinking about your future teddy bear and selecting suitable materials. And in the next part I will show you several patterns suitable for this purpose;-)
MK My new old friend part two
So, as I promised, let's continue :)
Let's now move closer to the point, that is, directly to making the bear.
The very first thing, as you already understood, is choosing a pattern. That is, you must decide for yourself what kind of bear you would like to sew!
Here, for example, is a wonderful pattern dating back to 1910-1919


The bear itself, sewn using this pattern, will look something like this

But before you cut out the pieces, get your mohair ready! Here are some simple "secrets"
Pre-wash the mohair in warm water with hair shampoo, wring out a piece of mohair (without fanaticism, until we tear it to shreds and tear out the lint from it) :))
Dry it by laying it out on a flat surface (this way you will avoid creases that will certainly form from a clothesline)
The mohair pile will become soft and shiny!
In addition, after washing, the pile will return to its normal (“native”) position and will no longer stick out in different directions.
Wet mohair can even be gently combed with a sparse comb or pet slicker brush to help long, matted hair lie down properly.
Of course, for rare pile antique mohair this may not be very relevant, but for mohair with slightly longer and thicker pile it is very significant.
If you are planning to sew a bear from viscose, then you should not wash it (unless it is too dirty with something, but this is more of a force majeure than a rule!)
When using plush, you should first figure out how old it is. If we are dealing with a piece of antique plush that you got as a result of a successful trip to the flea market, then most likely you cannot do without washing! But such plush should be washed very carefully, because most likely it simply will not survive intense twisting!
Newer plush, you will most likely want to age it (and rightly so!)
Of course, I simply won’t be able to tell you all the tricks and nuances in this short MK (I can tell and show all this for hours at a personal meeting and at MKs held live), but I will try to voice some points!
So, you want to age a piece of plush you have. What can we do with it?
Do you want the plush to not shine? Boil it in water with soda for 40-60 minutes. How much weight in grams?? :)) In a small saucepan that will fit your piece of plush and at the same time it will be completely covered with water - about 3-4 tbsp. spoons of soda
If you really want to “kill” this plush, you can put it in our “Whiteness” for a few minutes BUT!!! Stay close and watch! Believe me, you can easily find in a basin with a piece of plush many beautiful holes along the edges of which the remains of that same plush will sadly float :)) “Whiteness” is a nuclear thing!
If you want to give the plush an older look, you can boil it for 15 minutes in hot water with instant coffee
Before you start sewing with plush, it is best to place it on glue (antique ones first of all!). Then it will not warp and spread out when stuffed
Just in case, I will also voice the main points that you need to remember when laying out and cutting mohair:
1 lay out all the parts on a piece of mohair (if it does not contradict the requirement for the direction of the pile, then lay it out, observing the direction of the grain thread)
2 make sure the right amount of parts fits
3 do not forget to leave seam allowances (approximately 5 mm)
4 check whether you have transferred all the details correctly (you haven’t forgotten that we need to transfer some of the details in a mirror image?)
5 make sure that the pattern pieces are laid out in accordance with the direction of the pile (marked on the pattern with an arrow)
6, even before cutting, mark the attachment points of the paws and control points (if any) on the parts
7 When cutting, it is most convenient to use small scissors with sharp tips
8 make sure that when cutting you do not accidentally damage the pile
Now all you have to do is sew the parts together and turn them right side out (you didn’t forget to leave holes for turning???) :)))
You can start stuffing!
As I already said, for stuffing we can, without further ado, take padding polyester. But since we decided to make a real old bear... Let's take more “plausible” materials for it!
Good shavings. It can be obtained in imported online stores, in some of our specialized stores where they sell materials for teddy bears and in those places where they sell expensive wines (they use it to transfer bottles when packing them into boxes), as well as in flower shops. But the simplest thing is to still order it on the internet :)
For those who don’t know, the shavings look something like this :)))
.JPG)
Sawdust will also work. The places where they are found are quite accessible - these are pet stores! Look for packaging that says "insect repellent"

Can be stuffed with wool. Where to get it? And which one do we need? Still easier than with shavings. The wool that is used for the base is excellent for felting (do not confuse it)
If you decide that somewhere your bear will have places worn to holes (often they are done on the shoulder or on the thigh - in the places where the discs are attached), then you need to take care in advance that the “internal contents” correspond external image.
Agree, an old “dirty” bear with a frayed hole in the side from which the whitest synthetic padding sticks out is, at least, strange :))) So we will age the internal contents too!
The discs can be placed in a hot coffee solution (just make sure that they don’t get completely soaked). Sawdust or shavings can also be treated with a coffee solution. We dry everything thoroughly and only then put it into use!
How to stuff, with what density?
First, let's figure out what happens to the bear cub over time. Did you guess it? That's right! The stuffing in it sags! But how exactly?
The head is the only thing weakness there's a nose in it. All other places in the head cannot “sag”.
To be honest, I don’t like doing a “weak nose”, but you see for yourself
Then the stuffing sags so that the neck and hump become empty. The more weakly you fill the neck, the more “downcast” your bear will sit (hanging his head). The hump can be filled very, very weakly, or even not filled at all!
Paws - voids are usually formed behind the pads and feet (the feet and palms themselves are well padded, behind them there is about a cm of “empty” space and then normal padding again), as well as in the places where we place disc mounts.
The stuffing settles from top to bottom!
When sewing up the secret holes through which we stuffed the teddy bear, do not strive for the usual accuracy! These seams (not all of them are possible, just the seam on the back) need to be made visible! You can even deliberately gather the seam with a thread and only then sew it up, you can sew it up sweepingly, over the edge.
The ears, as you remember, for such a teddy bear we make from 2 parts of mohair (viscose, plush - insert what you need) That is, we do not use any felt or other inserts in the ear.
Palms and feet are felt.
We embroider the nose with thread of a suitable color.
When embroidering the nose, you can place a felt lining under it (to give it additional volume). Or you can deliberately sloppily embroider the nose with threads, stepping back from the previous stitch a little to the side, crossing one thread over another. Just imagine that this nose has already been repeatedly restored and corrected by the hands of a person who only played with bears ;-)
The eyes are black glass (the shoe buttons we talked about above were used before 1910, they won’t quite suit us on this bear)
Naturally, we don’t do any “whites”, eyelids or eyelashes on these bears!
When the eyes are sewn on, you can rub their surface with fine sandpaper. Such real, very believable scratches and abrasions are formed, which appear over time due to the fact that the beloved bear cub is often carried with its muzzle on the floor, table and other hard objects)))
So, the teddy bear is sewn, stuffed, assembled. It needs to be tinted and dressed.
It is best to use oil for tinting. Of course, its color should be chosen based on the color of mohair, but sepia, umber, and mars brown are quite universal.
I know that many are afraid to use oil paints for tinting, preferring acrylic or fabric paints, but believe me, there is nothing complicated in tinting with oil (and here again I have to admit that it is much easier to show some tinting techniques live once oil than to explain “on your fingers”, but, alas, this is only possible at a MK held live)
Tips: use pinene to thin the oil to the desired consistency and a hard, flat brush of the appropriate size :))
When the tinting is ready and has already dried, we begin to select clothes for our bear.
But since the tinting also does not dry immediately, we will talk about clothes for our bear in the next part of our small MK)))
MK My new old friend part three
The tint has dried and it looks like we can put on our little bear. But first, let's torture him a little, shall we? ;-)
Since you and I have decided to make an old teddy bear, then we will be consistent! Not a single old bear could reach us in perfect condition-it is a fact! Just look at these real antique bears. So we will act as the “evil stepmother” who mercilessly treats our “newborn”
In order to age a bear cub efficiently and believably, it would be a good idea to imagine how his life developed until the moment he appeared before the most respectable public (well, that is, before us). That is, now we will turn on our imagination and play a little, inventing a story for this bear !
Here they bring a brand new bear cub home and solemnly hand it over to a happy child (yes, comrades, these our grandmothers and great-grandmothers were such irresponsible individuals that they gave bears to their children to play with) :))))) And children, they are those toys, which they fell in love with, it’s scary to even say - they play!!! :)))
What's going on with the bear??? It is carried everywhere with you (and most often by the ear or under the arm). They feed them porridge, endlessly dress and undress them, put them to sleep next to them, take them out for a walk in the garden, where they make Easter cakes together... Sometimes the unfortunate person is quietly taken from the tenacious children's paws to quickly wash and dry... And also, if the teddy bear was given as a gift to a very small child, the caring mother would certainly take the eyes off the bear and put it in the chest of drawers, “until better times”! This, by the way, is one of the main reasons why so many antique bears came to us without eyes (they simply got lost during storage or, not being sewn on very well, fell off and, again, were lost)
Well, what do you think, can such a sufferer reach us in perfect condition? ;-)
What and how will we do with you? To restore “historical justice”?
Ears. We sew them onto the bear (we’ve already sewed them on, right?) And now we thoroughly moisten them with fairly hot water and begin to “twist” and wrinkle them. You can pinch the mohair on them in places. We leave the ears in a “broken” state and dry them. “At the output of the product” we will get an old, worn out, broken ear ;-)
Hump: we pluck out the mohair here and there with tweezers, take a blade in our hands (so dangerous, remember how there used to be “Neva” and “Sputnik” blades?) and carefully trim the pile here and there. Try not to cut yourself or cut through the base of the mohair (although if you happen to damage the fabric, you can mend it on top, deliberately not too carefully, with black or brown threads - it will even turn out interesting ;-))
Paws. Remember when we aged chips and discs? So, you can pluck the lint on the bear’s shoulder, take a thin piece of sandpaper and rub it properly! We wipe the base of the mohair to the state we like (you can slightly mark a hole so that the shavings can be seen through it, or you can make a decent hole, pull out the excess stuffing and so that the disk with the fastening can be seen directly) Everything is in our hands. As we decide, so it will be)))
As you already understood, in this way you can walk through different parts the body of our bear))) Make a darn here and there (it is not at all necessary to wipe the hole under it, you can imitate it ;-)) Here and there, use a razor to create bald spots. Pluck something with tweezers..... The scope for your imagination is simply limitless!
We embroider the nose and claws.
You can go over the embroidery with sandpaper, ruffling and rubbing the threads (here and there;-))
I like to wax noses (ie cover them with beeswax). This nose can also be sanded a little later ;-)
I'll take a little break. I'll tell you about the nose.
The fact is that many times I tried to explain to people exactly how to do this. But, either I’m untalented, or this is the case when I need to see exactly how I do it…. Since I simply can’t show it technically, I will tell you (well, I can show it to those whom we will someday meet in person :)))
So. We take a piece of natural beeswax in one hand, our favorite hair dryer in the other hand, and a bear with its nose up under the arm:))
We hold the wax over the embroidered nose and blow on it (the wax) with a hot hairdryer. The wax begins to melt and starts to drip. Here you don’t get confused and get this drop on your embroidered nose :)) This, girls, is the main thing! Because if you drip wax past the embroidery, an ugly whitish spot will remain :-(
We apply wax to the nose without fanaticism, the best is the enemy of the good! When a few drops of wax are already on the surface of the threads, blow on your nose with a hairdryer so that the wax is absorbed into the threads... I usually apply “two layers” of wax, that is, I dripped it, blew it with a hairdryer, the wax went inside the threads, dripped it again with wax and blew it with a hairdryer very far away again (if you bring the hairdryer too close, the wax will spread further, coming out far beyond the embroidered part of the nose )
When you decide that there is enough wax, let the spout cool a little and polish it with a soft cloth.
What else can you do with a bear to age it?
You can cut the pile with scissors in the designated places. If you go “along the pile”, it will be smoother and neater, if “against the pile”, you will get a “ladder” (also gives an interesting effect)
It’s the same with shaving with a blade: “against the lint” you clean more ;-)
You can also rub your palms and feet with sandpaper (until the felt becomes whitish or until there is a hole, as you prefer). You can sew a fabric patch on them “over the edge”
Now we meticulously examine the bear. Where else can we age it?
Stitches! Please note that the seams always get dirty, so we will darken them too!
Take a pastel, oil or watercolor pencil and go along the seams. Do you like the result? Then we go over the top of our tint with Vaseline or baby cream (we’ll get a dirty, greasy effect)
The already prepared bear can be sprayed with instant coffee from a spray bottle and placed (placed) on the battery - you will get excellent “streaks”. Well, just a peek :))
If you did not cover your nose with wax, then you can do this:
We take a frying bag (the kind in which we usually bake chicken;)), spray the bear well with a coffee solution and place it in this bag. Place a damp cloth next to it. We close the package and... into the oven (temperature 100 degrees)! This “fried” bear is very good, check it out :))
How to prepare fabrics for clothing?
Naturally, they also need to be aged, but how could it be otherwise? You wouldn’t want to break the image we created???
As with dolls, fabrics for bears are preferable to natural, thin, and well-draped fabrics.
You can dip a piece of fabric into “Whiteness” (remember that we are standing nearby and vigil?))))) - it will give a wonderful dilapidation!
Dye fabric by dipping it in instant coffee
Or in tea. Different types of tea will give different shades, experiment ;-)
You can take a decoction of oak bark
Decoction onion peel
Walnut ink
All these natural dyes will give a very good old shade of our fabric!
Ready-made clothes can also be dipped into one of these solutions, taken out, squeezed lightly, placed on a paper towel (multi-layered), put in all the folds we need at once and bake for 30 minutes at a temperature of 100 degrees
In fact, there are a lot of options and methods for dyeing fabrics for an aging effect! I am telling you only the simplest and most accessible ones (all of the above are almost always at hand)
You can also rub the hem on the finished garment with the same sandpaper - you’ll get a wonderful shabby edge ;-)
Well, since we got a lot of letters again, a clothing pattern and a little about costumes next time :)