Coloring Christmas balls in the shape of faces. Mk "New Year's balls with photos". Christmas balls for the New Year
The most interesting product For New Year's decor are transparent Christmas balls. You can make not only toys from them, but also various decorative elements and compositions. It's about decor New Year's balls their will go with his hands speech in four master classes.
Master class No. 1: decorating a Christmas ball with sparkles

Ordinary sparkles and small paper figures, which needlewomen often use in scrapbooking, etc., can be an excellent filler for a transparent Christmas tree decoration.
Materials
To decorate a Christmas ball with glitter with your own hands you will need:
- transparent ball for decorating the Christmas tree;
- dry loose glitter or small paper figures;
- glue that dries transparent.

Step 1. First, you need to carefully remove the hanging mounts from the ball. If you are afraid that it will burst, put on thick rubberized gloves on your hands.

Step 2. Deliver prepared glitter or small paper figures. Pour them into the ball in the amount you need.

Step 3. Insert the fastener back into the ball, having previously lubricated the joint with glue.

After the glue has dried, the ball is ready!
Master class No. 2: decorating a Christmas ball with live plants

Live plants can also be used as Christmas tree decorations.
Materials
To decorate a Christmas ball with live plants, prepare:
- transparent glass ball;
- sprigs of eucalyptus, spruce, pine, etc.;
- silver wire;
- scissors.
Step 1. Cut the prepared branches into smaller pieces. The length of the workpiece should not exceed the diameter of the Christmas ball. Eucalyptus sprigs or coniferous plants can replace any other plant that will not lose its character during the New Year holidays appearance and, for example, dried flowers, spikelets, etc. will not wither. It is important that they can fit through the hole in the toy.
Step 2. Carefully remove the fasteners from the Christmas tree decoration.
Step 3. Place the prepared branches inside the ball. Return the mount to its place.

You can send this decoration for its intended purpose on the Christmas tree or decorate other rooms and spaces in the house with it to bring a fabulous New Year's atmosphere to them. To use balls as decoration, instead of the usual fasteners, make an elongated one from intertwined wire. Collect several of these balls together, making their fastenings different in length. Ready!

Master class No. 3: DIY Christmas tree decorations with superheroes

Fans of comics and superhero sagas will love this master class. In it we will make Christmas tree decorations with superheroes with our own hands.
Materials
To work you will need:
- transparent Christmas balls;
- acrylic paints;
- stickers with superhero symbols.
Step 1. First you will need to remove the mount from the Christmas tree decoration.
Step 2. Take acrylic paint and if it is not liquid enough, add a little thinner to it and mix everything thoroughly.
Step 3. Pour paint into the ball and, turning it, ensure that the paint evenly covers the entire inner surface of the ball. If you want the toy to have a shimmering shine in addition to color, you can add glitter sparkles to the paint.

Step 4. Leave the ball open until the paint is completely dry and then put the mount back on.
Step 5. Glue a logo of a suitable superhero to the outside of the balloon.

Likewise, by combining paint tones and stickers, you can make a whole collection of similar toys.
Master class No. 4: DIY Christmas balls with photos

An ordinary Christmas tree toy can be turned into an exclusive souvenir or gift; all you have to do is send it a photo of your child or people close to you and bright moments from your life.
Olesya Tulinova
New Year one of the most beloved and anticipated holidays, it is loved equally by both adults and children. And when the New Year comes to our home, we gladly surrender to the power of children's habits and traditions. One of these habits and traditions for all of us is decoration. Christmas tree. We also started decorating our Christmas tree in class. While decorating our beauty, we became interested and asked where the first ones came from. Christmas decorations And balls? Why have they been the main Christmas tree decorations for so many years?
The first sacred tree that was decorated and around which merry songs and dances were performed was the apple tree. Later, spruce became a ritual tree, because ancient people endowed living nature with superpowers and in order to receive favor and help, it was necessary to make sacrifices.
Decorated "Christmas tree"according to special canonical rules: the top was crowned with the “Star of Bethlehem”, the apples personified the forbidden fruit that the ancestors Adam and Eve tasted. Burning candles are the essence of Christ's sacrifice.
The first Christmas tree decorations were edible. These were: apples, tangerines, oranges, carrots, potatoes, eggs, nuts, waffles, gingerbreads, figured sugar, candies.
But still, out of all the abundance, apples occupied the most honorable place among the whole variety of first decorations. In the fall, the most beautiful apples were selected, evenly large and strong. They were carefully stored until winter. And it was apples that became the prototype of glass balls.
According to legend, one day there was a bad apple harvest. Then the believers came to the glassblowers with a request to make glass apples for the holiday. And in 1848 In Thuringia, in the town of Lausta, glassblowers proposed a replacement for the apple, a glass ball made of transparent and colored glass, which was coated on the inside with a layer of lead and decorated on the outside with sparkles.
Such balls immediately won the hearts of people and their production became widespread.
Glass decorations were expensive for a long time (one ball cost as much as a car, so home crafts continued to be a favorite and useful activity. These were toys made of shells, colored paper, cardboard, cotton wool, etc. Now they are made of glass balls are gradually becoming a thing of the past - after all, they are fragile and short-lived. Plastic ones are taking their place. balls.
And for you I offer a manufacturing option DIY Christmas balls made of polystyrene foam. Balls from foam plasticcan be decorated using: pieces of felt, sequins, beads, threads, etc.
We decorated our balls with sequins. To decorate the balls we needed:
Foam ball-shaped workpiece;
Sequins various types and colors;
Multi-colored beads;
stud pins

The sequins are attached to the base using nail pins in a spiral from the center.

By attaching all the sequins you get a very beautiful ball.


When decorating a ball, you can use a wide variety of sequins and colors, which will give you the opportunity to make many different balls.


Thank you for your attention!
Publications on the topic:
 The book is not just a book, but something dear from childhood. The importance of books for a child is very great, because books broaden children’s horizons and develop them.
Summary of GCD for drawing “New Year's balls” Municipal preschool educational autonomous institution kindergarten No. 3 general developmental view of the city of Zeya Lesson notes.
 Hello everybody. I would like to offer you a simple way to make New Year's decorations together with your child. I found this idea on the Internet.
 Warm greetings to you, my dears! Recently, I have been very fond of and close to me the rustic style in decoration and design of crafts, for this reason.
 The wonderful and fabulous New Year holiday is just around the corner, and of course everyone is preparing gifts for their family and friends. But it has long been customary to give.
 The most beloved and most long-awaited holiday of the year is coming - New Year. Many people love winter because New Year's holidays, everyone is waiting.

The approach of that same magic can be felt long before the cherished date. Especially if you are interested in handicrafts: we suggest trying to make exclusive Christmas tree balls with your own hands. Of course, in stores today there is a huge selection of toys and jewelry, but a homemade item will evoke much more pleasant emotions and delight. So let's get started.
DIY Christmas balls decoupage
If you are a beginner, then the decor for you will be extremely simple: use thin paper and napkins, which are carefully glued to the ball. And if you paint on such a ball with a brush, it will look like a unique hand painting. As source material You can use foam, wood or plastic.


You will need:
- Christmas tree balls;
- several napkins with New Year or Christmas designs (it is advisable to use three-layer napkins);
- white acrylic paint;
- one tube of PVA glue;
- a little glossy varnish that can be used to cover the ball when it is ready;
- soft bristle brush;
- ordinary sponge;
- rhinestones and sparkles optional.

Prepare the ball. Before starting work, remove the wire mount from the ball. Next, use fine sandpaper to clean the ball of sparkles and rhinestones. If there is paint on the ball, it must be washed off. To do this, you can use nail polish remover (wipe the ball with a cotton pad). Next, the ball is washed with water and sanded again with sandpaper. This treatment will ensure a tighter adhesion of the pattern to the surface of the toy.


We prime. We use ordinary PVA glue. Mix about five milliliters with acrylic paint white(about thirty milliliters). The composition is ready, it can be applied to the ball. Please note that it is best to apply such a blank using an ordinary sponge. The mixture should dry thoroughly on the ball, after which a second layer of the composition will be applied.
Decor. When choosing a pattern, consider the size of the ball. The drawing is cut out and glued to the toy. The best thing to do in this case is to use napkins. The pattern comes off from the colorful top layer.
Note! It is best to cut a torn or cut out design a little. This way the picture will be able to take the shape of a ball, and unaesthetic folds will not form on it.


It is best to glue the picture using PVA glue. Just don’t forget to dilute it with water (the proportions are equal). The easiest way to apply a design is the classic way: coat a ball of glue and apply a design on top. At this stage, maximum care is important so that the fragile pattern does not tear. You can apply sparkles or rhinestones along the edges, which will hide possible roughness and irregularities between the pattern and the surface of the ball.

Check out some inspiring Christmas ball decoupage options:


You can watch educational videos about the decoupage technique:
DIY Christmas balls made from satin ribbons
This technique is called artichoke. Its essence is that individual parts are sewn and glued to each other. The name of this one is relative new technology deciphered simply: the fact is that the final product is very reminiscent of an artichoke fruit. The technique, it is worth noting, is simple. So why not master it? So let's do it christmas balls do it yourself: master class with photos.We start by preparing the base for the ball. The easiest way is to use foam blanks. Today they can be bought in almost any specialized store.

Let's start working with the ribbons. They are cut into strips of medium thickness. Be sure to take into account the proportions: let’s say the width of the tape you choose is about two and a half centimeters. In this case, the length of the strip should not be less than six centimeters. A square is cut separately from the ribbon and pinned onto the ball using needles.

Now we take the previously prepared strip and carefully fold it in the shape of a small triangle. He pins himself on the square. Please note that the needles should be in the lower corner of the ribbon bend.
Each triangle on all sides of the square is tightly secured. After the first row is ready, you can start making the next one. The principle is the same, but when attaching we use a checkerboard pattern.


The ball will look more interesting if the colors of the ribbons are alternated.

In this way, attach the ribbons to the ball until it is completely covered with them. The lowest part of the ball is decorated with the last square. For convenience, you can tie a thin satin ribbon to the ball: it can be used to hang it on the Christmas tree.


Check out some inspiring Christmas ball options from satin ribbons:


You can watch educational videos on how to make balls from satin ribbons:
Christmas balls made of thread and glue
You will need:- ordinary inflatable balloons (quantity at your discretion);
- one tube of ordinary PVA glue;
- white thread (thick, suitable for knitting);
- a little sparkles and rhinestones;
- some water;
- small bowl.


You can watch educational videos on how to make balls from thread and glue:
Share your experience in the comments below the article!
Photo: upon request from Yandex and Google
Our website publishes materials for those who want to make Christmas and New Year a real holiday for their children, a holiday that they will remember for many years. Here, to help parents, we publish articles and materials on preparing and holding the New Year holidays. Including this New Year's master classes on making original Christmas tree decorations and New Year's decorations with your own hands. If you start making New Year's decorations, Christmas tree decorations and gifts for friends and relatives in advance, then by December 31 your home will turn into a real New Year's fairy tale! We suggest making New Year's balls for the Christmas tree. You will learn how to make a New Year's ball with your own hands with your child, get acquainted with patterns of New Year's paper balls, and photos of Christmas tree decorations.
1. DIY New Year's ball (option 1)
To make this New Year's decoration you will need colored paper, thin wire, a stapler, and glue. The ball you see in the photo above was made from paper of three different colors (pink, blue and cyan).
Work plan
1. Take a small glass or glass (wine glass) and trace it on paper with a simple pencil 12 times. You should have 12 circles (4 circles of each color). Cut out the circles with scissors.
2. Fold each circle in half and stack them together as shown in the picture below. When making this Christmas ball we use three colors of paper (A,B and C). Stack the mugs in the following order: ABBCCAABBCCA. If, when making a New Year's ball, you used paper of two colors (A and B), then in this case you would have to fold the circles in the following sequence - ABBAABBAABBA.
3. Fasten the paper circles together using thin wire, wrapping it around them along the fold line. Twist the ends of the wire together. If you don't have wire, you can fasten the circles together using a regular stapler.
4. Spread the circles and glue adjacent halves of the circles together. Each half should be connected to one adjacent at the top, and to the other at the bottom.
2. Christmas balls do it yourself (option 2)
Cut out three circles of the same size from colored cardboard or thick paper, but different color. In the first of them, cut a cross (Fig. a), in the second circle, make a horizontal cut in the middle and two cuts perpendicular to it in the direction from the circle to the center of the circle (Fig. b), and in the third - four cuts in the form of a cross, also along direction from the circle to the center (Fig. c). Pass circle “c” into circle “b”. In circle “a”, bend the corners formed as a result of its incision; you will get a square hole. Thread circles “b” and “c” into it, having previously folded them. Then bend the corners again (Fig. d). Attach a thread to the resulting ball.
3. Christmas balls made of paper (option 3)
From old postcards or colored paper you can make these cute Christmas tree decorations - New Year's balls.
You can print ready-made colored circles to make a colorful New Year's ball using this technique.
4. Making a New Year's ball (option 4)
A very easy to make New Year's paper ball. To make it, you will need colored paper and glue.
Work plan:
1. Cut out eight identical circles from paper of different colors. Although, in fact, the number of circles can be any, but not less than three.
2. Fold each circle in half, right side inward.
3. Glue the halves of the circles together as shown in the photo below. Glue is applied to wrong side half a circle.
4. Before finally sealing New Year's ball, thread a thick thread or ribbon through it. You can also make a wonderful Christmas garland from large quantity paper balls.
Note: this Christmas decoration can be made not only in the shape of a ball, but also in any other shape. To do this, use different stencils.
5. DIY New Year's ball (option 5)
To make these wonderful New Year's lanterns you will need to cut colored paper into strips of equal length and width. The length and width of the strips depends on the size of the lantern you want to make. To make one paper lantern you will need on average 14-16 strips of paper
When making New Year's balls, you can use strips of paper of different colors and beads to decorate New Year's toys with your own hands.
If you bend the strips of paper in the middle, you will get this New Year's decoration.
6. How to make a New Year's ball (option 6)
So cute and easy to make New Year's craft We suggest you make one from old postcards together with your child.
1. Using a small glass or wine glass, draw and cut out eight identical circles.
2. Using another object with a round base but a smaller diameter, draw and cut out two small circles.
3. Fold each large circle in half, and then in half again.
4. Glue four folded large circles onto one small circle, and the remaining four onto the other. As a result, you will have two halves of your future Christmas ball.
It is very IMPORTANT to correctly position the quarters of large circles on small mug. Try to carefully straighten the “pockets” of folded circles and in advance, before gluing, estimate the correctness of their location. In this case, focus on the very first photo, which shows a ready-made ball.
5. Now all you have to do is glue the two finished halves together and, when the glue dries, straighten all the pockets. The New Year's ball is ready!
7. DIY thread ball (web balls)
Balls made from threads look very attractive and do not require any special skills or money. Many did them at school during labor lessons. And the use of these web balls is limitless: simply as a decorative element, as a lampshade, and as a New Year's toys. From several of these balls of thread you can make all kinds of toys: snowmen, birds, fish. In general, everything that is enough for your imagination.
Making balls from threads:
1. You will need: scissors, balloons, rich cream (vaseline), any yarn, PVA glue, bowl.
2. Dilute PVA glue with water, approximately 3:1.
3. Inflate the balloon to the desired size, give it a round shape, and tie it with thread.
4. Having unwinded the required amount of yarn, put it in a bowl and leave for 5 minutes.
5. Spread the ball thick cream and wrap it with yarn, first leaving a large distance between the threads.
6. Gradually reduce the distance between the threads until the entire ball is wrapped in yarn and resembles a cocoon.
7. Cut the thread and glue it to the ball. Leave it to dry (at least for a day).
8. Gradually untying balloon, carefully deflate it, and then remove it from the thread cocoon; We tie a rope to the top of the ball of thread for fastening.
When making a ball, you can use yarn (threads) of any color or paint it with any paint or glitter (spray). Especially for the New Year, you can decorate this thread ball with tinsel and stars. Hang small balls on the Christmas tree, decorate the room with large ones. Fantasize boldly!
If you are unable to wind glue-soaked thread onto a ball, you can wind dry thread and then thoroughly soak it in glue using a brush or sponge.
Instead of glue, you can use sugar syrup or starch paste. To prepare the paste, take 3 teaspoons of starch per glass of cold water, mix thoroughly and bring to a boil. Instead of thread, you can take a thin one copper wire and also wrap it around the ball.
Old Christmas balls can be updated by wrapping each of them in a piece of paper. beautiful fabric and tied with a ribbon.
Website: http://adalin.mospsy.ru
New Year is special family celebration On this day people remember the past and look forward with hope. To have a fun New Year's Eve, prepare a winter fairytale atmosphere in your home and create a unique item self made. You can transform old ones Christmas decorations, painting them to your taste. In this article we will look at how to paint Christmas balls with your own hands.
You will need: plastic ball, acrylic primer, acrylic paints in gold, green, white, brown and red, wide synthetic brush, sandpaper, acetone, glitter.
Master Class

- Paint the ball with golden paint using a wide brush, leave to dry, then sand.
- Apply another layer of golden paint and dry.

- Paint the fir branches with green paint.
- Paint the cones with brown paint, and use white paint for highlights on the scales.
- Draw red berries different sizes and add highlights.
- Dry the workpiece.

- Apply glitter to the outline of each detail of the design and leave to dry.
- Make an imitation of snow with white paint.
You will need: Christmas ball, acrylic paints, brushes.
Master Class
- Wet your hand with water.
- Apply a layer of white paint to your entire palm and fingers.
- Take the ball with your unpainted hand, place it in your painted palm and squeeze your fingers together.
- Pick up the ball with your unpainted hand and leave to dry.
- Draw a face for each finger, sign the name and year.
creative painting
You will need: plastic Christmas balls, acrylic primer, “Acrylic Hobby” paint in white and black, “Acrylic-Art” paint in purple color, gold glitter, foam sponge, pencil, sandpaper, thin brushes, acetone, wooden sushi stick, sheet of paper .
Master Class
- Attach a sushi stick to the ball.
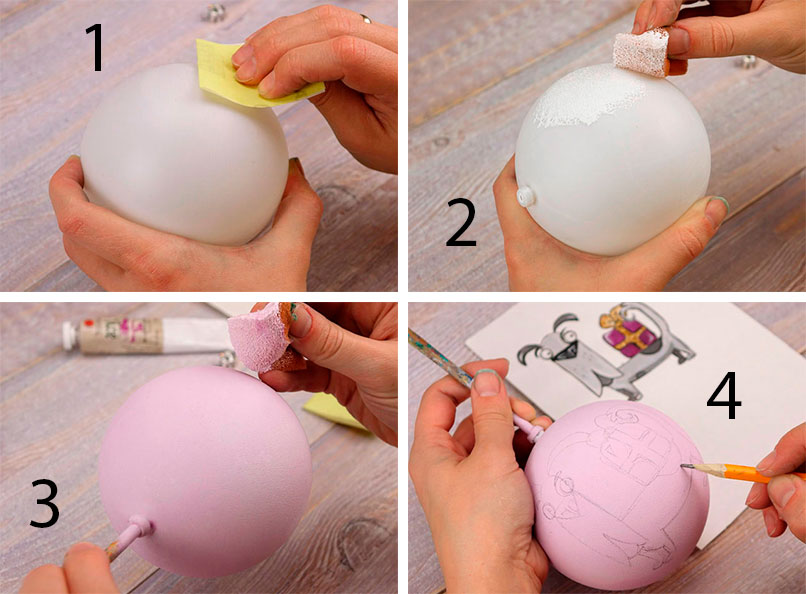
- Go over with sandpaper plastic ball, then degrease with acetone.
- Dilute the acrylic primer to the consistency of sour cream and apply it with a sponge to the entire surface of the ball, then leave to dry.

- Apply the purple paint with a sponge and wait until it dries.
- Draw the dog on a piece of paper, then transfer the sketch onto the ball using a pencil.

- Color the dog in this way: first the light areas, then the dark ones, following the photo instructions.

- Paint the nose and paws black and don’t forget to make spots on the dog’s body.

- Outline the outline of each part in black using a thin brush or marker.
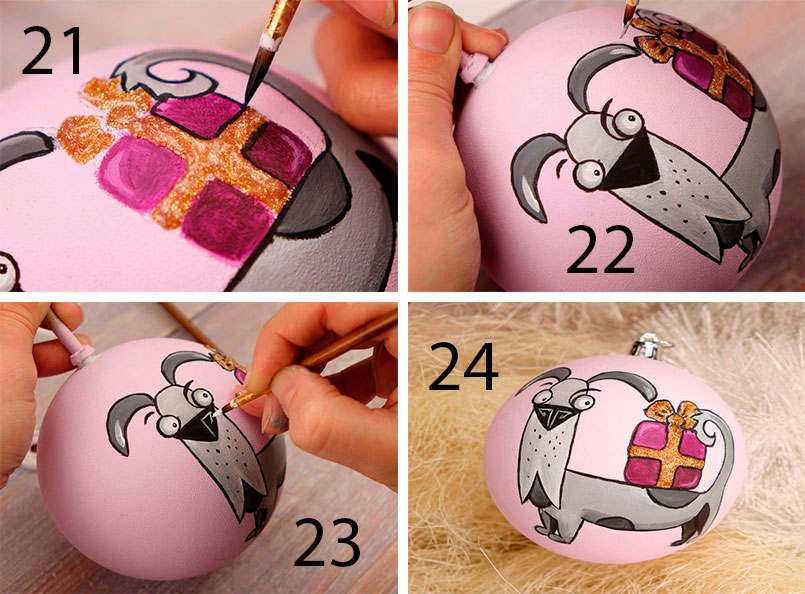
- Draw the face and the gift.
- Apply glitter to the gift and wait until it dries.
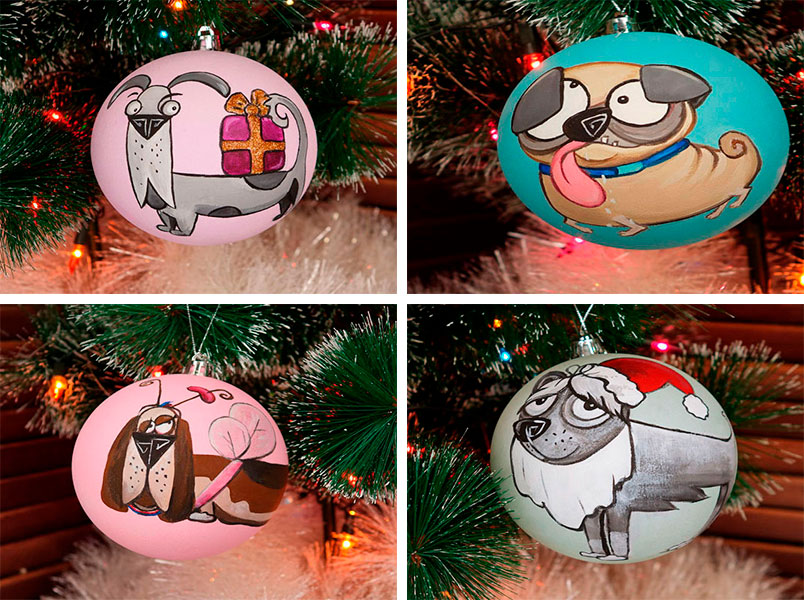
- You can make other dogs in the same way.
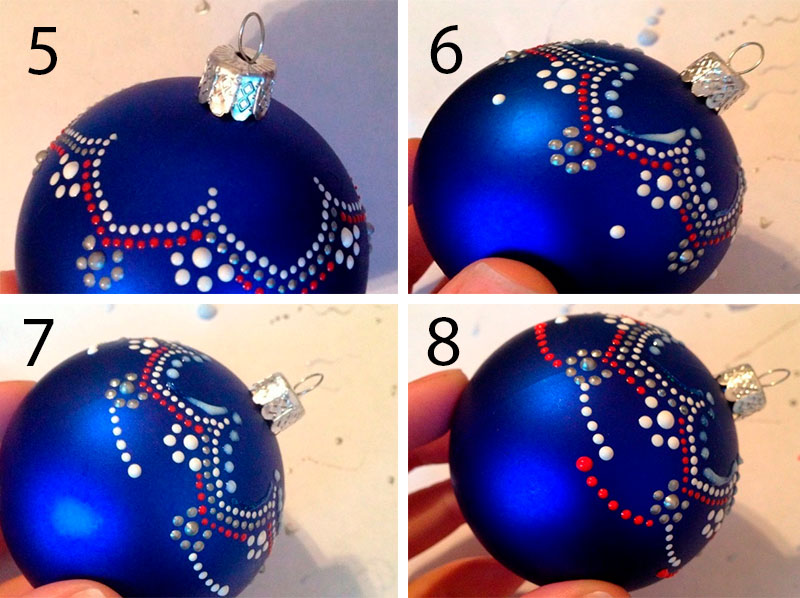
You will need: plain Christmas tree balls, acrylic outlines in white, gray and red, stained glass paints, a sheet of paper, a simple pencil, scissors, tweezers, ribbon.
Master Class
- Draw a flower and cut out the stencil.
- Wet the stencil in water and apply it to the ball.
- Place white dots along the outline of the stencil.

- Make a second outline of the flower, alternating dotted petals of gray and red.
- Place large white dots between the petals, then draw 4 dots side by side.
- Place large gray dots between the previous white ones, then draw 4 dots side by side.
- Draw dotted horizontal lines in white and red. The top of the ball is ready!
- Prepare a template in the shape of the first stencil, only smaller, then cut it out.
- Wet the stencil and apply it to the side of the ball.
- Carefully remove the stencil with tweezers so as not to smudge the dots.
- Make the inner outline of the flower with red dots.

- Using stained glass paints, dot-draw a snowflake - they will dry and become shiny.
- Repeat steps 9-13 to paint the second side of the ball.
- Wait for it to dry, attach a ribbon and hang it on the tree.
You will need: Christmas ball, glue, brush, glitter.
Master Class

You will need: Christmas ball, acrylic paints, brush.
Master Class
- Wet your index finger with water.
- Dip it in paint.
- Attach to the Christmas ball.
- Draw the eyes, nose and antlers of the deer.
- Wait until completely dry.
Unusual painting
You will need: transparent ball, felt-tip pen, pva glue, silver and gold glitter, black acrylic paint, brush, 2 black buttons.
Master Class
- Draw 2 large circles for the eyes.
- Draw an upside down triangle for the beak.
- Apply glue liberally to the eyes and sprinkle with silver glitter.
- Apply glue to the beak and sprinkle with gold glitter.
- Paint the ball with black paint.
- Glue buttons as pupils.
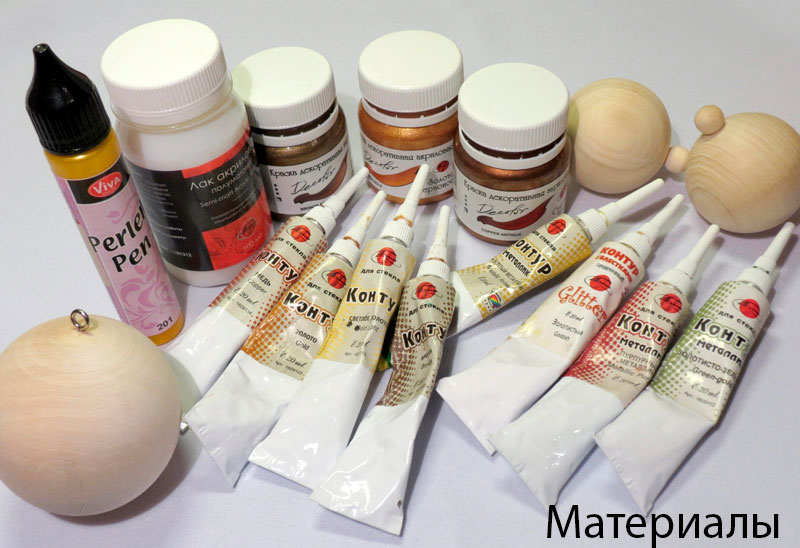
You will need: wooden Christmas balls, fine-grained sandpaper, acrylic paints (red gold, old copper and old bronze), glossy acrylic varnish "Tair", acetone, brush, gold pearl maker, acrylic outlines (gold, copper, bronze, yellow and purple metallic, golden green and golden glitter glitter).