Dress pattern step by step instructions. Dress patterns for beginners. Simple do-it-yourself patterns photos and videos. What to do after receiving the necessary measurements
When sewing simple clothes, you can do without a pattern; for clothes of complex styles, you will already need a pattern - paper template, along which fabric parts are cut out. If you choose between a finished pattern and a design drawing, then I will advise the second option.
Modeling basic pattern dresses. Step by step building patterns
Even if you are new to sewing, building a pattern will help you quickly understand and master the principles of designing clothes. In addition, the pattern is built according to your individual measurements, which means that the future product will fit well on the figure, ready-made patterns such a result is not guaranteed, since each of us has our own anatomical features of the figure. And finally, building a pattern is an interesting and exciting process!
In this article, we will learn how to model a basic pattern for a dress according to the method of Tatiana Roslyakova. In the last article, we learned that we need to sew a dress pattern. Let me remind you that the drawing of structures is carried out only on half of the figure, therefore, measurements of volumes and width are recorded in half size.
In addition to measurements, we need an increase in loose fit(CO). These additions are added to almost all measurements in the design drawing, they are needed for freedom of movement and breathing. Depending on the silhouette of the product, the allowance for free fitting differs in size. Increases for clothing styles (trousers, jackets, coats, etc.) also differ, moreover, for different types fabrics, there are separate increases. AT various methods the construction of patterns indicates different increases for the same silhouettes and styles, so it is very important to pay attention to the increases that are indicated in the methodology. But for now, we are learning to build the basis of the dress, so I offer you a few silhouettes:
SUPPLEMENTS FOR A LOOSE FIT ON THE LINE OF THE CHEST, WAIST, HIPS

LOOSE FIT ADDITIONS ON THE BACK AND SHELTER AREAS

ADDITIONS TO THE LENGTH OF THE BACK TO THE WAIST, TO THE DEPTH OF THE ARMHOLE, TO THE WIDTH OF THE NECK

SHOULDER CIRCUIT ADDITIONS

Explanations for tables:
- Pg - increase along the chest line
- Fri - increase along the waistline
- Pb - increase along the hip line
- Pshs - an increase in the width of the back
- Pshp - an increase in the width of the floor
- Pspr - an increase in the freedom of the armhole
- Pop - an increase in the girth of the shoulder
- Pshgor - an increase in the width of the neck
- Pdts - an increase in the length of the back to the waist
- Pdtp - an increase in the length of the front to the waist
- Pvpk - an increase in shoulder height oblique
Below is a list in which I wrote my measurements as an example. By these standards, I will make calculations, and you must substitute your data.
- Half-girth of the neck (Ssh) - 15 cm
- Half-chest (SG) - 40.5 cm
- Waist (St) - 29 cm
- Semicircumference of the hips (Sat) - 44.5 cm
- Back length to waist (Dts) - 40 cm
- Back Width (W) - 16.5 cm
- Front length to waist (Dtp) - 42 cm
- Chest height (Vg) - 25 cm
- Center of chest (Cg) - 9 cm
- Shoulder length (Dp) - 13 cm
- Product length (Di) - 85 cm
I will indicate all the allowances for free fit to these and other measurements in the formulas when constructing a pattern. In this article, we will build a dress with an adjacent silhouette.
Modeling the basic pattern of the dress. Step-by-step construction of a pattern
Let's start drawing
It is necessary to prepare a sheet of paper, the length of which should be 10-15 cm longer than the length of the future dress. If you have never built patterns before, then I advise you to do all the drawings on millimeter paper in a roll, it can be purchased at an office supply store. Drawing on such paper is a pleasure! Drawings are accurate and even.
Dress length. In the upper left corner of a sheet of paper, draw a right angle with a vertex at point P, stepping back from the top edge of 5 cm. From the point P down in a straight line, set aside a value equal to the length of the dress and put the point H (segment PH \u003d Di \u003d 85 cm).

Dress Width. From the point P to the right, set aside the half-girth of the chest + 3 cm (increase in free fit), and put the point P1 (segment PP1 \u003d Cr + CO \u003d 40.5 + 3 \u003d 43.5 cm). From the point H to the right, set aside a segment equal to PP1 and put the point H1 (segment HH1 = PP1 = 43.5 cm). Let's connect the points P1 and H1

Waistline. From the point P down, we set aside the measurement of the length of the back to the waist + 0.5 cm and set the point T (RT = Dts + CO = 40 + 0.5 = 40.5 cm). Draw a straight line from the point T to the right until it intersects with the line P1H1 and denote the intersection point as T1.

hip line. From point T downwards, set aside 1/2 measurements of the length of the back to the waist and put point B (TB \u003d 1 / 2Dts \u003d 40: 2 \u003d 20 cm). Draw a straight line from point B to the right until it intersects with the line P1H1, and denote the intersection point as B1.

Back Width. From the point P to the right, we set aside the width of the back + 0.9 cm and put the point P2 (PP2 \u003d Wc + CO \u003d 16.5 + 0.9 \u003d 17.4 cm). Draw a straight line of arbitrary length from this point

Armhole width. From point P2 we set aside 1/4 of the half-girth of the chest + 1.5 cm and put the point P3 (P2P3 \u003d 1 / 4Cr + CO \u003d 40.5: 4 + 1.5 \u003d 11.6 cm). Attention! The segment P2P3 is the width of the armhole, therefore, the resulting value of this segment must be distinguished for yourself, in the future we will use this value. Draw a straight line of arbitrary length down from the point P3.

Back neck cut. From point P to the right, set aside 1/3 measurements of the half-girth of the neck + 0.5 cm and put the point P4 (PP4 \u003d 1 / 3Ssh + CO \u003d 15: 3 + 0.5 \u003d 5.5 cm). From the point P4 upwards, set aside 1/10 of the half-girth of the neck + 0.8 cm and put P5 (P4P5 \u003d 1 / 10Ssh + CO \u003d 15:10 + 0.8 \u003d 2.3 cm). Divide the angle with the top P4 in half and draw a straight line, on this straight line we set aside 1/10 of the half-girth of the neck - 0.3 cm and put the point P6 (P4P6 \u003d 1 / 10Ssh-CO \u003d 15: 10-0.3 \u003d 1.2 cm). Connect the points P, P6 and P5 with a smooth line, while the angle at the point P must be straight.

Shoulder cut back. From P2 we set aside 2.5 cm down for normal shoulders, 3.5 cm for sloping, 1.5 cm for high and put a point P. Connect the points P5 and P, and on this straight line we set aside from P5 the length of the shoulder + 2 cm to the tuck and put P1 ( R5P1=Dp+2cm=13+2=15cm). Again, on this line from the point P5 we set aside 4cm and put the point O (P5O = 4cm). Down from the point O, set aside 8cm and put the point O1 (OO1 \u003d 8cm). Set aside 2 cm to the right of the point O and put the point O2 (OO2 \u003d 2 cm). Let's connect the points O1 and O2, on the straight line obtained from the point O1 we set aside 8cm and put the point O3 (O1O3 \u003d 8cm). Now let's connect the points O3 and P1.

Armhole depth. From P down we set aside 1/4 of the half-girth of the chest plus 7 cm (for stooped figures plus 7.5 cm, for kinky figures plus 6.5 cm) and put the point G (PG = 1/4Cr + CO = 40.5: 4 + 7.5 = 17.6cm). Draw a line through the point G to the intersection with the line RN, denoting the intersection point G1, to the line P1H1, denoting the intersection point G3, and the point of intersection with the straight line from the point P3, denote G2.

Back cutout. From G upwards, set aside 1/3 of the distance PG + 2cm and put P2 (GP2 = 1/3PG + CO = 17.6: 3 + 2 = 7.8 cm). Divide the corner at point G in half and set aside 1/10 of the armhole width + 1.5 cm and put the point P3 (GP3 \u003d 1 / 10Shpr + CO \u003d 11.6: 10 + 1.5 \u003d 2.6 cm), divide the GG2 line in half and put G4. We will connect points P1, P2, P3 and G4 with a smooth line.

Shelf armhole cut. From G2 upwards, set aside 1/4 of the half-girth of the chest + 5 cm (for stooped figures + 4.5 cm, for kinky figures + 5.5 cm) and put P4 (G2P4 \u003d 1 / 4Cr + CO \u003d 40.5: 4 + 4.5 \u003d 14, 6cm). From P4 to the left, set aside 1/10 of the half-girth of the chest and put P5 (P4P5 \u003d 1 / 10Cr \u003d 40.5: 10 \u003d 4 cm). From G2 upwards, set aside 1/3 of the segment G2P4 and put P6 (G2P6 \u003d 1 / 3G2P4 \u003d 14.6: 3 \u003d 4.8 cm). We connect the points P5 and P6 with a dotted line and divide it in half, from the division point to the right at a right angle we set aside 1 cm. Divide the angle at point G2 in half and set aside 1/10 of the armhole width + 0.8 cm and mark the point P7 (G2P7 = 1/10Spr + CO = 11.6:10 + 0.8 = 1.9). Connect the points P5,1,P6,P7, and G4 with a smooth line.

Shelf neck cut. From G3 upwards, set aside 1/2 of the half-girth of the chest + 1.5 cm (for stooped figures + 1 cm, for kinky figures + 2 cm) and put P7 (G3P7 \u003d 1 / 2Cr + CO \u003d 40.5: 2 + 1 \u003d 21.2 cm). From G2 we set aside the same value upwards and put the point P8 (G2P8 \u003d G3R7 \u003d 21.2 cm). Let's connect points P7 and P8. Now, from the point P7 to the left, set aside 1/3 of the half-girth of the neck + 0.5 cm and put P9 (P7P9 \u003d 1 / 3Ssh + CO \u003d 15: 3 + 0.5 \u003d 5.5 cm). Down from the point P7, set aside 1/3 of the half-girth of the neck + 2 cm and put the point P10 (P7P10-1 / 3Ssh + CO \u003d 15: 3 + 2 \u003d 7 cm). We connect the points P9 and P10, and divide the resulting segment in half. From the point P7 we draw a straight line through the division point of the segment P9P10, and on this line we set aside 1/3 of the half-girth of the neck + 1 cm and put the point P11 (P7P11 \u003d 1/3Ssh + CO \u003d 15: 3 + 1 \u003d 6 cm). Connect the points P9, P11, P10 with a smooth line, keeping a right angle at the point P10.

Shoulder section of the shelf and the line of the chest tuck. From G3 to the left, set aside the measurement of the center of the chest and put G6 (G3G6 \u003d Tsg \u003d 9cm). From G6 we draw a line up to the intersection with the line P7P8, we denote the intersection point as P12. From P12 down, set aside the measurement of the height of the chest and put the point G7 (P12G7 \u003d Bg \u003d 25cm). From the point P12 we set aside 1 cm down and put P13 (P12P13 \u003d 1 cm). Let's connect points P9 and P13. And we will connect the points P13 and P5 with a dotted line. On this line from point P5 to the right, we set aside the length of the shoulder minus the value of the segment P9P13 and minus 0.3 cm, put the point P14 (P5P14 \u003d Dp-R9R13-0.3 \u003d 13-3-0.3 \u003d 9 cm). From the point G7 through the point P14 we draw a segment equal to the segment G7P13 and put the point P15 (G7P15 \u003d G7P13). Let's connect points P5 and P15.

Side seam line. From G to the right, set aside 1/3 of the width of the armhole and put a point G5 (GG5 = 1 / 3Shpr = 11.6: 3 = 3.8 cm). Draw a vertical line through point G5. At the intersection with the armhole line, we put point B, at the intersections with the waist, hips and bottom lines, we put points T2, B2, H2.

Determining the solution of tucks along the waistline. We add 1 cm to the measure of the half-circumference of the waist (St + CO = 29 + 1 = 30 cm), subtract this value from the width of the dress along the line TT1 (43.5-30 = 13.5 cm). Thus, we calculated the total amount of tuck solutions along the waist line, i.e. 13.5cm.
the size of the solution of the front tuck \u003d 0.25 of the total solution of the tucks (13.5 x 0.25 \u003d 3.4 cm),
the size of the side tuck solution = 0.45 of the total solution (13.5 x 0.45 = 6 cm),
the size of the back tuck solution = 0.3 of the total solution (13.5 x 0.3 \u003d 4.1 cm)
Determining the width of the dress along the hip line. We add 1 cm to the semi-girth of the hips (Sb + CO = 44.5 + 1 = 45.5 cm). From the obtained value, subtract the width of the dress along the line BB1 (45.5-43.5 \u003d 2 cm). We will distribute the result equally between the shelf and the back (1 cm each).
Side tuck. From B2 to the left and right, set aside the resulting difference (in my example, 1 cm) and put points B3 and B4. From T2 to the left and to the right, set aside half the solution of the side tuck (6: 2 \u003d 3 cm) and put T3 and T4. We connect point B with points T3 and T4. We will connect the points T3, B4 and T4, B3 with a dotted line, we will divide these segments in half, from the division points towards the side we will set aside 0.5 cm each and we will now connect the side cut with smooth lines through the points T3.0.5 and B3 and through the points T4, 0 ,5, B4.

If the difference between the half-girth of the hips with an increase in free fit and the width of the dress along the hip line turned out to be negative, for example, the half-girth of the hips + CO = 47 cm, and the width of the dress along the hip line is 45 cm, then the difference between these values will be -2 cm. This result is equally distributed equally between the backrest and the shelf (-1cm). And the side seam line will look like this.

If the difference is zero, then points B3 and B4 will coincide, i.e. the side seam line will join at point B2.

Shelf waist line. From the point P7 down, we set aside the measurement of the length of the front to the waist + 0.5 cm and put T5 (P7T5 \u003d Dtp + CO \u003d 42 + 0.5 \u003d 42.5 cm). We will connect points T4 and T5 with a smooth line, observing a right angle at point T5.

Shelf hip line. From B1 down, set aside the value of the segment T1T5 and put B5 (B1B5 \u003d T1T5. We will connect points B3 and B5 with a smooth line, observing a right angle at point B5
Shelf tuck. Draw a straight line from G6 down to the intersection with the line BB1. Intersections with the lines of the waist and hips will be denoted by points T9 and B7. From T9 to the left and to the right, set aside half the solution of the front tuck (3.4: 2 \u003d 1.7 cm) and put T10 and T11. From G7 down, and from B7 up we set aside 4 cm, put points and connect them to T10 and T11.

Back tuck. We divide the segment GG1 in half, and denote the division point as G8. From G8 we lower the line down to the intersection with the line BB1. At the intersections with the waist line and the hip line, we put points T6 and B6. From T6 to the left and to the right, set aside half the solution of the back tuck (4.1: 2 = 2 cm) and put T7 and T8. Set aside 1 cm from G8 down, set aside 3 cm from B6 up. We connect these points with T7 and T8

Shelf bottom line. Draw lines from B3 and B4 down to the intersection with the straight line HH1 and mark the points H3 and H4. From H1 down, we set aside the value of the segment T1T5 and put the point H5 (H1H5 \u003d T1T5). We will connect points H3 and H5 with a smooth line, observing a right angle at point H5.

And now we can congratulate ourselves, our dress pattern is ready!

Once again, I draw your attention to the fact that I did all the calculations according to my own standards, so be sure to substitute your data in the calculations. Good luck with your sewing and creative inspiration!
The pattern of almost any dress is built on the main pattern. By changing the style and adding some elements (undercuts, folds, embossed seams, cuts, etc.), you can cut out any dress model.
This guide refers to a size 46 dress. To build individual patterns, you should use the dimensions corresponding to the measurements taken from the person for whom it is planned to sew a dress.
In the process of constructing a pattern, it will be explained from which measurements a certain size is taken and how it is calculated.
Measurements that will be needed to build a pattern:
Basic grid
We start building a drawing from the base grid (calculated and constructed main lines): 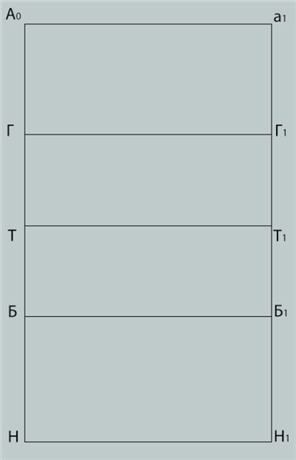
A 0 a 1 \u003d 51 cm. The length of this segment is calculated by the formula:
POg2(half bust 2) + Pg(increase in loose fit to the chest) = 46 cm + 5 cm = 51 cm.
The remaining horizontal segments in this figure are equal and parallel to A 0 a 1.
A 0 D = 23.2 cm = vprz(back armhole height) + Pspr(increase on the free fit of the armhole) + pdst(increase to the length of the back to the waist) = 20.7 cm + 2 + 0.5.
A 0 T \u003d Dst + Pdst \u003d 41.6 + 0.5 \u003d 42.1 cm.
TH=45cm= DOJ(skirt length).
TB=18.8cm= Dst(back length to waist): 2 - 2. = 41.6: 2 - 2
back drawing

The width of the back to the armhole is a rectangle A 0 aG 2 G.
A 0 a \u003d 18.8 cm \u003d ( Shs(back width) : 2) + Pshs(increase in back width) = 17.8 cm + 1 cm.
The width of the armhole is a rectangle aa 2 G 3 G 2.
Segment a 2 a 1 \u003d 20.2 cm \u003d (Shg(chest width) : 2) + ( Pog2(semi-bust 2) – Pog1) + Pshg(increase in chest width) = 16.7 + (46 - 44) + 1.5.
For control.
Segment aa 2 \u003d 12 cm \u003d A 0 a 1 - (A 0 a + a 1 a 2), measured from the drawing.
Segment aa 2 = ( Op(shoulder girth) + Pop(increase in shoulder girth)) : 3 = (29.1 + 6) : 3. = 11.7.
The width of the armhole may deviate from the control calculations by 0.2 - 0.4 cm, but cannot be less than them. In our case, it should not be less than 11.7.
The neck of the back is formed by the A 1 A curve.
Segment A 0 A \u003d 7 cm \u003d Posh(semi-girth of the neck) : 3 + Pposh(increase to the half-girth of the neck) = 17.8: 3 + 1.
A 0 A 1 \u003d 2.3 cm \u003d A 0 A: 3. The curve A 1 A itself is drawn by hand, approximately as in the figure.
The construction of the shoulder point P.
Shoulder point P is formed by the intersection of two radii TP and AP.
tp=42.5cm= VPK(shoulder height oblique) + pdst(increase to the length of the back to the waist) = 42 + 0.5.
AP=15cm= Dpl(shoulder length) + 2 cm = 13 + 2 cm.
2 cm is an increase in the groove solution, for a stooped figure this value is 2.5 - 3.5 cm, for a kinky figure the groove is replaced by a fit and this size is 0.7 - 1 cm.)
The segment AP is an auxiliary straight line on which the undercut will be built.
Groove construction

AB = 4.3 cm = Dpl : 3 = 13: 3.
The segment BB 1 is parallel to A 0 G. BB 1 \u003d 8 cm. This value is constant (from 7 cm to 9 cm) for standard figures.
BB 2 (groove solution) \u003d 1.5 cm \u003d 2 cm (increase for the groove solution) - 0.5 cm (increase for planting the shoulder seam).
B 1 B 3 \u003d B 1 B \u003d 8 cm. This segment passes through the point B 2, which is located on the segment AP.
Point G 4 divides the segment G 2 G 3 in half. The segment P 1 P is perpendicular to aG 2.

G 2 P 2 \u003d 7.8 \u003d P 1 G 2 (measured on the drawing): 3 + 2 (constant increase).
From point Г 2 we draw a bisector 1 with a length of 2.9 cm \u003d 0.2 * Г 2 Г 3 + 0.5 \u003d 0.2 * 12 + 0.5
G 2 G 5 \u003d G 2 G 3: 3 \u003d 4 cm.
The PG 4 curve is built by hand and must pass through P 2 and the end of the bisector.
Building a front drawing
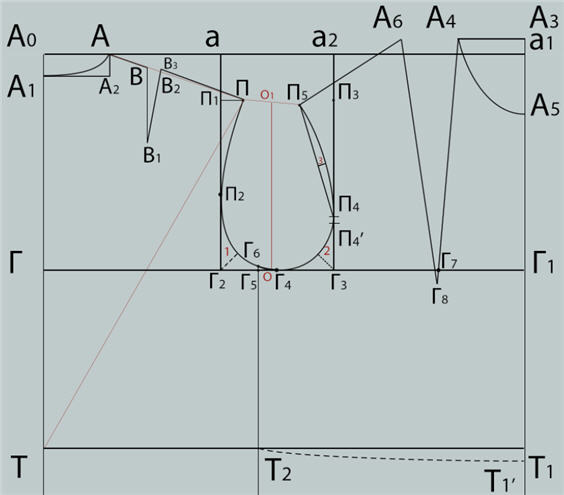
Through the point G 5, parallel to A 0 H, we draw a segment G 6 H 2 - the line of the side seam.
For free-form products, with raglan sleeves and one-piece, the side seam can pass through the point G 4, and not G 5.
Neck construction
T 1 A 3 = 43.3 cm = dpt(front length to waist) + Pdpt(increase to the length of the front to the waist) =
= 42.8 + 0.5. If measure dpt more than Dst by 6 or more centimeters, then each of the points T 1, B 1, H 1 should be shifted down by an amount that is calculated by the formula - ( dpt – Dst) : 4.
For example, (46 - 40): 4 = 1.5, T 1 T 1' = B 1 B 1' = H 1 H 1' = 1.5 cm.
A 3 A 4 \u003d A 0 A \u003d 7 cm - we draw parallel A 0 a 1.
A 3 A 5 \u003d 8 cm \u003d A 3 A 4 + 1 \u003d 7 + 1.
Curve A 4 A 5 is drawn by hand, approximately as in the figure.
Building a groove in front
G 1 G 7 = 9.1 cm = CG(center of chest)
A 4 D 8 = 26.2 cm = Vg(Chest height), drawn from point A 4 through G 7.
Point A 6 is built by the intersection of the radii A 4 A 6 and G 8 A 6.
A 4 A 6 \u003d 6 cm \u003d 2 * ( Pog2 – Pog1) + 2(Increase to undercut).
The increase in undercut for size 38 is 0.5 cm, 40 - 0.8 cm, 42 = 1.1 cm, 44 - 1.5 cm, 46 - 2 cm, 48 - 2.5 cm, 50 - 3 cm.
Front Armhole Height
On the segment a 2 G 3 we mark an auxiliary point P 3.
G 3 P 3 \u003d G 2 P 1 (we measure in the drawing, in our case 17 cm).
G 3 P 4 \u003d G 3 P 3: 3 \u003d 17: 3 \u003d 5.7.
P 4 P 4 ' = 0.6 cm (constant value for all sizes).
Building a shoulder line
Point P 5 is built by the intersection of two radii P 4 'P 5 and A 6 P 5.
P 4 'P 5 \u003d P 4 'P 3 \u003d 12 cm.
A 6 P 5 = Dpl(shoulder length) = 13 cm.
Armhole construction
We draw a perpendicular 3 (1 cm) in the middle of the auxiliary segment P 5 P 4.
From the angle G 3 we draw a bisector 2 \u003d (2.4 cm), the length of which is calculated by the formula:
0.2 * G 2 G 3 \u003d 0.2 * 12 \u003d 2.4 cm, where 0.2 is a constant value.
The line of the armhole in front is formed by the curve P 5 G 6, which passes through the points P 4 and G 4, perpendicular 3 and the end of the bisector 2.
Calculation for a sleeve pattern
The segment O 1 O is drawn from the middle of the segment PP 5 parallel to A 0 H.
The length of the segment OO 1 is measured in the drawing.


The resulting pattern drawing for further use must be divided into two parts along the line of the side seam. The result should be two parts of the pattern - a back pattern and a front pattern.
All of this is done on paper. life size. Then each of the patterns is cut out and transferred to the fabric. Already on the fabric, allowances for seams and processing are added.
I thought about making myself a small one. black dress. I invite you to do this with me.
To build a basic dress pattern, we need the following measurements:
OSH - neck girth ( POSH 18 cm)
OG - chest girth ( POG 46 cm)
OG1 - centimeter tape runs along the shoulder blades, armpits and lies along the line above the breasts ( LL1 43 cm)
FROM - waist circumference ( POT 37 cm)
OB - hip circumference ( POB 50 cm)
DTS - back length ( 39 cm)
DR - sleeve length ( 60 cm)
RTA - front waist length ( 37 cm)
Dpl - shoulder length ( 13 cm)
ШС - back width (36 cm)
ShP - front width. We measure at the most convex points of the front from the point of articulation of the body and left hand to the point of articulation of the body and right hand ( 37 cm)
CG is the center of the chest. We measure along a horizontal line between the most convex points of the breasts. We write down half the value ( 9 cm)
VG - chest height (25 cm)
CI is the length of the product, in this case the length of the dress. It is measured at the back along the back from the waist line along the spine to the waist, and then down to the length you need (100 cm).
Allowances for loose fit:
5 cm - along the chest line
2 cm - along the line of the hips
1 cm - along the waist line
We start the pattern by building a back pattern
On a sheet of paper, draw a vertical line (the center of the back) and at a right angle build an upper horizontal line (the neck line).
Define the line of the hips.
Down from point T we set aside 1/2 DTS and denote the new point by the letter B.
39/2=19.5 (cm)
Let's draw a line from t.B to line BH1 and put v.B1.
Let's draw a cut of the neck.
To the right of point A, set aside 1/3 plus POSH 0.5 cm and put v.A3.
18/3 plus 0.5=6.5 (cm)
Up from point A3, set aside the value of 1/10 POSH plus 0.8 and draw v.A4.
18/10 plus 0.8= 2.6 (cm)
From point A4 we will draw a segment at an angle of 45 degrees to the line AB. The length of the segment is 1/10 POSH-0.3 cm. We put v.A5.
18/10-0.3=0.5 (cm)
We connect points A, A5, A4 with a curve.
Let's build the shoulder section of the dress.
Down from point A1, we set aside a segment that is equal to:
2.5 cm - normal shoulders
3.5 cm - sloping shoulders
1.5 cm - high shoulders
I have normal shoulders, so I choose the value - 2.5 cm.
Set aside 2.5 cm down from point A1 and put etc..
Now let's connect points A4 and P. From point A4 towards point P, we will postpone the measurement of Dpl, adding 2 cm to the future tuck and set t.P1.
13 plus 2=15 (cm)
Now from t.A4 on the line A4P1 to the right we set aside 4cm and put t.O. Draw a line down from this point, which will be equal to 8 cm and put point O1.
On the line A4P1 from t.O to the right, set aside 2 cm and put t.O2. Connect points O and O2. The segment O2 O should be the same as O1 O. Where the resulting segment went beyond point O2, we put v.O3.
Let's connect t.O3 and t.P1.
Determine the depth of the hole. Down from t.P., set aside 1/4 POG plus 7 cm - for a normal figure (or 7.5 cm - for a stooped figure, or 6.5 cm - for a kinky figure) and set t.G.
46/4 plus 7.5= 19 (cm)
Through t.G we draw a parallel line of the line AB, put down points G1, G2, G3.
We recheck the received value. To do this, the centimeter tape must be attached to the shoulder line and measured down 19 cm. This should be the point of contact of the arm to the body.
In order to learn how to make patterns of dresses of various styles, you need to be able to correctly build drawing of the main pattern of the dress. Based on this pattern, by changing its individual parts and adding some details, you can build a pattern for dresses of a wide variety of styles.
The drawing here will be based on the example of a size 44 dress. You must put down your own measurements and use only them when calculating.
Construction of a drawing of a pattern of a back and a shelf
On the left side of the sheet of paper, draw a vertical line on which you mark the length of the dress (108 cm), put points A and H and draw horizontal lines to the right of them.
From A to the right, set aside the half-girth of the chest plus 5 cm and put a point B (AB \u003d 44 + 5 \u003d 49 cm)
From B, lower the perpendicular to the intersection with the bottom line, mark the intersection as H1.
From A down, set the length of the back to the waist plus 0.5 cm and put a point T (AT \u003d 38 + 0.5 \u003d 38.5 cm). Draw a horizontal line from the point T to the right, mark the intersection with the BH1 line as T1.
From T down, set aside half of the back to the waist and set point B (TB \u003d 38: 2 \u003d 19 cm). Draw a horizontal line from B to the right, mark the intersection with the BH1 line as B1.
From A to the right, set aside half the width of the back plus 1.5 cm and set point A1 (AA1 \u003d 17.2 + 1.5 \u003d 18.7 cm)
From A1 to the right, set aside 1/4 of the half-girth of the chest plus 0.5 cm and set the point A2 (A1A2 \u003d 44: 4 + 0.5 cm \u003d 11.5 cm). This is the width of the armhole, it will be needed in further calculations. From A2 and A1, lower the perpendiculars - for now, of arbitrary length.
From A to the right, set aside 1/3 of the half-girth of the neck plus 0.5 cm and set the point A3 (AA3 \u003d 17.5: 3 + 0.5 \u003d 6.3 cm). From A3, set up a perpendicular, on which set aside 1/10 of the half-girth of the neck plus 0.8 cm and set the point A4 (A3A4 \u003d 17.5: 10 + 0.8 \u003d 2.6 cm). Divide the angle AA3A4 in half, from A3 along the line of dividing the angle, set aside 1/10 of the half-girth of the neck minus 0.3 cm and set the point A5 (A3A5 \u003d 17.5: 10 - 0.3 \u003d 1.5 cm). A4, A5, A connect with a smooth line.
From A1 down, set aside 2.5 cm for normal shoulders, 1.5 cm for high shoulders, 3.5 cm for sloping shoulders and put a point P. Connect A4 and P with a straight line, on the continuation of which set aside from A4 the length of the shoulder plus 2 cm on the tuck, plus 0.5 cm for the fit and put a point P1 (13 + 2 + 0.5 \u003d 15.5 cm).
From A4 to the right, set aside 4 cm and put a point O. From O down, draw a vertical line 8 cm and put a point O1. Set aside 2 cm from point O to the right and set point O2. Connect O1 with a straight line to O2, on the continuation of this line, set aside the value of the segment OO1 and put a point on O3. Connect points O3 and P1.
From point P down, set aside 1/4 of the half-girth of the chest plus 7 cm and set the point G (PG \u003d 44: 4 + 7 \u003d 18). This is the depth of the armhole of the back, it will be needed when calculating the sleeve.
Draw a horizontal line through G to the left and right. Mark the intersection with the AH line as G1, with the armhole width line - G2, and mark the intersection with the BH1 line as G3.
From G up, set aside 1/3 of the distance of the PG plus 2 cm and set the point P2 (GP2 \u003d 18: 3 + 2 \u003d 8 cm). Divide the angle P2GG2 in half, from G along the dividing line of the angle set aside 1/10 of the width of the armhole plus 1.5 cm and put a point P3 (GP3 = 11.5: 10 + 1.5 = 2.7 cm). Divide the GG2 line in half, mark the division point as G4. Connect the points P1, P2, P3, G4 with a smooth line.
From G2 up, set aside 1/4 of the half-girth of the chest plus 5 cm and put a point P4 (G2P4 \u003d 44: 4 + 5 \u003d 16 cm). From P4 to the left, draw a line on which set aside 1/10 of the half-girth of the chest and put a point P5 (P4P5 \u003d 44: 10 \u003d 4.4 cm). From G2 up, set aside 1/3 of the segment G2P4 and put a point P6 (G2P6 \u003d G2P4: 3 \u003d 16: 3 \u003d 5.3 cm). Connect P5 and P6 with a dotted line, divide it in half, set a perpendicular from the division point, on which set aside 1 cm and put a point 1. Divide the angle P6G2G4 in half, From G2 along the dividing line of the angle, set aside 1/10 of the width of the armhole plus 0.8 cm and put a point P7 (G2P7 \u003d 11.5: 10 + 0.8 \u003d 2 cm). Connect the points P5, 1, P6, P7, G4 with a smooth line.
From G3 up, set aside 1/2 of the half-girth of the chest plus 1.5 cm and put a point B1 (G3B1 \u003d 44: 2 + 1.5 \u003d 23.5 cm). From G2 along the line G2A2 set aside the same amount and put a point B2. Connect points B1 and B2.
From B1 to the left, set aside 1/3 of the half-girth of the neck plus 0.5 cm and set the point B3 (B1B3 \u003d 17.5: 3 + 0.5 \u003d 6.3 cm). From B1 down, set aside 1/3 of the half-girth of the neck plus 2 cm and put a point B4 (B1B4 \u003d 17.5: 3 + 2 \u003d 7.8 cm). Connect B3 and B4 with a dotted line, divide it in half. Connect the division point with a dotted line to B1. From B1 along this line, set aside 1/3 of the half-girth of the neck plus 1.5 cm and put a point B5 (B1B5 \u003d 17.5: 3 + 1 \u003d 6.8 cm). Connect with a smooth line B3, B5, B4.
From G3 to the left, set aside the measurement of the center of the chest and put a point G6 (G3G6 \u003d 9 cm). From G6, restore the perpendicular to the line B1B2, mark the intersection with this line B6.
From B6 down, lay down the height of the chest (25.2 cm) and put a point G7.
Set aside 1 cm from B6 down, put a point at B7 and connect it to B3. Connect B7 and P5 with a dotted line. From P5 to the right along the dotted line, set aside the length of the shoulder minus the value of the segment B3B7 minus 0.3 cm and put a point B8 (P5B8 \u003d 13 - 2.8 - 0.3 \u003d 9.9 cm). Connect G7 and B8 with a straight line, on the continuation of which from G7 set aside a value equal to the segment B7G7, and put a point B9. Connect points B9 and P5.
From G to the right, set aside 1/3 of the width of the armhole and put a point G5 (GG5 \u003d 11.5: 3 \u003d 3.8 cm). From G5, lower the perpendicular to the bottom line, mark the intersections with the waist, hips and bottom lines as T2, B2 and H2.
To determine the total solution of tucks, add 1 cm to the waist half circumference (34 + 1 = 35 cm). Then subtract this value from the width of the dress between points T and T1 (49 - 35 = 14 cm). The size of the solution of the front tuck is 0.25 of the total solution (14 x 0.25 = 3.5 cm), the side is 0.45 of the total solution (14 x 0.45 = 6.3 cm), the rear is 0.3 of the total solution (14 x 0.3 = 4.2 cm).
To calculate the product along the line of the hips, add 2 cm to the half-girth of the hips for a free fit, from this value subtract the width of the dress obtained when constructing the drawing between points B and B1 (50 + 2 - 49 = 3 cm). Distribute the result equally between the shelf and the back (3:2 = 1.5 cm). Set aside 1.5 cm from B2 to the left and right and put points B3 and B4. From T2 to the left and right, set aside half of the solution of the side tuck (6.3: 2 \u003d 3.2 cm) and put points T3 and T4. Connect these points with straight lines to the point "g" on the armhole. Connect points T3 and B4, T4 and B3 with dotted lines, divide them in half, from the division point, set up perpendiculars by 0.5 cm and connect the resulting points with smooth lines with points T3B4 and T4B3.
From B1 down, lay down the length of the front to the waist plus 0.5 cm and set the point T5 (B1T5 \u003d 42.2 + 0.5 \u003d 42.7 cm). Connect T4 and T5.
From B1 down, set aside the value of the segment T1T5 and put a point B5. Connect B3 and B5.
Divide the distance between points G and G1 in half and put a point G8. Lower the perpendicular from it to the line BB1, mark the intersections with the lines of the waist and hips as T6 and B6. From T6 to the left and right, set aside half the solution of the back tuck (4.2: 2 = 2.1 cm) and put points T7 and T8. From G8 down, set aside 1 cm, from B6 up 3 cm. Connect the resulting points with straight lines to T7 and T8.
Draw a vertical line from G6 down. Intersections with the lines of the waist and hips designate T9 and B7. From T9 to the left and right, set aside half the solution of the front tuck (3.5: 2 \u003d 1.8 cm) and put points T10 and T11. From G7 down, and from B7 up, set aside 4 cm. Connect the resulting points with T10 and T11.
If the dress is straight, from B3 and B4 lower the perpendiculars to the bottom line, mark the intersections as H3 and H4. If the dress is extended, set aside 4-5 cm from H3 and H4 to the left and right and connect the resulting points with dashed lines to B3 and B4.
Please note that the lower parts of the back and shelf drawings overlap each other, so you will need to glue the corresponding pieces of paper to them later.
From H1 down, set aside the value of the segment T1T5, put a point H5 and connect it to H3.
In the next article, we will look at
Currently, unheard-of popularity has gained products self made, and it doesn't matter what it is: soft toy or women's dress. Many people ask themselves: why sew clothes when you can either buy in a store or seek help from a professional atelier? The answer is simple: A hand-made thing will definitely be of high quality and unique, you can be 100% sure that no one else has such a dress, which means that the chances of meeting a double on the street are zero.
Sewing a dress with your own hands is easy and simple
At first glance, it may seem that tailoring a dress is an incredibly difficult task that is not given to everyone. However, looking closely and typing in the search phrase: We sew dresses for beginners patterns you can be sure that there is nothing difficult in this and in just a couple of evenings you can easily sew a beautiful and stylish dress. Simple patterns for beginners turn the process into an exciting game, and the sewing process will not seem as scary as it was perceived before!
Advantages of a custom made dress:
- Truly exclusive
- Can do custom design
- Your creativity develops
- Opportunity to make money from your hobby
- Significant savings in time and budget when buying new clothes.
As you can see, a dress, and indeed clothes sewn with one's own hand, has more pluses than minuses than purchased ones.
How to sew a dress with your own hands for beginners? Patterns below
There is nothing better in the heat than a beautiful, bright, weightless dress. But what if you sew it with your own hands?

But before undertaking this difficult task, the amateur will have many questions: how to build a dress pattern for beginners? How to make a pattern for beginners? What fabric to choose for your first piece? How to tailor a summer dress? We are ready to answer these many questions in order. Any dress model is a “case” perfectly fitted to your body, and small changes (like a lowered sleeve or a slightly looser waist will make your look more interesting) do not be afraid to experiment, because now there are a lot of master classes on the net. However, there are several general rules which must be strictly observed:
- The fabric is always marked on the wrong side.
- As a material for the pattern, you can use tracing paper or plain paper.
- Before tracing the template, pin the cutout with pins so that everything turns out neatly.
- Lay the fabric out on a large, flat surface (e.g. a huge table, large floor) this will help you cut the right piece accurately.
- Do not forget to finish the hem and edges of the product at the end of the sewing work.
Taking into account all these simple rules, you will end up with a light and simple dress, just what you need for hot weather.
Stores offer big variety beautiful summer clothes. But the best solution would be to make an outfit yourself and get unreal pleasure from the process. The first and most important step will be the choice of fabric. It should be light and flowing. Cotton or silk works great (however, silk is harder to work with)
- Take measurements from your figure properly (this will affect how the dress will sit on you in the future) The following parts of the body are obligatory for measurement: waist, shoulders, hips and, if desired, arms.
- Draw a pattern according to the measurements taken on the fabric. Building a basic pattern understandable way for beginners = look and choose the best
- Cut out carefully.
- Stitch the details on a sewing machine, however, you can also sew on your hands, then the process will take much longer.
- Process the edges of the finished product, steam.
This is a general algorithm for sewing a summer dress with your own hands.
Patterns of blouses for beginners simple do-it-yourself patterns?
What is the simplest dress? That's right, two stitched rectangles of fabric, with cutouts for the arms and head.

However, even this miracle can be made neatly and beautifully if you take standard measurements from the model, which will form the basis of the future masterpiece.
How to make a basic pattern for beginners
BASIC MEASURES (WITHOUT THEM IT IS IMPOSSIBLE TO SEW THE PRODUCT)
- OG - 96
- OT - 75
- OB - 101

BACK MEASURES
- Dst (back length to waist) - 41
- Shsp (back width) - 35
- W shoulder - 12
Front measurements.
- Dpt (front length to waist) - 43.5
- SH (chest height) - 26.5
- CG (centre of the chest) - 18
- Vgk (chest height oblique) - 24
- SHG (chest width) - 37
- Gp (armhole depth) - 20
Remember that the side seams must necessarily match completely, only then you will get a neat and beautiful product.
How to sew a children's dress with your own hands for beginners patterns
If our visitors have little princesses, then closer to the holiday season, the question of how to dress young beauties becomes relevant. By typing in any search engine patterns of children's dresses for beginners simple do-it-yourself patterns You will be surprised at the abundance of all kinds of styles, patterns and master classes, choose the most suitable option for yourself.

The algorithm for sewing dresses for girls is exactly the same as for adults, although their delicate skin needs only natural and high-quality fabric.
How to sew a dress to the floor with your own hands for beginners patterns
A floor-length dress looks beautiful and romantic, this is the best choice for young girls, because such clothes allow you to emphasize grace and lightness. For sewing, you can use absolutely any elegant fabric.

For beginners perhaps the best choice there will be viscose knitwear and, of course, a standard set of needlewomen, as well as an overlock, so that the edges of the finished product look as even as possible. Many of these models do not have a pattern, but beginner craftswomen should use a template in their work.
How to sew a sheath dress with your own hands for beginners patterns
A sheath dress is nothing more than a second skin, which must be sewn to the unique measurements of each. This work requires a lot of diligence and diligence from the fashion designer and tailor, because it is quite difficult to get the dress to fit perfectly, but a beginner can try his hand and sew a simple, straight dress based on exact measurements.

Dress patterns for beginners, simple do-it-yourself patterns ALL THIS is a great opportunity to try new needlework, find your hobby and possibly a new source of income, because all girls and women (and sometimes young princesses) love to dress up in beautiful clothes. Now you have replenished the baggage of knowledge, which will allow you to make a truly exclusive and nice clothes both for yourself and for your friends. Patterns of summer dresses for beginners simple do-it-yourself patterns
About ten years ago, we could not even imagine that we would again sew our own clothes, and not buy them in stores and supermarkets. However, the number of people who prefer things of their own making is growing.
If you are not in the mood to spend money on magazines, or prefer electronic sources of information to paper ones, you do not lose at all. By entering queries into the search engine:
Why sew your own clothes?
The reasons why women sit down again Sewing machines like in the 90s or more early years, weight. Yes, as before, some hostesses do this in order to save money: to use a fabric that has been idle for a long time or to alter an unfashionable thing from a still strong material. As a rule, this is true for those whose budget has suffered significantly due to the economic situation in recent years.
Fortunately, the desire to save money is not the only thing that motivates women to sew in 2016. A much more common reason for this now is to create for yourself a special, unlike other thing. Someone leaves an order for such an exclusive to professional craftsmen, while someone copes on their own. The latter option, of course, carries risks, but in case of luck, hand-made clothes become truly loved.

A considerable part of beautiful ladies resorts to independent sewing in order to be able to wear dresses, skirts and blouses that fit exactly to the figure. After all, modern stores offer customers many models of clothing ( different color, texture, style), but all of them are usually sewn with the expectation of women with standard figures such as "hourglass" (thin waist with approximately the same volume of the chest and hips) and "rectangle" (the waist is not pronounced, the difference between the main volume is minimal). It is more difficult for pronounced “pears” (hips are much wider than shoulders), “inverted triangles” (hips are much narrower than shoulders) and “apples” (have a noticeable tummy) to choose something that does not focus on figure imbalances.
Where to start if you want to sew clothes?
Convinced of the seriousness of your own intentions, take care of the means of production, the main of which is a sewing machine. If you have it, check its serviceability and, if necessary, contact the master. If you don't have a car, get one. When it is better to be guided not by the principles "the more expensive the better" and "the better known brand, the longer it will serve”, but the technical characteristics and reviews of real people.

For example, it is fundamentally important when purchasing sewing machine, understand what types of fabric you will process on it. Not every machine can handle thick coat fabric or leather. Also, not all devices are suitable for sewing knitwear, thin tulle fabrics, and so on.
Then, having chosen a certain number of machines that suit your characteristics, read reviews about them. They can be found on specialized review sites, needlewomen forums, as well as on resources like Yandex.Market.
It is also necessary to take care of the acquisition of such things as tailor's scissors, centimeter tape, pins, chalk, and so on.
When all the funds are ready, it is worth moving on to buying materials: fabrics, threads, necessary accessories. If this is your first time deciding on tailoring, you should not take the most expensive one. Start with budget options.
What to sew first and where to get patterns?
Perhaps, novice needlewomen should not immediately take on products with a complex cut, from capricious fabrics: coats, shirts, trousers. Better suited for debut relatively simple products such as straight or pencil skirts and casual dresses.
Patterns for future outfits can be found in several sources. For example, in cutting and sewing magazines, the most famous of which is, of course, Burda. As a rule, such publications contain not only intricate models, but also detailed instructions About, how to sew simple summer dress do it yourself for beginners. Here you will also find materials on how to sew child dress do-it-yourself for beginners, patterns menswear, in general, having accumulated magazine issues for several years, you can get a full-fledged tutorial on cutting and sewing.

Traditionally, books devoted to needlework are also popular. A significant part of them is devoted just to inexperienced seamstresses. So, on the shelves of bookstores you can find publications containing recommendations for a specific type of product: We sew a dress with our own hands patterns for beginners», « DIY dress: sewing is easy and simple. For beginners" and so on.
There are also thick books, almost encyclopedias, in which you can find tips on how to sew anything from an apron to a coat. They may be called " We sew ourselves. For beginners. patterns and recommendations "or" Dressing the family ourselves: a guide to sewing all types of clothing.
If the book contains not only a description of the product manufacturing algorithm and small illustrations of the details that need to be designed, but also full-size patterns, this is usually said right on the cover. Pay attention to publications with the names “Sewing patterns for summer dresses for beginners”, “Simple patterns. Now you can sew everything with your own hands”, “How to sew a dress with your own hands? Pattern and models”, “Simple patterns of summer dresses and sundresses for beginners” or, for example, “Children's clothing patterns for beginners. Simple patterns with your own hands.
To make sure that the book really has patterns in its composition, you need to scroll through it. And when ordering books on the Internet, choose those stores that add photos of the content and sheets from it to the page of each edition. By the way, often such advanced trading platforms allow you to leave reviews for books. It will also be useful to read them, so as not to be mistaken with the choice.
If the article of any resource turned out to be successful, for example, how to sew a dress with your own hands for beginners, patterns were also quite applicable to reality - do not be lazy, save the link to the site in your bookmarks. By following this rule every time, you can accumulate a whole collection of links, following which you will get high-quality “recipes” for clothes.
Summer dress pattern for beginners
Of course, within the framework of one article it is impossible to give as much information on cutting and sewing as a specialized website, book or magazine binder can provide. However, after reading our text, you are guaranteed to benefit from it. And it will be not only theoretical, but also practical. So, we present to your attention the instruction on how to how to sew a summer dress with your own hands for beginners, patterns we will give you too!
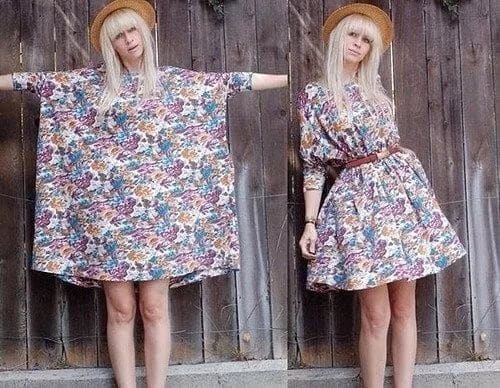
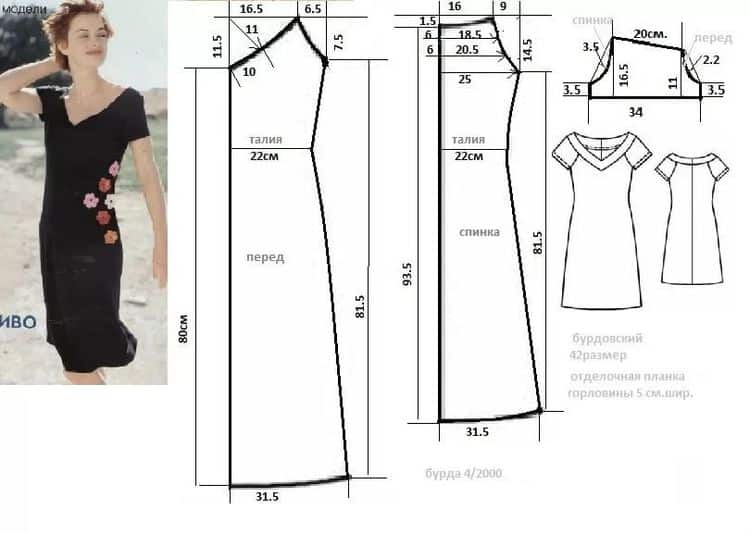
Beach clothes have always been considered the simplest in terms of cut. On vacation by the sea or river, you don’t need much. Pleasant colors, a loose or semi-adjacent silhouette, the presence of a small sleeve to cover the shoulders prone to burning - these are the foundations of success. beach dress.
In our example, a stylish dress with V-neck and a drawstring at the waist made in juicy yellow, but you can choose another. Turquoise, red or the color of young greens are perfect.
The first thing we'll start with is construction of a base pattern. The easiest way for beginners- pattern building. In the diagram below you will see a reduced pattern of a beach dress for a size 46-48 and a height of 160-170 centimeters. If you are shorter or taller, leaner or fuller, difficulty how to build a dress pattern for beginners, should not occur either.
In order for the dress to sit exactly on the figure, remember that the length of the chest line (on the pattern it is 25 cm) should be a quarter of the girth of your bust. So, a girl with a chest volume of 90 cm should be put aside in the drawing 27.5 cm. The same principle applies to the waist and hip lines: their length on the pattern will be equal to a quarter of the actual volume + allowance. If you want the dress to be more spacious in the lower part of the body, add two or three centimeters instead of one centimeter.
Try not to overdo it with the depth of the cut. You can always increase it, but it can be problematic to reduce it.
To make a drawstring, take a piece of fabric with a length equal to the girth of the dress in the waist area. Sew it on with front side, tucking the edges inside, and iron. Then make holes for the cord and overcast them. After that, you can thread the cord.
When sewing the shoulder seams, leave room for the cords, and pull them through as well. This will allow you to play with the shoulder line and change the character of the dress depending on the conditions and mood.

We hope now you are convinced that sewing a dress with your own hands is easy and simple. Having successfully completed the sewing of a beach dress, you learned that building a base pattern for beginners is not such a big problem. And this means that you should look for “how to make a basic pattern for beginners”, “how to sew a dress with your own hands for beginners”, “how to sew a simple straight dress with your own hands for beginners”, “how to sew a straight dress with your own hands”, “how to cut straight dress for beginners”, “how to sew a straight dress with your own hands for beginners patterns” is no longer necessary.
It is enough to sew a dress with your own hands once - patterns and models will no longer seem like a Chinese diploma. Simple dress patterns for beginners will not cause much difficulty, which means that soon it will be possible to realize the most daring fantasy from the latest magazine or book.
Having trained on picky fabrics and silhouettes, you can proceed to more capricious ones: silk, woolen and others.
We wish you good luck in all your endeavors! Be unique in your own clothes!