Creative creativity. Unique jewelry for yourself and your loved ones. Wire Weaving for Beginners: Viking Jewelry How to Weave Jewelry
Volumetric bracelet made of beads and beads
Weaving jewelry from beads is a whole art, and the works of individual masters are true masterpieces. Looking at the complex interweaving of patterns, ornate shapes and original color combinations, such work seems difficult for beginners. Of course, in order to comprehend the basics of ancient needlework, you need a little theory and practice. Visual beading lessons will help beginners with this. Having learned how to weave bracelets from beads for beginners, you can create amazing collections of designer jewelry as a gift to yourself, loved ones and friends.
The bracelet is one of the most popular jewelry. Fashionistas can wear it to social events, for a walk and even to work in the office, diluting a little strict look. Especially valuable and original jewelry hand made. Despite the fact that beaded accessories are relatively inexpensive, outwardly they are not inferior in beauty to expensive jewelry. Do not assume that such accessories are suitable only for teenage girls. Elegant ladies, lovers of luxury and fans of creative solutions in fashion will certainly like beaded jewelry. In shops where craftswomen sell their author's masterpieces, not everyone can afford the price of such products, because handwork always highly valued
Bracelet with comfortable clasp One size bracelet
 Airy beaded bracelet
 Colored bracelets
There is a great solution - to learn how to weave beaded bracelets according to weaving patterns for beginners. Having immersed themselves in the fascinating process of weaving, with the help of simple master classes, beginners can create beautiful jewelry in just a few hours.
First of all, it is important to follow simple advice experienced craftsmen:
- Before work, you need to stock up on everything you need. To weave a beaded bracelet, you need a base (fishing line, thin wire or thread), the material itself, scissors. Hooks-clasps or carabiners, special thin needles will also come in handy.
 Necessary materials for work
- The choice of material. Beads are the main component of jewelry. To make the product look beautiful and neat, you should stock up on high-quality beads in large quantities.
 Beads for every taste and color
Advice!
Chinese beads are cheaper, but the quality and aesthetics leave much to be desired. Beads can be chipped, non-uniformly colored, unequal in size, which negatively affects the final product.It is better not to skimp and buy high-quality Czech beads. The choice of needlewomen is presented with an incredible number of colors, textures and shapes of miniature beads, from which it is a pleasure to weave.
- Organizer for work. In order for the work process to captivate and bring pleasure to the craftswoman, you should organize a place so as not to experience discomfort. To organize the beads by color, shape and size, you should stock up on small containers or make a DIY organizer box.
 Convenient organizer
What else might be needed to get the job done? Of course, free time. The process of weaving is not only a creative process, but also painstaking work that requires concentration, slowness and attention. Following the simplest tips, you can easily weave the bracelet of your dreams.
Weave with our own hands
For beginners, at first glance, weaving a beaded bracelet may seem like a difficult and time-consuming task. The main thing that is required is perseverance, the desire to create something beautiful, as well as a creative mood. To help beginner craftswomen, there are many simple circuits, by embodying which, you will be able to master the skill and share successes in creativity. We offer several lessons on creating bracelets from beads with your own hands.
 Bracelets for all seasons
monastery cross
The basic pattern is called a monastery cross. Having mastered simple weaving, you can create wide baubles, creating original patterns, combining colors and even interweaving names or phrases.
 Bracelet with poppies
To work, you need to prepare a monofilament or fishing line for the base, a thin needle and beads. The algorithm is the following:
- We collect four beads on the fishing line, close them in a ring, and bring the needle into the first, second and third. So we get a cross.
 Start of weaving
 - Then again we string three beads onto the base, now we insert the needle into the fourth bead of the previous link. This is how the next cross turns out.
- Similarly, add beads until we weave the first row of the bracelet of the desired size. You should get a chain of crosses, but it does not look too even.
 Weaving the first row
- We return to the beginning of weaving. We introduce a needle into the side bead of the first link, then we collect three more, forming a cross.
 Weaving the second row
- We bring the needle through the upper bead of the last cross, again we collect two, introducing it into the side of the second link and into the upper bead of the cross.
 Final stage
We repeat weaving until the base of the desired width and length is obtained. Beautiful beaded ribbon gracefully wraps around the wrist. We attach a carbine or clasp to the ends, and the bracelet is ready. Having learned how to weave a monastery cross pattern, you can create beautiful and original baubles with names, weave in any logos or patterns. For this method of weaving, many craftswomen use a loom, which you can buy or make yourself.
 Approximately such an original bracelet is obtained
Cross stitch. Monastery Weaving. (Part 1)
Cross stitch. Monastery Weaving. (Part 2)
Beautiful beaded lace
We offer you to create a luxurious openwork bracelet in just a couple of hours. To work, you need to prepare a fishing line or monofilament, beads at number 11 and 15 of different colors.
 Bracelet with fish and hearts
 Bright, flower bracelet
Attention! When starting to weave according to the scheme, you should have an idea about the future product in advance, take measurements of the circumference of the wrist and the possible width of the accessory.
Step by step algorithm:
- We make a strip that will become the basis of the bracelet. Its width depends on the width of the product, as the weaving will go up.
- We string four beads onto a piece of fishing line or monofilament, closing the element into a square. Weaving is done in one thread, which we use for each bead several times.
- We string two beads on a thread that comes out of the last pair, sends it back to the previous pair, moving from the back side. Finishing the previous element, we immediately form the next one.
- When the first row is formed, proceed to the second. We string the beads in the following order: first, two beads at number 11, then one at number 15, and again two at number 11. We will direct the needle into the next pair of the first row, pass through it and send it to the next pair to form a new row.
- When all the rows are formed, we complete the weaving. To make the bracelet look neat, by the end we gradually reduce the number of beads until only one bead remains. Attach a clasp to it.
 Weaving pattern Here we have such an interesting bracelet
Using this technique, you can weave an elegant set of jewelry, consisting of a bracelet and a fashionable choker around your neck.
Luxurious bracelet made of beads and beads
By combining beads and other materials for needlework, you can create luxurious jewelry worthy of queens. We offer to weave a magnificent bracelet, which in beauty and luxury is not inferior to an expensive one. jewelry. To make the jewelry look truly expensive, we take beads, bicones and beads of noble shades, gold or silver, antique bronze or delicate pearls for weaving. For the base you need a nylon thread.
Bracelet with different beads and beads Cute wrist bracelet
Thin bracelet made of beads and beads
 Very romantic and delicate bracelet
The work is as follows:
- We use a kapron thread in two additions so that the weaving is reliable and the product does not break during wear. To the end of the thread, folded in a loop, we fasten the lock with a sewing knot.
- We collect six beads, then one bicone and again six beads. With a needle we pass through two large ones, we tighten the first element. On the other hand, we repeat the steps.
- We collect beads again in this order: one large, six small, a bicone and six more small ones. We pass the needle through the previous one, and again we string a large bead. So we repeat until the end of weaving, and at the end we fix it with a lock.
 Lesson on weaving a bracelet from beads and beads
Very beautiful bracelet in delicate color scheme
Lesson on weaving a bracelet from beads and beads
Very beautiful bracelet in delicate color scheme
A stylish and elegant bracelet can successfully complement an evening look, become an elegant addition to a touching wedding look.
Bracelet made of beads and beads
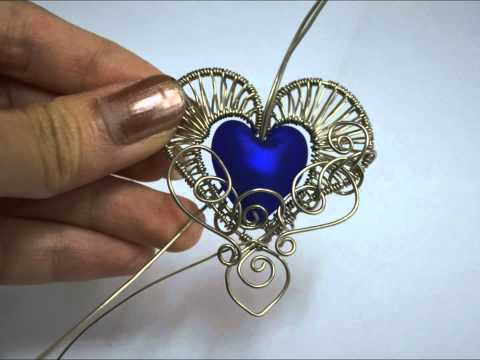
Original volumetric decoration
Handmade beaded jewelry will be able to advantageously emphasize any fashionable style. Especially harmoniously they complement outfits in the style of boho or boho-chic, Provence or country. Graceful simplicity, creativity and incredible charisma are inherent in all hand made products, and this is their value. Volumetric decorations today at the height of fashion.
 Tricolor beaded bracelet
 Interesting bracelet weaving
We offer to make a simple but original three-dimensional bracelet with your own hands.
Making it easy:
- We cut several pieces from the jewelry cable. We string beads thickly on each. You can use several shades that harmonize with each other to create a trendy gradient effect.
- From one edge we connect all the segments together, hiding them under a hat with a clasp. Similarly, we fix the elements from the other edge.
- We give the bracelet a shape, twisting all the individual segments with a tourniquet, you can also weave a voluminous pigtail.
In such a simple technique, you can also make a beautiful necklace by adding a bracelet.
 Step by step creation bracelet
 This bracelet can be made in any color.
Unusual ideas to create beautiful bracelets beaded for beginners set. Feel free to use ready-made master classes, complementing the schemes with author's elements. The main thing in the art of beading is experience, creativity and skill.
How to make a beaded bracelet with your own hands: master class
The history of this type of needlework, like weaving jewelry from ordinary wire, goes back thousands of years, because. BC, there was still weaving from wire, which were found during excavations by archaeologists. The production of wire was very complex and time-consuming, so in the past the products were quite expensive, but now you can make an original product for beginners.
Nowadays, wire is a material that is relatively easy to make, and its use is widespread. From ordinary, unremarkable wire, they even create wonderful jewelry, accessories, figurines, baskets and decorate household items with it.

This creativity requires perseverance and perseverance, as well as, in addition to the material itself, a lot of tools (pliers, round-nose pliers, a file, a triangular file, a hammer, wire cutters, tweezers, a small vise, a piece of a flat iron sheet and a number of small carnations).
The wire is used thin, no more than 3 mm in diameter, it has the name knitting, it can be made of brass, galvanized steel, aluminum or copper (it is better for beginners to start weaving with it). Often, in addition to weaving, beads, beads or ornamental stones are used for decoration, then the product gets a more complete look.
It is better to take the first steps in wire weaving for beginners with rings, spirals, curls and chains, because. they are the basis of even the most complex products.


Weaving wire jewelry for children
Children also want to join the creativity of adults, and for starters, they can be offered braiding pencils with wire. Weaving will be created with macrame knots.
Another example of a pencil braid looks like this:

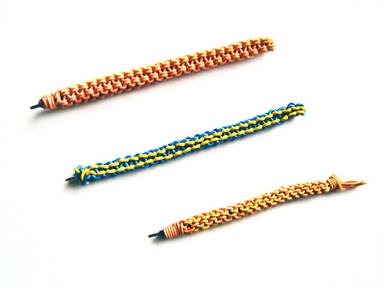
Little is required - a rod that will be braided, colored wire in two colors, beads for decoration and scissors.
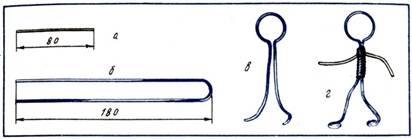
According to the following simple pattern, you can braid not only a pen or pencil, but also any handle, for example, toys (sword), as well as a thicker wire, which can then be twisted into a circle, so you get a bright bracelet.

It is necessary to tie the first knot according to this scheme, then the rod is inserted and then the entire rod is braided with the same knots to the end.

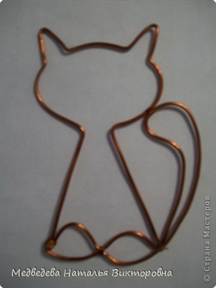
Braiding pencils is suitable for preschool and toddler kids school age, they can also be offered to twist various simple shapes from colored wire. Simple figures are preferable, because more complex ones can lead to a loss of interest in this needlework.


Older children can learn beadwork and weave more complex beadwork and wire.


In weaving jewelry, beading is used, but wire is used instead of fishing line.


Easy wire weaving tutorial
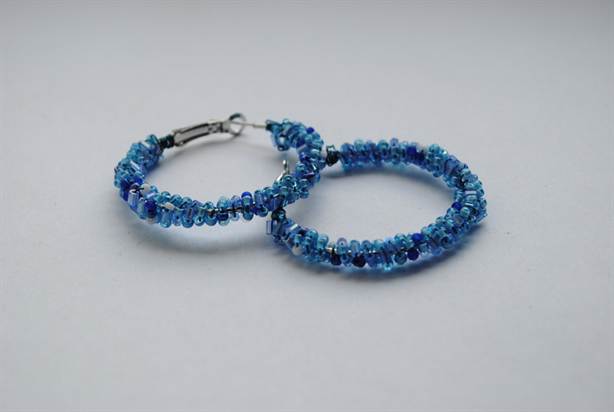
The bracelet below will be able to be woven by a child as a gift to his mother or girlfriend. Let's analyze a master class on weaving jewelry.

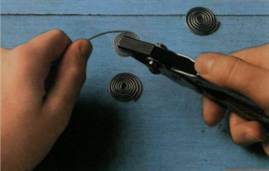
You will need multi-colored beads, a thin wire, suitable in thickness for the holes in the beads, a clasp for a bracelet and a pencil.
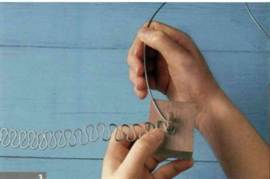
First of all, the beads are strung on a wire, which is bent into a ring at the end so that the beads do not fall off. Next, several layers of wire with beads are twisted into one bundle, it is wound around a pencil. This beaded spiral must be carefully removed from the pencil and the bracelet is almost ready, it only remains to fasten the clasp.

An important warning - adults must tell children about safety precautions before starting to work with wire, because sharp wire and tools that can cause injury are used in the work, so it is safer to work with gloves and goggles.
DIY wire jewelry for beginners
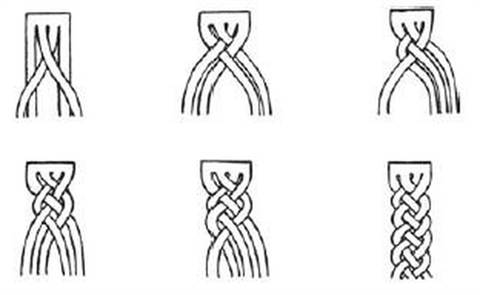
If there are unusual knots in a wire product, then for beginners, jewelry weaving patterns will facilitate the process.
The diagrams show the sequence of actions in weaving knots.
1) A bracelet woven with a pigtail of four strands.

2) Necklace made of decorative macrame knot with several weaves.
3) Chain mail bracelet "box".
In the new review, the attention of readers immediately 12 stylish jewelry, each of which can be done with due diligence and attention to the issue with your own hands. Definitely, any of these crafts will help to make a positive impression on others, so watch and remember.
1. Thread earrings

Original long earrings that will become great addition, both for everyday look and for evening, and the process of creating them will take no more than half an hour. To create such earrings, you need a skein of floss threads of the color you like, which you need to carefully cut, form two tassels, attach loops to them, fasten with a thread of a contrasting color and put on base hooks, bought in a specialized store.
2. Pin necklace

From safety pins of the same color and size, beads, two strong cords, you can create an unusual and very effective necklace that will become an exquisite addition to any look.
3. Resin pendants

From epoxy resin, without special skills and efforts, you can create incredibly beautiful pendants. To do this, you need to put dried flowers, shells, beads or sparkles in special silicone molds, fill them with epoxy resin, pre-mixed with a hardener, and wait for it to harden.
4. Glitter pendant

A simple and at the same time very attractive shimmering pendant that you can make yourself from a metal base, decoupage glue and sparkles. Sequins should be carefully laid out in layers on a base greased with glue. Each new layer must be smeared with glue and filled with glitters until they fill the entire pendant.
5. Bright necklace

A stunning large necklace made of dyed beans will be a wonderful addition to the spring and summer look. Painted beans, together with accessories, must be glued to thin plastic according to a specially prepared template. When the layout is finished and the glue dries, the necklace must be carefully cut out, holes made on the sides and fastened to the chains.
6. Asymmetrical necklace

Original asymmetric necklace in the style of Christian Dior, which can be made from a hoop by sewing beads on it different lengths.
7. Choker

Trendy choker with a ring in the middle, which is not at all difficult to make with your own hands. To do this, using glue and a small ring, you need to fasten two identical pieces of thin velvet ribbon and equip the product with a clasp or ties.
8. Massive necklace

An original massive necklace made of rope and knots, which, despite the simplicity of its creation, will become a universal decoration and addition to any outfit.
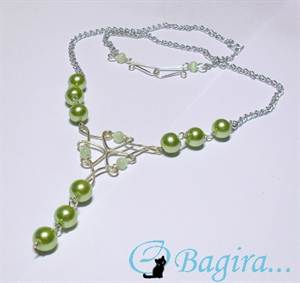
9. Necklace-harness

An ordinary clothesline can be braided with threads of beads and create a unique and very beautiful neck decoration that will undoubtedly draw attention to its owner.
10. Wooden earrings

From small wooden blocks, special accessories, glue and varnish, you can make unique long earrings, which, for sure, will appeal to all lovers natural materials and connoisseurs of creative things.
11. Dreamcatchers

Simple in execution, but at the same time beautiful and airy talisman earrings that you can make yourself from special accessories, small rings, wire, threads and feathers.
12. Volume necklace

Leather accessories always look expensive and elegant, and if the product is also made with your own hands, it automatically becomes exclusive. Getting a unique necklace is not difficult at all. You just need to cut out several identical petals from the skin, give them the desired shape, fasten them together with glue and connect them with a chain.
Handmade jewelry always looks original, stylish and attracts the attention of others. Many do not undertake such creativity due to the lack of imagination and certain skills, however, guided by the master classes presented below, do it yourself beautiful decoration at home will be very easy.
Stylish lace
Materials:

- leather or suede lace;
- accessories;
- pliers.
Cut the cord to the desired length, attach accessories to its edges.


bottle pendant
Materials:
- wire or pin with a ring at the end;
- a small bottle with a cork;
- beads, sequins, keys;
- chain or lace;
- pliers, round-nose pliers;
- Super glue.

At the initial stage, you need to fix the pin on the cork so that it is convenient to hang the bottle on a string. To do this, the pin should be well smeared with glue and stuck into the cork, as shown in the photo.
Then twist the free part of the pin into a ring using round-nose pliers, while paying attention to the diameter of this ring - the chain on which the pendant will hang should easily pass through it. If the size of the pin does not allow making a sufficient diameter of the ring, then an additional ring of the required diameter can be made from the wire and attached to the pin.
Then the fun begins - the choice of contents for the bottle. Here fantasy can roam freely, but we suggest investing something small or something memorable there. The original key, dried flowers, beads, beads, sequins and sequins will look good.


Glitter pendant
Materials:

- glitter;
- metal base for necklace;
- matte decoupage glue;
- tassel;
- pliers;
- chain with accessories.
Apply glue to the workpiece with a brush. Then sprinkle glitter on the glue. After drying, shake loose glitter from the workpiece and apply glue and glitter to it again. Repeat these steps until the workpiece is completely filled. Measure the desired length of the chain, attach a lock to it and put a pendant on it.


Broken glass pendant
Instead of glitter, from the above master class, broken glass can be used to fill the workpiece. First, this glass must be crushed, and then carefully glued to the base, as in the previous version. Once dry, the glass can be painted any desired color with nail polish.


braided choker
Materials:

- elastomeric thread for beading or wires from old headphones;
- scissors;
- Scotch.
Fix the thread on the table with adhesive tape and weave the choker according to the scheme, as shown in the photo.


Ribbon choker
Materials:

- tape of the desired width;
- fittings for processing the edges of the tape;
- scissors;
- pliers.
Cut off the required length of tape. Fasten the fittings at its ends. A similar ribbon can be tied around the neck as shown in the photo.


Choker with ring
Materials:

- ribbon;
- metal ring;
- glue;
- scissors.
Cut the ribbon into 2 halves. Glue the ends of the tape to the ring. Tie the choker around the neck in a knot. A similar decoration, but smaller, will be an excellent wrist bracelet.


Chanel style choker
Materials:

- wire;
- large beads;
- fittings for fastening;
- Super glue;
- pliers.
According to the size of the neck, measure the length of the wire and bite off its edges so that it is convenient to put the choker on the neck. Put beads on the edges. Put glue into the holes of the beads and insert the fittings for fastening there.


By analogy with a choker, you can make the same original bracelet or ring.
Chain with braided pendant
Materials:

- 6 laces of different textures and shades;
- chain;
- meter or tape measure;
- scissors;
- pliers;
- chain clasp;
- masking tape.
At the initial stage, you should decide on the length of the product, and on the basis of this, cut off the desired chain size.

Then this cut must be folded in half on the table, and 6 different laces should be placed on top of it.

Tighten the chain around the laces, as shown in the photo, then secure it with tape to the table and start weaving.


After the pendant is ready, cut the ends of the laces.


And attach a clasp to the chain.


bean necklace
Materials:

- product template printed on a printer;
- beans;
- beads;
- transparent plastic 2-3 mm thick;
- nail polish of the desired color;
- chain with clasp;
- cutting board;
- stationery knife;
- tweezers;
- hole puncher;
- Super glue.
First, the beans must be painted with nail polish and wait for it to dry completely.
Attach the paper template on the back to a sheet of transparent plastic.

In accordance with the scheme, glue the beans on the plastic, spreading it well with glue.

First, it is better to collect large bean patterns, and fill the gaps between them and small patterns with beads.


After the blank is completely glued, it must be given time to dry, and then, using a clerical knife, cut the plastic strictly along the edge of the product. With a hole punch at the extreme points of the necklace in plastic, it is necessary to make holes and insert the links of the chain into them.


Beaded necklace
Materials:

- beads, beads or beads;
- hair band covered with fabric;
- needle and thread;
- a piece of fabric to match the beads;
- scissors;
- glue.
To quickly create such jewelry, it is better to take ready-made beads, which are usually sold by the meter, and cut them into pieces of different lengths. Or independently collect beads or beads on a strong fishing line.
Fold the pieces of beads so that one end is shorter than the other and carefully sew them to the fabric of the hoop.


At the edges of the hoop, there should be segments of beads of maximum length, and in the middle - the shortest. In this case, the transition from the edges to the center should be performed very smoothly.


When all the segments of the beads are fixed, you need to sew or glue a piece of fabric on the inside of the choker, which will hide all the seams.


Fine jewelry that you can create with your own hands using different techniques weaving with beads will become your highlight when decorating any outfit. Beaded jewelry with the addition all kinds of auxiliary materials such as beads, rhinestones, sparkling stones or delicate pearls, will help to create your image a unique style that is unique to you.
Schemes according to which you can weave all kinds of jewelry will help you not to make mistakes during manufacturing required product. Over time, gaining invaluable experience in beading and learning the incredibly fascinating science of this man-made art, you will be able to invent and bring to life charming decorations. You will also learn how to correct ready-made weaving patterns and add your own ideas to them. fresh ideas and development.
Naturally, any woman wants to have as many different kinds of jewelry in her jewelry boxes as possible. Earrings or rings, necklaces and necklaces, brooches and hairpins, bracelets and baubles, belts and handbags- all this is just a small fraction of accessories that you can create from placers of beads, learning and putting into practice new types of weaving and techniques for their execution.

Having picked up in specialized stores the materials and tools you need for work, you will plunge into the world of incredible discoveries. For example, try to make with your own hands, such an ornament as a ring. Beaded rings can look very impressive on your fingers, if they are made with taste and love. We invite you to try yourself in the intricacies of this jewelry work, carefully looking at the patterns of weaving rings.
And here is another version of the ring weaving scheme.

You begin to weave the product in a chain, having measured the length you need in advance (Fig. 1). Then it must be closed into a ring, passing both needles into the first bead. Perform this action so as not to disturb the drawing. Now pass the needles along the two edges of the ring in order to insert between the extreme beads 3 or 4 additional (Fig. 2). By the way, if you do any work from beads, you can do without special needles, then the end of the working thread must be dipped in glue or any nail polish and let it dry.

The ring we are making should be elastic, so you need to make sure that the working thread is well stretched. And at the very end of the work, you need to go through the extreme beads again, pulling the thread tightly.
In order for your ring to be worn complete with earrings, it is worth doing this product using beadwork. Take beads of the same color and shape and weave the desired decoration according to the proposed pattern.

We offer you a scheme for weaving beaded earrings, which have a round shape and are made with the help of technology brick stitch” . There are two options for weaving such earrings. They can be made in any color scheme you need, but contrasting shades of beads will look best.

The second diagram is presented with an example of a semicircle, but you need to complete a full circle. This version of round earrings is woven using glass beads.
For our example, we will take:
- white beads with a diameter greater than 6mm;
- beads number 8 white;
- beads number 10 blue;
- a thread;
- bead needle;
- two fasteners;
At the beginning of work, you need to make a belt for a bead. It is not at all difficult to make it, and its length will depend on the size of the center bead you choose. In the process of weaving it, you need to try on its length, focusing on the bead so that it fits it tightly enough.
Then you need to fix the first completed row on the bead itself, passing the needle through its hole. Weave the next row using “brick” weaving with blue beads. Because, this series will be larger and is performed from more small beads , then you will need twice as much of it.

Weave the third row again from white beads. The number of beads will need to be adjusted and calculated in the process of work so that the weaving is even and has no gaps. In this example, we finish the weaving of the earrings with the fourth row, but you can do as you need to make the planned product.
Next, we form the fourth (last) row. Dial 3 blue beads and hook on the thread in the 3rd row. Now collect two more beads and thus continue to form the last row to the very end.
At the end of the work, you should attach the finished braided circles of beads to both earwires and your earrings are completely ready!
Such wonderful beaded jewelry will please you or serve as a great gift for any woman. According to these schemes, you can make several sets of such jewelry at once, changing the colors and shapes of beads and beads. Believe that each of the jewelry sets you have created will look different if you think about how you can successfully replace just a few parts.


