How to make DIY gift bags. Original handmade gift bag. DIY paper gift bag: interesting ideas
When making gifts to relatives and friends, it takes quite a long time to look for good packaging for them and spend money. Paper packaging is becoming more and more popular. It is harmless compared to polyethylene and plastic. In the store, packaging can be bought ready-made, but if you wish, you can make a paper bag with your own hands.
To make a fancy paper bag, you will need a rectangular sheet of wrapping paper. If you don't have one, you can take the wallpaper that was left at home after the repair, or a simple newspaper printed on thick paper. In addition, you will need glue, as well as ribbon, lace or twine. After collecting all the materials and fixtures, you can proceed to create a bag of kraft paper with your own hands.
Description of work:
- At the top of the rectangle, fold the edge to the middle by 1 cm.
- Then fold the paper 2 cm from the edge of the left side.
- Next, you need to fold the sheet in half.
- Using glue, attach the folded edge and the covering part. You will get a bag blank, where one wrapped edge is its upper part.
- After that, work with the bottom of the product. To do this, wrap the bottom of the bag to the central part by 7 cm.
- Bend the edge of the bottom, which is adjacent to the surface of the table, bend the side parts to the middle of the bottom.
- Bend the sides of the bottom of the product again to the middle so that one of them lies a little on the second.
- Glue the place of application.
- If necessary, make holes in the top with a hole punch and thread pieces of ribbon through them, tying their ends into knots inside the bag.
- These bags can be decorated in a variety of ways. For example, attach a ribbon bow, appliqué, etc.

This is how easy it is to make a paper bag with your own hands. However, there are other types paper packaging which are just as easy to make.
Kraft paper option
To make a craft bag with your own hands, you can view a master class on creating such products. After that need to take certain materials and fixtures. To make a bag, you will need very few materials and accessories.
List of materials and tools:
- Rectangular kraft paper sheet.
- Scissors.
- Hole punch and thick tape.
- Small ribbons or laces to create handles.
Once necessary materials and accessories are ready, you can go to work and make an unusual gift wrapping. The manufacturing process will go faster if you follow the step-by-step instructions.
Scheme of work:
Paper shirt with tie
 If you understand the intricacies, it is easy to understand how to make a paper bag with your own hands. To create a beautiful package, you should act consistently and carefully so as not to spoil the craft. As a result, you will get a chic blank, which can be decorated to taste, or you can leave it in its original form.
For this gift, you can make a paper shirt with a tie with your own hands.
This will require a rectangular sheet of A4 format. It must be folded in half, highlighting the line in the center, and then straightened. The left and right parts need to be bent, connecting in the center along the original line. The upper corners should be folded outward - these will be the sleeves of the shirt.
Turn the sheet over with the reverse side up and sleeves down, bend a 4 cm line towards you from above. Turn the sheet over again to the outside and bend the corners to the center line - you get a collar. Lift the lower part up, folding the product in half and slipping it under the corners of the rack. That's all: the shirt is ready, it remains only to add a tie.
How to make a paper bag with your own hands. Of course, it is very easy to buy a paper gift bag in the store, but how nice it is to make a gift bag with your own hands in the size you need and decorate it the way you need. Especially very beautiful and fashionable today is gift wrapping with your own hands, made in the RETRO style.To do this, designers around the world use ordinary wrapping paper, twine and natural decorative elements, including lace, twigs, or wood. In order to make it easy for you to make a paper bag with your own hands, I offer the following Master class on how to make a paper bag with your own hands.
You will need:
Wrapping paper
Double-sided tape (or regular stationery glue - pencil)
Scissors
Hole puncher
Twine (or ribbon, woolen threads)
For decoration, decorative items
So, for starters, cut a piece from the wrapping paper into a rectangular shape. The size depends on your gift. If the paper is wrinkled, it must be ironed. In my case, I use a shopping paper bag, which I ironed with a very hot iron.

On the one hand, where the paper was bent by 1 cm, we glue double-sided tape (or spread it with glue). We tear off the protective layer from the adhesive tape. We glue the two sides, after which we draw a hand on the other side for a more accurate fold.

Next, we unscrew our blank from below by 3-6 cm (depending on the width of your gift). We straighten as shown in the photo. We bend the lower part again, and stick pieces of double-sided tape on the upper part, as shown in the photo.

Tear off the protective tape. We lower the upper part of our bottom of the paper bag down and smooth it with our hand.

Then we put our hand into the bag and straighten it a little, straighten the bottom of the paper bag, and press the side parts inward.

We make holes with a hole punch. We cut off the required length of the handle for the package. We tie a knot on one side, thread it through the holes and tie a knot on the other side.

Giving gifts is always nice. Especially if it is something useful and long-awaited. But sometimes the design of such pleasant surprise not enough attention is given.
If the holiday took you by surprise, and there was not enough time to take care of the gift bag, then you can make it yourself. In addition, you can create something unusual and unique with your own hands.
What you will need when making gift wrapping
To make the process easy and fast, you should prepare necessary inventory. To make a gift bag with your own hands you will need:
- base for the product. It can be any wrapping or kraft paper. You can also use the usual one, but you will have to decorate it yourself. You should also consider the weight of the gift and the strength of the selected paper.
- Ruler.
- Pencil.
- Scissors.
- Glue.
- Decorative or regular tape.
- Hole puncher.
As pens suitable: durable paper, ribbons, lace, ropes, leather straps, etc.

To decorate the package: ribbons of various colors and sizes, lace, paints, pencils, stickers in the form of bows, rhinestones, pebbles, hearts, etc.
Traditional gift bag
The usual solution for placing a gift is a bag with pens. They differ in size (depending on the gift) and the materials used.
Consider making a gift bag with your own hands from kraft paper.

- First of all, it is necessary to determine the dimensions of the finished gift wrapping. They should be such that the gift is completely placed inside.
- A sheet of paper must be folded in half and glue the free edges with tape on the inside.
- At the bottom, you need to form a bottom. To do this, you need to bend both edges at a certain distance, and then fold them, as in the figure.


You will get a gift bag, made with your own hands, in the form of a bag with handles.
Gift bags for small gifts
In the same way, small items can be made. Or show imagination and make them more original.
For example, a do-it-yourself gift bag made of paper with a ribbon or bow.
To do this, wrap the gift itself or a box of the right size with paper. Glue the edges of the paper with tape or glue. Do not glue the top edge. It needs to be bent by 1.5-2 cm. Then make holes with a hole punch immediately through 4 layers of paper. Thread through satin ribbon and tie a bow.

Another handmade gift bag in the form of a cone. It is necessary to roll a piece of paper in the shape of a cone. Fix in this position with glue. Decorate, place a gift, close the top corner and secure with a neat bow.
This packaging format is perfect for small presentations.
These are just some of the ways to make a DIY gift bag. You can find many more ready-made solutions or come up with your own method. For any of them, the following recommendations will be useful:
- Additionally, glue the bottom with cardboard for greater strength.
- Buy decorative tape and ready-made sticker bows. This will simplify and speed up the process.

- Use various applications and thematic drawings for decoration.
- Take care of the strength of the handles and take into account the weight of the gift.
- When using ribbons, it is advisable to lightly cauterize the cut so that it does not bloom.
- Do not be afraid of experiments: use fabrics or other unusual materials as the basis for bags.
- If the paper is wrinkled, then before making the bag, it should be ironed with an iron.
- For greater strength and water resistance, special laminated paper should be used.
- Always consider who the gift is intended for and for what reason.
As you can see, making a gift bag with your own hands is not difficult at all and provides an opportunity for creativity.
It is always nice to receive and give gifts. Do not forget that the impression of the "present" also depends on its packaging. Now it is very convenient to use gift paper bags for such purposes, which are sold in stores, but they are not cheap and are not always at hand. If you want to save money and surprise your family and friends, you can make such a package with your own hands. This takes a little time and desire.
How to make a gift bag with your own hands
So, to make a gift bag, you will need:
- sheet of paper (we have dimensions 100x70 cm),
- rope or ribbon
- scissors,
- glue,
- ruler.
Step-by-step instruction:
- We take our paper, for the convenience of working with it, you can iron it, fold it into three parts to get three identical pieces.

- On a piece of paper, which we got 70 by 32.5 cm in size at the top in width, we bend the edge of the sheet by 3 cm and glue the corners.


- Then we fold a sheet of paper in half, bend the tip to determine the middle.


- We unfold our sheet of paper again and fold it in such a way that we glue the edges of the paper in the middle, which we marked in advance.

- We smooth the edges. We glue and give a little time to dry.

- Next, at the bottom of the square that we got, we measure 9 cm and bend it up


- Then we bend the corners and form the bottom, as shown in the photographs.


- Pay attention that you get even diamonds. We glue the corners and the middle of the bottom of the package.


- This is the bottom you should have.

- We unfold our package, and bend the sides.


- To determine the required number of centimeters, pay attention to the evenness of the angle that you get, it should be 90 degrees.

- We do the same on the other side. Smooth the sides with your fingers.

- Here you will get such a package, but it still does not quite look like a gift.

- Therefore, you need to align and select all its sides. The middle of the sidewalls must be bent inside the package.

- Next, we punch two holes in the middle with a hole punch and proceed to the manufacture of handles.

- To do this, cut off 60 cm of paper rope, which we bought at a hardware store

- Tie a knot at one end.

- We pass through the hole in the bag and fix it with a knot on the other side.

- We do the same with the other handle. Here is the package, ready. For greater strength, you can put a piece of cardboard the size of the bottom of the bag at the bottom of the bag.

Gifts should be presented beautifully! Everything is important here: the present itself, the words spoken during the gift, and, of course, the packaging. In this master class, we will show you how to easily and quickly make a paper gift bag with your own hands. If everything is done carefully, the package will turn out no worse, and even better than the standard purchased one.
To make it, we need:
- paper of a suitable color (in our case, pink);
- waxed white cord;
- pink and white cardboard;
- white and pink corrugated paper;
- curly hole punch-border;
- ordinary hole punch;
- white half beads;
- scissors;
- glue gun;
- ruler;
- pencil;
- awl or toothpick.
First of all, you need to draw a bag layout on paper, expanding it front side down. First, draw a rectangle measuring 28x15 cm, and then divide it into the desired fragments. White lines in the diagram mean that in these places you need to make cuts or even cut off the paper.
 Click on the template to view it in a larger size
The result is such a paper blank for a bag.
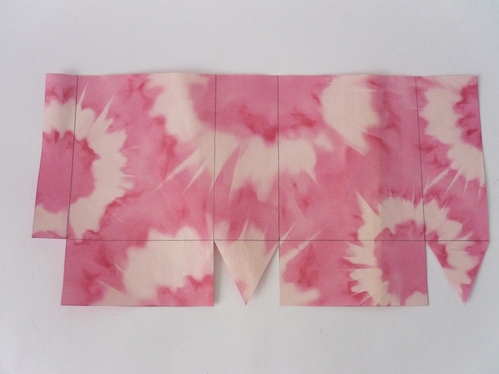
We do not erase the lines from the pencil. It is very important that the paper is bent at a right angle along these lines and does not wrinkle. Therefore, we direct the blunt side of the scissors under the ruler along the same lines. You need to press a little to get a cavity along the entire length.

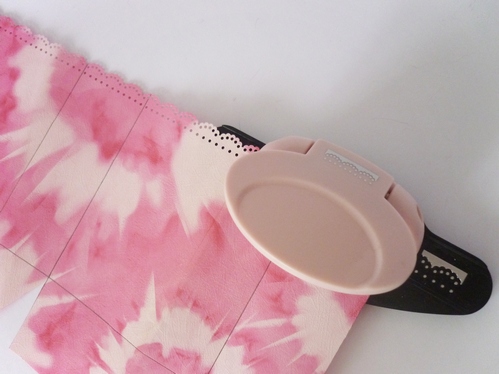
We punch the upper edge of the paper blank with a figured hole punch-border.
Now we bend all sides of the bag so that the traces of the pencil are inside. You can erase them first with an eraser.
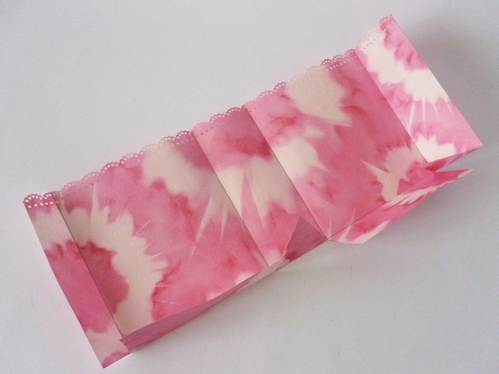
Let's start building the package. In this case, it is very important that all sides, in contact with each other, form a right angle. First, glue the triangle, which is in the middle of the workpiece, onto the rectangle located to the left of it. The triangle is glued on top of the rectangle. Then glue the extreme triangle under the adjacent rectangle. After that, we glue the two rectangles together, hiding the triangles between them.

After we glued the bottom, we fasten the side wall with an allowance so as to form a right angle. We hide this allowance inside.
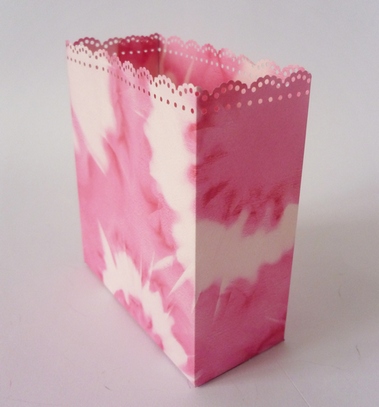
It turns out like this square box with an openwork top edge.
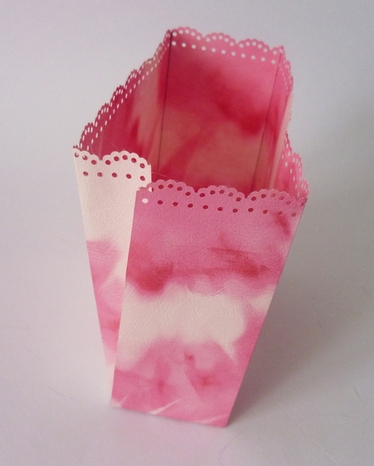
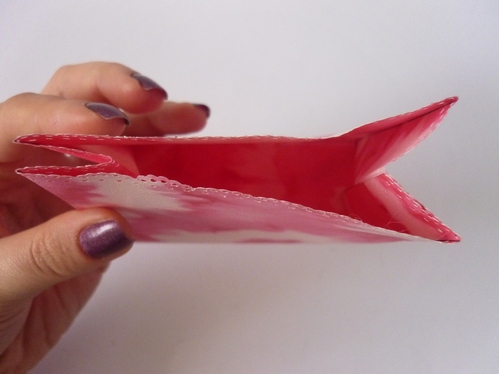
The side walls need to be flattened from above and in the middle so that the fold is directed inside the bag. This is necessary so that the tied bag has a beautiful shape.
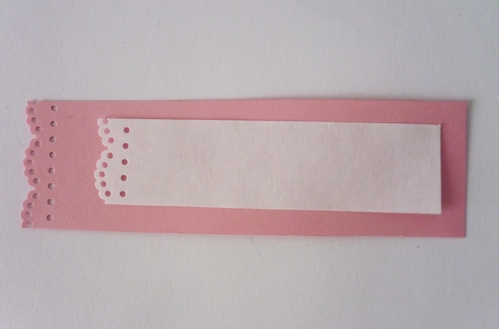
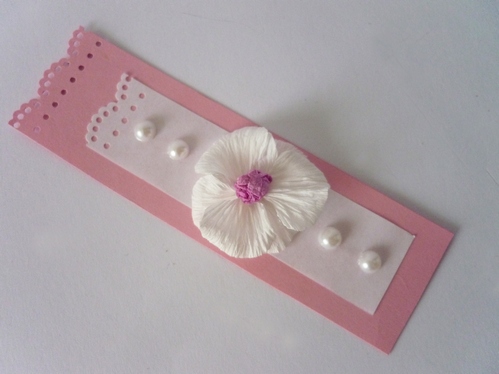
Now cut out two stripes. One of pink cardboard measuring 3x10.5 cm, and the second of white cardboard measuring 2x8 cm. We process one edge of each strip with a figured hole punch. glue white stripe on pink so that there are equal indents from each edge.
Corrugated paper cut into seven small squares. We make one edge pointed, and the other rounded.
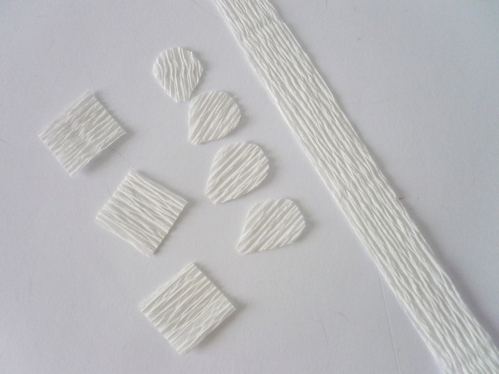
Then gently stretch the rounded edge and twist it with an awl or toothpick.
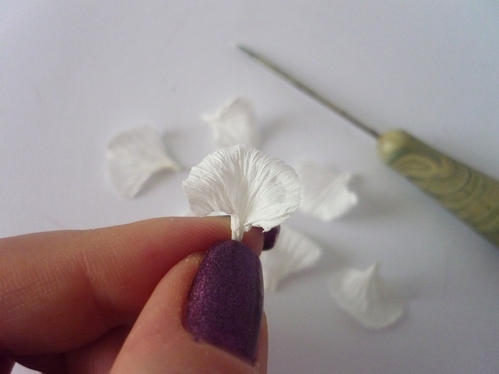
We fasten all the petals with a sharp edge to each other in the middle of the white strip.

Cut off a piece of pink corrugated paper and roll between your fingers into a small ball. Glue this ball in the middle of the flower. Along the white strip we decorate the paper with half beads.

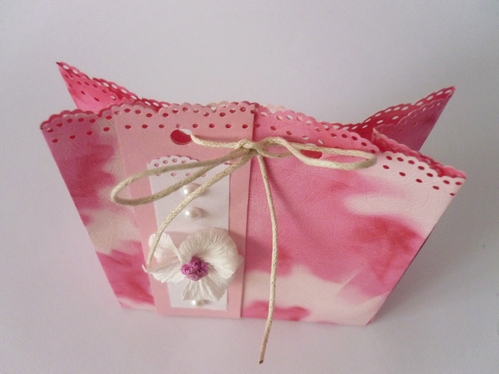
We glue the paper blank on the right side of the bag so that the openwork edge from the pink stripe coincides with the edge of the bag. We mark the places where we will punch holes. They should not affect the folds inside the package.

We make holes with a simple hole punch.

We pass the waxed cord through the holes and tie it into a bow.

We get a beautiful and simple do-it-yourself paper gift bag.
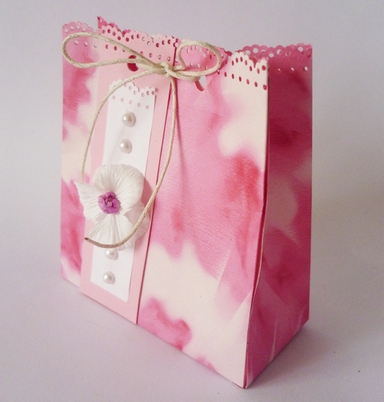
DIY paper gift bag


